DIY Clear Ball Grinch Ornaments
Turn simple clear ball craft ornaments into Grinch faces or a “3 sizes too small” Grinch heart. These are an easy DIY Christmas craft for adults or kids!
I’m back with more DIY Grinch ornament ideas!
There are lots of ways you can customize these particular Grinch ornaments. They just start with a clear glass or plastic craft ornament and then it’s up to you to decide the details on how you want to make them!
You can use various fillers (even glitter–learn the best way to make glitter ornaments HERE).
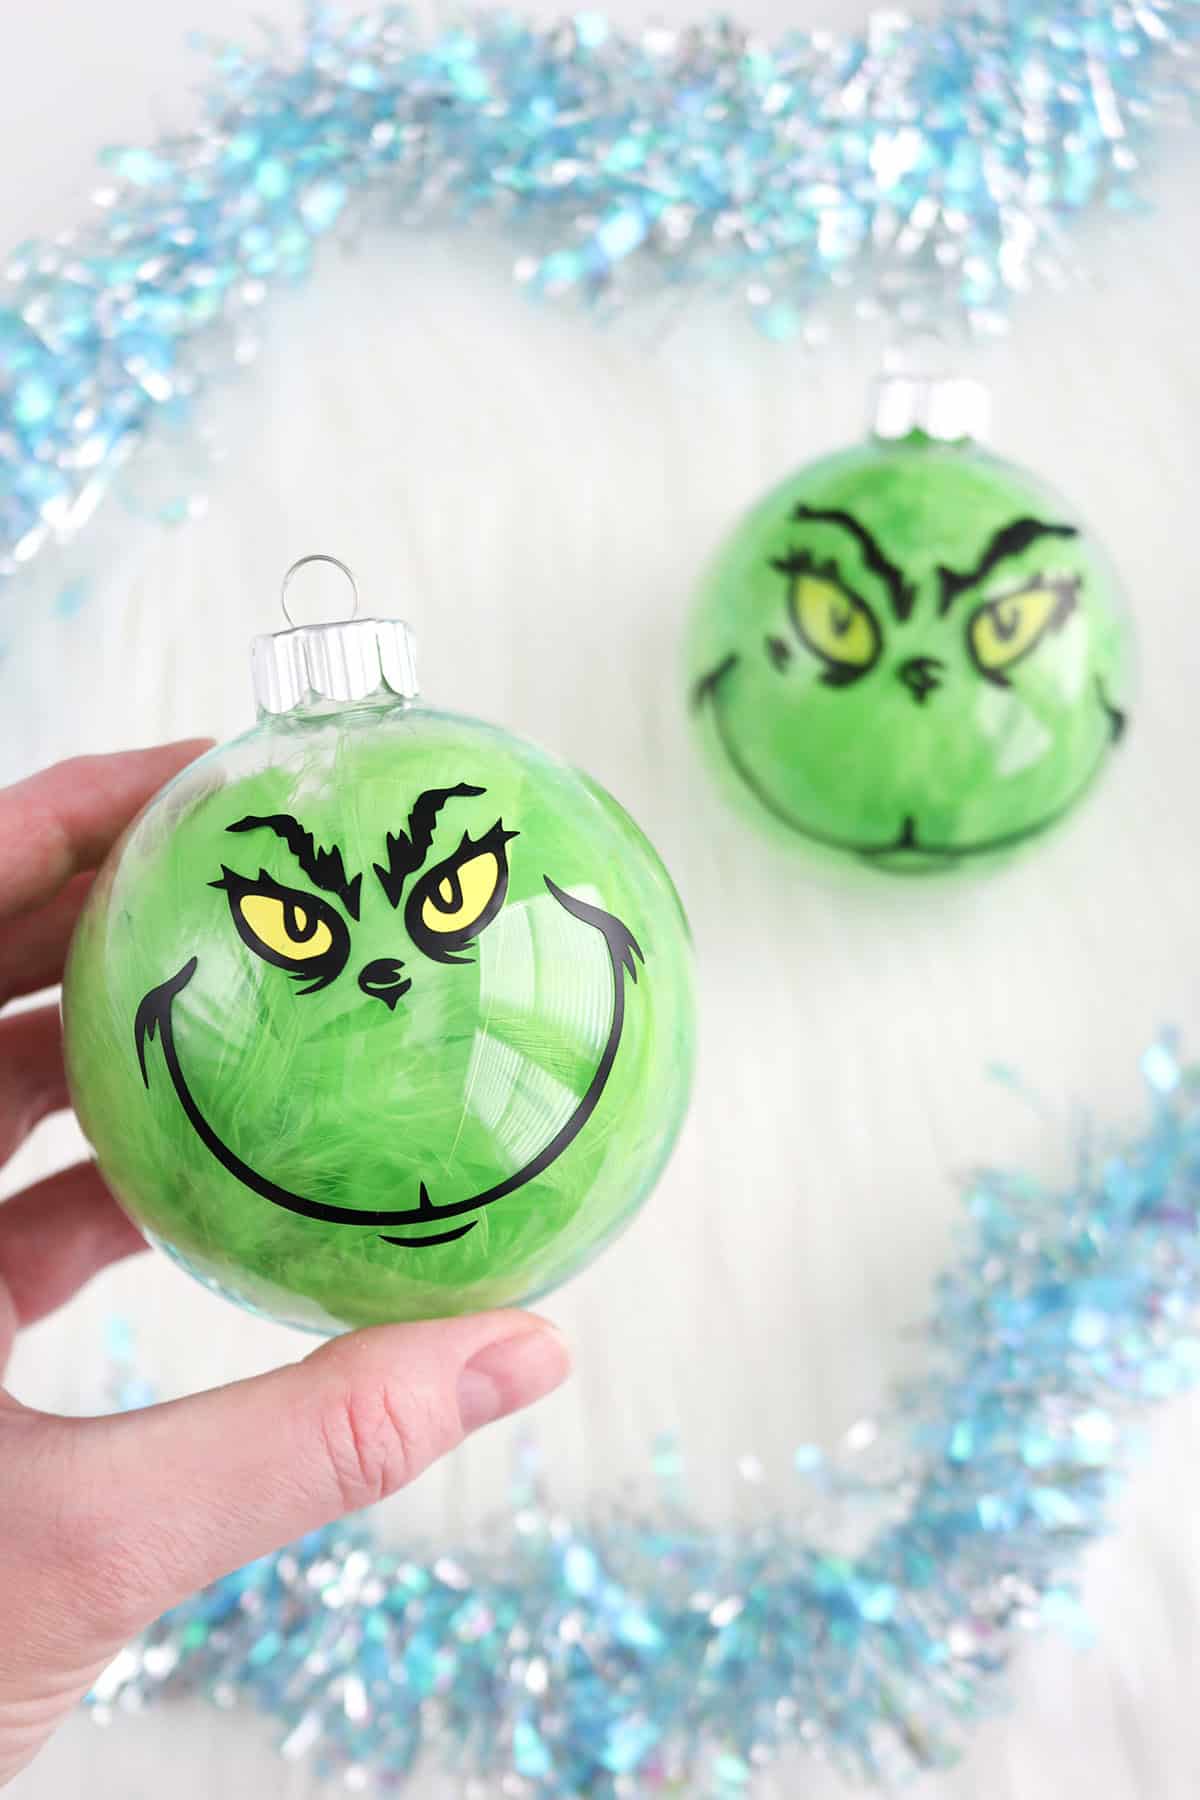
And you can decide what kind of design to put on the front: I made a couple Grinch faces and one with a heart that’s three sizes too small. You could also cut vinyl phrases from How the Grinch Stole Christmas book/song/movie (“stink stank stunk” is a popular one).
If you’re making a Grinch-themed Christmas tree, these ornaments would be perfect and they’re easy and inexpensive to whip up. These also make a fun kids craft project for the Christmas season!
This post contains affiliate links. For more information, see my disclosures here.
More posts you’ll like:


What you need to make these DIY Grinch ornaments

- clear ball ornaments, glass or plastic both work (if you plan ahead, I like to buy these after Christmas when they go on clearance at either Michaels or Hobby Lobby)
- green filler: pom poms, feathers, or paper shred
- red heart stickers, red craft felt, or red paint pen
- white, black, and yellow paint pens: I used this paint pen set and also the yellow from this paint pen set since it was more pigmented
- permanent vinyl & Cricut supplies to cut vinyl (the Cricut Joy Xtra would be the perfect machine for this! You can learn all about the Cricut Joy Xtra HERE.)
- a hot glue gun: optional, you might want it if you’re gluing on a heart for the Grinch heart ornament or if you’re adding other decorations, like a ribbon bow (I totally forgot about adding bows to mine, oops)
How to make a Grinch face ornament
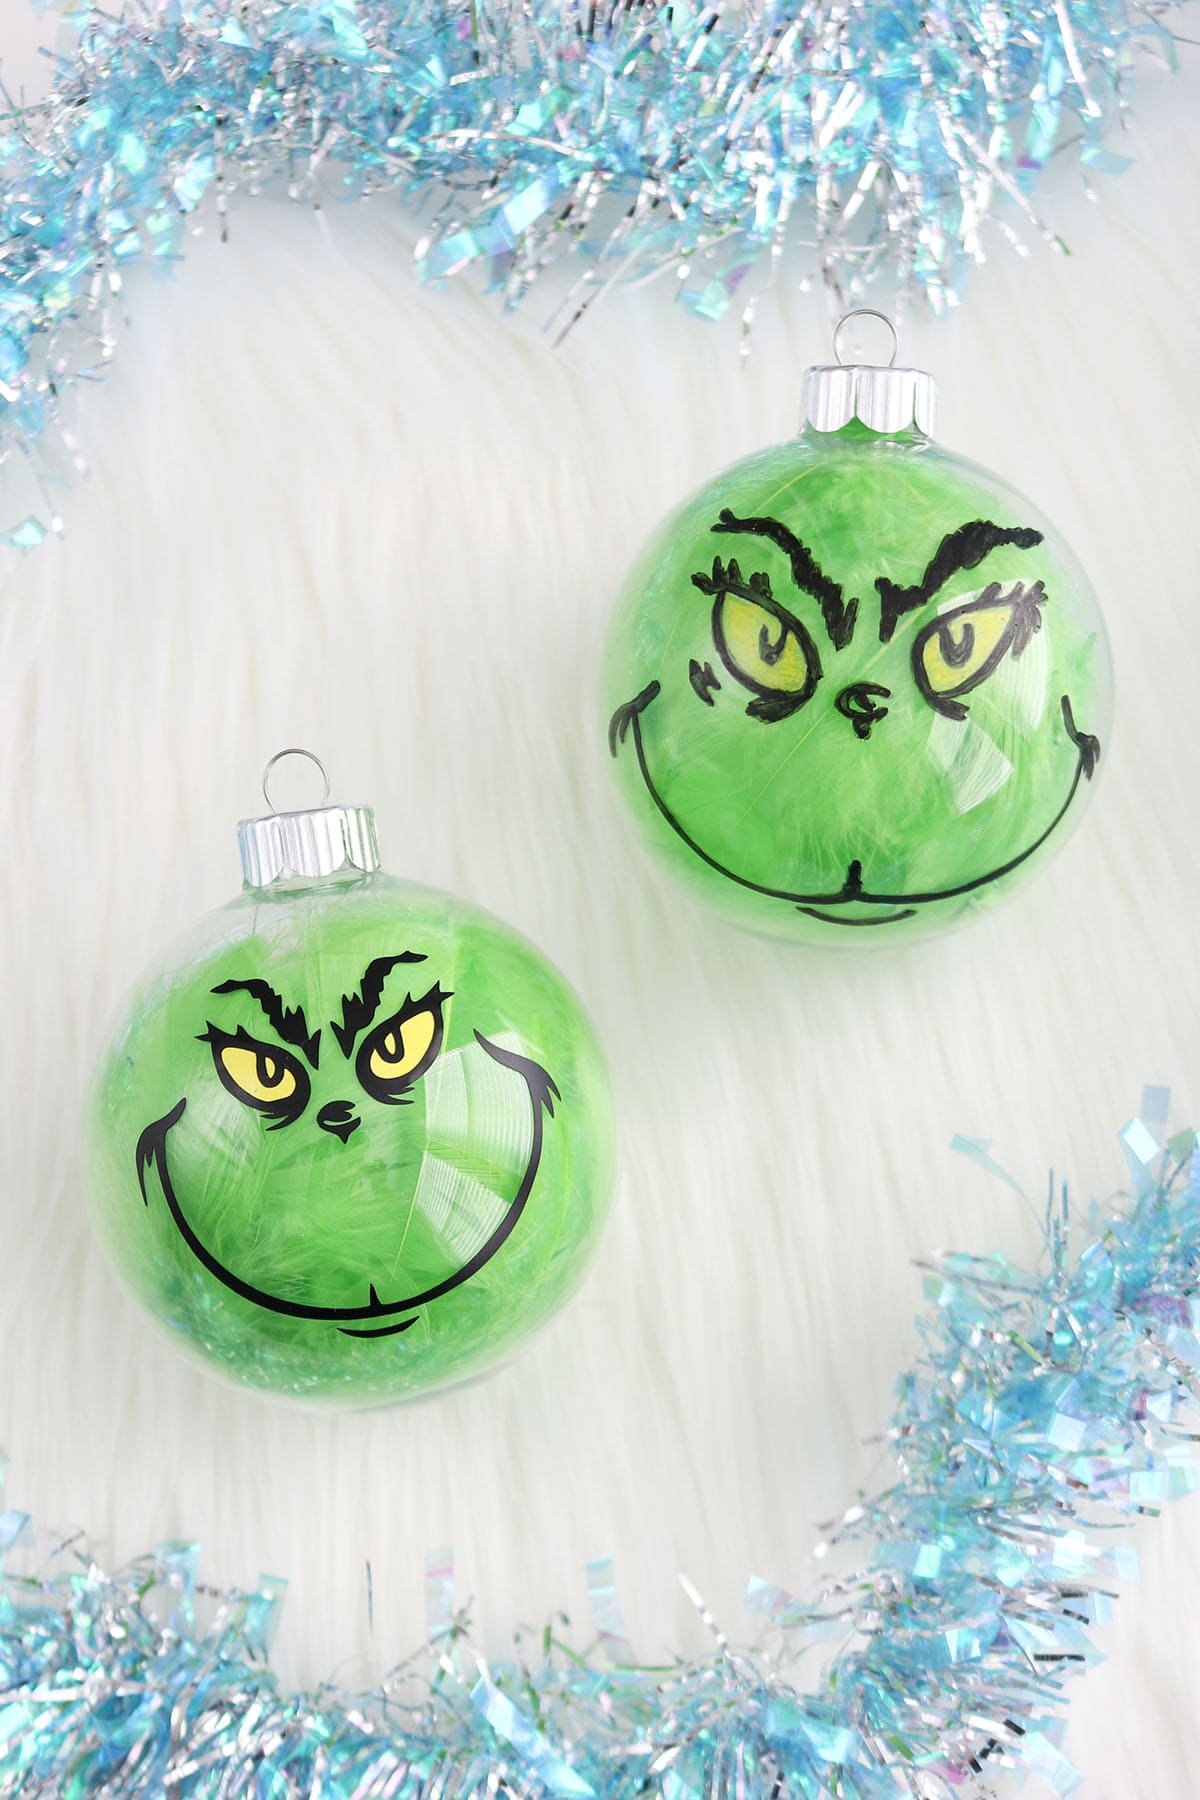
Fill a clear ornament with your choice of filler. For my Grinch face ornaments, I chose green feathers. Fill the ornament full enough that you don’t see large gaps of clear space (you want the ornament to look solid green).
Now you can choose which method you want for adding a Grinch face: permanent vinyl or paint pens. The permanent vinyl is definitely more professional-looking, but the paint pens are fun too! I guess it also depends on how confident you are in your art skills.
For the vinyl:
I feel like my vinyl Grinch face could’ve been just slightly bigger, so I would make one ornament to start and make sure your design is sized correctly before mass-producing a bunch.
Upload a Grinch face SVG to Cricut Design Space (I used an image from a set I purchased off Etsy a couple years…I know, I know…probably poor taste considering copyrights and all that, but my ornaments are just for me, so…).
On the Design Space canvas, create a circle shape that’s the same size as your circle ornament (it’s hard to measure a sphere, so just do your best to eyeball the diameter). Resize your Grinch images to fit this, then hide the circle by toggling the eye icon in the layers panel.
Click Make. Follow the prompts until you get to the material screen. Set your base material to Premium Vinyl-Permanent Glossy, then load your vinyl onto your cutting mat and load into your machine. Click Go from your computer/phone (if using a Cricut Joy Xtra) or press the start button on your machine (if using an Explore or Maker) and cut your material.
Remove the cutting mat from your machine, then remove the vinyl off it (I like to flip the mat upside down and peel the mat away from the material to avoid curling it).
Weed your vinyl designs to remove the excess vinyl. I mostly stick to the weeding tool (and scraper for the next part) in this set.
If doing a Grinch face, apply transfer tape to the large black face first, then layer the yellow eyes underneath (use a scrap of parchment paper or a scrap of the transfer tape liner so you don’t accidentally press the vinyl to your table). Burnish well with a scraper tool to get the eyes to stick to the black vinyl and peel away the vinyl backing.
For the best adhesion, clean the surface of your ornament with an alcohol wipe (if using a plastic ornament, I’d test this first in an inconspicuous spot in case it affects the plastic in any way).
Now, this is important: because you’re putting a 2D image on a 3D object, the vinyl isn’t going to want to lay very nicely at first. It helps to cut slits in your transfer tape all around your vinyl image, especially at corners. Lay your combined transfer tape/vinyl on your ornament, centering it, and press just the center first. Then, press outwards from there, doing your best to avoid creases or wrinkles in the vinyl. If needed, you can press the vinyl just enough to get it to separate from the transfer tape, then adjust the vinyl after you’ve peeled the transfer tape away.
For the wide smile on my Grinch face, I definitely had to use my fingers (or the tweezers from this set) to stretch the smile a bit and reposition it a few times until it looked right. If you’re new to vinyl, it doesn’t hurt to cut a few extra faces and practice this–you can always peel the vinyl off the ornament carefully if it gets messed up and try again.
Once you’ve got the vinyl where you want it, press it down well with your fingers (if you don’t have a layer of transfer tape in between, I wouldn’t use a scraper tool as it could scratch the surface of the ornament).
For more tips on how to apply vinyl to ornaments (and step-by-step photos!), check out my DIY Glitter Ornaments post.
For the paint pens:
Sketch a Grinch face onto your ornament with a black paint pen. I have to look at a reference image whenever I draw or paint, so I pulled up a simple Grinch face while doing this. If you mess up, you can use an alcohol wipe to wipe away the paint pen (at least on glass ornaments, which is what I used–I’d test this again for plastic).
You will probably want to do two coats of paint, so go over your lines again carefully (sometimes the tip of the paint pen tries to clear away the lines you’ve already made instead of laying on more paint, so go lightly and just do your best).
When you’re done with the black, fill in the eyes with yellow paint pen. I used a light yellow paint pen first, then went over them a second time with a darker yellow from this set.

Touch up any black lines as needed, and you’re done!
I honestly don’t know how durable the paint pen ornament is going to be…but so far so good, so I’m going with it! I’d imagine if the ornament gets scratched hard enough, the paint could chip off, so just be nice to it and package it well for storage.
How to make a Grinch heart ornament

I filled my Grinch heart ornament with green pom poms (it takes quite a few to fill, so plan accordingly if you’re mass-producing these!).
Next, I stuck on a red felt heart sticker that I had on hand (a Valentine’s pack from Dollar Tree). You could also cut a red heart out of felt and hot glue onto the ornament or draw one on with red paint pen.
The final step is to add two dotted outlines around the heart with a paint pen. You could use white or black for this, whatever you think looks better!

And that’s it! You could even add a simple ribbon bow to the top. How’s that for a super easy Grinch ornament?!
DIY Grinch Ornaments
I hope you’ve been inspired to go grab some clear ball ornaments at the craft store and make your own Grinch face or Grinch heart ornaments. They’re pretty simple, but a lot of fun to make! They’ll make a great addition to any Grinch-themed tree.
Check out more DIY ornaments HERE.

Don’t forget to pin and save for later!
