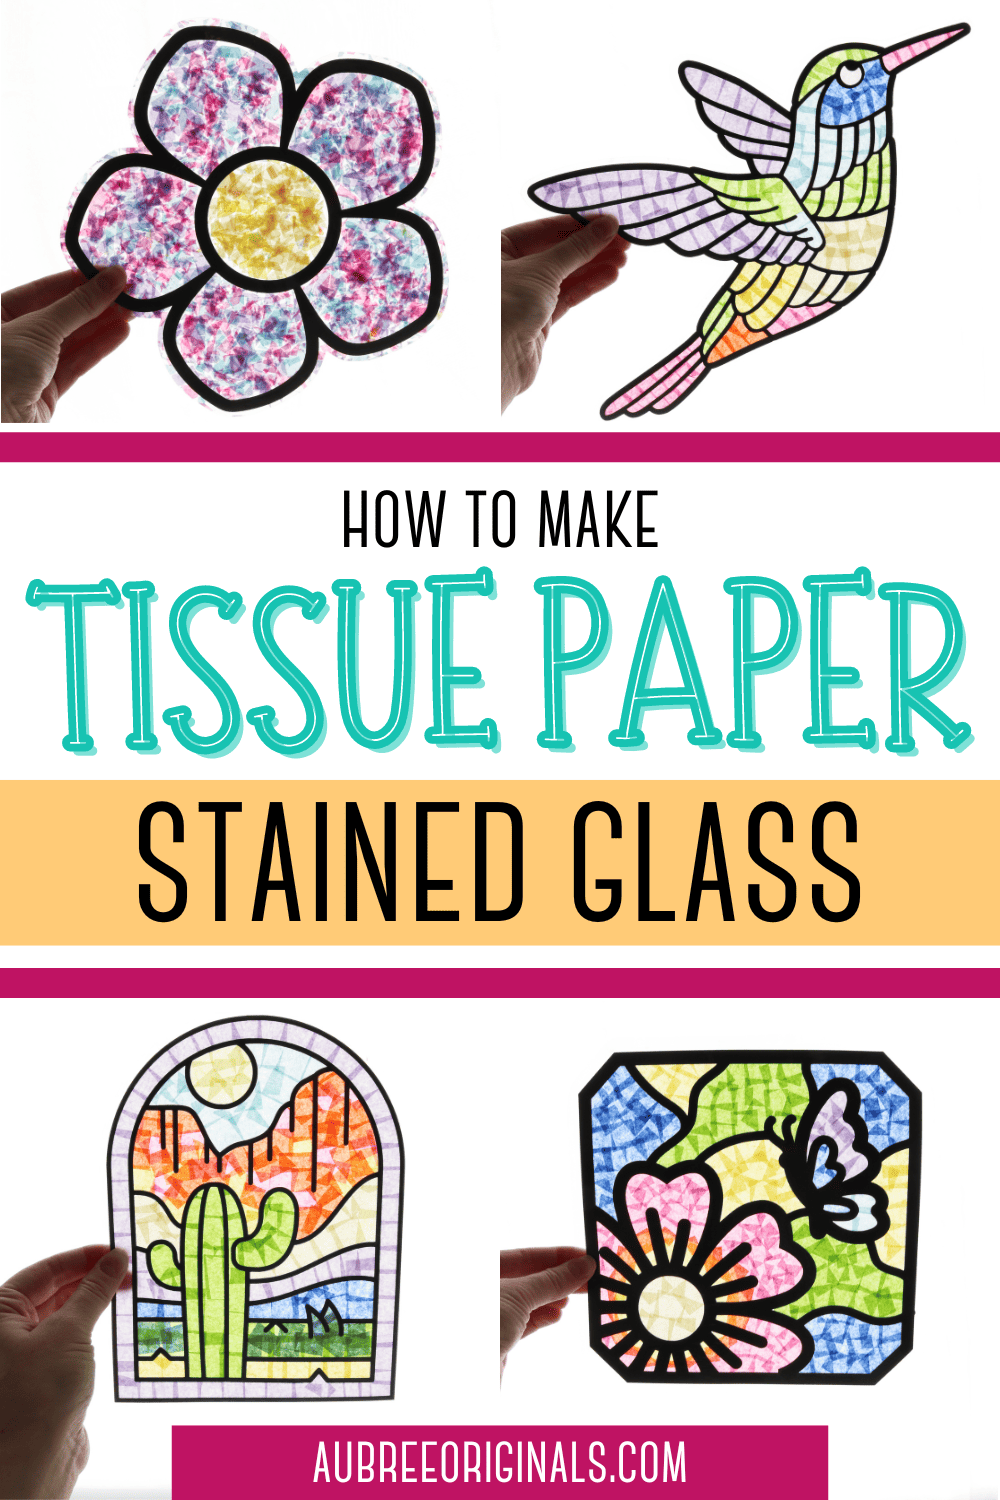
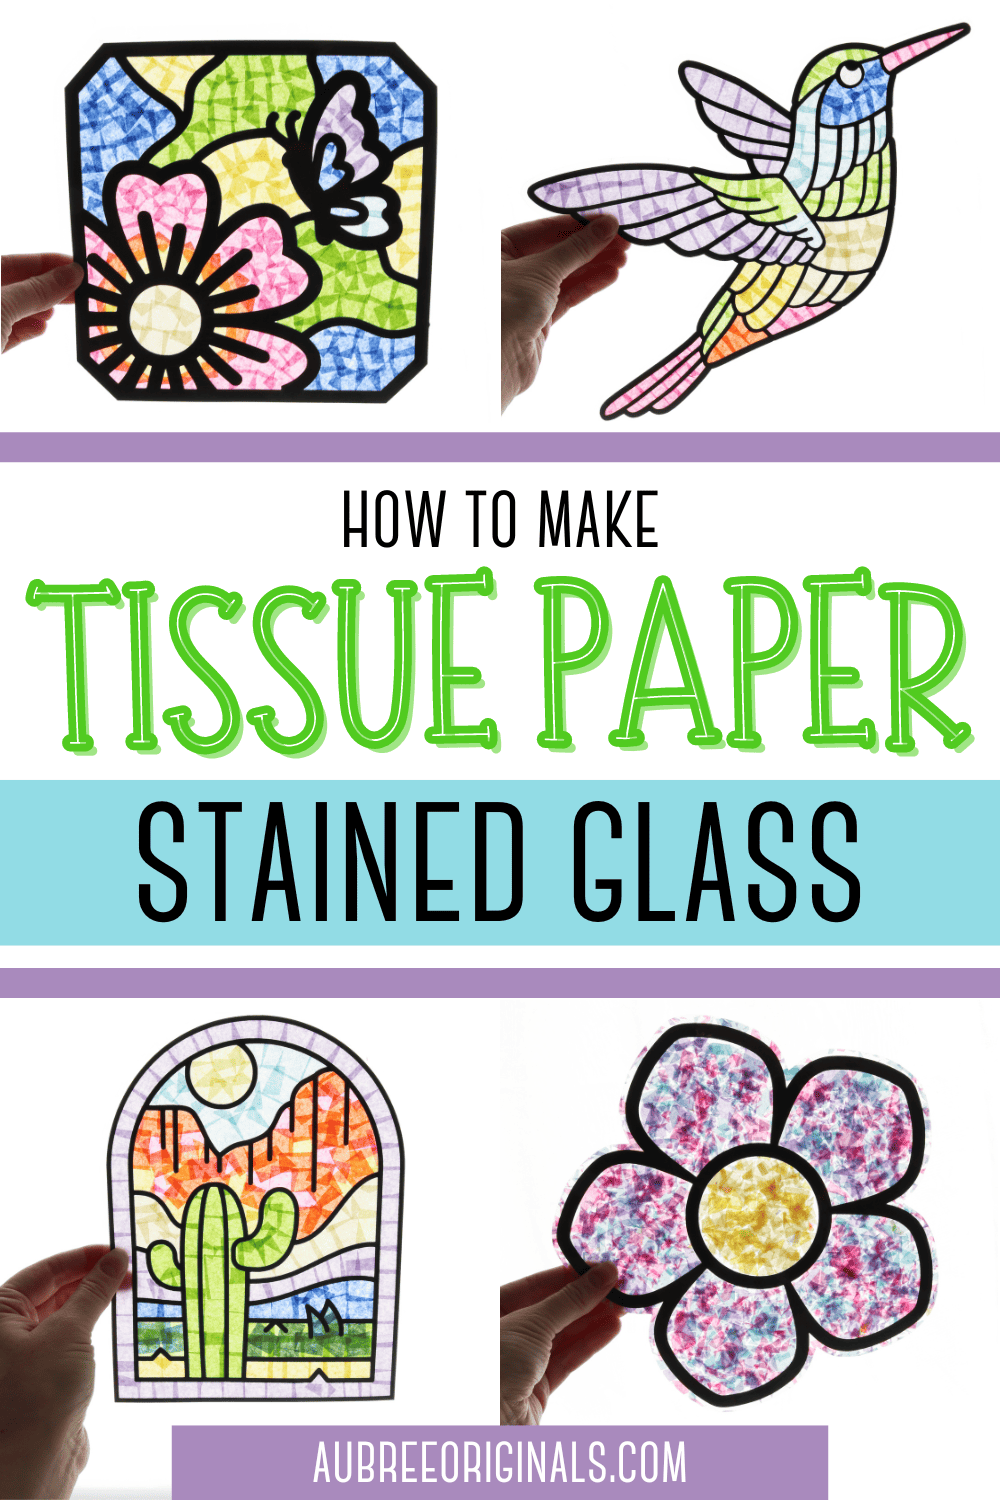
Easy Tissue Paper Stained Glass Craft for Kids and Adults
Tissue paper stained glass is such a fun (and cheap!) craft project, perfect for spring and summer. All you need is tissue paper, contact paper, and cardstock. This is a fun craft for both kids and adults!
I made some simple stained glass crafts out of tissue paper years ago, but I finally decided to revisit it, and this time with some more exciting designs. This is such a fun art technique to create faux stained glass!
I adapted images in Cricut Design Space to create eight different designs for this tissue paper stained glass craft—there’s something for everyone, including a truck and boat for boys (which my toddler was thrilled about).
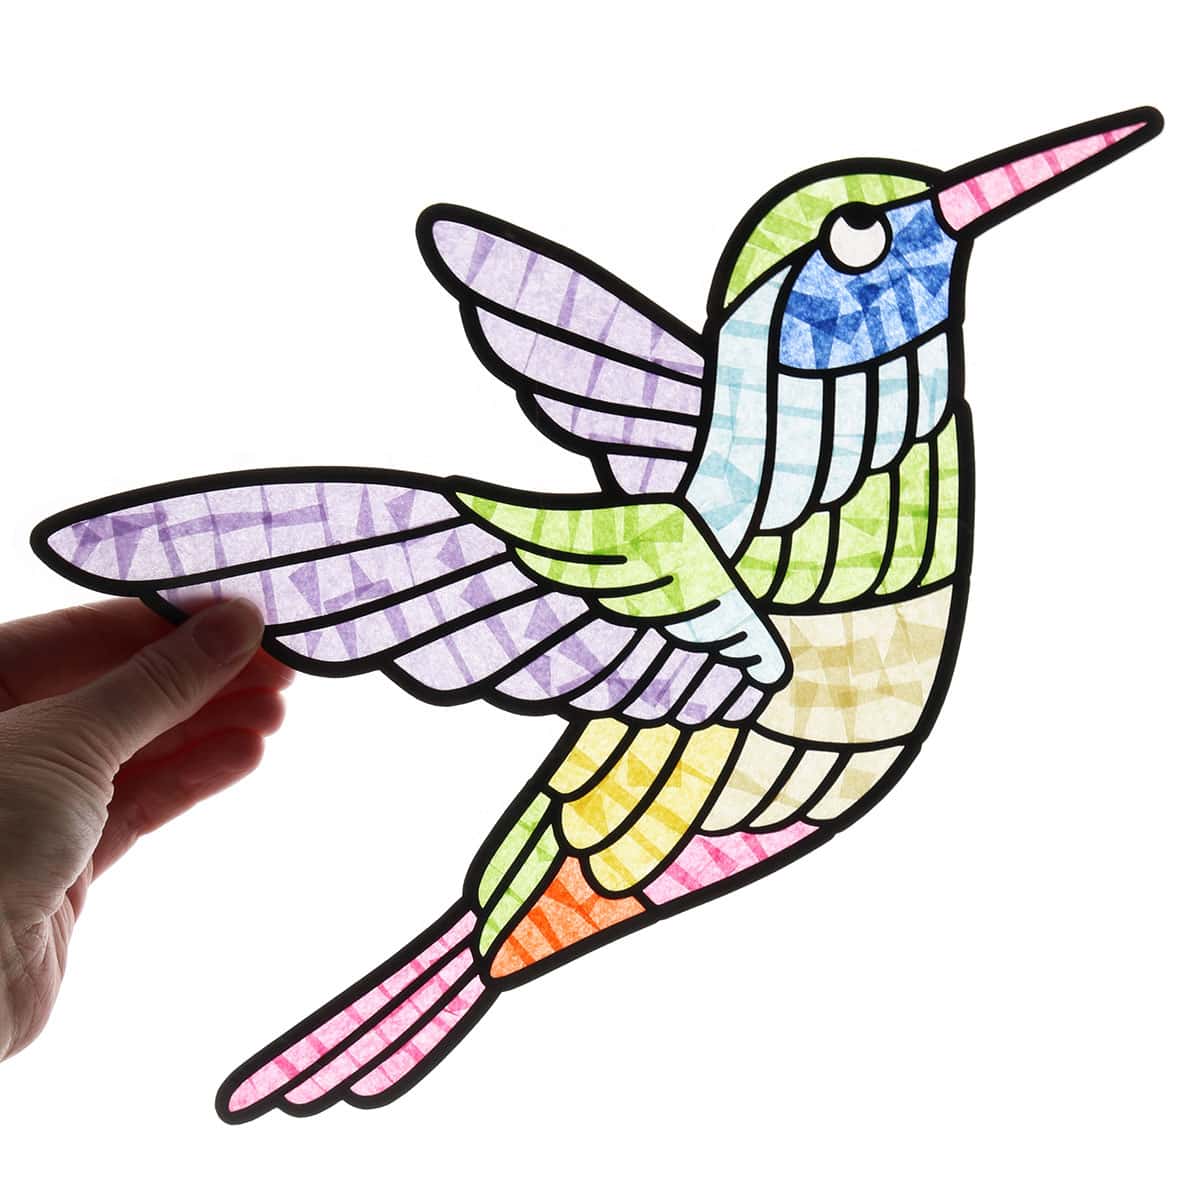
I think my favorite might be the hummingbird…or the desert scene…well, but I absolutely love how my “confetti” flower turned out, too. You might just have to make one of each kind, haha!
If you’re looking for fun art projects to occupy kids on a rainy day, this is a winner! (And, bonus, it’s also a great way for younger kids to work on their fine motor skills!)
This post contains affiliate links. For more information, see my disclosures here.
More posts you’ll like:

Craft Supplies Needed to Make Tissue Paper Stained Glass
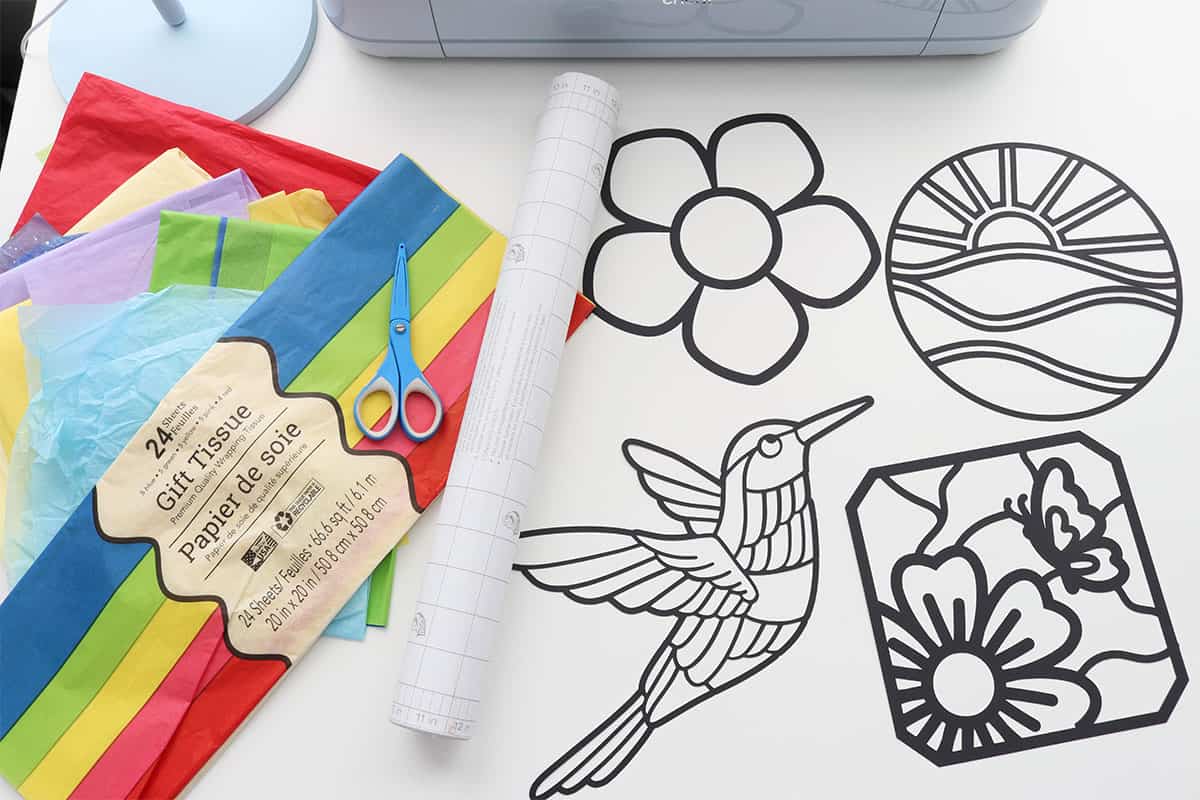
- Cricut machine: The easiest way to cut these stained glass images is with a Cricut machine! I have both the Cricut Maker and Maker 3 and both would be great for this.
- a Cricut Access subscription: The stained glass designs I adapted in Design Space all require an Access subscription. I personally love my Premium subscription, but read this post for a more thorough review of Cricut Access.
- black cardstock or black construction paper: I LOVE using Cricut’s 12×24 inch card stock for this craft! I sized my designs fairly large, so only one design will fit on a 12×12 sheet, but you can fit 3 on a 12×24″ sheet (much more efficient.
- 12×24″ StandardGrip cutting mat
- clear contact paper: there’s several different ways to make tissue paper stained glass, but I think contact paper is the easiest (and cheapest!)
- tissue paper in various colors: I like to buy the multicolored packs in the gift wrap section at Walmart or Dollar Tree, or you can save colored tissue paper from presents and recycle it! A little will go a long way, so you will have plenty for a group making this stained glass craft or for future tissue paper crafts.
- pair of scissors
- craft tweezers, optional (helpful for the more intricate designs, I’m using the ones that come in this set)
- craft glue or glue stick, optional (this is only required if you want to double-up tissue paper layers to create new colors, more on that below)
Save $10 on any Cricut machine or heat press with the coupon code AUBREE-10
How to Make Easy Stained Glass Tissue Paper Art
Cut the cardstock outline
Open my Tissue Paper Stained Glass project in Design Space.
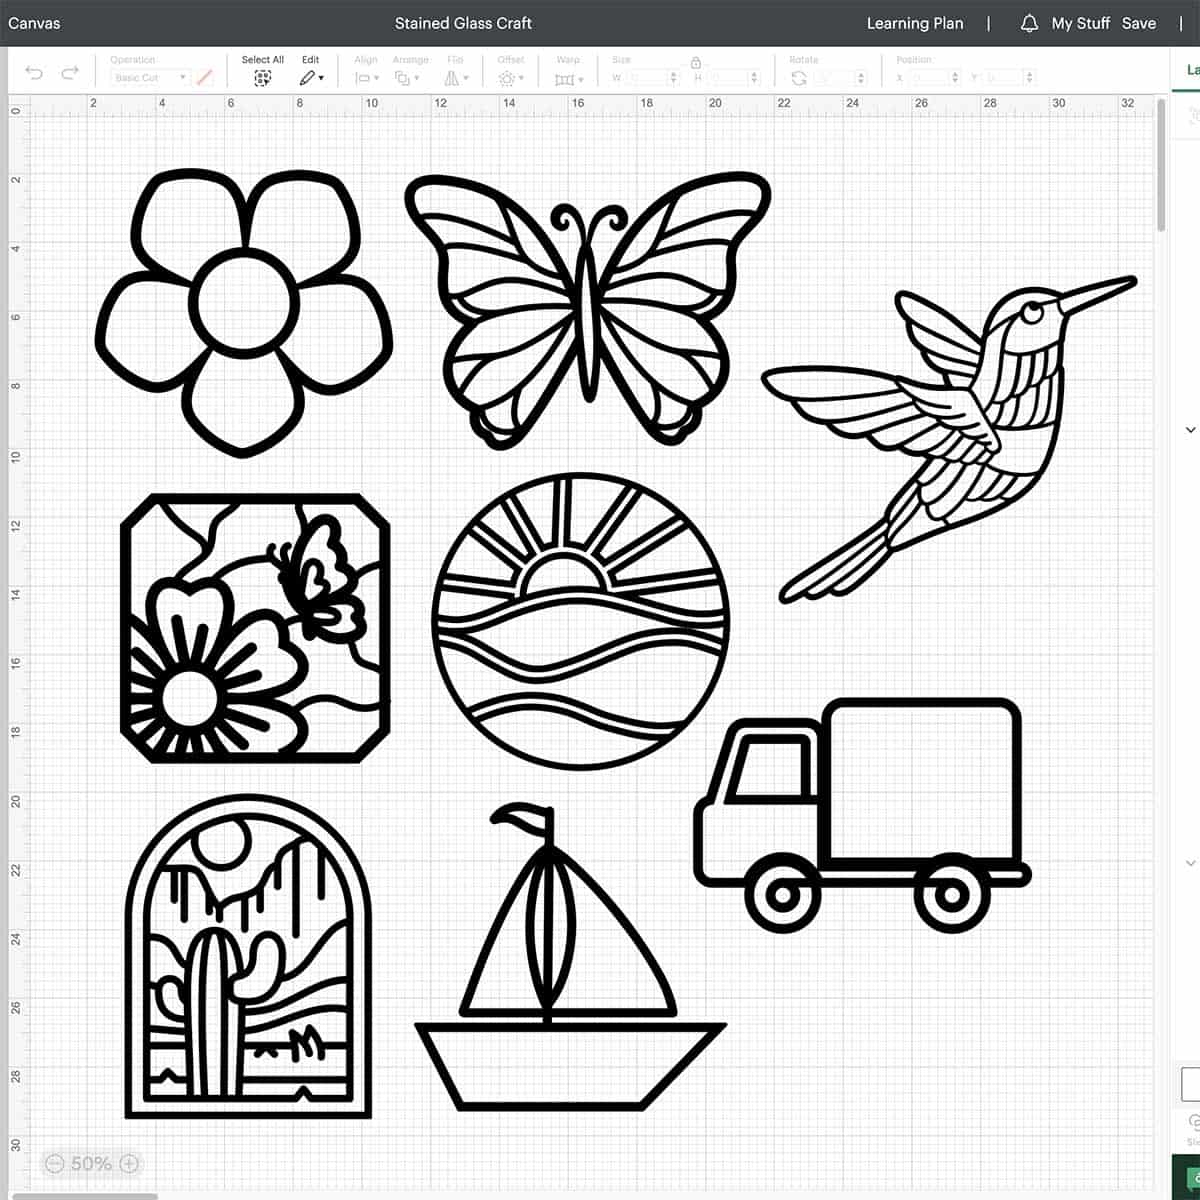
You can also create your own outline designs* in Design Space or search for additional “stained glass” images in the Design Space library. (This could easily be adapted for holidays: Valentine’s Day tissue paper hearts, stained glass shamrocks, a leaf sun catcher for fall, or a stained glass Christmas tree!)
Like I mentioned earlier, I sized my designs fairly large so the outlines would be thick enough to work with, but that makes it so only one design will fit on a 12×12 sheet, or 3 on a 12×24″ sheet. You’re welcome to resize them smaller to save on cardstock, but keep in mind that they’ll be a little more delicate and trickier to fill.
Once you’ve finished any edits, follow the prompts in Design Space to cut the designs you want (you can toggle the eye icon in the layers panel to hide any images you don’t want before clicking Make It). I recommend moving the images around on the mats when you get to the Prepare screen before going to cut so you maximize the space and don’t waste cardstock.
*If you want to design your own stained glass image, keep in mind that you want all lines/pieces to intersect, like how stained glass would be (you also want the final cut image to be in a single piece so it’s easy to apply to the contact paper). This might mean you will need to use small shapes (I mostly used little rectangles) to unite or weld the pieces together.
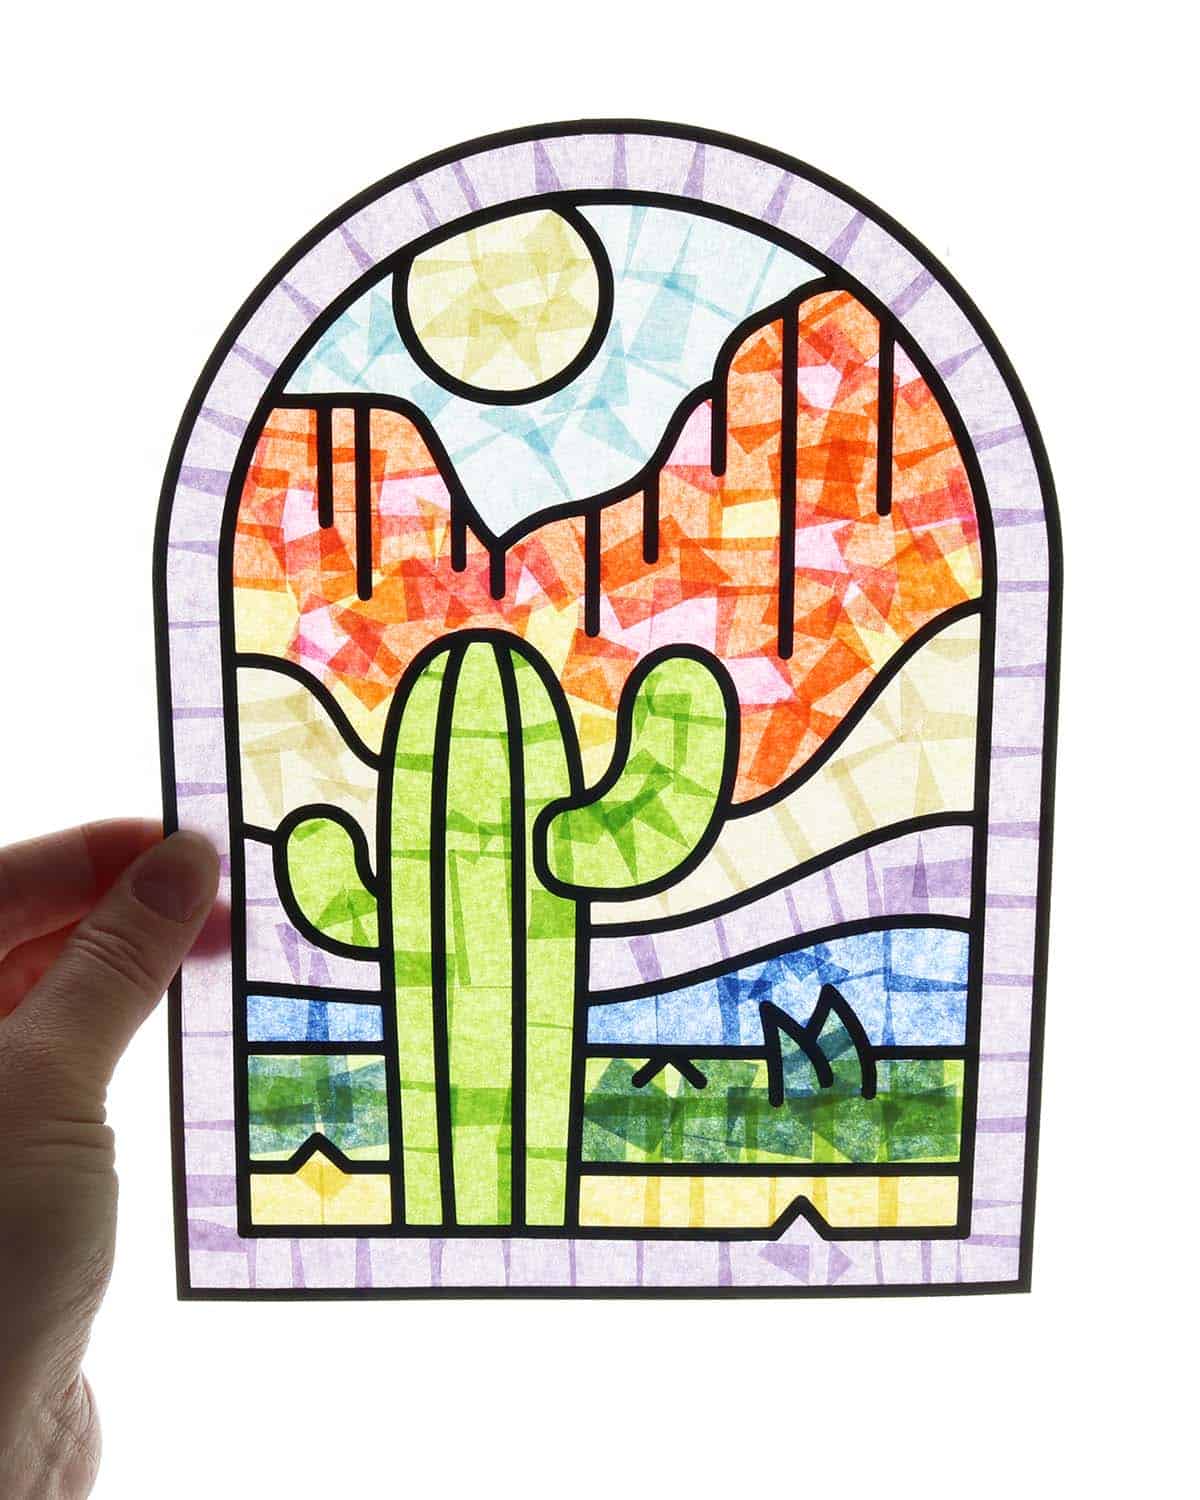
The only image of mine that doesn’t intersect all the way is the cactus/desert scene. I left it as is, though, because it’s only the outermost outline that’s not connected and it’s easy to see how you’d lay it out (just center the middle image inside of it).
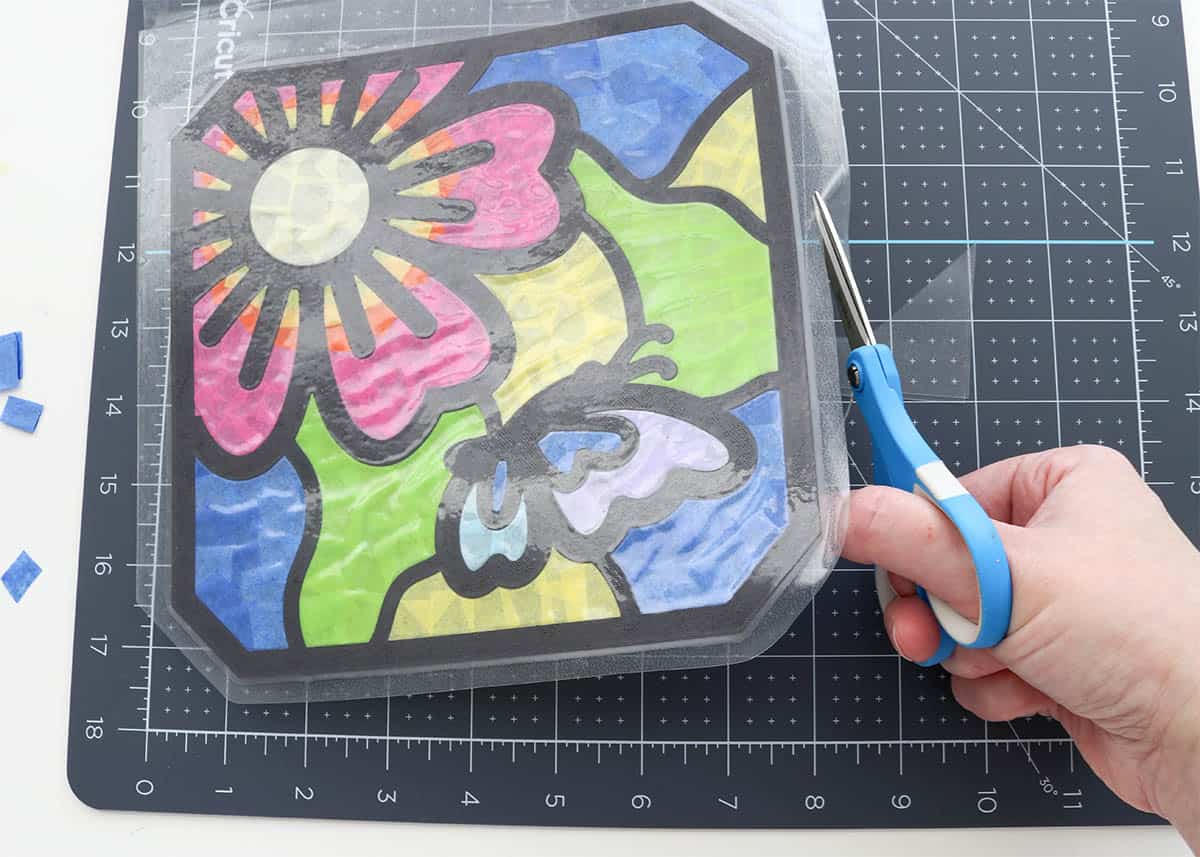
Stick the outline to contact paper
For each outline, you need a sheet of contact paper that’s at least twice the size so it can be folded over to form the front and back of the stained glass. If the image is small enough, you can just cut a sheet of contact paper that’s a few inches wider than the outline and 18″ long (18″ is the width of the contact paper roll).
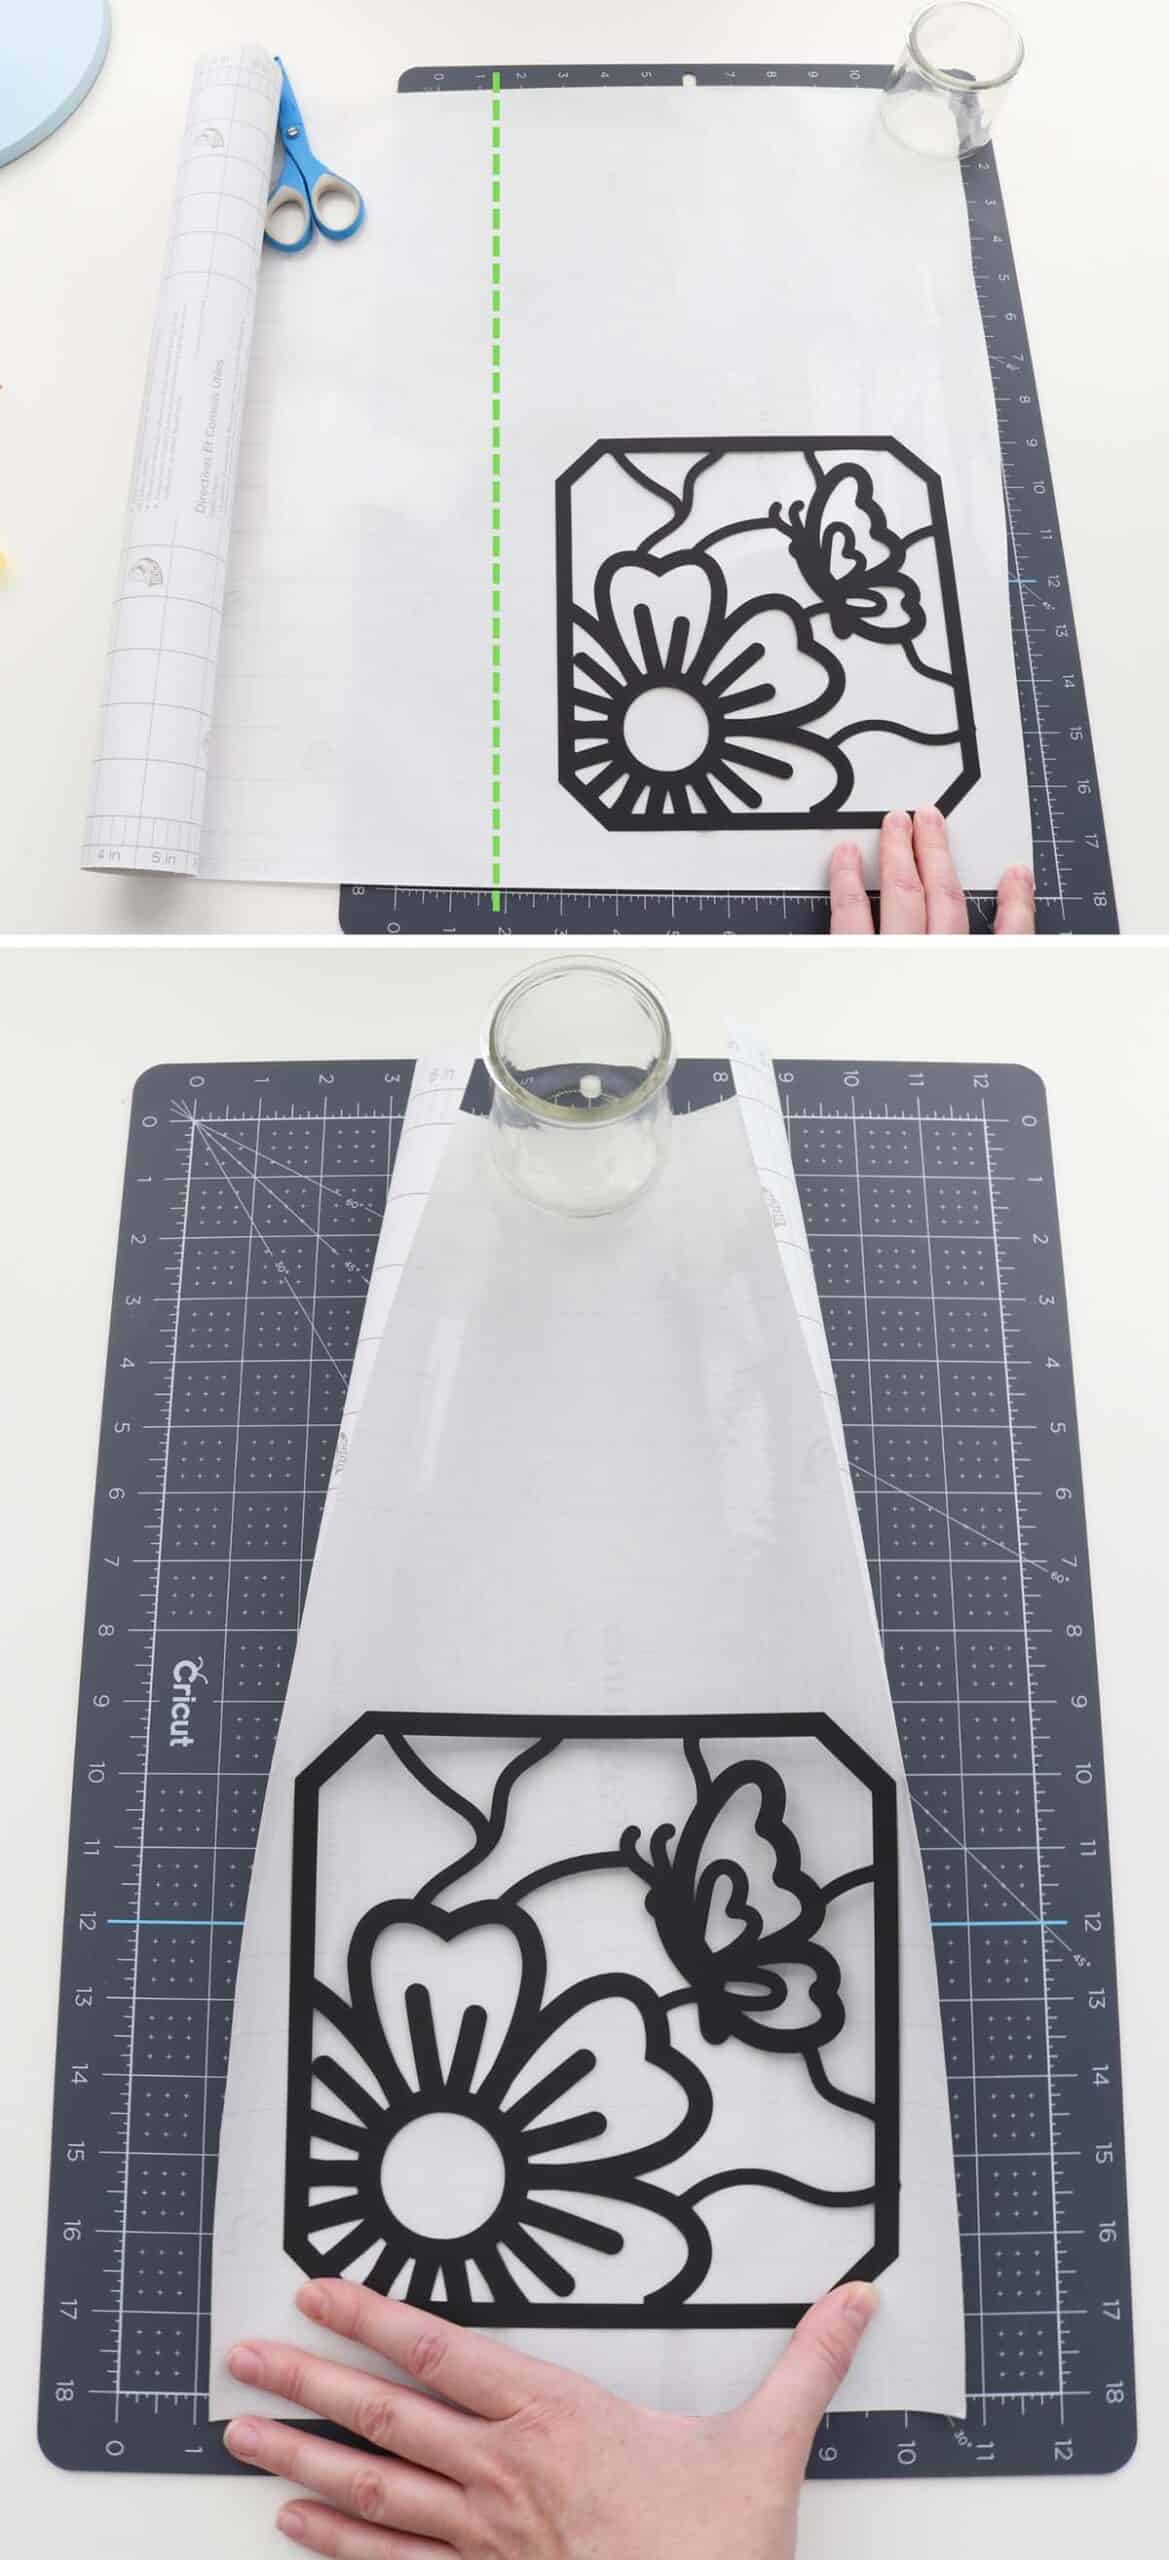
The boat, butterfly, and hummingbird are larger so you’ll want to fold the contact paper the opposite way (going further down the roll). So, for the hummingbird for example, you’ll need a sheet of contact paper that’s about 19″ x 15″–you don’t need to cut it down from 18″ to 15″, I did only to save that little scrap of contact paper for something else).
Fold your piece of contact paper in half and crease it so you know where to place your outline (don’t go further than this line or you won’t have enough contact paper for the back of your design!).
Open up the contact paper so the liner is on the bottom, then peel back one half of the contact paper to reveal the sticky part. Place your cardstock outline on the sticky contact paper, upside down.
The contact paper will show fingerprints, especially if your hands are at all dirty, so do your best to only touch the cardstock (and then the tissue paper later). If it’s easier, you can put the contact paper liner back over the outline to press it down, then peel it back again when you’re ready to add the tissue paper.
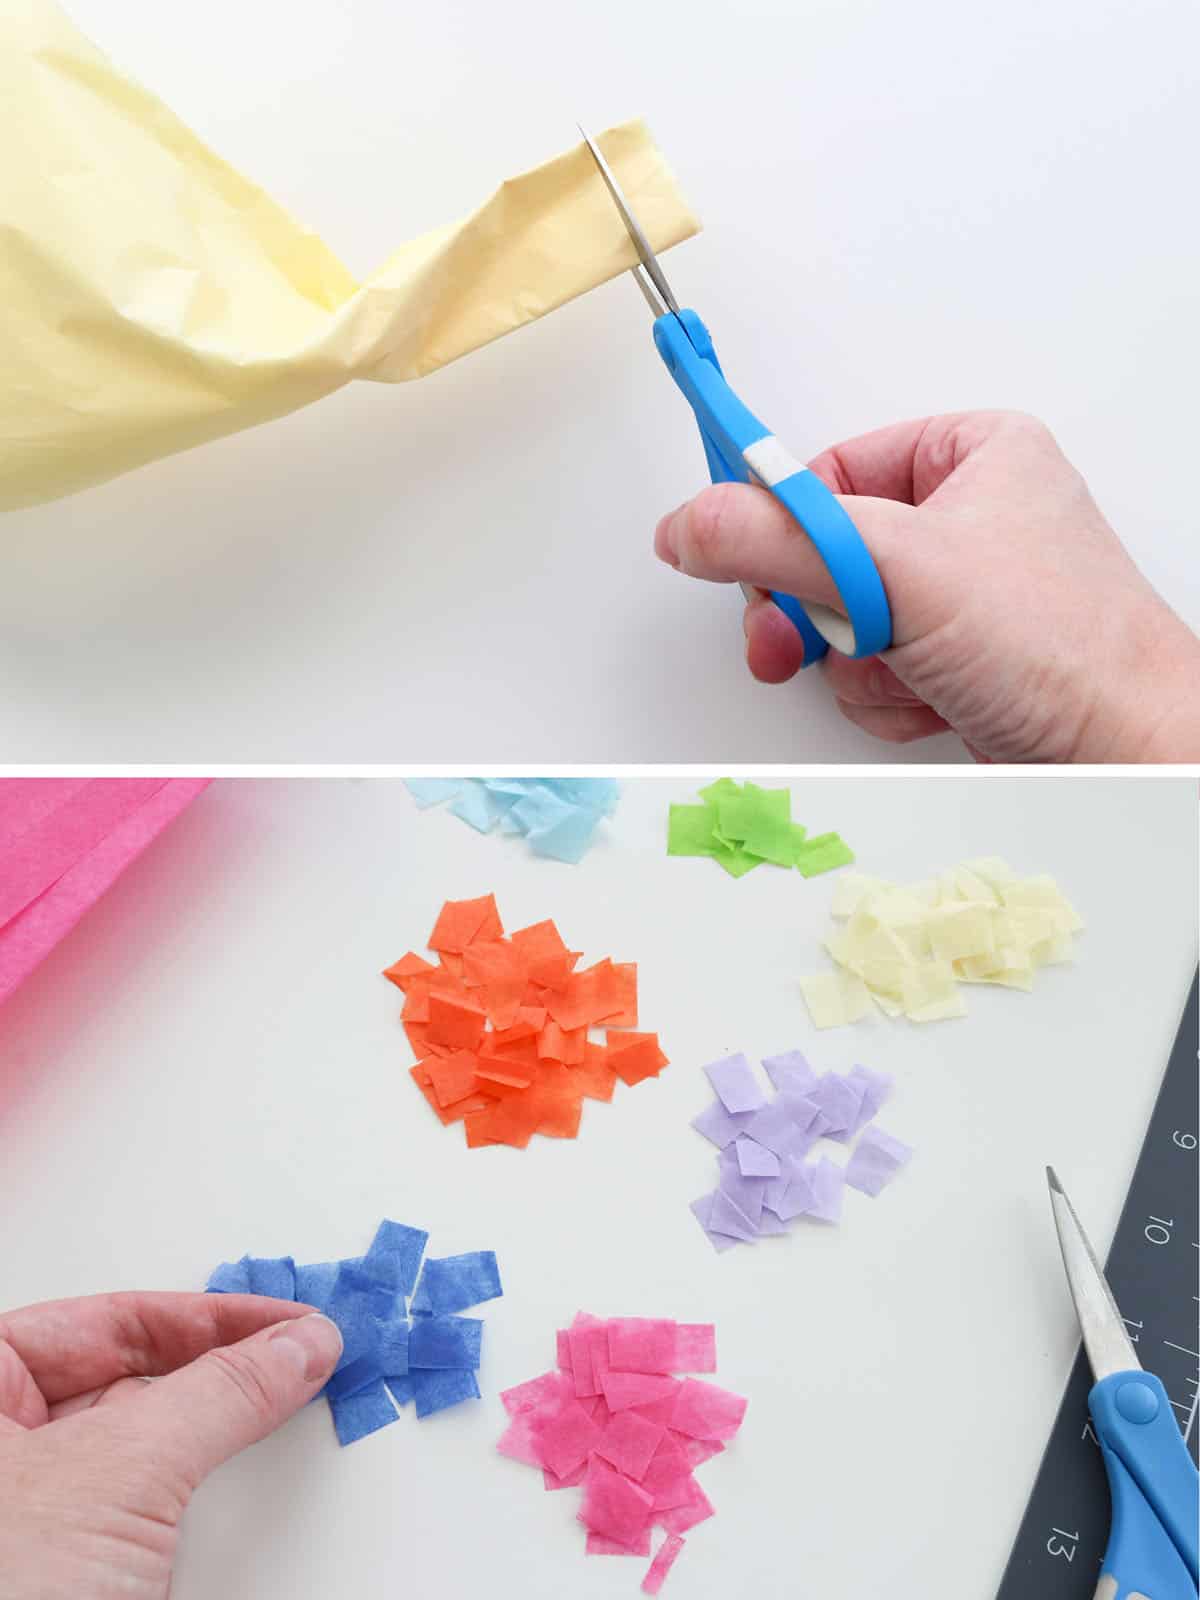
Cut tissue paper into squares
Cut your tissue paper into small squares, about 3/4″ inch in size (you can do smaller for more intricate designs or larger squares for children). Instead of cutting each tissue paper square one by one, you can fold a piece of tissue paper, cut off a 3/4″ strip, then cut that into squares (tissue paper is thin so you can cut multiple at once).
Fill in the outline with tissue paper
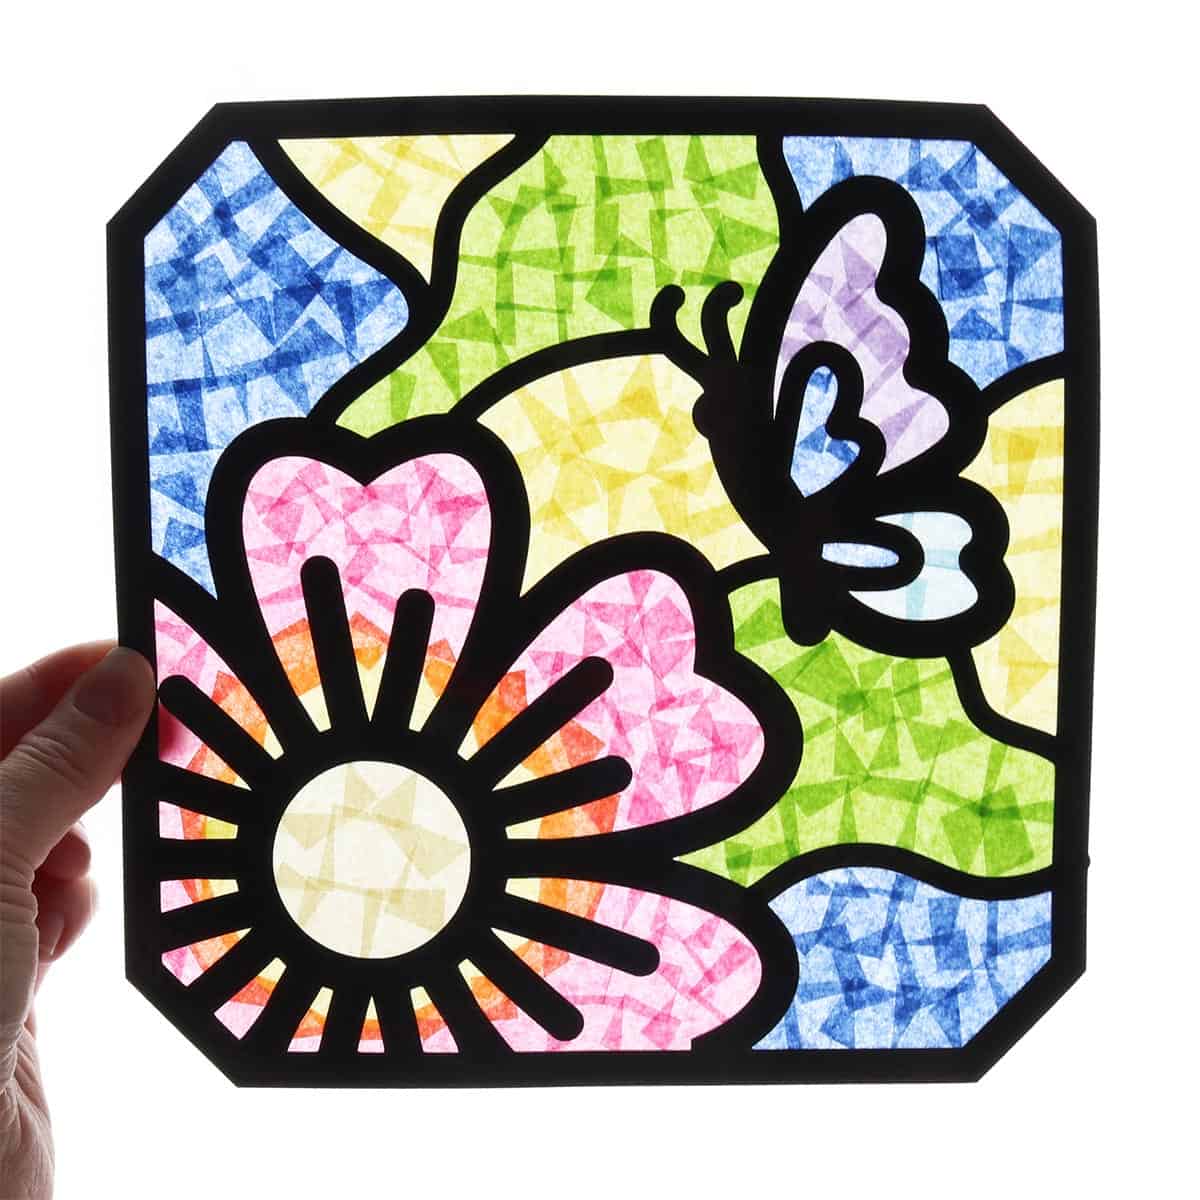
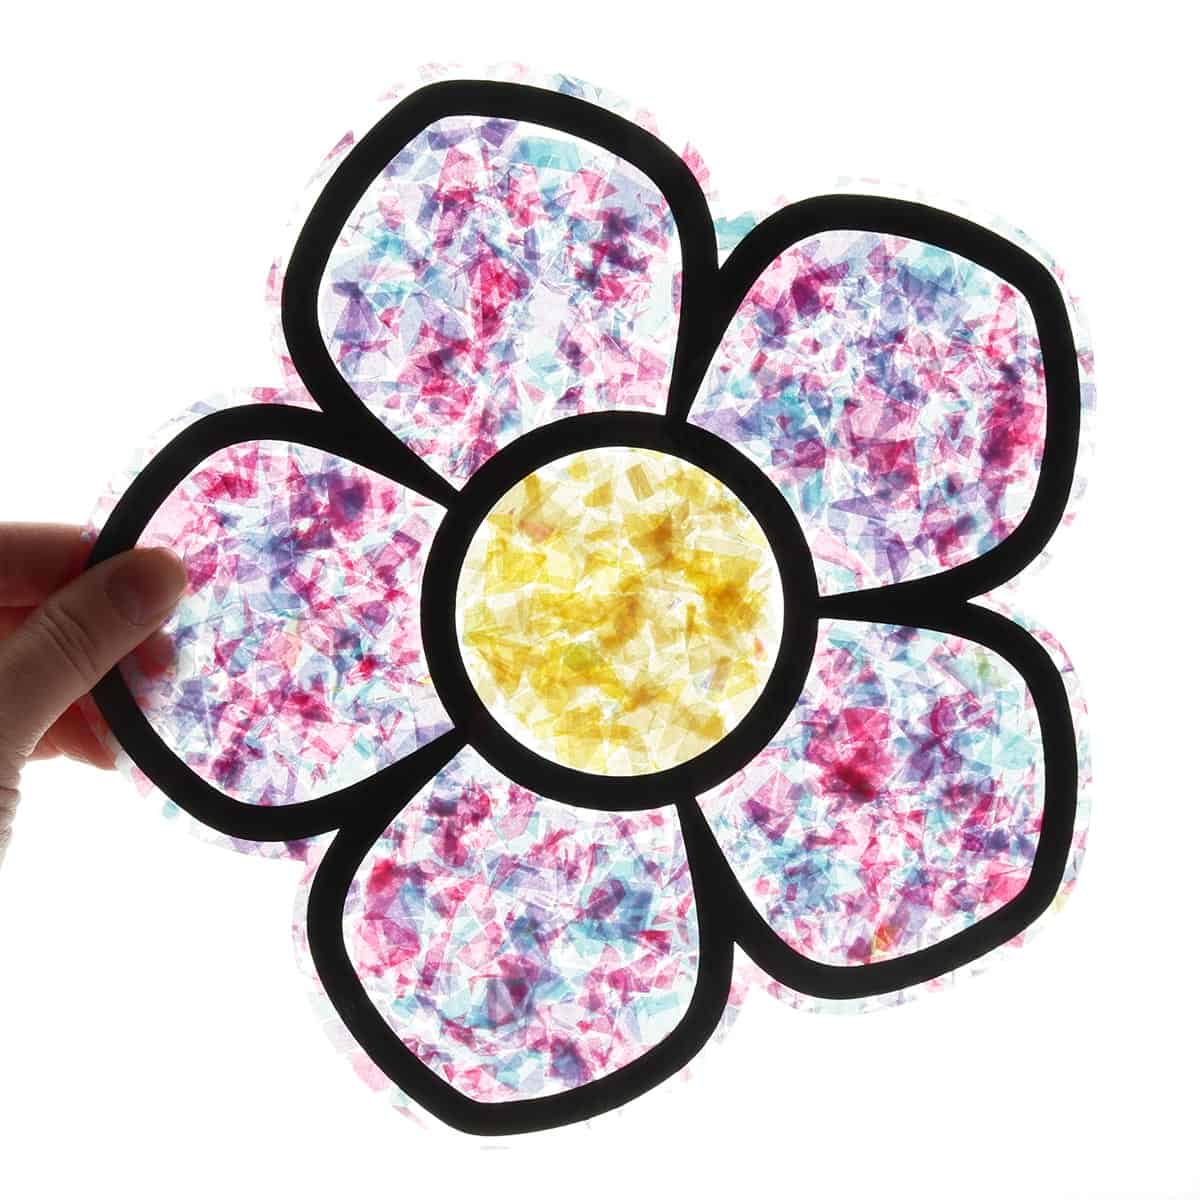
Now for the fun part! Fill in your design with whatever colors you want. You can stick to a single color per “section” or you can do multiple, to achieve a “watercolor” effect, like my flower below.
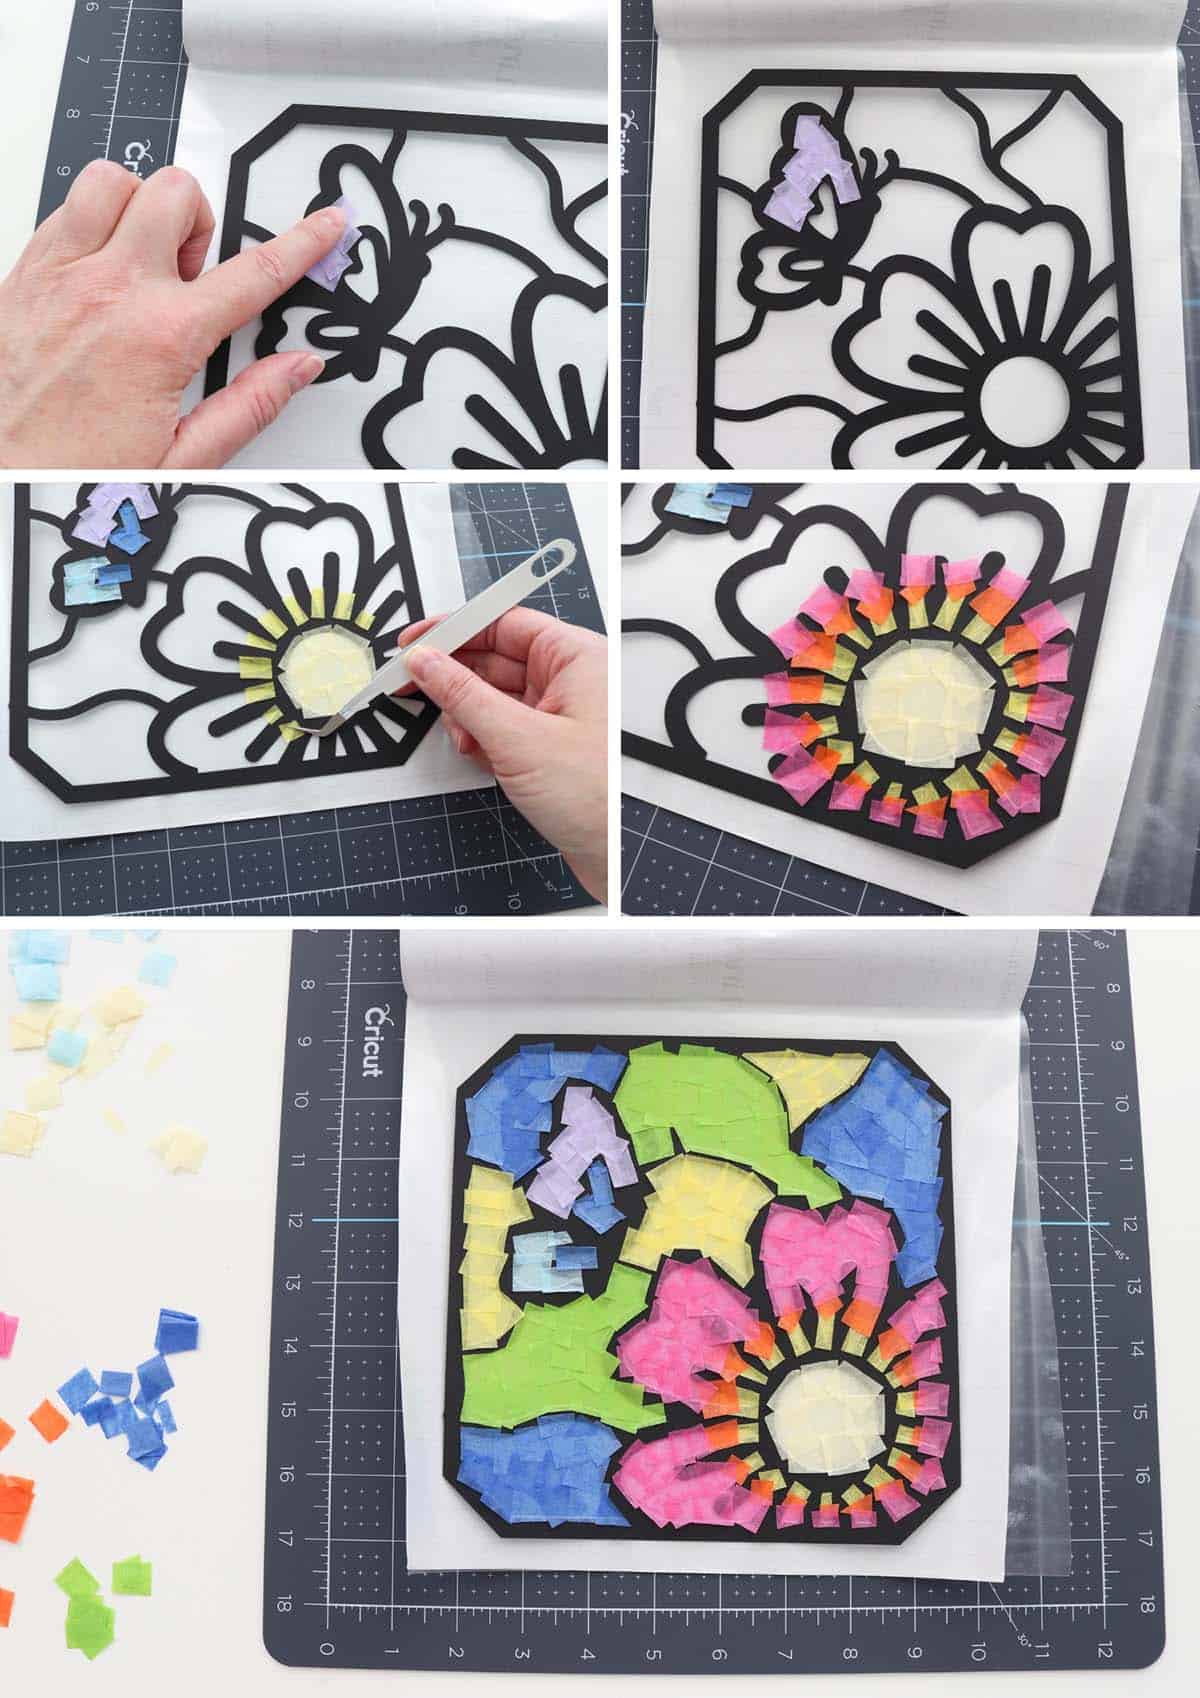
If you want to be particular (in other words, OCD like me 😜), do your best to keep the squares of tissue paper within the black lines—if they overlap other sections, it may “muddy” the other colors when you hold your stained glass up to the light. You can use small scissors to snip any overlapping parts. You may also need to cut the squares smaller as you work, sometimes creating triangular or rounded pieces to fit. (Of course, children don’t need to worry about being this precise and adults honestly don’t need to either—the results will be beautiful either way!)
You may find craft tweezers to be handy when placing small pieces on the more intricate designs!
How to create additional tissue paper colors
If you want, you can create different colors of tissue paper by layering two colors on top of each other. To do this, you’ll need to use glue to adhere the second color to the first (use the tiniest amount of glue possible, just enough until it sticks, since tissue paper is incredibly absorbent—a glue stick might actually be better than the liquid glue I used).
For the best results, use a light color for the first layer and then a darker color glued on top.
(You can see how I used this technique to create a darker green for the grass in my desert scene (using light green then dark blue). Oh…and I realize I totally messed up the layers in this desert scene…I thought I was making a sunset with my orange section, but that was probably supposed to be a mountain. We’ll just pretend they’re red rock.)
Finish the tissue paper stained glass
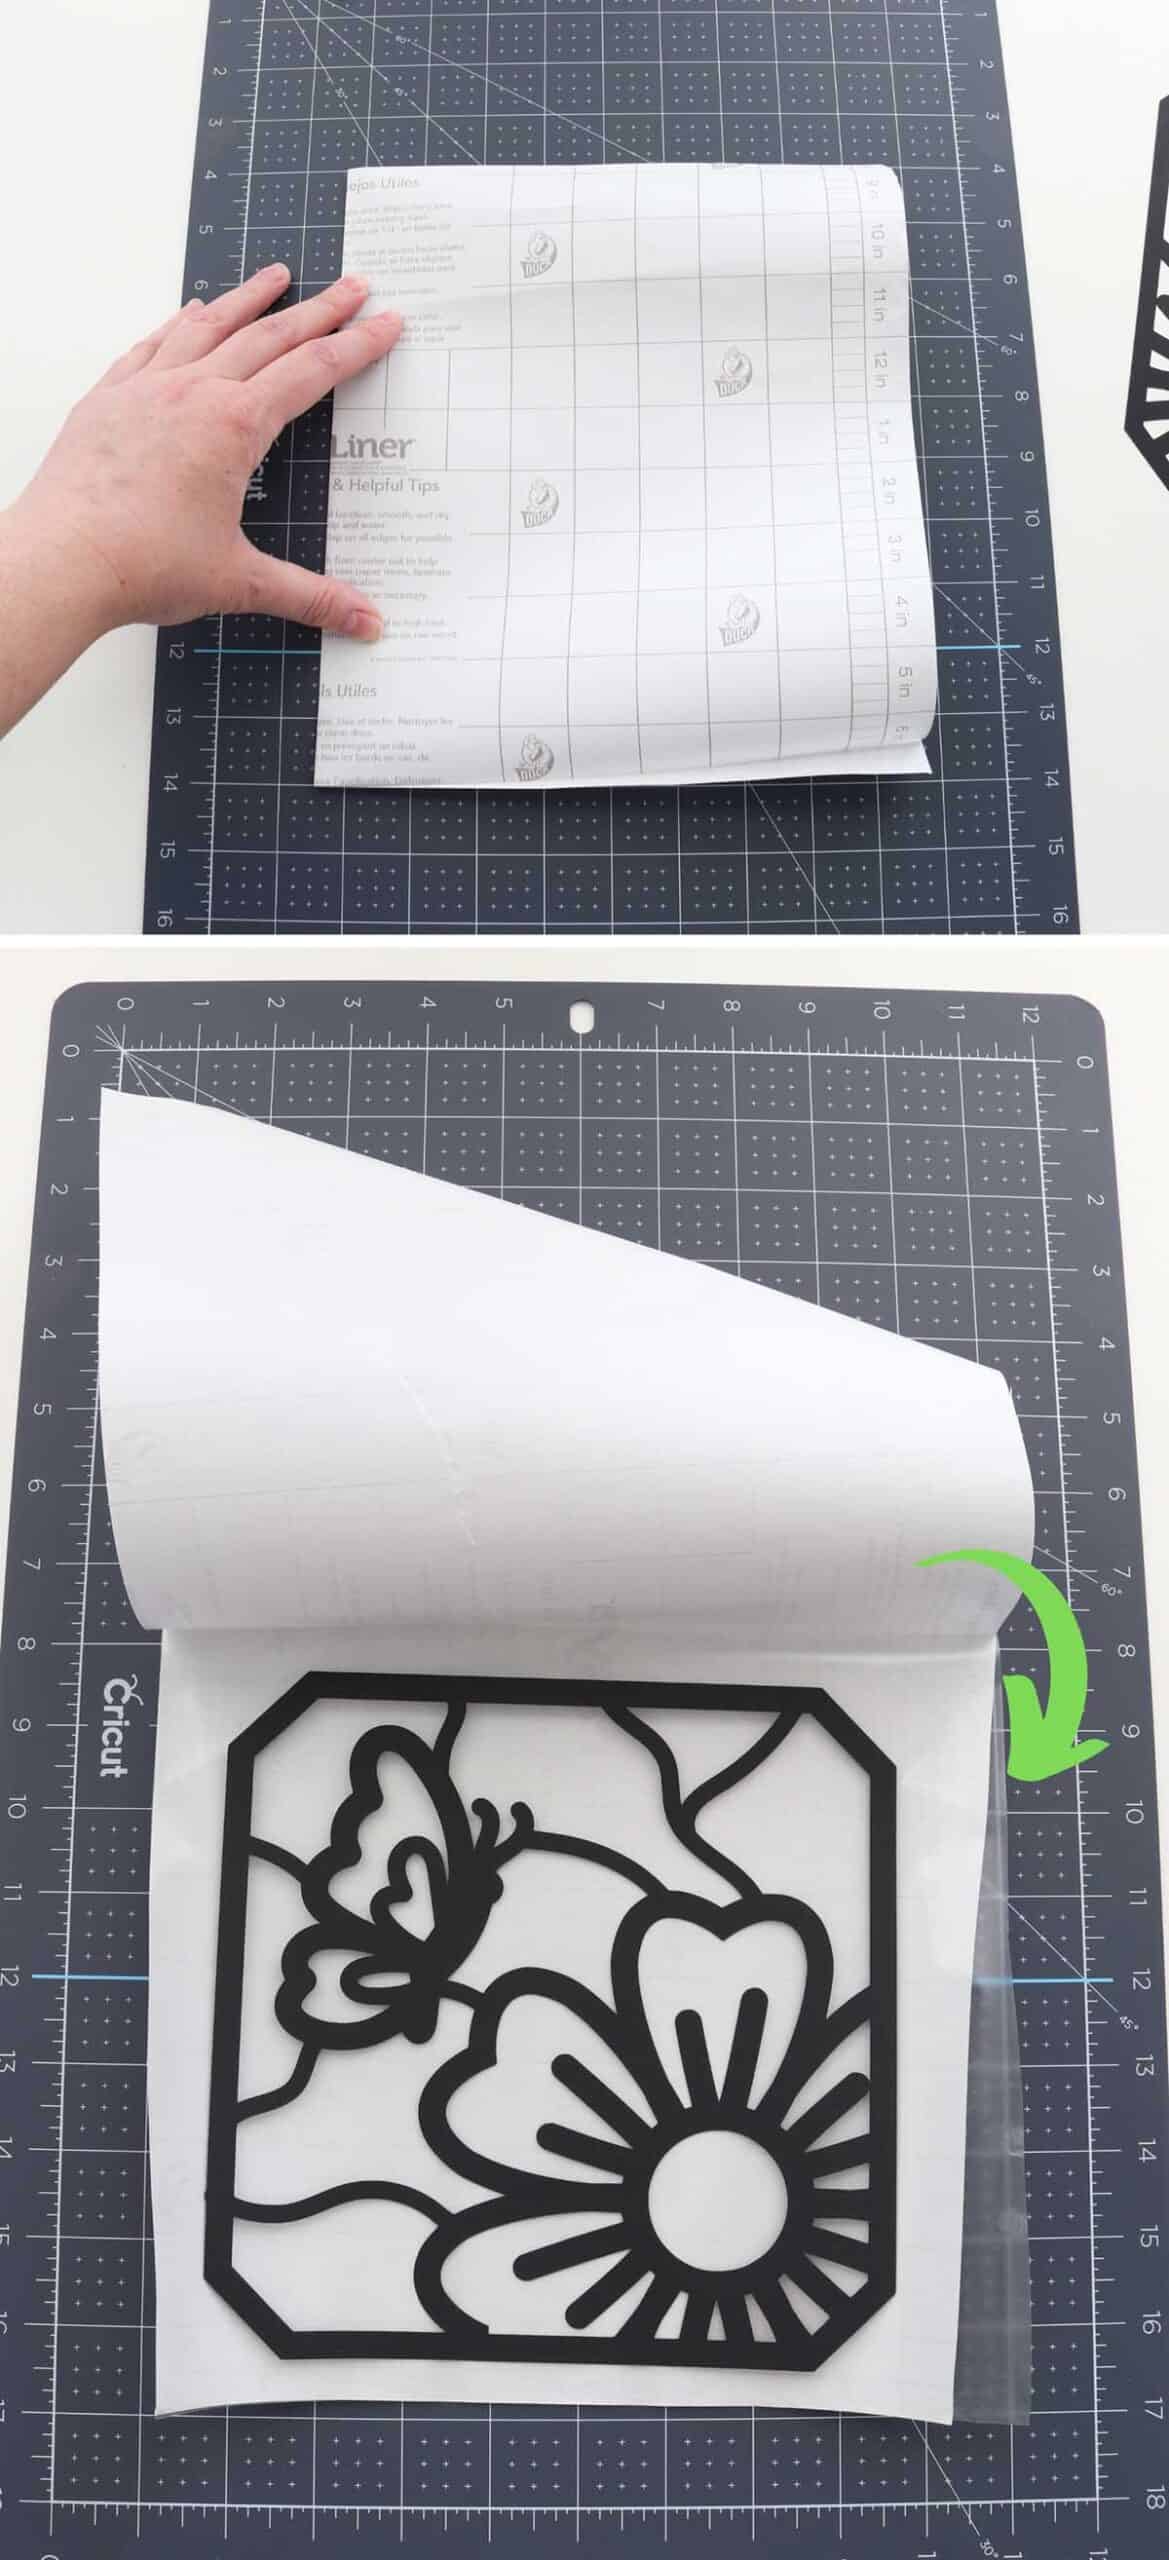
Once you’re done filling in your design with tissue paper, you’re going to fold the extra half of the contact paper over to cover the back of the stained glass.
Pay attention to where the middle of the contact paper is (where you creased it) and do your best to fold it over straight (if you get too crooked, you might not get the entire design covered).
Using the images below for reference, lay your contact paper out with your design and the sticky side face up. Begin peeling back the liner, about an inch past the crease. Carefully fold the contact paper over along this crease and press down so the contact paper sticks to itself. Continue pressing it down while you pull the liner out with your other hand. Go slowly to keep it straight and avoid extra creases.
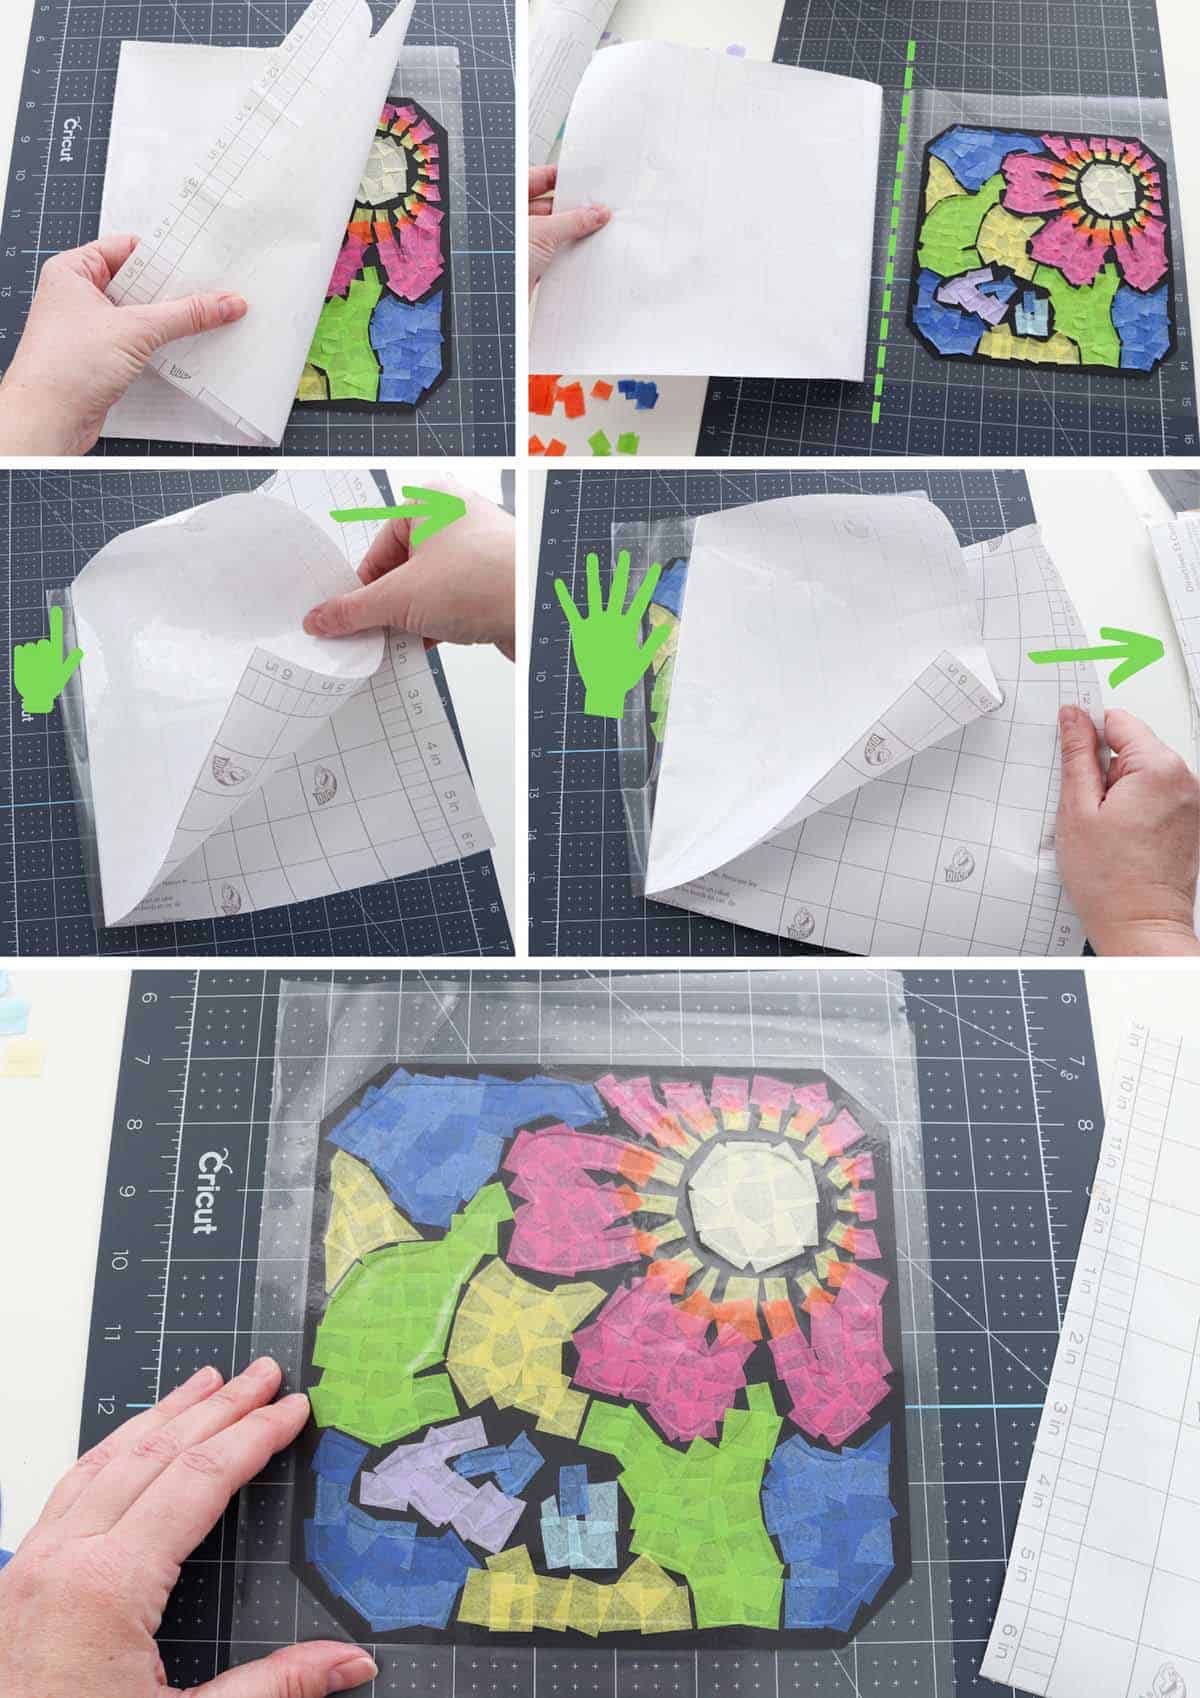
That’s probably the trickiest part of this whole thing, but no worries if you accidentally get it crooked. If your stained glass didn’t get covered all the way, just cut an additional sheet of contact paper to cover that part—it won’t even be noticeable once you hang your stained glass in a window! (And if you find my fold-over method too difficult, you can always just cut an entirely separate sheet to lay on top of the back.)
Once you’ve pressed the contact paper down really well, you can trim the excess, leaving about 1/4″ around your design.
Hang and enjoy!
Hang your stained glass in a sunny window or on a glass door with clear tape. These would be gorgeous in classroom windows!
You could also punch a hole on the edge or corner of your stained glass, tie a string through it, and hang it somewhere where light can shine through it.
If you want to gift this to someone, you could also put it in a floating glass frame that could sit on a tabletop (I might have to do this for my mother-in-law, she would love it!).
Isn’t it so pretty?! I love my faux stained glass window! And here’s how my son’s turned out:
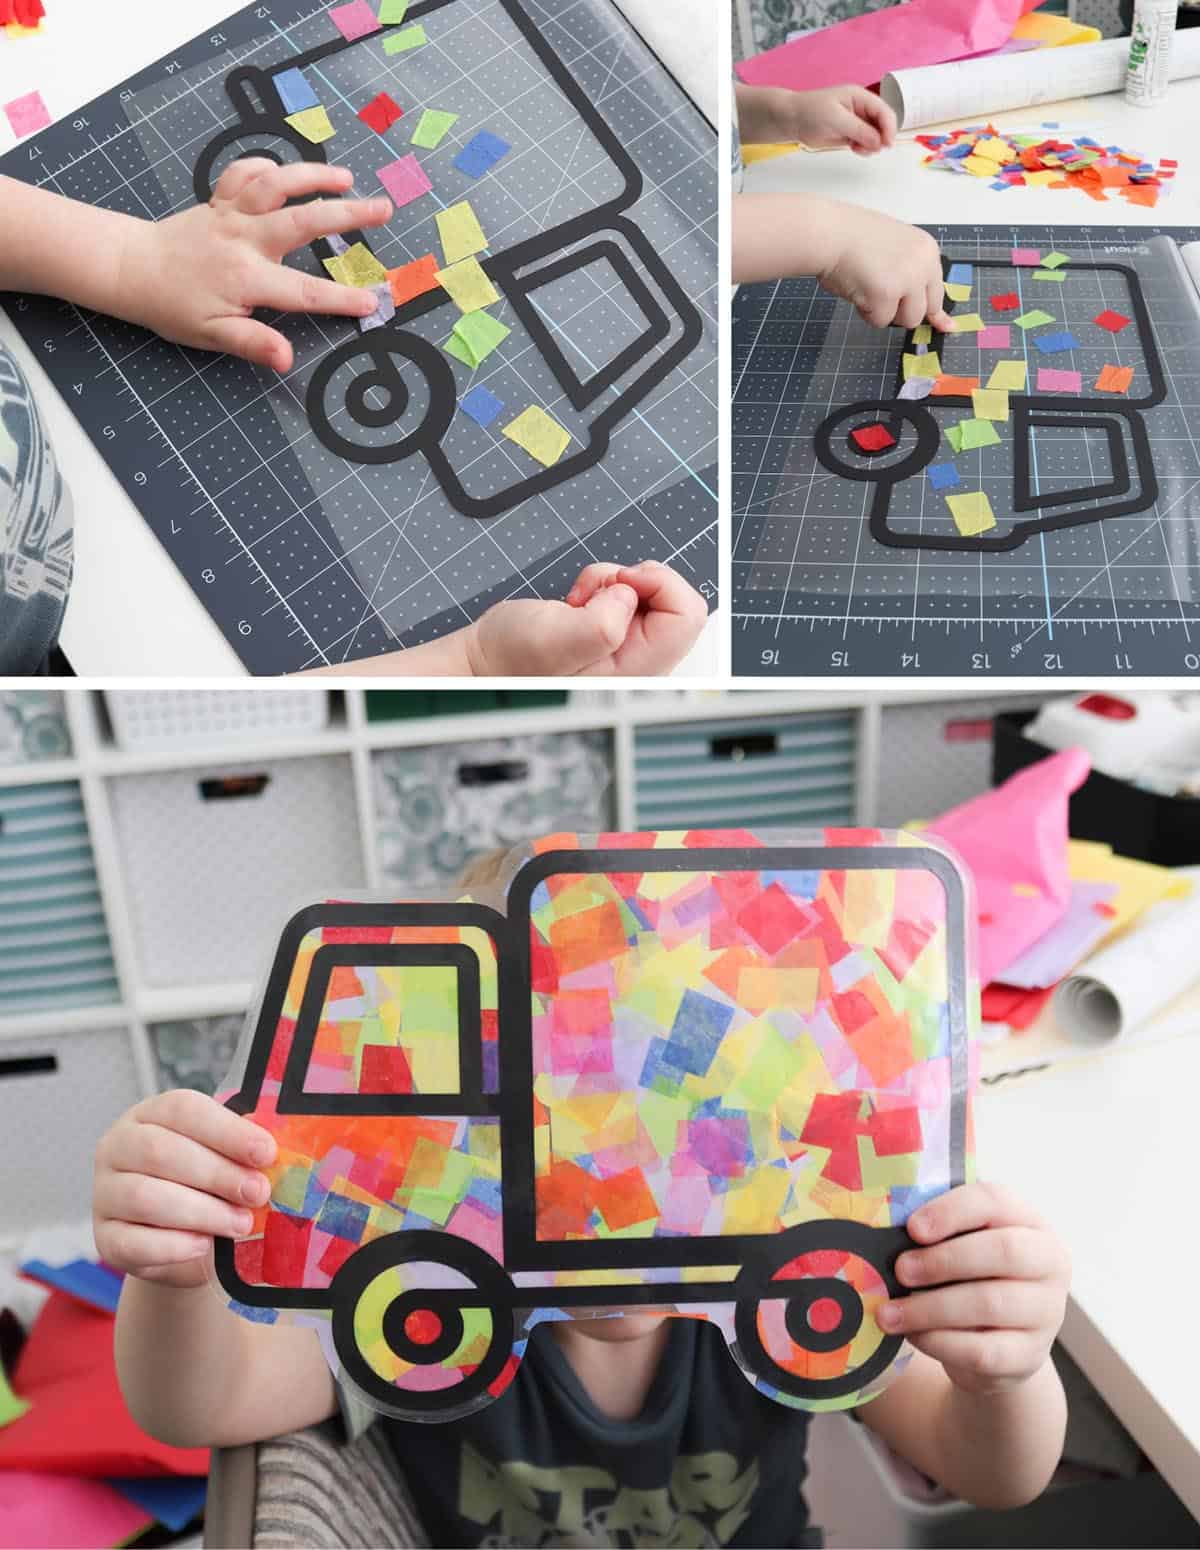
I totally encouraged him to grab handfuls of tissue paper squares (after I realized how long it was going to take letting him do it one by one) and he loved that. He calls it his rainbow truck.
“Confetti” tissue paper stained glass variation
If you want a fun alternative to the tissue paper squares, try cutting them into even tinier “confetti” pieces. Select a color scheme, make a pile of squares, then cut them until they’re tiny. (It’s easiest to just cut with one hand in a sort of chopping motion, keeping your other hand far out of the way so you don’t cut yourself.)
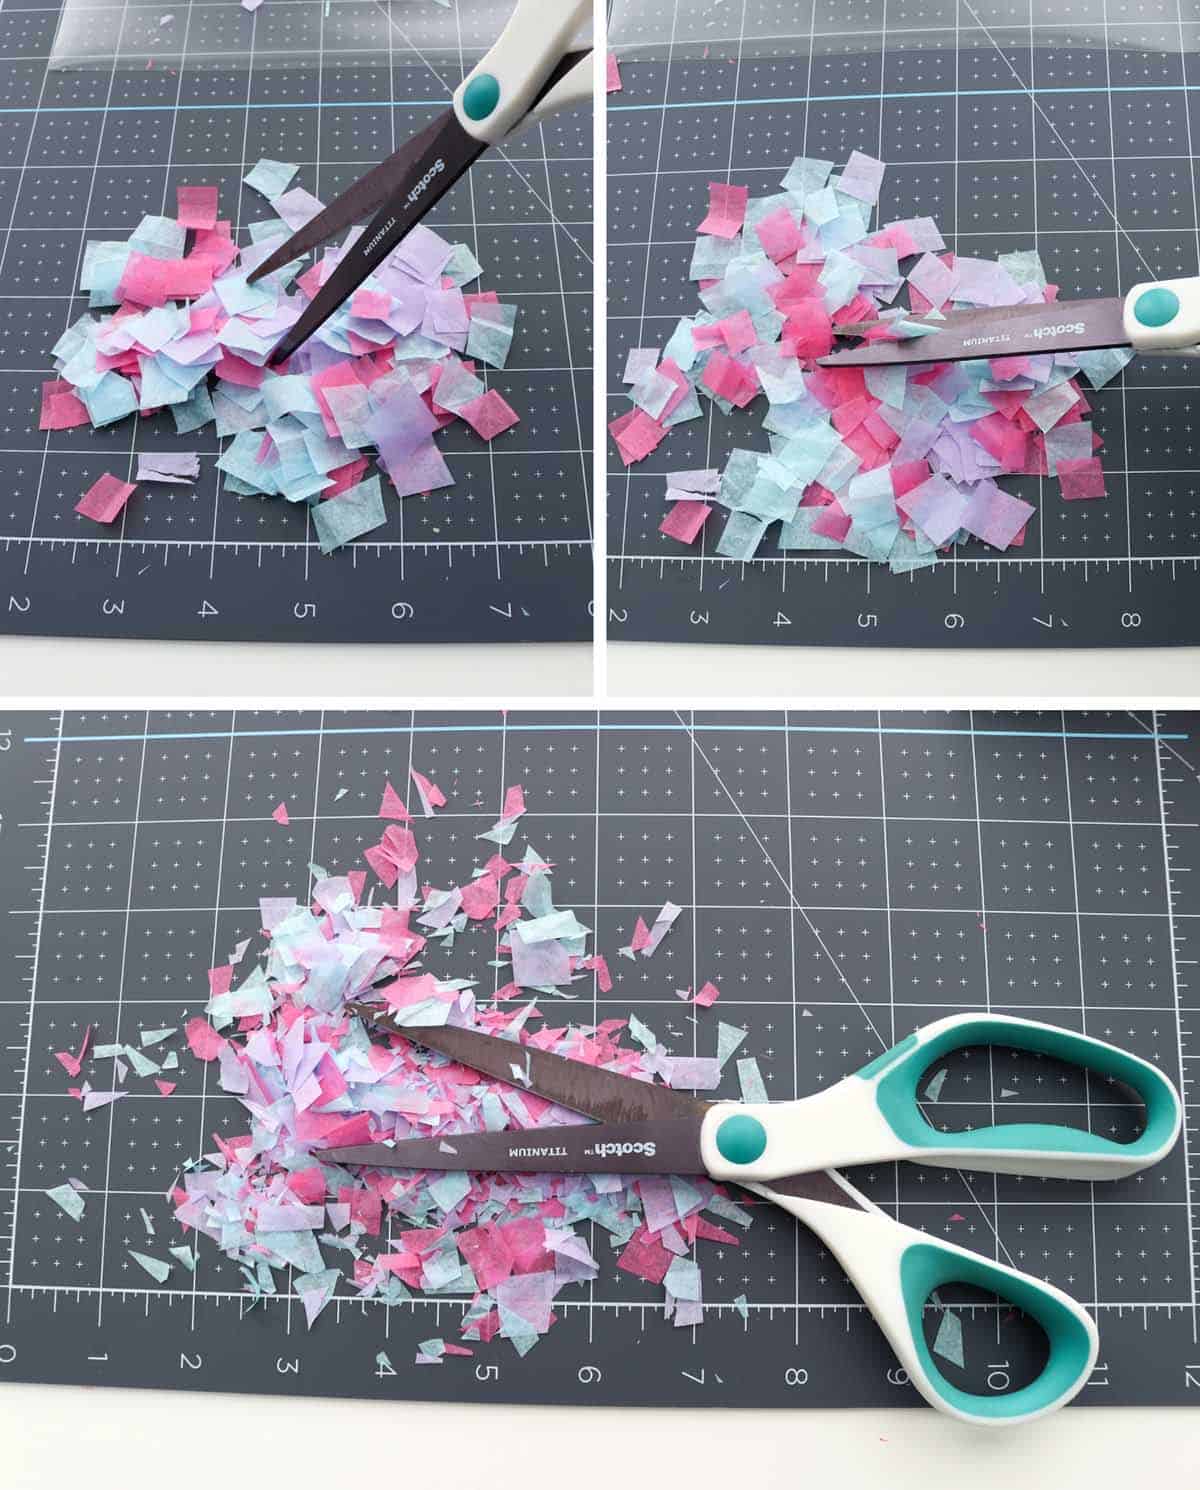
Then, set up your outline on contact paper and grab small handfuls of the confetti tissue paper and drop it in each section. This part is so fun and it goes so much faster than the squares! Don’t worry about getting tissue paper outside of the outline, it’s kind of hard to avoid with this technique.
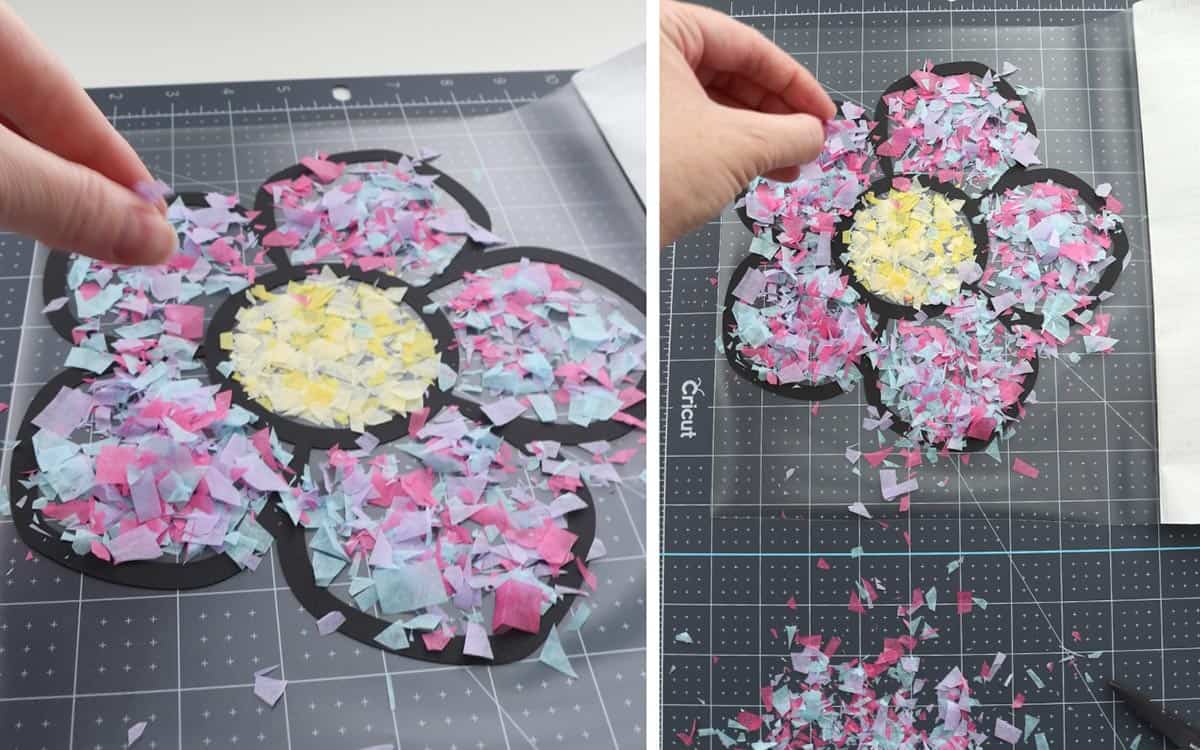
You can periodically shake off your design to get rid of the extra confetti that’s not sticking, or you can just leave it and cover it with the other half of the contact paper when you go to finish.
This is definitely a very messy method and not one I’d probably recommend for young children, but the results are stunning!
Simple frame variation
If you want to make this an even more creative activity, you could cut a simple black frame and allow kids to make their own tissue paper shapes to create a scene inside the frame (they could cut or tear the tissue paper pieces).
Double-sided variation
If you want your black outline to be clearly seen when looking at either side of the stained glass, you can place an additional cardstock outline over the first after you’ve finished filling in with tissue paper squares. I recommend gluing it down so it doesn’t shift when you cover it with the contact paper.
This would definitely be the most professional-looking option, but it also uses that much more black cardstock (which can get expensive), so it’s not necessary. (Of course, using black construction paper or regular black paper will save on cost, too.)
Tissue paper stained glass with laminating sheets variation
If you want really sturdy stained glass that can withstand more heavy use, you could use a double-sided laminating sheet instead of the contact paper. Your tissue paper won’t stick to the laminating sheet, so your design may not be quite as precise, but once you run it through your laminating machine, it will be thick and sturdy. When designing, you can lay your laminating sheet on top of a plain sheet of cardstock and use that to help you carefully transport it to your laminating machine.
(I haven’t personally tried this, so you’ll have to let me know how it works if you do!)
Can you take this craft camping?
Yes! This stained glass papercraft makes a fun camp craft for kids or adults. However, it is best done indoors or on a day with absolutely NO wind (ask me how I know this, haha). Tissue paper and wind don’t play well together, and neither do the sticky contact paper and dust. Also, if your hands are even a little dirty, your fingerprints will show on the contact paper (but maybe not a huge issue if you’re just looking for a fun camp craft to keep kids entertained).
All that said, I took this craft camping and all the kids we were with loved it (younger children and teenagers)!
The only thing I’d do differently next time is to have sandwich bags full of pre-cut tissue paper squares instead of taking the whole sheets of tissue paper (kids, especially toddlers, don’t have the patience to wait for the squares to be cut). You could do bags of cut tissue paper separated by color or just give each person their own mixed bag with lots of colors.
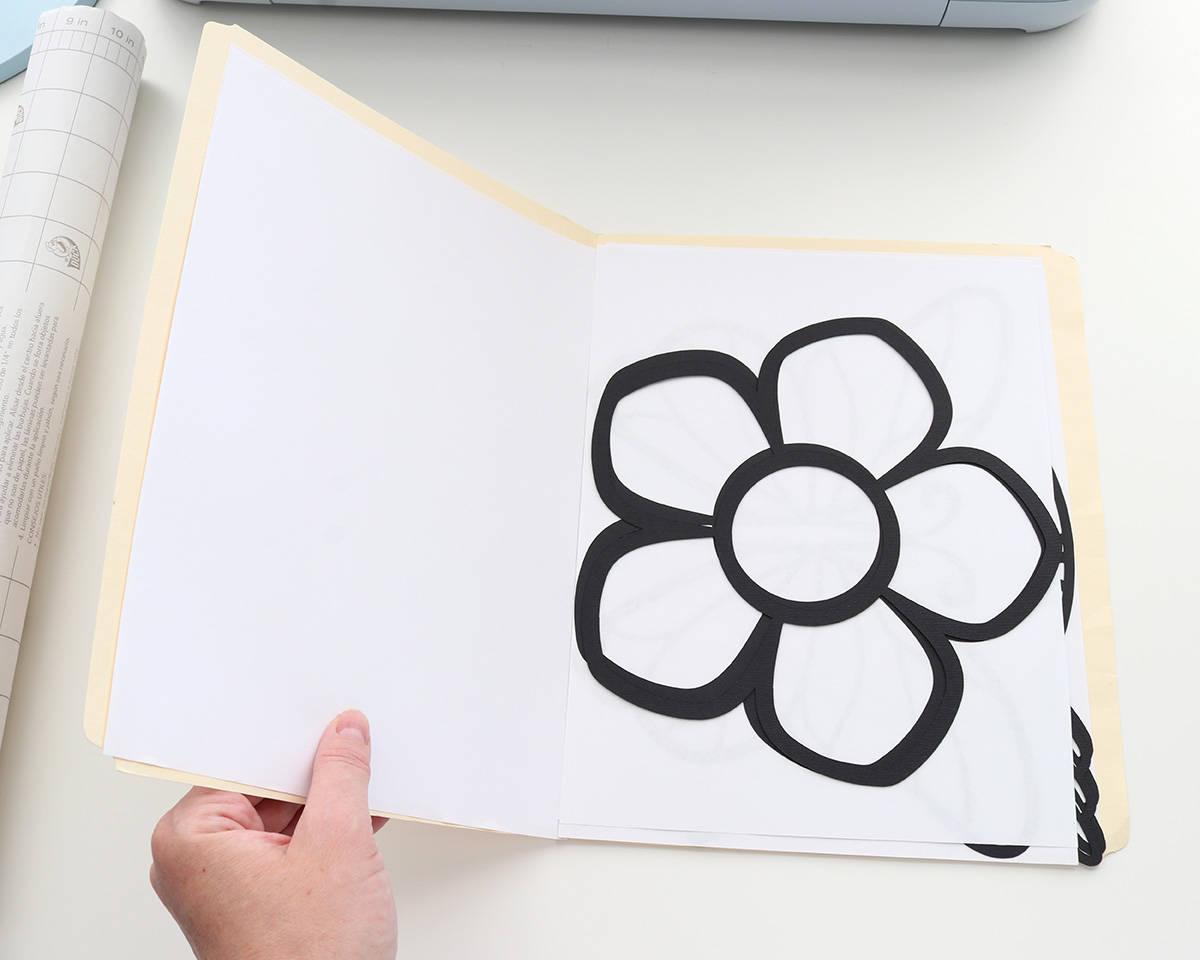
To easily transport the outlines without them getting tangled or torn, separate each design with a sheet of paper and keep them in a folder:
These stained glass art pieces would make fun DIY campsite decorations! Simply punch a hole in your design, tie a string to it, and hang somewhere where it will catch the light.
DIY Stained Glass Tissue Paper Sun Catchers
I hope you have so much fun making this colorful stained glass art project! I seriously find them so therapeutic—it makes a great craft to do while catching up on my Netflix shows. And my son loves making them, too, so win-win!

Don’t forget to pin and save for later!