Cricut Joy Xtra: Everything You Need to Know & How to Use It
Learn everything you need to know about the new Cricut Joy Xtra machine in this complete guide! This is the perfect beginner Cricut machine!
Cricut recently came out with a new machine that I am so excited to share with you: the Cricut Joy Xtra!
This machine is a step up from the Cricut Joy with increased capabilities, making this a great compact machine for anyone looking to get into the exciting world of Cricut crafting—say hello to personalized items, custom t-shirts, cute decals and stickers, professional-looking organization, and more!
This guide will answer all your questions about the Cricut Joy Xtra, inspire you with project ideas you can make with it, and help you decide if it’s the right Cricut machine for you and your crafting needs!

This is a sponsored post written by me on behalf of Cricut. All thoughts and opinions are my own.
This post contains affiliate links. For more information, see my disclosures here.
What is the Cricut Joy Xtra?
The Cricut Joy Xtra is Cricut’s newest machine, released in September 2023. It is a compact cutting machine that works with Cricut’s Design Space app, helping you create one-of-a-kind craft projects. Even though it is the second-smallest cutting machine Cricut offers, I think you’ll be surprised at all the awesome things you can make with it!
The Joy Xtra is slightly bigger than the original Joy machine, allowing you to make projects up to 8.5 x 11 inches (and A4 size) and, if using Smart materials, up to 4 feet long. Another important upgrade from the original Joy machine is the Xtra’s ability to Print Then Cut (the original Joy did not have a sensor, but the Xtra does!).
What are the important features of Cricut Joy Xtra?
The Cricut Joy Xtra can:
- cut 50+ compatible materials (more on these below)
- foil, write, and draw
- work with inkjet printers to Print Then Cut images for stickers and limitless other projects
- do so much more than the Cricut Joy, thanks to the larger cut size (yay for being able to use standard paper sizes with it!)
What can you make with the Cricut Joy Xtra?
Oh, man, where do I even start…you could craft endlessly with this machine and never run out of fun projects to make with it! Here’s a small sampling of things you could make and personalize with the Joy Xtra:
- t-shirts (ideas: read more books shirt, glow-in-the-dark ghost shirt, camping shirt)
- baby onesies
- full-color stickers (ideas: frog sticker sheet, school sticker sheet)
- waterproof decals (idea: positivity & motivation sticker sheets)
- gift tags (idea: foil thank you tags)
- custom cards (ideas: birthday cutaway cards, Christmas cutaway cards, 10+ Cricut Valentine’s cards)
- paper flowers
- keychains
- bookmarks
- organizational labels (idea: vinyl pantry labels)
- mugs
- cosmetic bags
- tote bags
- coasters
- banners and party decorations (idea: Easter banner)
- coloring pages (idea: Bloom With Kindness coloring page)

How much does the Cricut Joy Xtra cost?
The Cricut Joy Xtra machine is priced at $199 USD.
Save $10 on any Cricut machine or heat press with the coupon code AUBREE-10
Cricut Joy Xtra Specifications
Dimensions: 12.5 in x 6 in x 5.5 in (31.7 cm x 15.2 cm x 13.9 cm)
Weight: 6 lbs (2.7 kgs)
Max cut size using machine mat: 8.25 in x 11.75 in (20.8 cm x 29.7 cm)
Max cut size using Smart Materials: 8.5 in x 4 ft (21.6 cm x 1.2 m)
Cut speed: 5.65 in per second
How big is the Cricut Joy Xtra?
The Cricut Joy Xtra is 12.5 in x 6 in x 5.5 in. This is about 1.5 times the size of the Cricut Joy and about half the size of a Maker machine. Here it is compared to the Maker 3:

This makes it the perfect size machine for quick and easy crafting: it’s small enough (and cute enough!) to keep on a counter, store on a shelf when not in use, or even take it on the go for Cricut crafting away from home.
No dedicated craft room? No worries! This machine works great in small spaces.
What color is the Cricut Joy Xtra?
The Cricut Joy Xtra is all white, even the subtle Cricut logo on the front. Neutral and perfect for everyone!
What comes in the box?
- Cricut Joy Xtra machine
- Premium Fine-Point Blade + Housing
- Cricut Joy Fine Point Pen
- Cricut Mini Weeder
- Power adapter
- Materials for a practice cut
- Welcome card
- Free trial subscription to Cricut Access (for new subscribers)
- 50 free, pre-designed projects in the Design Space app
Does a cutting mat come with the machine?
No, a cutting mat is not included with the Joy Xtra machine. If you want to use non-Smart materials, like regular vinyl, HTV, sticker paper, and cardstock, then you will need to purchase a Joy Xtra cutting mat separately.
Depending on your material and project you’re making, there’s the Standard Grip mat, Light Grip mat, and Card mat, all sized specifically for the Joy Xtra machine. I highly recommend all three so you get the most use from your Joy Xtra machine!
I wanted to mention that Cricut also sells a Cricut Joy Xtra + Materials Bundle, which I think is a great deal: it includes the machine but also gives you the Light Grip mat and some useful materials and accessories so you can get crafting right away!
How to set up the Cricut Joy Xtra

When you first unbox your machine, you will see an envelope. Inside the envelope is:
- a user guide
- a “let’s get started” guide
- a warranty statement
- materials for practice cuts: mine came with permanent Smart Label writable vinyl, removable Smart vinyl (2 sheets), Smart iron-on, and transfer tape

Next, you’ll find your machine (shrink-wrapped with plastic). Underneath the machine is a:
- power cord/adapter (2 pieces)
- Cricut Joy fine point pen
- mini weeder (it looks almost like a guitar pick…when they say mini, they mean mini)

Remove the shrink wrap from the machine, as well as the pieces of blue tape and foam on the backside.

The front lid is magnetic, so pull down from the gap at the top to open the machine. You’ll see that the fine point blade and housing that comes with your machine is already installed in the single clamp. Remove the foam from around the blade housing.
Set up your machine in the Cricut Design Space app
Got to Cricut.com/setup. Select “cutting machine.” Then you’ll be prompted to download the Design Space app (or open if you already have it installed). Again, choose cutting machine and click on Cricut Joy Xtra.
Connect the power cord to the machine, then plug into a wall outlet.

Connect using bluetooth (unfortunately for some, the Cricut Joy Xtra does not have a USB port for connecting your machine another way—bluetooth is the only way to connect to Design Space). You may need to go into your computer’s or device’s bluetooth settings to find the machine and connect it manually.

Once connected, you will be prompted to add your Cricut Joy Xtra machine to your Cricut ID (the email you use with Cricut). Your machine will then take a minute or two to update.

Do a test cut
Continue following the on-screen prompts to do a test cut (you’ll be making a Cricut decal with removable Smart vinyl).
There are no buttons on the Joy Xtra machine so press Go from the Design Space app. When finished cutting, press Unload from the app as well.

Peel off the vinyl decal to make sure that your machine has cut it correctly (mine cut like butter and it was surprisingly quiet while cutting!).
Now your machine is all set up! You’re ready to create your own projects in Design Space!
FAQ about getting started with the Cricut Joy Xtra
How do you open the Cricut Joy Xtra machine?
The front cover flap of the Xtra is magnetic. Simply pull or push from the gap at the top to pull the flap down (once the cover is open to about a 45º angle, it will soft-open the rest of the way if you want).
How do you turn on the Cricut Joy Xtra?
There is no power button on the Cricut Joy Xtra machine. To turn on the Cricut Joy Xtra, plug it in and connect to the Cricut Design Space app via bluetooth—this is all you need to do to turn your machine on. Once you click “Make It” to cut a project in Design Space, all the load/unload/go buttons will be within Design Space.
How do you turn off the Cricut Joy Xtra?
The only way to “turn off” the Cricut Joy Xtra machine is to unplug it. I find that mildly annoying, but it’s not a deal breaker for me. I’d just get into the habit of unplugging it after every crafting session (I tell you this knowing full well I’m going to forget all the time, haha).
Why won’t my Cricut Joy Xtra connect to bluetooth?
Bluetooth connectivity is a love/hate relationship, for sure. I will say that I’ve noticed a little more difficulty getting my Joy Xtra machine to connect to bluetooth than I do with my Maker. It seems like if I leave my machine plugged in/on for too long without doing a cut (or if I have to cancel a cut and then try to make it again), then it “times out” and disconnects from bluetooth.
If you can’t get your machine to reconnect and Design Space is just spinning the wheel, searching for your machine, try one or all of these options:
- cancel the cut and restart it by clicking Make It again
- unplug your machine and plug it back in
- go into your computer’s or device’s bluetooth settings and manually reconnect the machine
- close Design Space and restart it (make sure your project is saved first!)
Phew, that’s a little tricky. Lately, I’ve just been skipping to the last option and quickly canceling the cut, saving my project, and closing out of Design Space. It’s a pain but it works every time to get my machine to connect again.
My other Cricut machines do occasionally struggle to connect to bluetooth, too, so this isn’t to say that you’ll never run into those issues with another machine, because you will. It’s just the nature of bluetooth. And it’s not all bad—at least you don’t have to worry about cords getting in your way!
How to calibrate the Cricut Joy Xtra
The first time you go to make a Print Then Cut project with your Cricut Joy Xtra, you will most likely be prompted to calibrate your machine (I was prompted before printing). Definitely do this! If I hadn’t calibrated first, my project would have cut way off the lines.
This process only takes a few minutes and can be redone at any time if your Print Then Cut isn’t cutting accurately. Check out this post for a step by step walkthrough of how to calibrate the Cricut Joy Xtra, plus lots of troubleshooting tips.
What blades and tools are compatible with Cricut Joy Xtra?
The Cricut Joy Xtra is compatible with:
- the premium fine-point blade (comes with the machine and is the same as the Cricut Joy)
- the Cricut Joy foil transfer tool (must be purchased separately)
- Cricut Joy pens and markers (one Cricut Joy fine point pen comes with the machine)

You can’t use any other tools in the Cricut Joy Xtra (so, no knife blade, rotary blade, scoring wheel, or scoring stylus). I do love my Maker’s ability to score, so if that’s something you need, especially if you’re heavily into paper crafting, you might want to consider an Explore or Maker machine (though, you can always score small projects by hand with the scoring stylus).
Which Cricut pens/markers work with Cricut Joy Xtra?
All of the Cricut Joy pens and markers are compatible with the Cricut Joy Xtra. The pens and markers for the Explore and Maker machines do not work in the Xtra.
Which Cricut foil transfer tool works with Cricut Joy Xtra?
If you want to be able to foil with your Cricut Joy Xtra, be sure you’re purchasing the Cricut Joy foil transfer tool set—this is also compatible with the Joy Xtra. (There is another foil transfer tool set that works only with Maker and Explore machines, so make sure you’re not putting that one in your cart.)
What cutting mats can you use with Cricut Joy Xtra?
There are three different mats that are designed to work with the Cricut Joy Xtra: this Standard Grip mat, this Light Grip mat, and this Card mat.
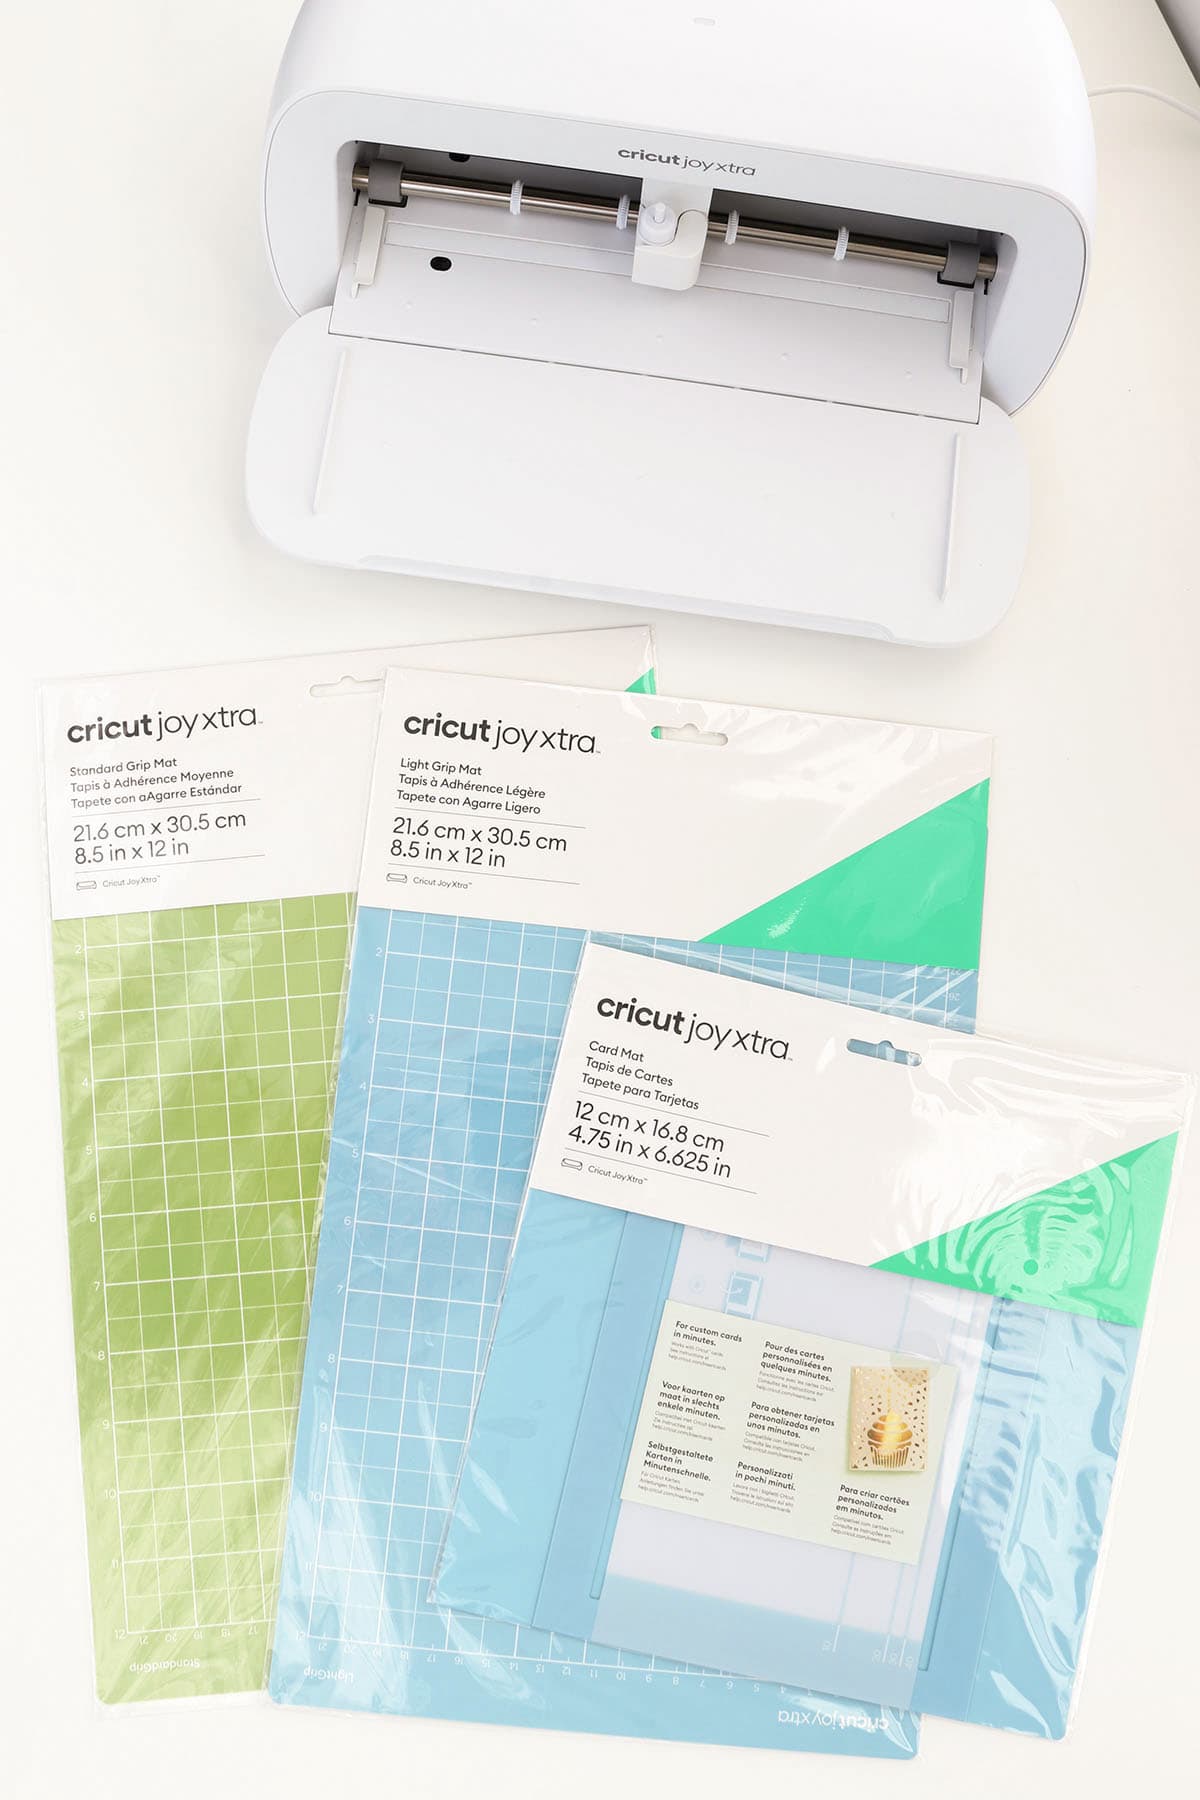
The Standard Grip and Light Grip mats are 8.5 in x 12 in mats, which is perfect for standard 8.5 x 11 paper (the actual size of the mat is 9.5 in x 14 in).
Use the Standard Grip mat for medium-weight materials like:
- iron-on
- vinyl
- patterned paper
- embossed cardstock
Use the Light Grip mat for lightweight materials like:
- printable materials
- printer paper
- thin cardstock
- vellum
- construction paper
- vinyl
The Card mat is a 4.75 in x 6.625 in mat, which can fit one card at a time (the actual size of the mat is 9.5 in x 8.5 in).
Use the Card mat for:
- all Cricut cards, including insert cards, cutaway cards, and watercolor cards
- other pre-folded cards

How you use the Cricut Joy Xtra card mat is almost identical to how you use the 2×2 card mat for Explore and Maker machines. Check out that tutorial for step-by-step instructions if you’re new to card mats.
Keep in mind that, with the Joy Xtra, you’ll only be able to do one card at a time. You’ll also need to push the white star wheels on your machine to either side so they don’t roll over your card.

Get my Cutaway Birthday Cards project in Design Space HERE.
What materials can the Cricut Joy Xtra cut?
The Cricut Joy Xtra can cut 50+ basic materials. You can check out the complete list here, but these are some popular materials that you can cut with Cricut Joy Xtra:
- Iron-on vinyl (p.s. I tested multiple brands of iron-on vinyl and this is the best iron-on vinyl for shirts)
- Specialty iron-on like glitter, holographic, glow-in-the-dark, color changing, and more
- Removable and permanent adhesive vinyl
- Specialty adhesive vinyls like chalkboard, glow-in-the-dark, holographic, true brushed, color changing, and more
- Smart label writable vinyl
- Infusible ink
- Cardstock
- Cutaway cards and insert cards
Cricut released several new products at the same time as the Cricut Joy Xtra and they are all compatible with this machine as well. These are:
- Prismatic glitter iron-on: This is a microplastic glitter with a completely smooth texture, almost rubbery. This is great for apparel and things like pillow covers where you don’t want the rough texture of the original glitter iron-on.
- Printable iron-on, for both light and dark fabrics: I am so amazed by this and can’t wait to make more shirts with it!
- Printable sticker paper: This is much thinner than the old sticker paper so it won’t get jammed in your printer.
- Printable vinyl: This creates stickers/decals that are a little nicer than the paper ones, and it now comes in gold and silver in addition to white and clear.
- Printable waterproof sticker sets: My new favorite way to make water bottle stickers!

I’m so excited for these new materials—so many possibilities!
Can you cut infusible ink with Cricut Joy Xtra?
Yes! I had this question when I received the Cricut Joy Xtra, so I thought I’d give it its own answer in this post. This machine can cut infusible ink. Don’t forget to mirror!
How big can Cricut Joy Xtra cut?
If you’re using a cutting mat, the maximum cut size is 8.25 in by 11.75 in (20.8 cm x 29.7 cm).
If you’re using Smart Materials, the maximum cut size is 8.5 in by 4 ft (21.6 cm x 1.2 m).
All available Cricut card sizes can be used with the Joy Xtra Card mat.
How to use Cricut Joy Xtra
The Cricut Joy Xtra is a very simple machine to use. It’s great for all crafters, whether you’re a Cricut pro or you’re just starting out! Here are some tips for getting started so you can get crafting right away.
How much clearance space do you need for the Cricut Joy Xtra?
When operating the Cricut Joy Xtra, you need to make sure you have at least 10 inches of space behind the machine (and about the same in front of the open machine). You’ll see this notice during your initial machine setup:

How to load and unload Smart materials in the Cricut Joy Xtra
There are multiple Smart materials sized specifically for the Cricut Joy Xtra—and they’re so convenient to use since they don’t require a mat*!
When you go to make a project, choose Without Mat for how you’ll load your materials (or you can also choose Manually select for each load, then you’ll choose Without Mat on the next screen for the Smart materials).
When Design Space prompts you to load the material, hold it straight with both hands and place it under the left and right machine guides at the front of the machine until the rollers grip it. Make sure you load Smart iron-on with the shiny/carrier sheet side down.
*To use Smart materials without a cutting mat, they need to be at least 6 inches long. Once they get shorter than that, you will need to put them on a cutting mat (so save your scraps because they can still be used!).
How to load and unload mats in the Cricut Joy Xtra
When prompted by Design Space to load a cutting mat, hold it straight with both hands and slide it under the machine guides until the rollers grip it. The machine will roll the mat through to measure it to make sure it’s the right size for your project. If your mat loads crooked, your machine will try to correct it while it measures, or you can also click Pause in Design Space and then Unload/Load again.
(If you are doing a Print Then Cut project, I have heard it’s best to push the cutting mat flush against the left machine guide rather than centering it between the guides…but I’m not sure it makes a huge difference.)
How to install pens and markers in the Cricut Joy Xtra
To install a pen or marker in the Cricut Joy Xtra machine, simply open the clamp, remove the blade housing or whatever is currently installed, and drop the pen into the clamp. The pen will just rest in the clamp—there’s no need to push it or snap it into place like you would on Maker/Explore machines. Close the clamp.

How to draw with Cricut Joy Xtra
To draw or write with Cricut Joy Xtra, you will need to make a project with drawing elements. From the Canvas in Design Space, you can change the operation type of elements from Basic Cut to Draw, and then select Pen. You can also choose images that are specifically for drawing by filtering the search results in the image library to Operation Type – Draw Only.

If you want your image to draw on something specific in your project (a background shape, etc.), you will need to attach the drawing element to that by selecting both and clicking Attach.

When you go to make your project and after you select your material settings, Design Space will prompt you to load a pen into the Joy Xtra machine. Follow the Design Space prompts to load a mat in your machine and click Go.
Your machine will draw all the drawing elements first. Once finished, Design Space will prompt you to remove the pen from the clamp and replace it with the fine point blade to finish cutting your project (if your project also has cut elements).
Check out how fun this flower coloring page is (100% drawn by my Cricut Joy Xtra)! Get the project in Design Space HERE.

How to use the foil transfer tool with Cricut Joy Xtra
The Cricut Joy foil transfer tool is also compatible with the Joy Xtra. To install the foil transfer tool, drop it into the open clamp (the same way you would the blade housing or a pen) and close the clamp. A full tutorial on how to foil with Cricut Joy Xtra is coming soon!
Get my Foil Thank You Tags project in Design Space HERE.

How to Print Then Cut with Cricut Joy Xtra
To Print Then Cut with Cricut Joy Xtra, you will need to make a project with Print Then Cut elements. You have three options for this:
- From the Canvas in Design Space, you can change the operation type of elements to Print Then Cut (or flatten elements together).
- You can also choose images that are specifically for Print Then Cut by filtering the search results in the image library to Operation Type – Print Then Cut.
- Or, if you are uploading your own images, upload them as Print Then Cut images.
Once you’re finished editing your elements (feel free to add background shapes or offsets), select all the layers and click Flatten. This will automatically change the operation type to Print Then Cut and will turn multiple elements into a single piece (making it so your machine only cuts around the outermost edge).

If you want multiple Print Then Cut images to be positioned together (like for a sticker sheet, for example), then select all the flattened images and click Attach. This will keep the same positioning you have on the Canvas and transfer it to the cutting mat.
The maximum paper size for Print Then Cut with the Cricut Joy Xtra is 8.5 in x 11 in. The maximum cut size for your image(s) will depend on how they fit within the registration marks (the required black marks that will print in each corner of the page to be read by your machine’s sensors so it knows exactly where to cut). You can use this template in Design Space to know how big you can size your images (but don’t include the guide layer when attaching or flattening your images).
If any of your images or attached images are too big, Design Space will give you a warning in the layers panel. If you want, you can let Design Space automatically resize the images for you. Or, if using my template, reposition them so they are within the lines on all sides.

Click Make It. Make any adjustments you need on the Prepare screen (if you wanted to move images around or change the number of copies, etc.), then click Continue.
Click Send to Printer. Choose your printer and select whether you want bleed (usually recommended) and if you want to use system dialog (highly recommended).
Bleed extends the ink on the edges of your images to help prevent a white line around them after cutting (this helps with any slight variance in the accuracy of the cut).
Choosing to use your printer’s system dialog gives you more control over the quality of the print (I usually set my printer to plain paper and best quality). The print dialog box may show up behind Cricut Design Space, so minimize Design Space if you don’t see it.

Once your page is printed, set your base material in Design Space (this is whatever material you printed on) and load the page onto a cutting mat. Load the mat into your machine and click Go in Design Space once prompted. Your Cricut Joy Xtra’s sensors will read the black registration marks and then complete the cut.

If you have any cutting issues with Print Then Cut, check out this tutorial for calibrating your Cricut machine (I offer several troubleshooting suggestions in there as well).
I used Print Then Cut when I used the new printable iron-on for my book t-shirt and it might be my new favorite way to make shirts (pictures don’t do it justice, the image is a lot more vibrant in person). The text was cut from the new prismatic glitter iron-on, which is also more sparkly in person.

Cricut Joy Xtra Review: Pros & Cons
Pros
There are so many wonderful things about the Cricut Joy Xtra, and I hope you’ve been able to see that already if you’ve read this far. Just to emphasize one more time, here are a few of my favorite things about the Joy Xtra:
- This is a fabulous beginner Cricut machine: I feel like this machine is just powerful enough and big enough to do all the most popular projects but it feels less overwhelming if you’re just starting out or just want a Cricut for a few crafts here and there.
- Great price point: I love that this machine is more affordable to fit different budgets. (Hello, perfect Christmas gift for crafters!)
- Compact and lightweight: Ahhh, I love the size of this machine! It’s so easy to maneuver and pull down from a shelf when I want to make something quick, or push out of the way when I’m done cutting and now need space to assemble my project.
- It’s perfectly sized for 8.5 x 11 in or A4 paper.
- It can Print Then Cut thanks to the addition of the Print Then Cut sensor!
Cons
Bluetooth only
If you struggle with bluetooth connections and prefer to plug your machine directly into your computer with a USB cable, the Joy Xtra’s “bluetooth only” feature may be a drawback. I agree that it can be frustrating when your machine disconnects regularly, forcing you to try one or more of the troubleshooting options I mentioned earlier.
But, I think the bluetooth connectivity could also be a positive thing. If you’re like me, you hate cords stretching across your work surface and getting in your way. I also like that I’m not limited to keeping my machine right next to my computer—this makes the machine easily transportable, too. Even if the Joy Xtra could be connected another way, I’d still pick the bluetooth.
No buttons on machine
Since there are no buttons on the Joy Xtra machine, everything must be done from Design Space. I mention this as a con only because it could potentially be annoying to have to constantly go back and forth between your machine and Design Space to cut a project. (I think it’ll just take some getting used to, especially for someone who also uses other Cricut machines where you don’t have to do this.)
No scoring tool, deep cut blade, etc.
The Joy Xtra only works with the fine-point blade, Cricut Joy pens and markers, and the Cricut Joy foil transfer tool. If you need additional machine functions (like scoring), you’ll want to upgrade to an Explore or Maker.
No extras in the box
Unless you purchase the machine bundle, you’re not getting a lot of extras with your machine. I suppose it’s normal to have to purchase tools and accessories separately (and I highly recommend one of the tool kits since the included mini weeder is, well, adorable but not very ergonomic). I wish a cutting mat had at least been included (though, now that I think about it, they’re not included with the newest Explore 3 and Maker 3, either…but still).
Cutting mats don’t have holes for hanging
I suppose this isn’t really a con of the machine itself, but I’m a little bothered that the Cricut Joy Xtra mats don’t have holes for hanging. (I don’t believe the original Cricut Joy mats have notches either.)
I hang all my Cricut cutting mats on hooks in my craft room—I think it’s the easiest way to save space, keep them from getting dirty, and have them easily accessible when I want to use my Cricut. I especially dislike that I can’t easily hang the protective sheet on a hook while I’m using the mat.
I either have to find a new home for these mats or find a way to hang them. It won’t look quite as neat, but maybe I can use a binder clip on the edge of the mat and hang them that way.
Should I get the Cricut Joy or Joy Xtra?
If you’re debating between getting the original Cricut Joy or the Joy Xtra, I definitely recommend the Xtra! The added capabilities, as well as just being a newer and improved machine, make the Xtra worth the additional cost.
The price difference isn’t all that much, though! The original Joy retails for $179.99, and while that machine is often on sale (and the Xtra won’t be for some time still), it’s still a reasonable price for a beginning machine with lots of craft potential.
Keep in mind that the original Joy does not have a Print Then Cut sensor, so if you ever see yourself wanting to use that feature, go with the Xtra. Also, the increased cut size of the Xtra, while still being a compact and portable machine, make it the perfect choice!
Should I get the Cricut Joy Xtra or Explore?
The Cricut Explore Air 2 retails for $249.99 (and is often on sale for less), which is not a huge price jump up from the Joy Xtra at $199. (The Explore 3 is quite a bit more at $319.99.) You might want to consider getting the Explore instead of the Joy Xtra if:
- You want to cut larger than 8.2 in x 11.7 in with non-Smart materials. The Explore will allow you to make larger t-shirt designs and things like pillow covers, large wall art, and posters.
- You need the scoring tool, which is very handy for paper crafts. I do use mine fairly frequently since it’s so convenient, but it’s not always necessary.
Do I need the Cricut Joy Xtra if I already have a Cricut Explore or Maker?
If you already own an Explore or Maker machine, then you already have all the crafting capabilities that the Joy Xtra machine has. However, if you want an additional machine and can afford to do so, I highly recommend getting the Joy Xtra as well!
After doing one test cut, I was already in love with how lightweight and small the Xtra is and how smooth (and quiet!) it cut.
I’m currently working out of a small bedroom craft room and only keep my machines on my craft table when I’m doing Cricut projects. I can already tell you that the Xtra is going to be my new default machine for quick projects—and it’s going to be a much more permanent resident on my craft table compared to my Maker machines since it takes up half the space!
What’s the best beginner Cricut machine?
This is a loaded question and it really comes down to your crafting needs.
If you have specific crafts in mind that require a Maker machine (if you want to cut fabric or use a deep-point blade for thicker materials, for example), then I obviously recommend purchasing that first, even if you’re a beginner (it doesn’t make sense to invest in a smaller machine that won’t fit your needs).
If you don’t need quite as many features as the Maker but want to still do larger projects (up to 11.5 in wide on a mat), then you could choose an Explore machine.
If most of your crafting is done on a smaller scale (up to 8.2 in wide on a mat) and you want a straightforward Cricut machine to start out with, that’s both affordable and compact in size, I think the Cricut Joy Xtra absolutely fits the bill! Even if you decide to upgrade later on, I still think you’ll love having this smaller machine on hand for its convenience and portability!
What else do you need for Cricut Joy Xtra?
Even though the Cricut Joy Xtra technically comes with everything in the box to make a project (sample materials and a mini weeder), you will want to purchase some additional things to go with so you can keep crafting:
- materials, obviously, whether this is cardstock, vinyl, iron-on, or any of the new products like waterproof sticker sets
- cutting mats: I recommend one of each of the Standard Grip, Light Grip, and Card mat
- some kind of basic tool set with at least a spatula, scraper, and weeding tool (I also like this set that comes with the paper trimmer)
- Cricut Joy foil transfer tool, if you want to add extra shine to your projects
- Cricut Access subscription: you can always upload your own designs to Design Space, but I personally think the best way to maximize your Cricut machine is to purchase an Access subscription, that way you can use anything in the Cricut Design Space library at any time and always have professionally-designed images at your fingertips. Read this post to see if an Access subscription is right for you.
- an EasyPress if you plan on making iron-on vinyl or infusible ink projects: I love the EasyPress Mini and use it all the time for small things, and then I’d say my 9×9 EasyPress is my most-used of the larger size presses (great for shirts)
- a home inkjet printer if you plan on making Print Then Cut projects like stickers: I recently bought this printer and have been happy with the results
- project blanks: Cricut offers a variety of blanks like shirts, tote bags, coasters, and more
For all these different materials, try to catch a good sale on the Cricut website! Having an Access subscription will also save you on your Cricut.com purchases!
Everything You Need to Know About Cricut Joy Xtra

I hope you found this guide helpful! If you’re interested in getting into Cricut crafting or want to upgrade from the original Cricut Joy, I definitely think the Cricut Joy Xtra is worth looking into! The wide range of features and affordable price point of the Cricut Joy Xtra make it a great machine for all budgets and crafting levels.
I’m loving all the things I’m making with it, and I think you’re going to love it too!

Don’t forget to pin and save for later!


I really loved this article! Thanks for such a detailed guide <3
You’re welcome! Thanks for reading, Bianca!