How to Use the Cricut Cutaway Cards and Card Mat 2 x 2
Learn how to use the Cricut Cutaway Cards and Card Mat 2 x 2 with your Cricut Maker or Explore machine! No glue required!
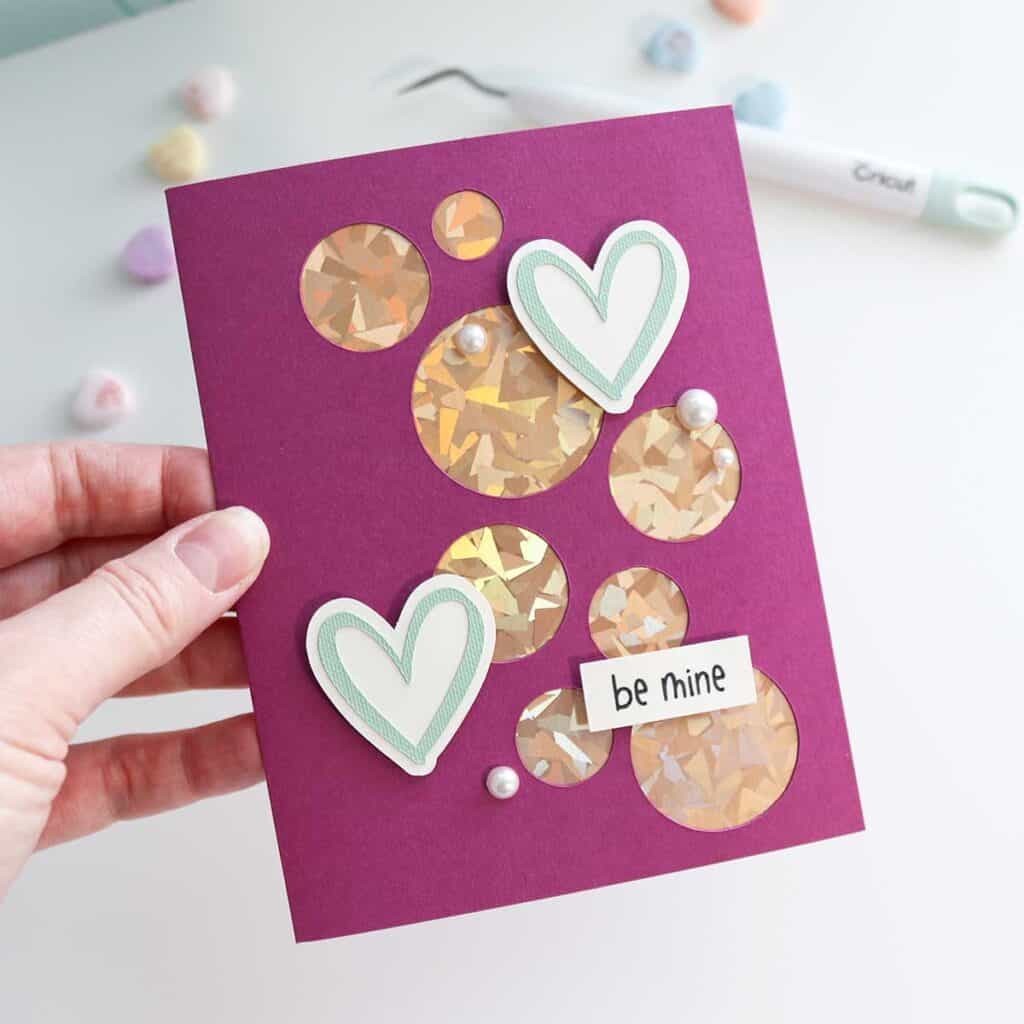
I had never used the Cricut Cutaway cards until I received them in a Cricut mystery box. But they’re actually super easy to use and the results are gorgeous!
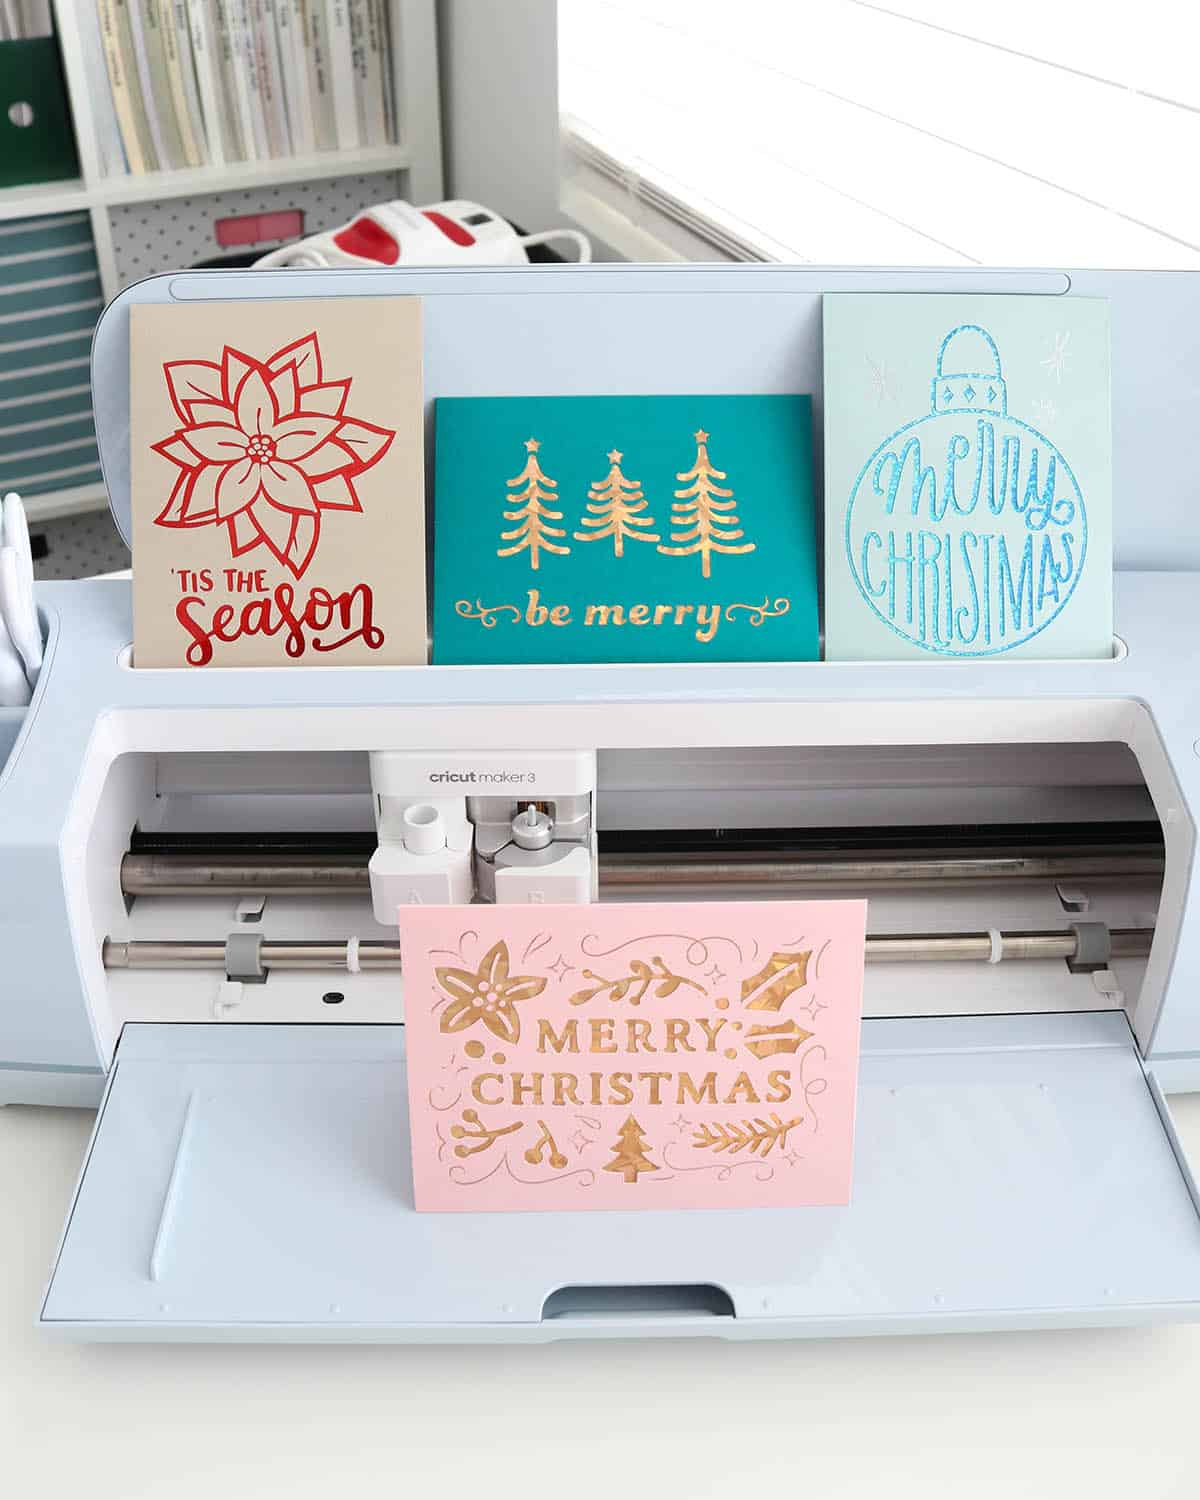
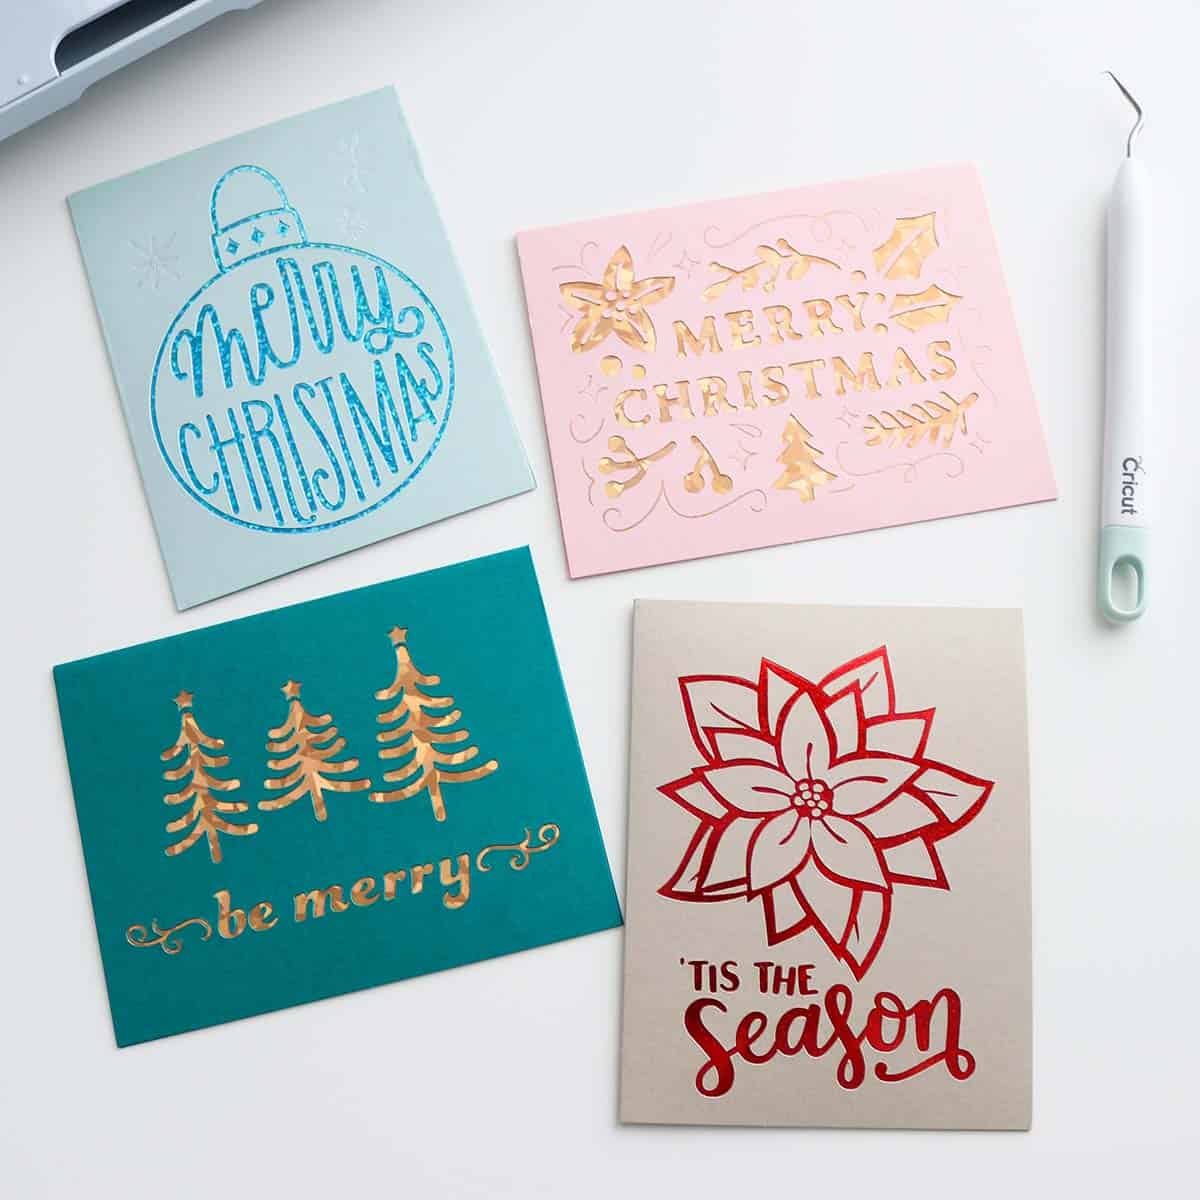
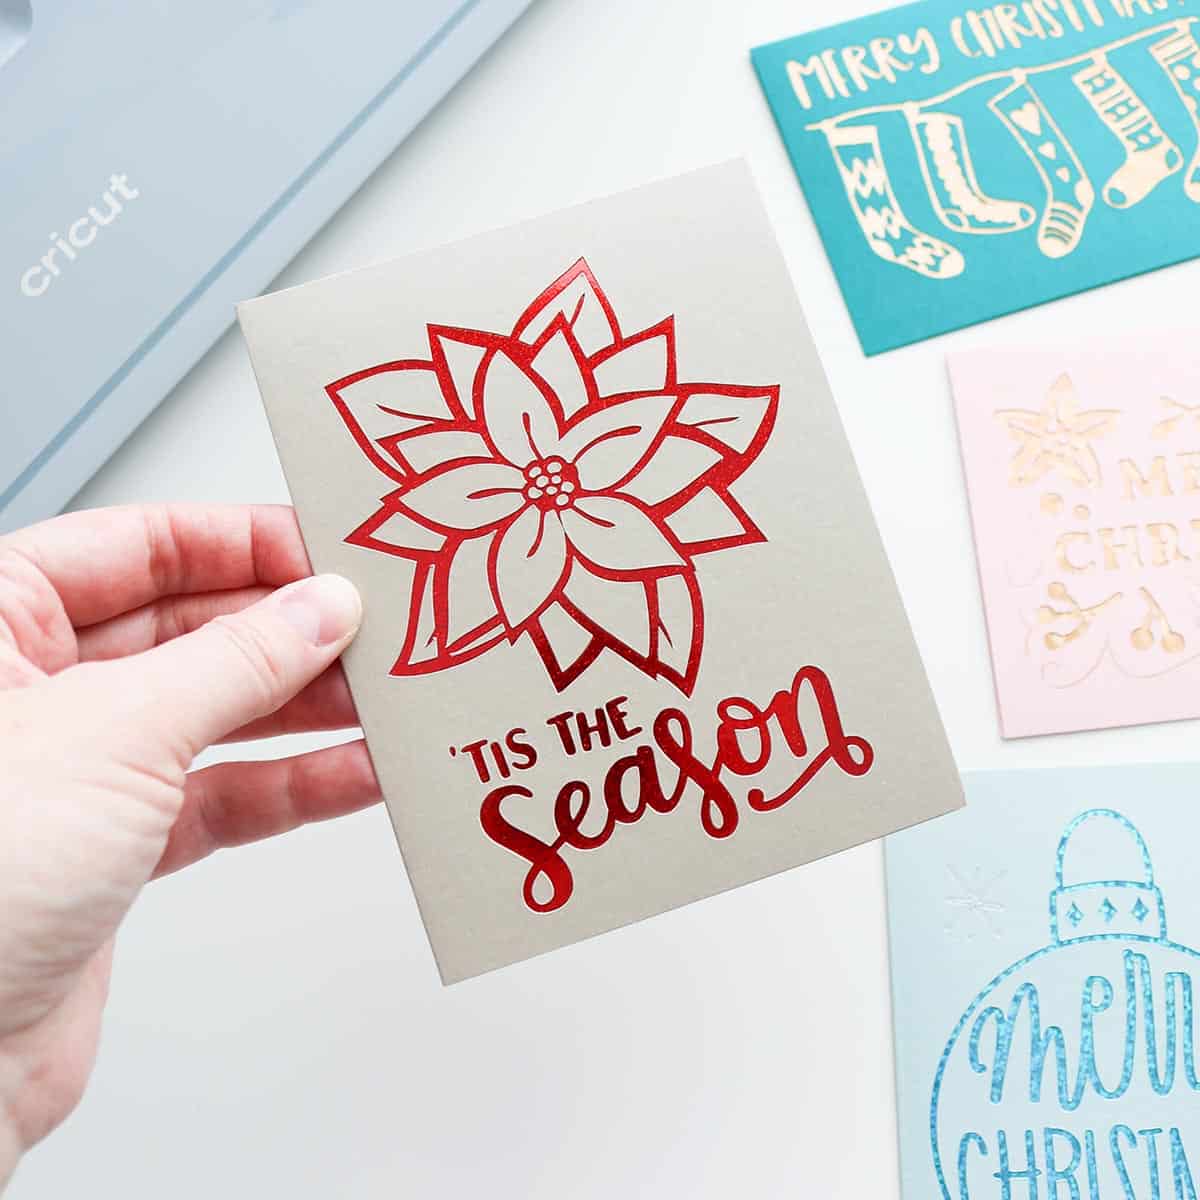
I made these simple Christmas cards and was amazed at how pretty they turned out with relatively little effort on my part. I love that the adhesive in the cutaway cards makes it so you don’t have to glue down all the tiny pieces by hand! Such a fun way to make cards!
Product for this post was generously provided by Cricut, but all thoughts and opinions are my own.
This post contains affiliate links. For more information, see my disclosures here.
What are Cricut cutaway cards?
Cricut Cutaway Cards are pre-made cards that have an adhesive film on the inside front of the card. Each pack of cutaway cards comes with backers that stick to the adhesive so that when you cut your design out of the front of the card and weed the pieces out, the pretty backer shows through. When you set your material settings to Cutaway Card + Backer, your machine will know to only cut through the top of the card and not the backer. Pretty nifty, huh?!
Cricut cutaway cards require a card mat: if you have the Cricut Joy, you’ll use the Cricut Joy card mat. If you have a Cricut Maker or Explore machine, you’ll use the Cricut Card Mat 2 x 2 (which is what this tutorial covers). These mats are awesome at holding your cards in place and make card-making so much easier!
What’s the difference between cutaway cards and insert cards?
Insert cards are another style of pre-made cards that Cricut offers, but they don’t function quite the same as cutaway cards. When making insert cards, you cut slots in each corner of the front for an insert card (similar to a cutaway card backer) to slide in (you can see examples of these designs if you search “insert card” in Design Space projects). You don’t put the insert card in until the card is completely cut, and also there’s no adhesive to hold the card in place (which is what the slots are for, however, I usually still apply a little bit of glue to the pieces before putting the insert card in—just personal preference).
So far, I’m liking the cutaway cards so much better—I just hope Cricut adds more color options for them soon!
More posts you’ll like:
What you need to make Cricut cutaway cards
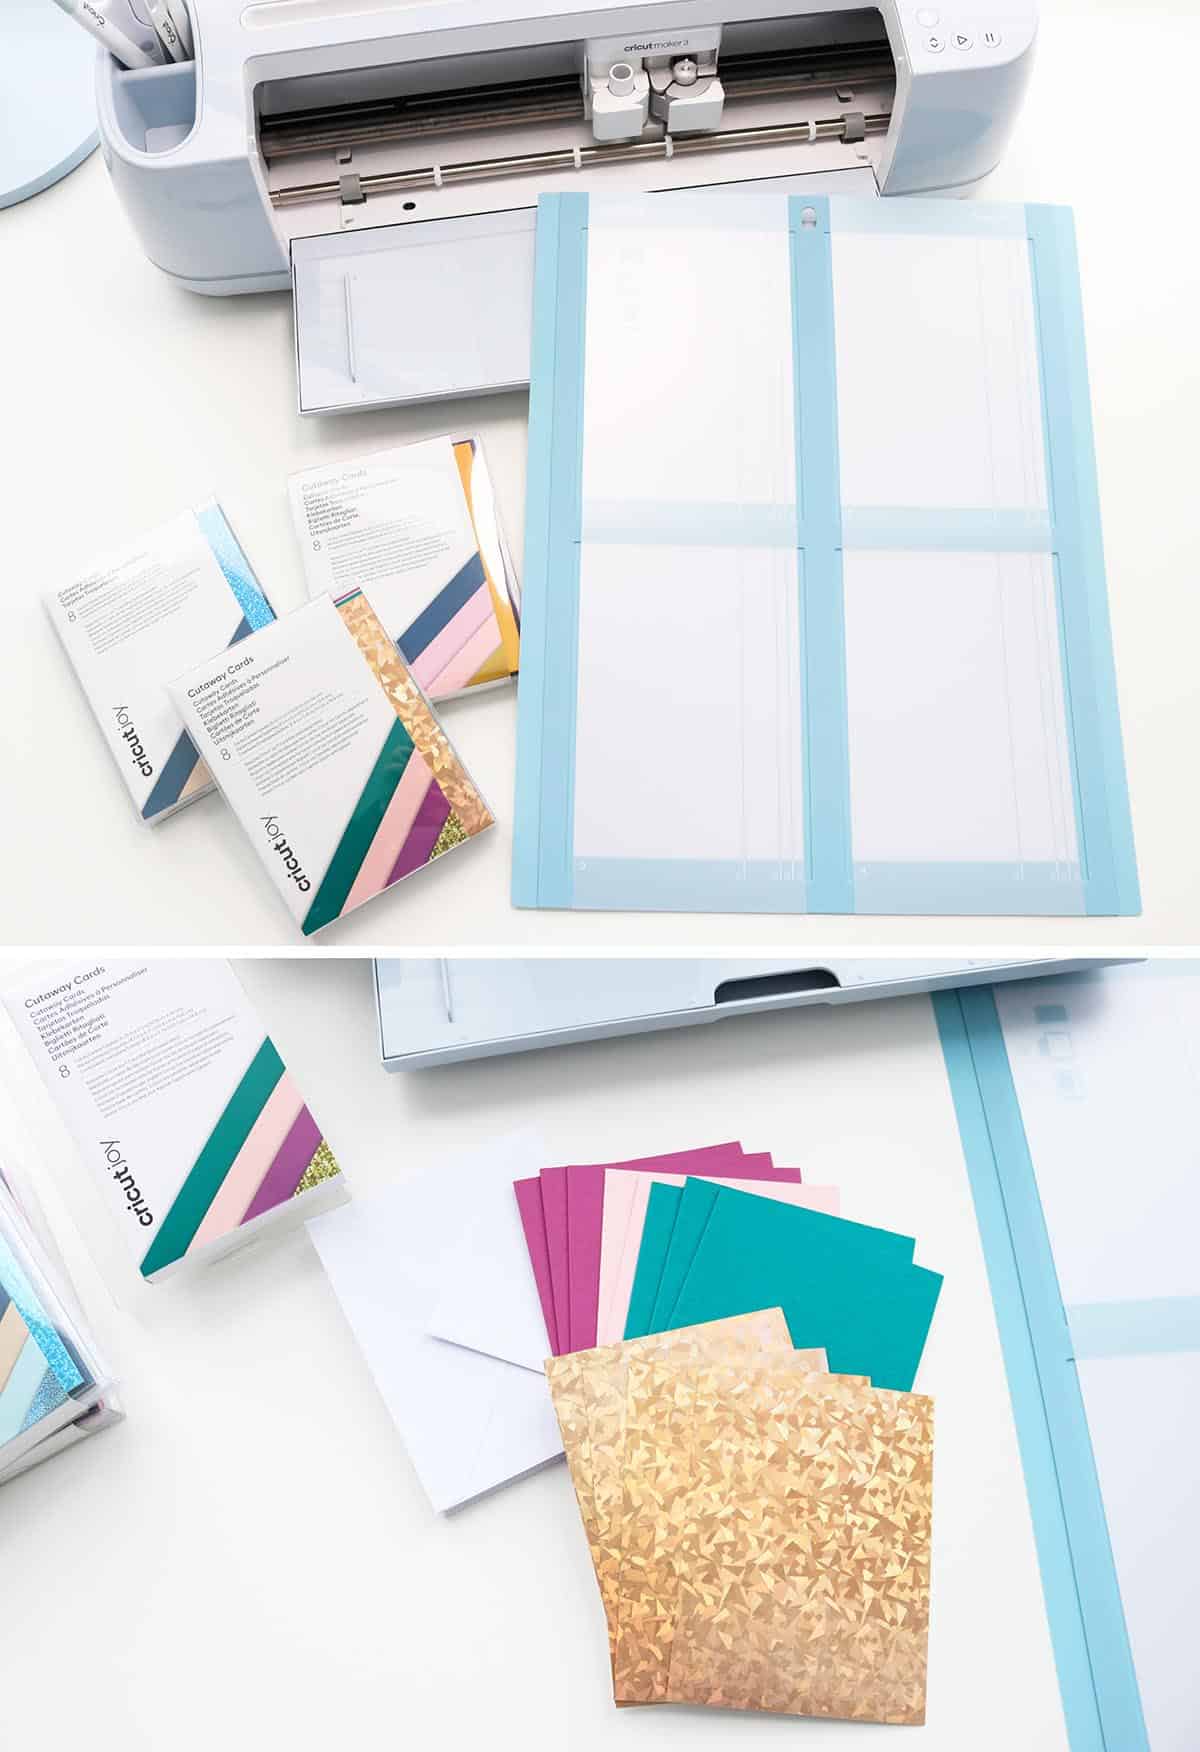
Cutaway Cards: For the cards pictured in this post, I used the Cricut Joy Corsage Sampler pack and the Cricut Joy Marina Sampler pack (even though they say Cricut Joy, they work on Cricut Maker and Explore machines too, now that there’s the 2 x2 card mat). All cutaway card packs come complete with the adhesive cards, backers, and even envelopes—how awesome is that?!
Cutaway Card Mat 2 x 2 (this is the mat designed for Cricut Maker and Explore machines)
a Cricut machine: I’m using the Maker 3
a Cricut Access subscription: check out my post all about Cricut Access if you have questions!
a weeding tool: I really like using the hook weeder in this weeding tool set
Cricut pens/markers, foil transfer tool, foil transfer sheets (optional)
extra cardstock, sparkle paper, etc. for custom backers (optional)
How to make Cricut cutaway cards
Design your cutaway card project
Start a new project in Cricut Design Space (or, if you want to use my Christmas card designs in this post and skip the next couple steps, you can find my Design Space project here).
Click on Projects in the lefthand toolbar and search “cutaway card design”. Click on the first one that comes up. In the drop-down, select your card’s finished size and then click Customize.
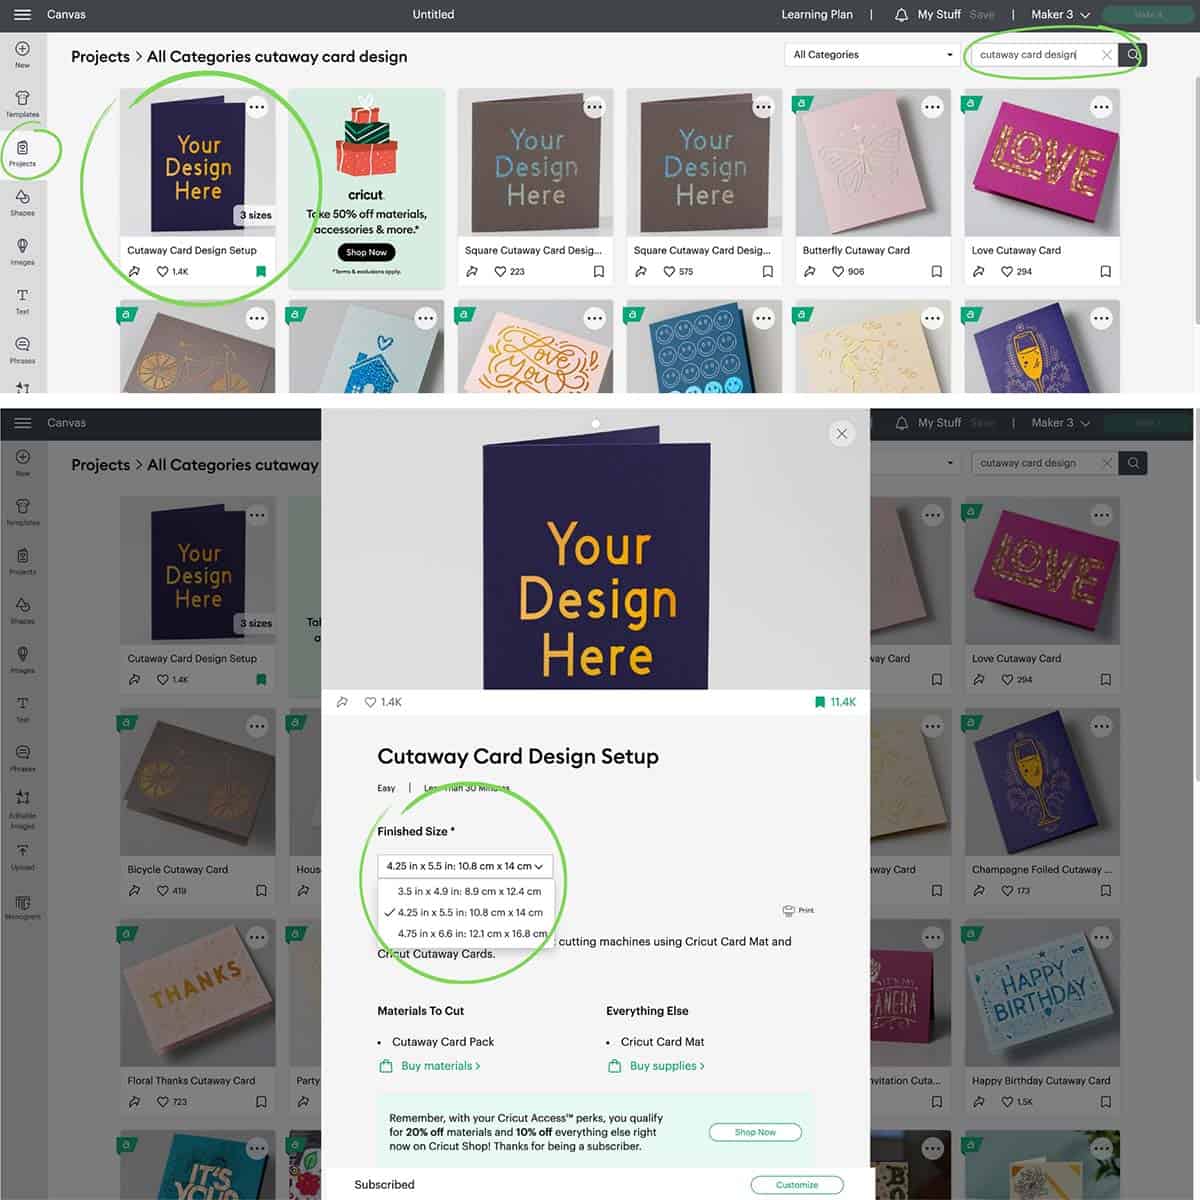
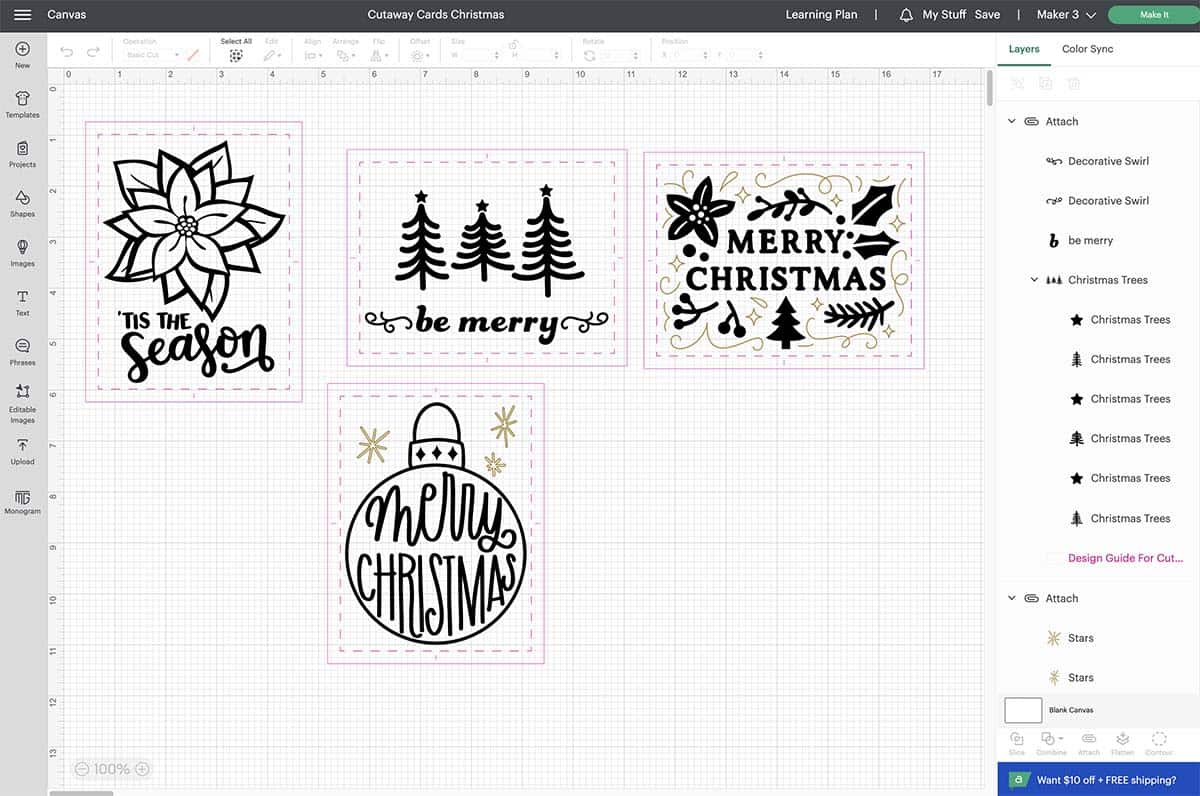
On the canvas you will see a guide for the card: a rectangle with a smaller dotted rectangle inside giving you a 0.25″ margin. You will want to keep any designs/images within the dotted rectangle (the card’s adhesive only goes this far, so if you extend past it, those elements won’t be adhered to the backer).
You can duplicate this guide and rotate it as needed. Because this is only a guide, you don’t need to worry about deleting or hiding this before going to cut your cards—but you can if you want to.
Add images, text, drawing, and/or foil elements to your card template. (This is where an Access subscription is SO awesome! See more tips on designing cutaway cards below.)
Once you’ve completed your card design, select all the elements (either by highlighting all of them together or selecting them in the layers panel using your “shift” key) and attach them so your card cuts with the same positioning that you have on the canvas. (I included the guide when I attached since it was easy to just highlight it all together, but it’s actually only necessary to attach the actual elements of the card design.) If you have multiple cards on the canvas like I do, make sure you’re only attaching one card’s elements at a time (you don’t want different cards attached to each other).
Click Make It and select On Card Mat as your material loading preference.
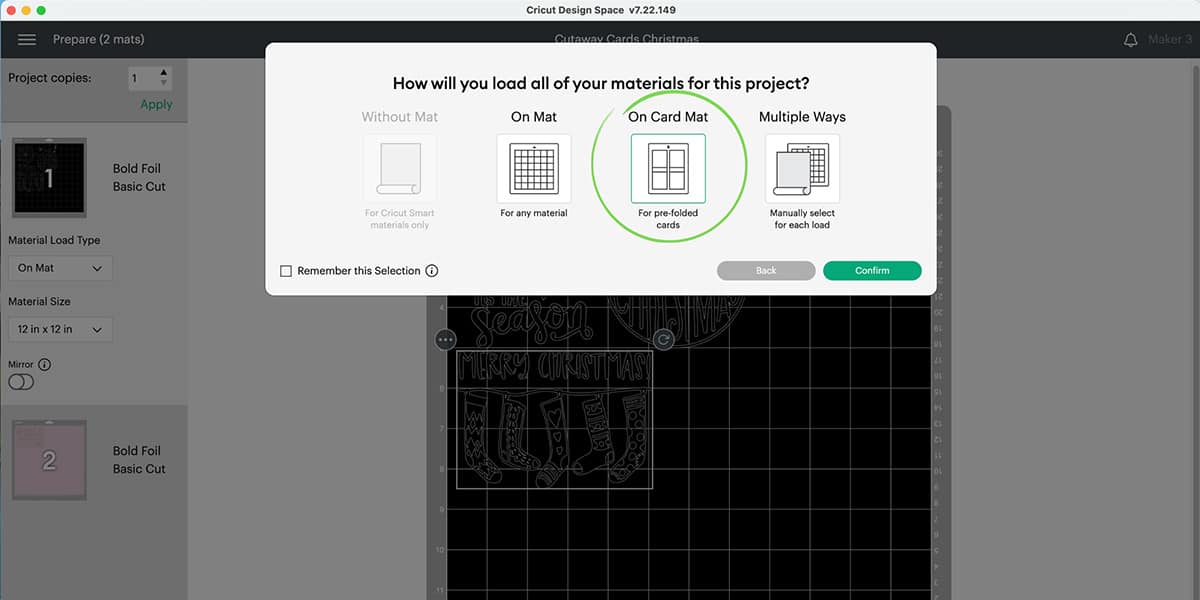
Continue to the next screen where you can adjust project copies (fabulous if you’re mass-producing cards!) and make sure your material/card size is correct. Also, if you have different colors for the cut elements on the canvas, the cards will show up on different color mats here (the foil and pen color does not matter for this).
If you’re only cutting a few different cards, you can easily move them to the same mat to save space/time. Click on the card design you want to move, then click on the 3 dots and select Move object. Finally, select the new mat you want to move the card design to.
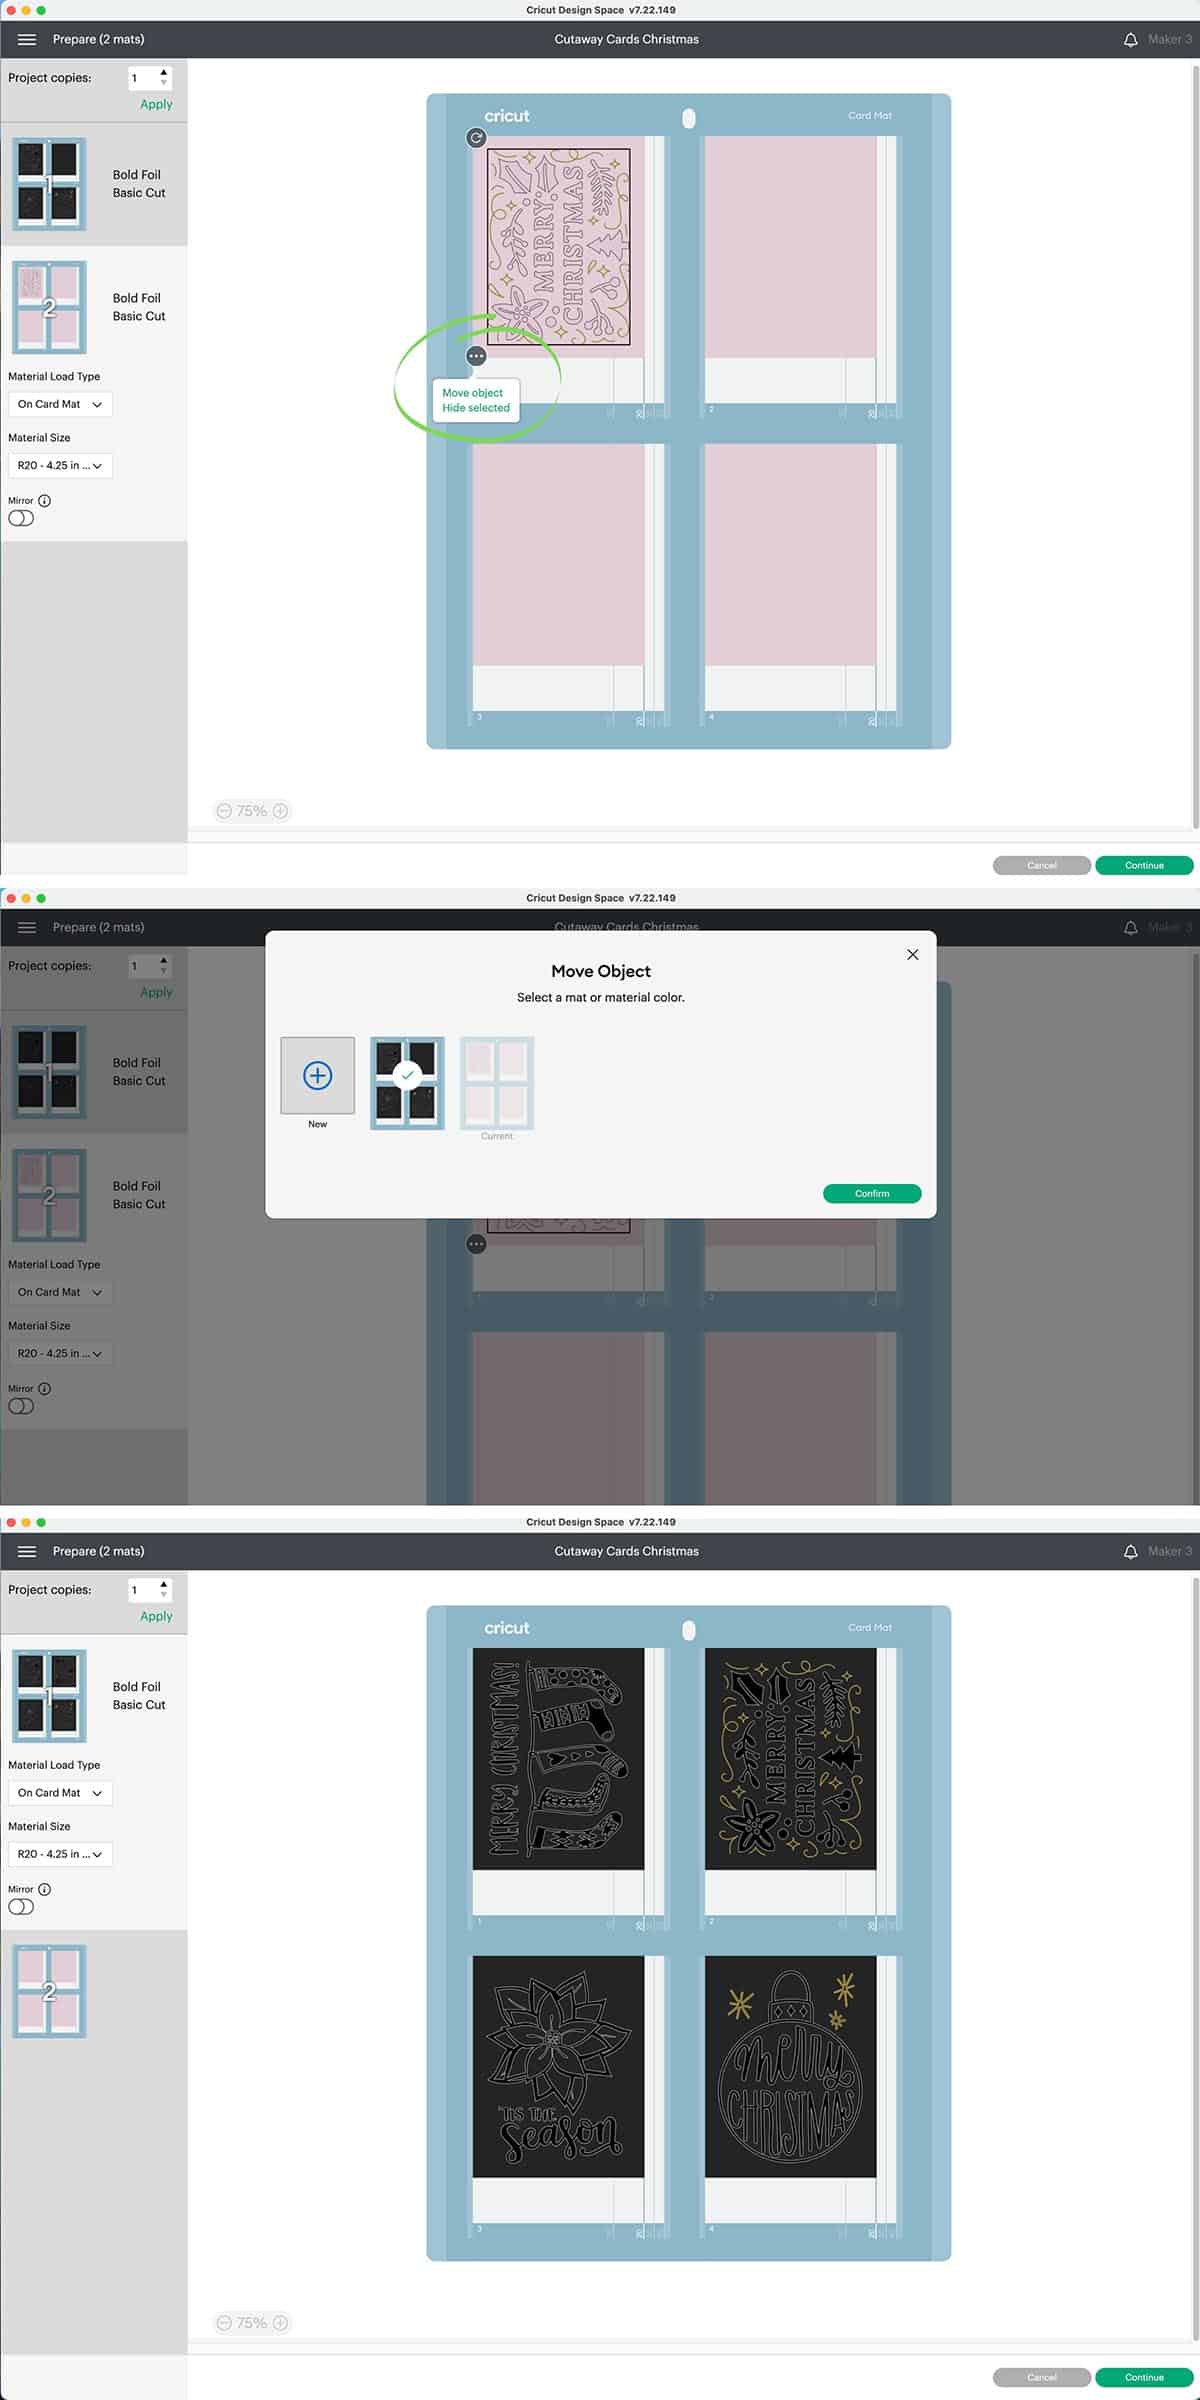
(Just be sure to pay attention to which cards go where if you want to use different material colors. Also, I will say that Design Space does a much better job of centering the designs for you, so, if you want them all on the same mat, it might be better to just make them all the same color on the Design Space Canvas so you don’t have to move anything. And you can still put different colors of material on the actual mat, of course.)
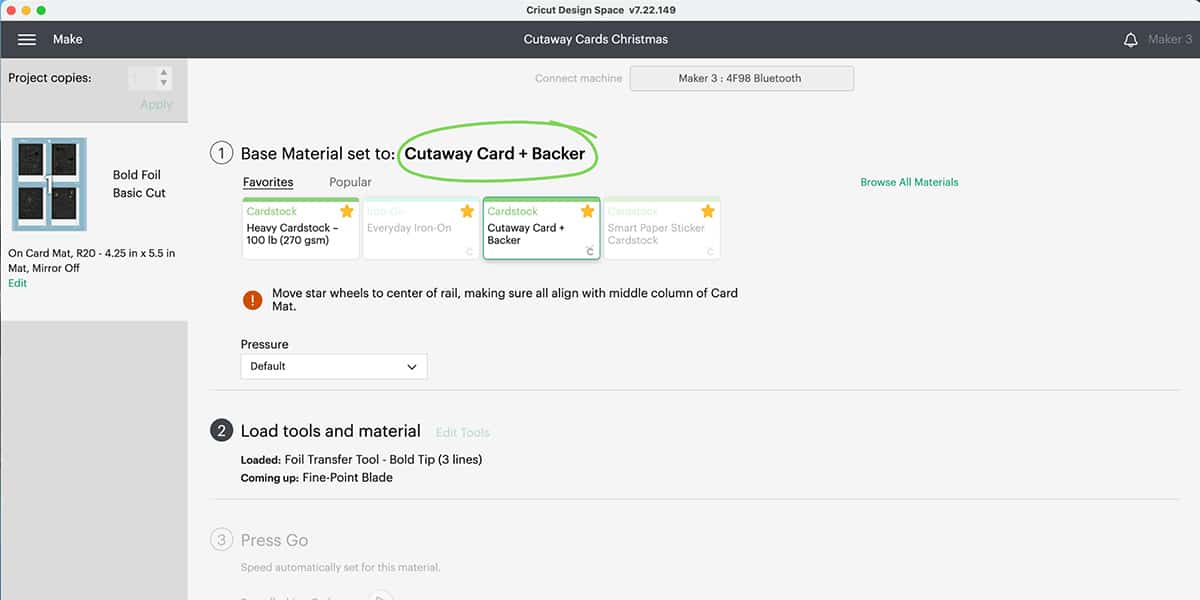
On the next screen, click Browse All Materials and find Cutaway Card + Backer (click the little star next to it if you want to make this a favorite so it always shows up on the materials screen, that way you don’t have to search for it next time you make cutaway cards).
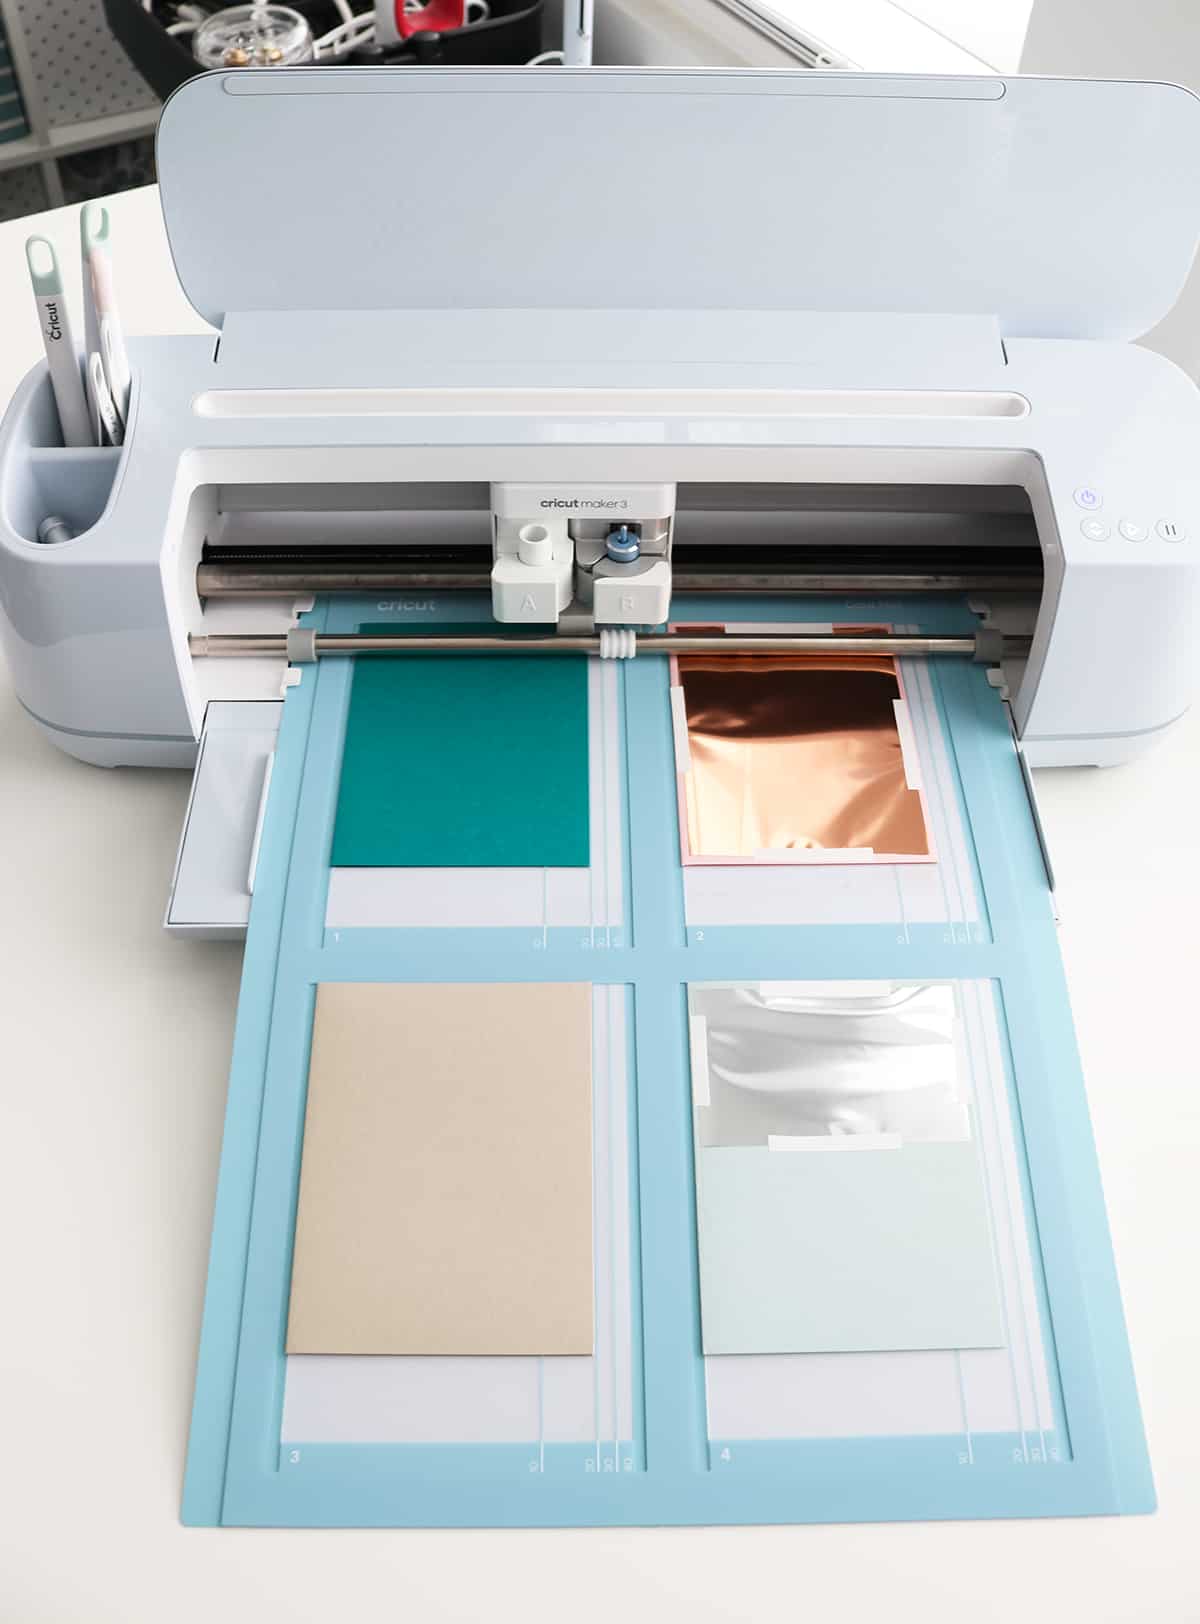
Load your tools you’ll be using into your machine. Load your card mat with the cutaway cards you’ll be cutting (more details on how to do this in a second).
IMPORTANT: Before you load the card mat into the machine, move the star wheels (the 4 white wheels along the rail) to the center so they go in the center of the card mat and don’t leave marks on your cards.
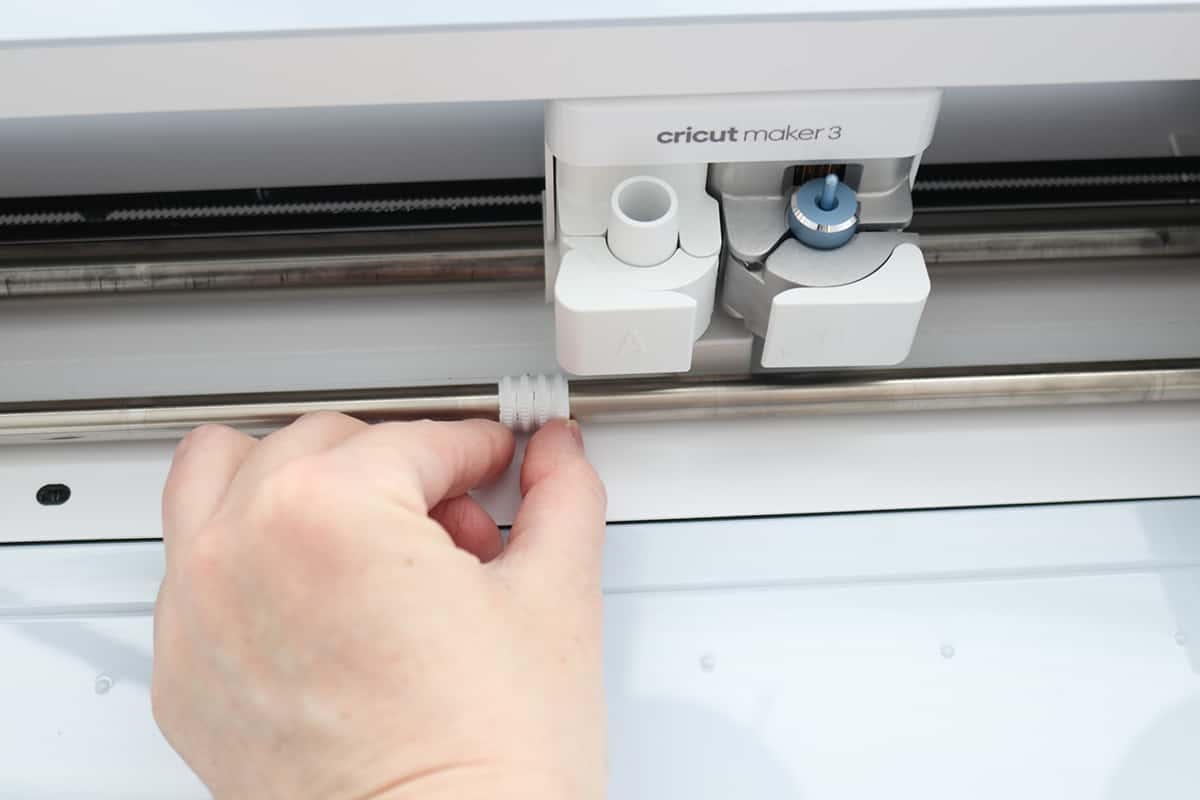
(Oops…I needed to move the wheels a little more to the right so they’d be centered over the middle blue part of the mat, but obviously I wasn’t paying attention before I pushed the load button..)
Load the mat into your machine, follow the prompts in Design Space, and let your machine work its magic!
How to use the Cricut Cutaway Card Mat 2 x 2
Remove the protective sheets on both sides of your 2 x 2 mat. BUT FIRST, if you’re OCD and want to know exactly where to place them again later and which side should be face down (to avoid getting dust on that side), use a fine point Sharpie to mark it first: I just marked the little numbers in each corner.

Now you can remove the protective sheets. (I do the same thing with the sheets for my regular cutting mats, marking the + in the center and writing on it if the mat is for vinyl—paper tends to wear out your mat faster so I keep them on separate mats.)
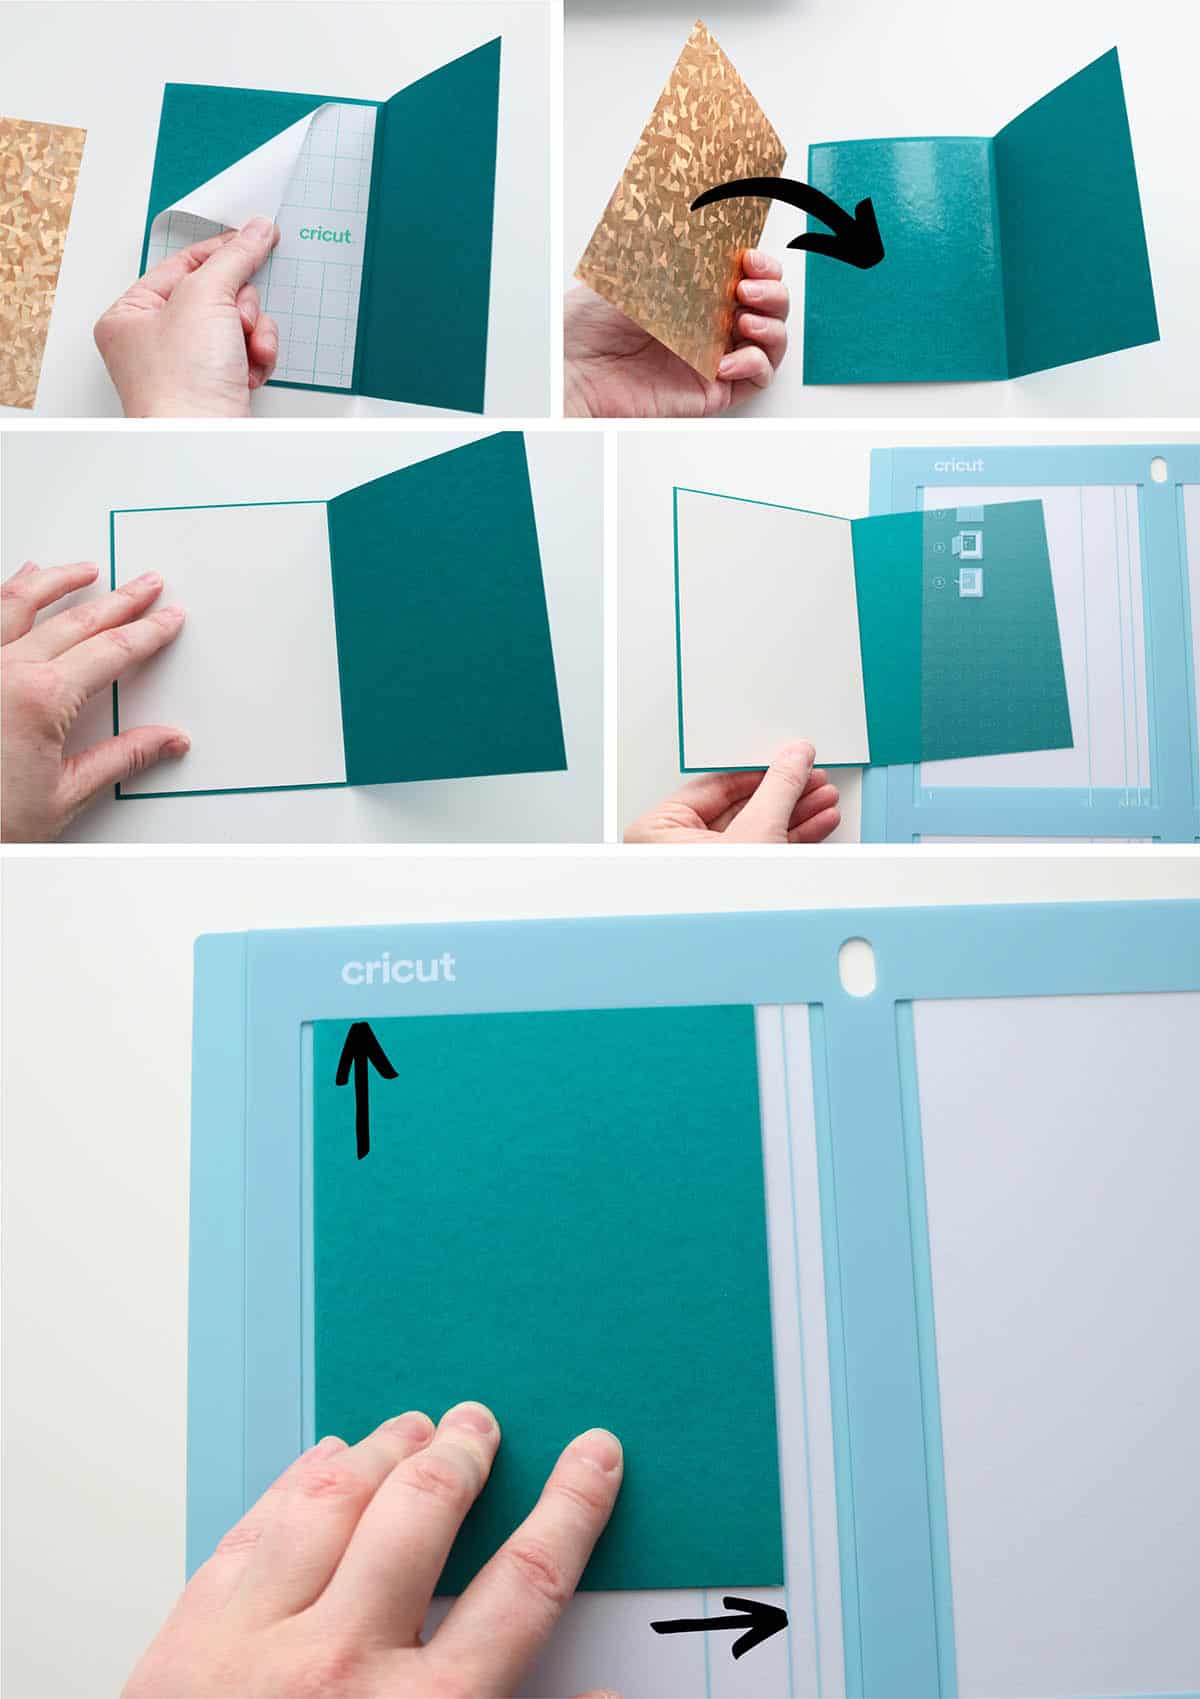
Before inserting a cutaway card, open it and remove the adhesive liner from the cover. Place a backer PRETTY SIDE DOWN onto the adhesive, centering it as much as you can.
To insert your cutaway card into the mat, simply lift the clear plastic part and slide your opened card in (with the front of the card with attached backer on top of the plastic). Push the card all the way to the top and make sure the fold is snug against the clear plastic (so you’re pushing the card up and to the right as far as it will go). There are also line guides marked 10, 20, 30, and 40 for different cutaway card sizes, just make sure your card is lined up to the correct one.
Press the card down on the mat—you can use a brayer tool here if you want.
There are four card slots on each 2 x 2 mat, so you can insert up to 3 more cards like this.
How to use Cricut pens with cutaway cards
To add pen details to your project in Design Space, select an element/layer from the layers panel and change the “operation” (dropdown in the top toolbar) to Draw–pen. If you want, you can select the square next to operation and change the pen weight and color (this is mostly for you to see a preview on the Canvas but it doesn’t affect how your machine actually draws, as far as I know).
Click “make it” and follow the Design Space prompts. Choose your base material, then load your pen into Clamp A and your blade into Clamp B. Load your mat into your machine and press the start button. Your machine will draw the pen elements first.
DO NOT remove your mat from the machine at any point during this process (if you do, you’ll risk changing the position of each operation and your end result won’t be centered). Continue to follow the prompts until all operations are completed.
How to use foil transfers with Cricut cutaway cards
Similar to drawing, you can change the operation type for elements on the canvas to Foil, then choose Fine, Medium, or Bold (the foil transfer kit comes with 3 different size tips, so choose the one you want and then load it into the foil transfer tool housing—follow these instructions if you’re not sure how to do that).
Click “make it” and follow the Design Space prompts. Choose your base material, then load your foil transfer tool into Clamp B.
Before loading your mat into your machine, tape foil transfer sheets over the cards that will have foil elements. You can use the tape that comes with the transfer sheets (cutting it into skinnier strips if needed) or you can use a similarly-gentle tape, like washi tape. For best results, tape along the entire edge of the transfer sheet and make sure it’s taut.
Load your mat into your machine and press the start button. When it’s done, you’ll be prompted to remove the foil sheet and replace the foil transfer tool with the fine-point blade. DO NOT unload the mat from your machine during this process.
Once the foil sheet is removed and you’ve loaded the fine-point blade, you can press start again to finish your card.
How to use multiple different tools with Cricut cutaway cards
If you want to use a combination of tools (like both pens and foil), the process is the same as above, you’ll just be loading different tools at different times until each operation is completed. Follow the Design Space prompts to know when and which clamp to load the tools in. Remember, do not remove the mat in between these operations or you’ll ruin your positioning! And don’t forget to remove the foil transfer sheet after foiling—I may or may not have made that mistake once!
Once your machine is finished cutting, unload the mat and gently remove the cards.
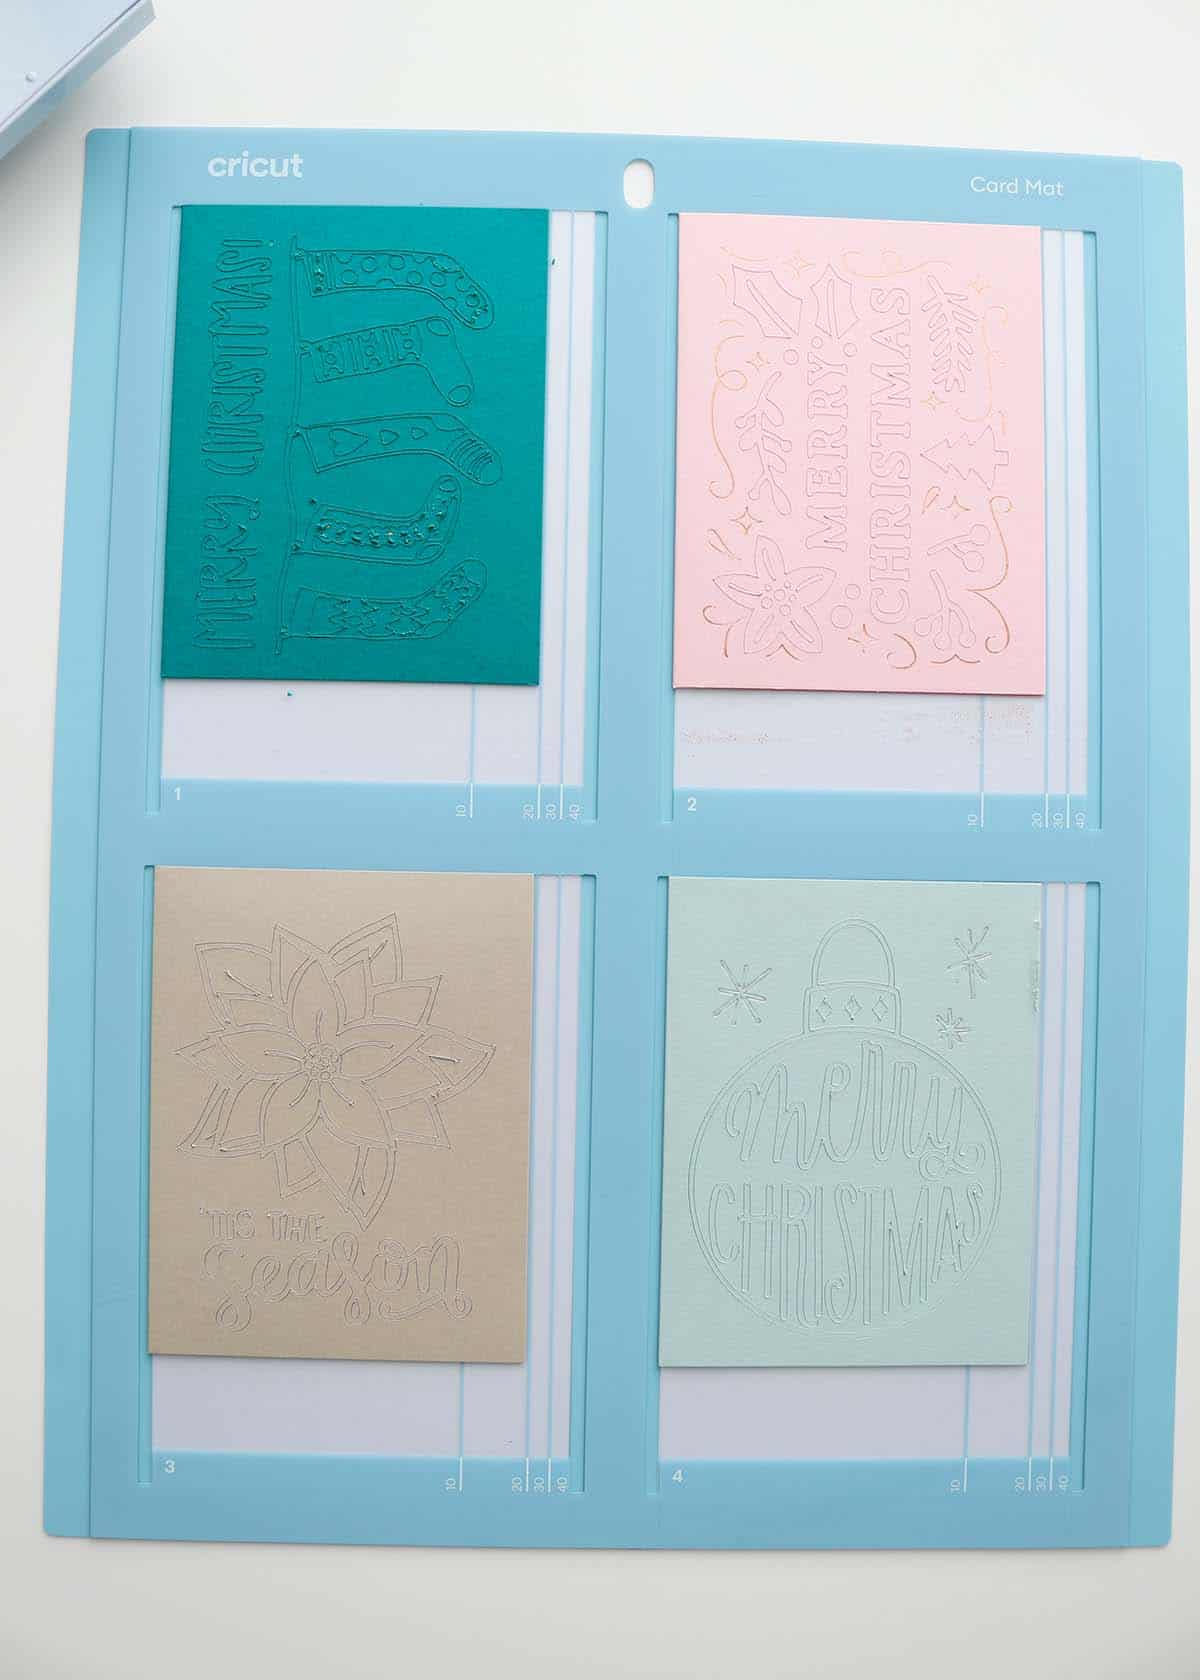
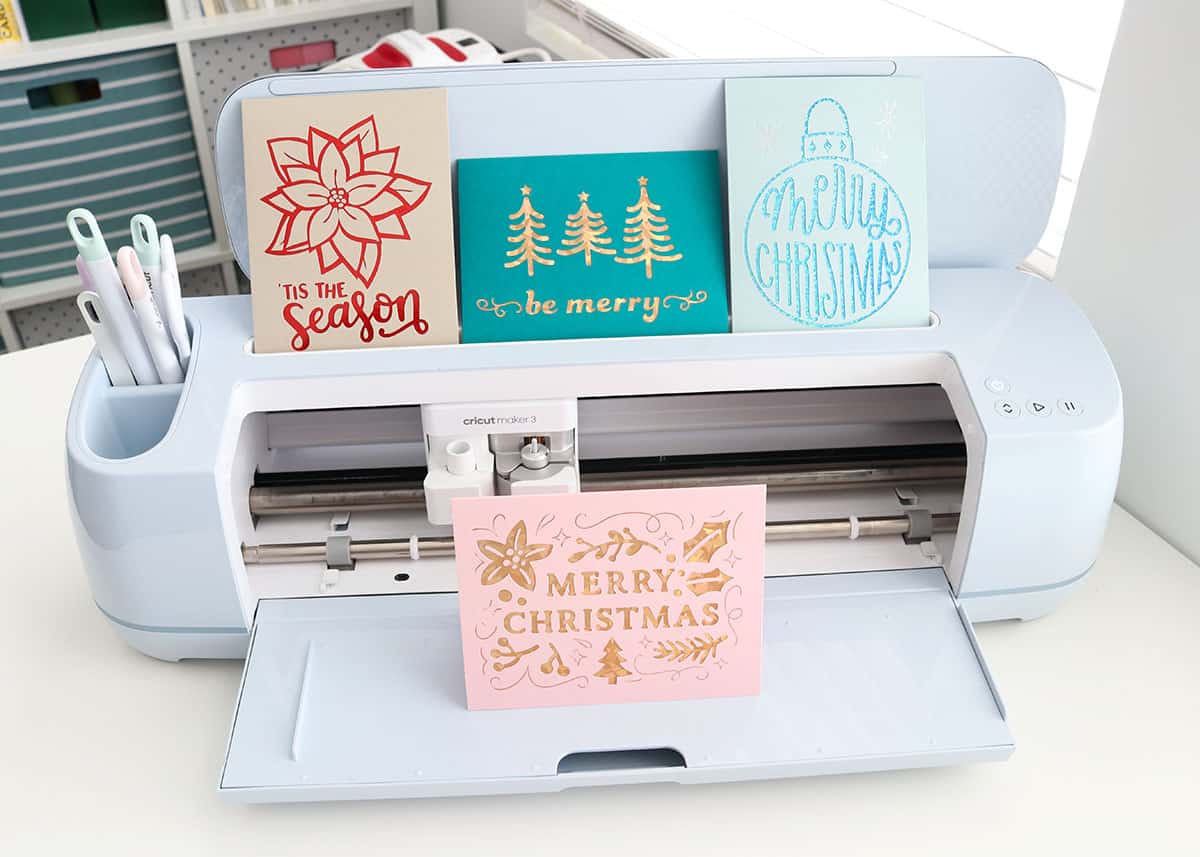
These cards foiled and cut fairly well…except the dark green card at the top left, but I’ll talk about that near the end of the post (and you may have noticed I’ve since replaced it with a better card design in my Design Space project).
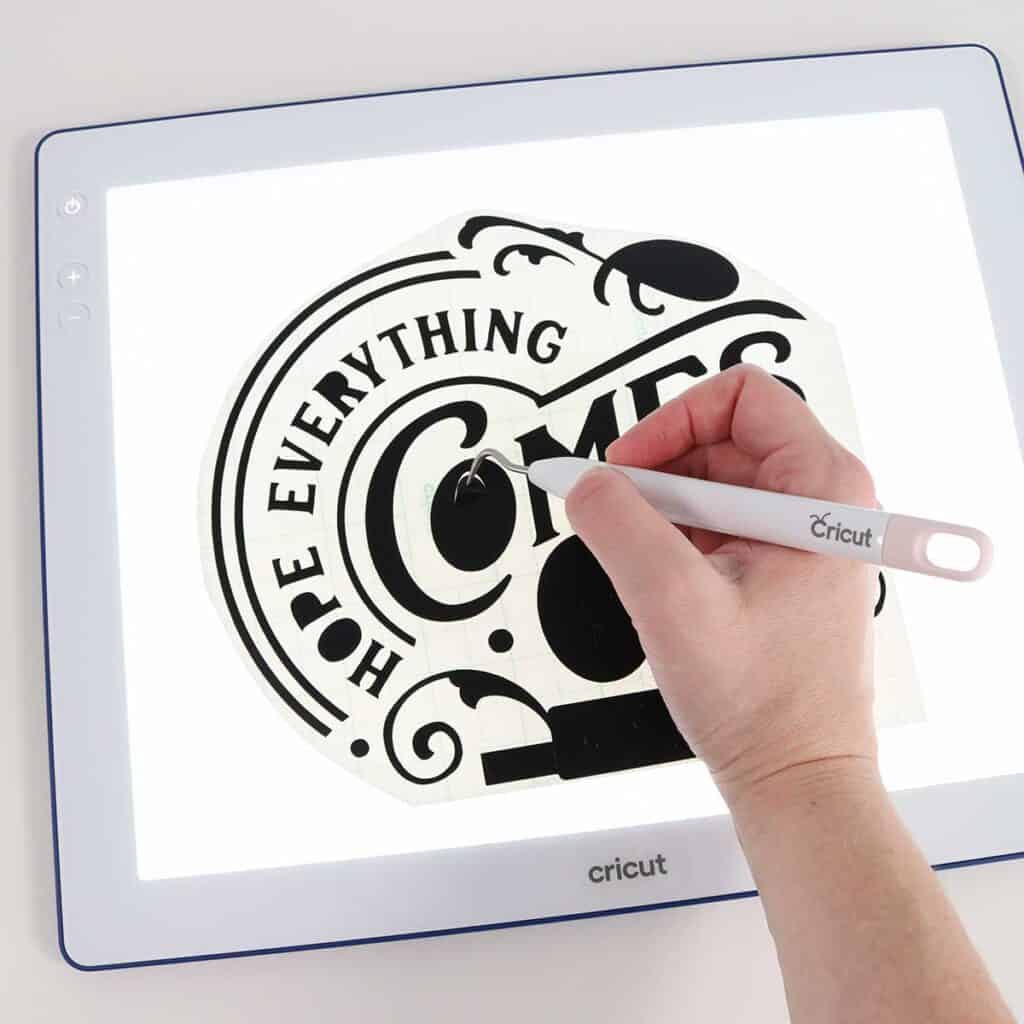
How to weed cutaway cards
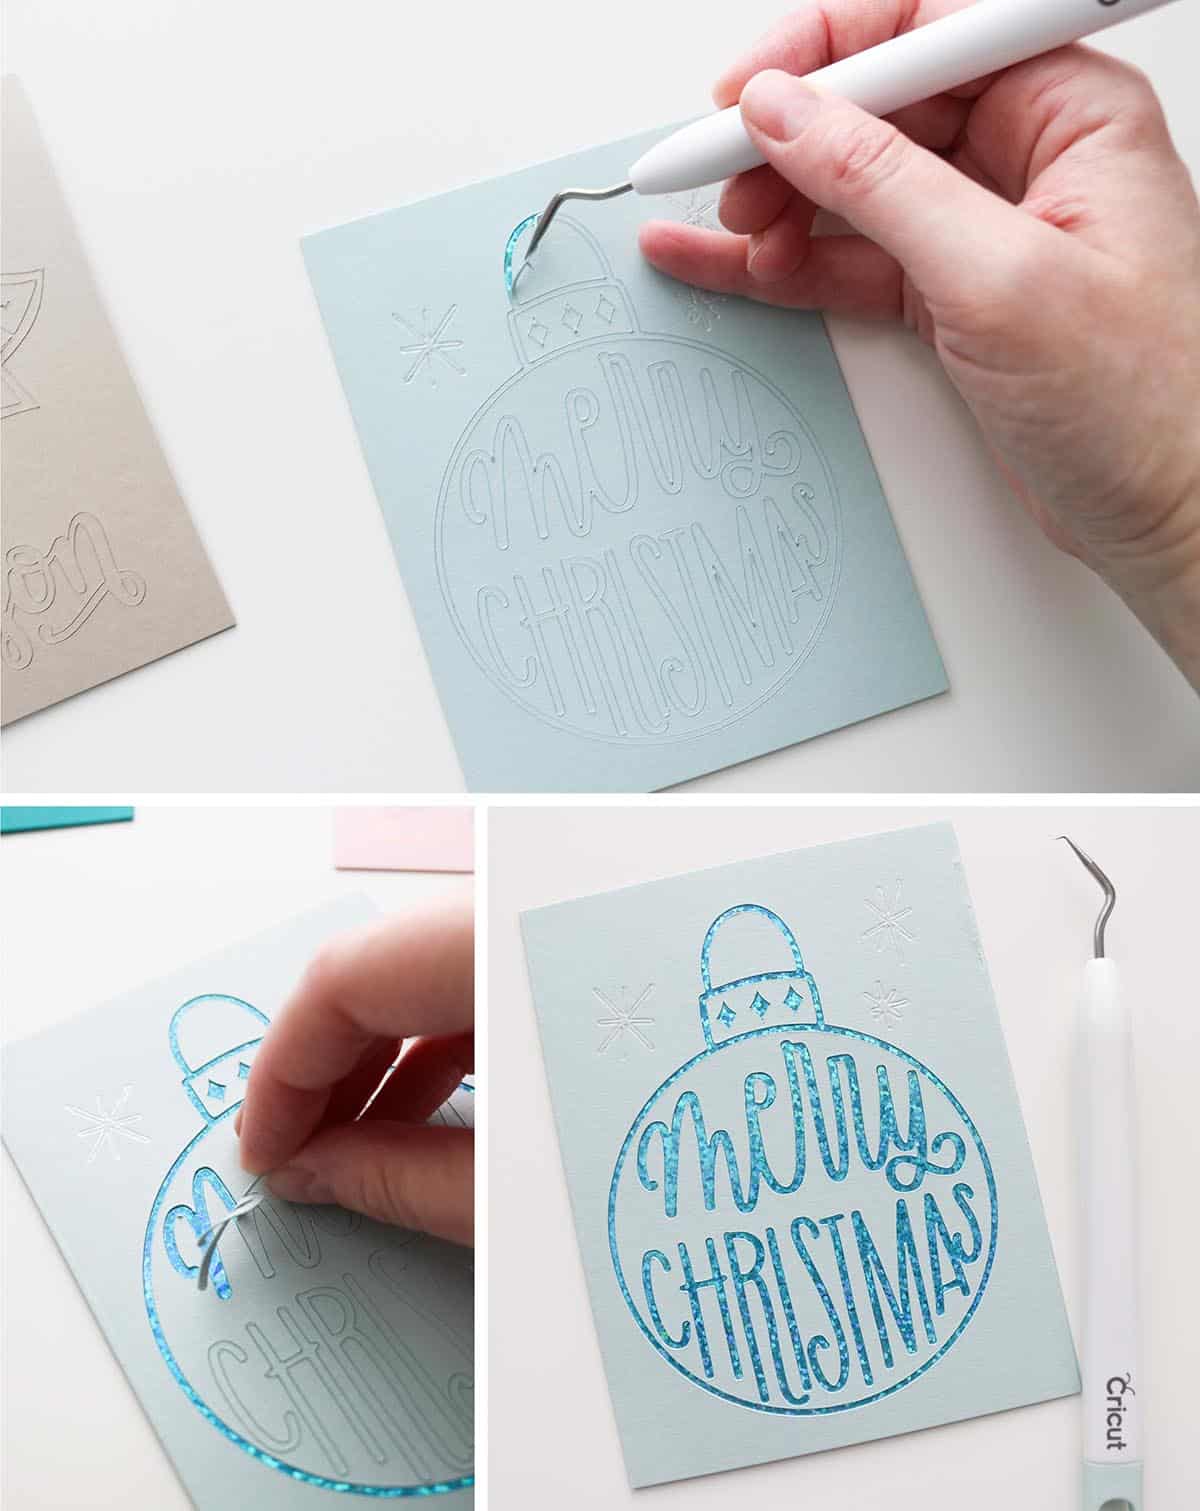
The final process of making cutaway cards is to weed the elements that were cut from the front of the card. This is a little bit different than weeding vinyl since the backer is easily scratched and indented, so you’ll need to weed carefully. Use your fingers as much as possible to remove the cutouts, but you’ll need a weeding tool for smaller pieces. I like the hook weeder best for this.
When using the weeding tool, try to stick the tip just along the edge of a cutout and don’t use too much pressure or you’ll scratch the backer. It takes a little practice—I’m still not perfect at it!
Sometimes you can get your weeding tool to hook the inside layer of the cardstock and that will be enough to pull the piece away so your tool doesn’t even touch the backer card. You can also try gently bending the card (not enough to crease it) and use your fingernail to lift the edges of pieces to remove them.
If you lose a tiny piece with the scraps, use tweezers to gently pull it away and place it back on the card.
Fun and totally optional tip: if you’re gentle enough removing the cutouts, you can save them to be used in another project! I whipped up a couple of simple gift tags with some of my pieces (the adhesive got touched too much—*cough, toddler escapee*—so they did need a little bit of glue at that point).
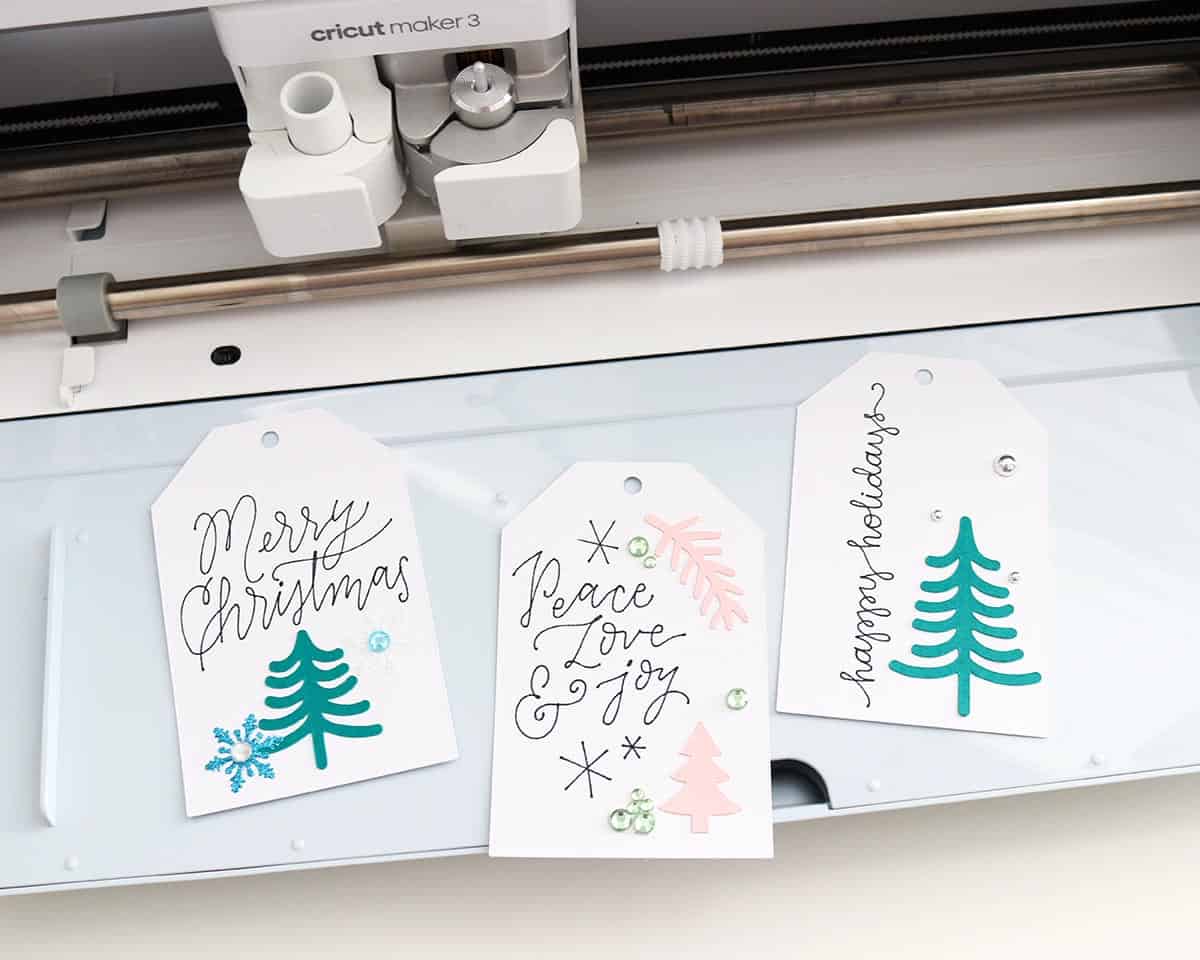
You can find the Christmas tags project in Design Space here.
Tips for choosing cutaway card designs
When designing your own cutaway cards, don’t choose images that are too intricate. I tested the stocking image below (and it’s pictured in some of the screenshots above), but I knew my machine wouldn’t do great with the tiny pieces—the adhesive on the cutaway cards isn’t strong enough for that level of detail, and they kind of just get pushed around when cutting. (And if they do cut correctly, they don’t stick to the backer.)
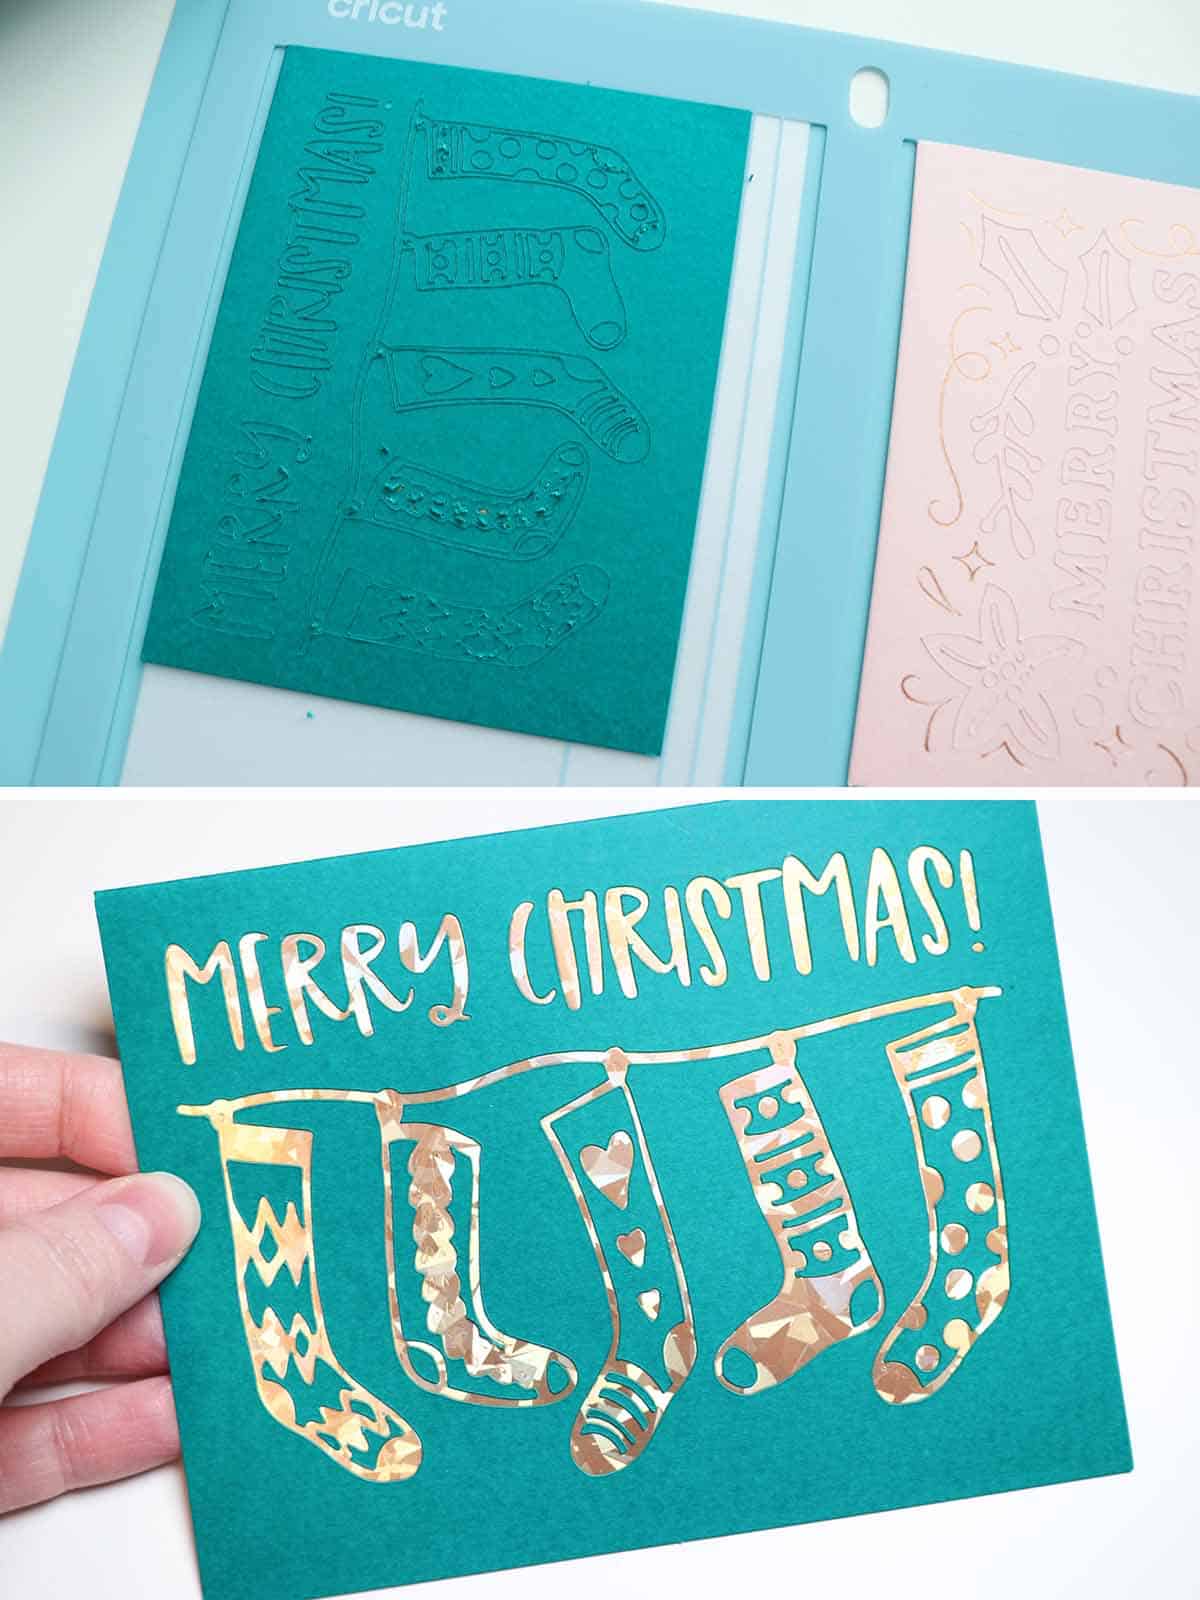
Try to look for images that are fairly simple. If you’re totally new to this, I recommend doing one of the pre-designed projects in Design Space as a test so you can get a feel for how these cutaway cards work (or try one of my Christmas card designs). Or…if you’re stubborn like me and want to try a more intricate design, just be okay losing some of the smaller details. (My stocking card still looks decent, but you can tell it’s missing the smallest pieces—it won’t be a repeat design for me.)
Can you make your own backer for Cricut cutaway cards?
Yes! This is really easy to do! I recommend using one of the backers as a template so you know what size to cut (for the 4.25 x 5.5″ cards, the backers are 4 1/8″ x 5 3/8″). Then use your handy paper trimmer to cut your material to size.
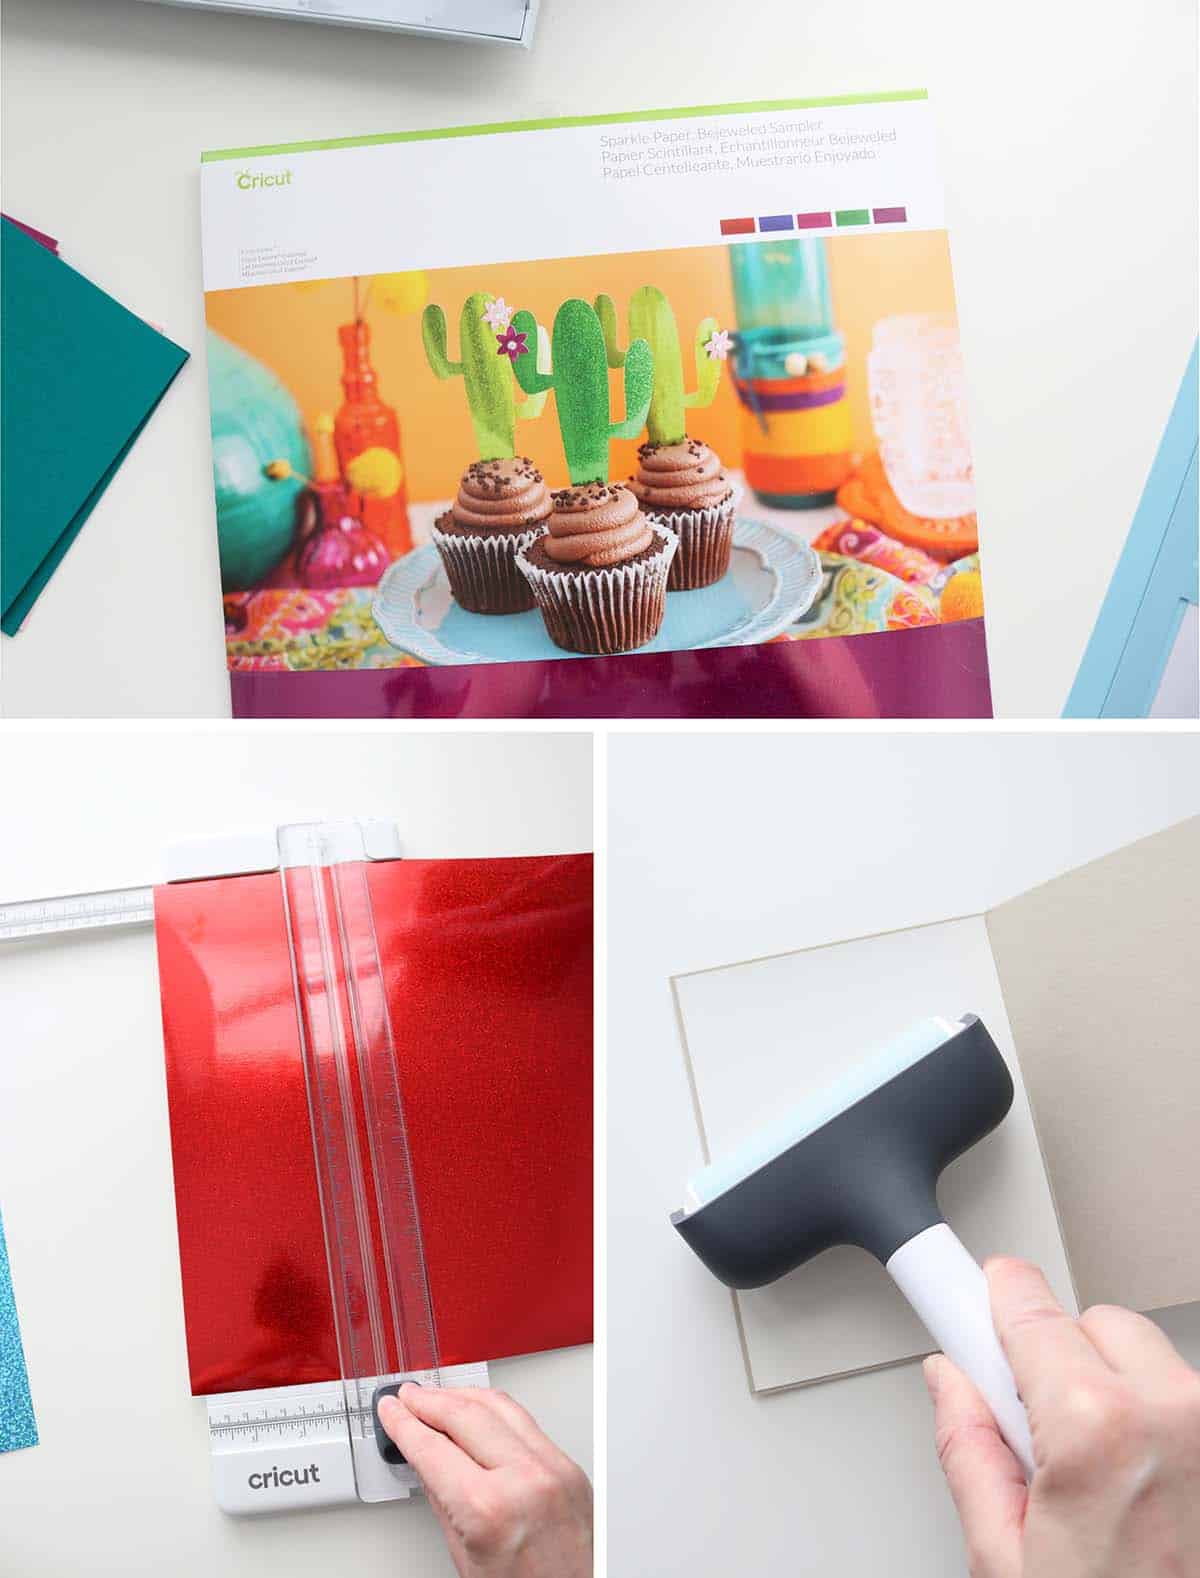
I used a sheet of red sparkle paper for my poinsettia card and it turned out so pretty (I wish you could see just how shimmery it is in person!). (Sadly, I don’t think Cricut sells the sparkle paper anymore! It was something that came in a Cricut Mystery Box, I believe).
How to make cutaway cards with Cricut
There you go! I hope this tutorial was helpful! Don’t be intimidated by cutaway cards because they’re super easy and fun to make…I think you’re going to be addicted after making just a few.
Let me know if you have any questions in the comments—I respond to all of them!
Happy crafting!

Don’t forget to pin and save for later!
Thanks for the tips!!
You’re welcome! I’m glad you found it helpful!
Thank you for taking the time to make this post! It’s so thorough and will help me make some of these. Blessings to you and your family during this holiday season!
Thank you so much, Cecie! ❤️ I appreciate you being here and I’m happy to help! Merry Christmas!