How to Organize Scrapbook Paper (and Scraps!)
This is the most efficient way to organize scrapbook paper and cardstock! Plus, I’ll show you how to organize scrapbook paper scraps. Use these storage ideas for 8.5×11, 12×12, and scrap paper! You’ll love how little space it takes up!

This post contains affiliate links. For more information, see my disclosures here.
My scrapbook paper storage has gone through a lot of trial and error over the years. It has now evolved into something I absolutely love!
This latest storage method feels 100% organized and accessible, which is a big deal, especially when it comes to finding that one random sheet of paper that has the little llamas all over it. Just kidding. I only wish I had that paper.
The big secret to storing scrapbook paper efficiently
Go vertical! Seriously. It will change your life.
It drives me a little crazy every time I see those uber-organized craft rooms with wall-to-wall Sterilite containers with horizontal drawers. Ah! The wasted space! (To clarify: I say this for paper storage. Plastic Sterilite organizers are super handy in other situtations, and I use a bunch throughout my craft room for other items, just not paper.)
Your paper will take up so much less room if you go vertical, not to mention it will be so much easier to flip through. I made the switch about 10 years ago and I haven’t looked back. I even store my scraps vertically (we’ll get to that).
Looking for more craft room organization ideas? Check out these related posts:
13 Random Items You Should Keep in Your Craft Room
What you need to store scrapbook paper properly
- magazine holders or storage boxes large enough to fit 12×12 paper
- dividers for the magazine holders (you can make your own or purchase something similar to these)
- a label maker, optional but super handy (or, if you’re super fancy/lucky, you can always use your Cricut to make labels)
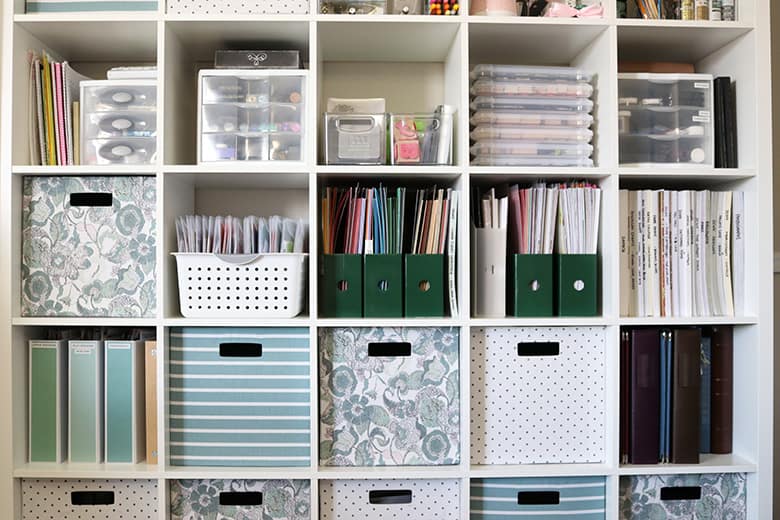
- somewhere to store your magazine holders (I have an IKEA Kallax unit that I love)
Here are a few container options:
- this 3-compartment desk organizer (this DOES NOT fit in the IKEA Expedit/Kallax units, that I am aware of)
- these options from Advantus (again, check measurements because I’m not sure these fit into the IKEA Expedit/Kallax)
- the much cheaper/versatile ones I use from Totally Tiffany (if you can’t find these online, I found mine at Hobby Lobby and was able to use a coupon too)
I love the Totally Tiffany boxes, but I will say that they are just simple cardboard (brown on the inside and a shiny white on the outside). I have since spray-painted mine green–scroll to the end of the post for photos!
Because of how thin the boxes are, they work better when they’re full of paper, as well as when they have other boxes to sit with or a cube shelving (like my IKEA unit) to give them support.
Most scrapbook paper these days is 12×12, so I recommend getting containers that will fit at least 12×12 paper (I still have some 8.5×11 that I keep in the same containers).
Now, for the actual organization part and why I love this method so much!
The best way to organize scrapbook paper within storage boxes
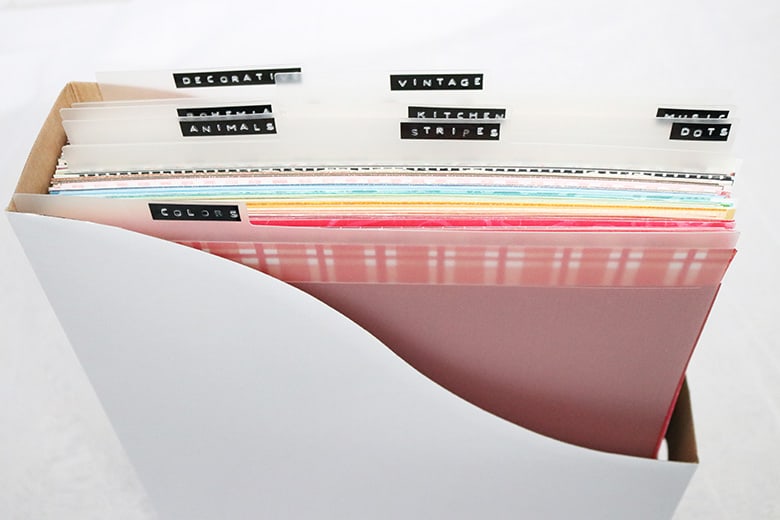
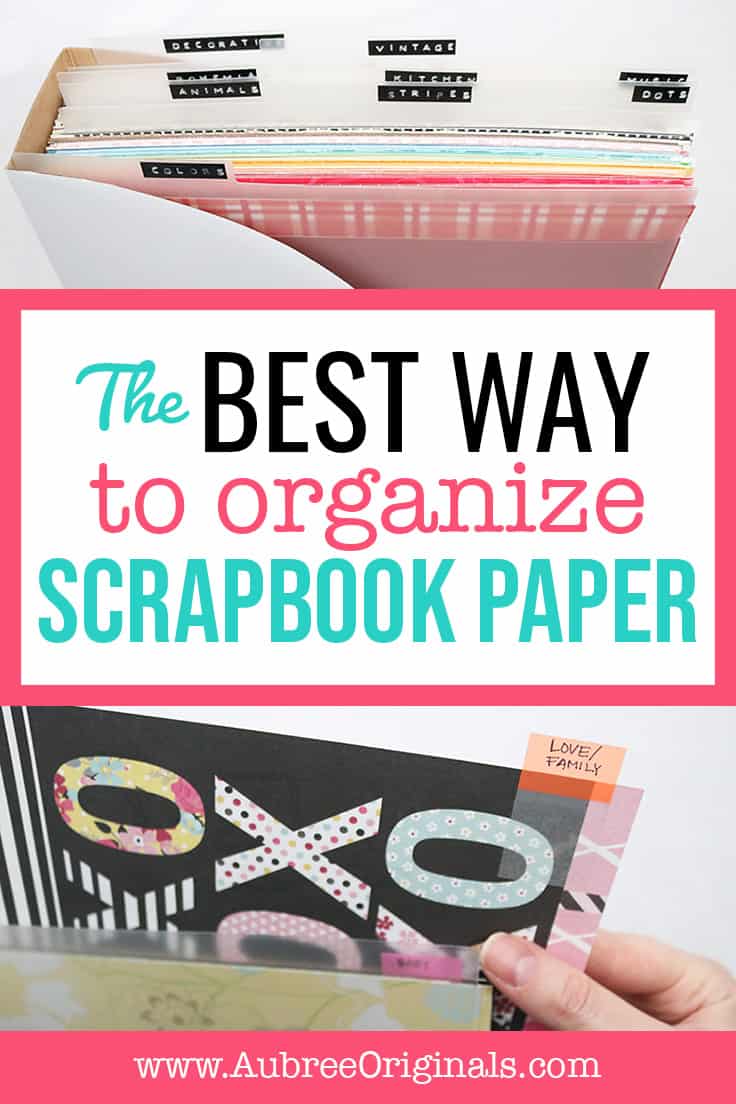
First, divide the cardstock from patterned paper. Cardstock is easy, and will get sorted by color (and then by size, if you have multiple sizes).
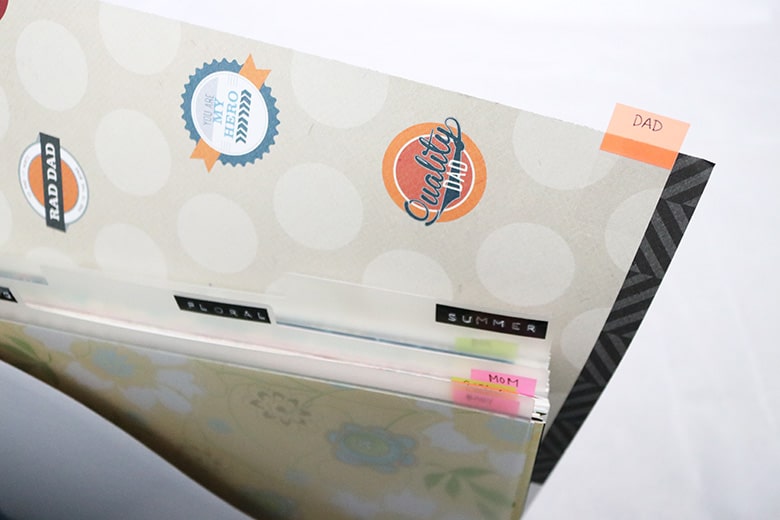
For patterned paper, I sort by these categories, using the plastic dividers and my old-school Dymo label maker (until they fall off and I switch to my new label maker):
- color (this is for paper that has a light pattern and no real design)
- stripes
- dots
- animals
- food/cooking/kitchen (a smaller category, but one that I had enough paper for)
- music
- vintage
- decorative (for paintable paper, shimmer, and lace)
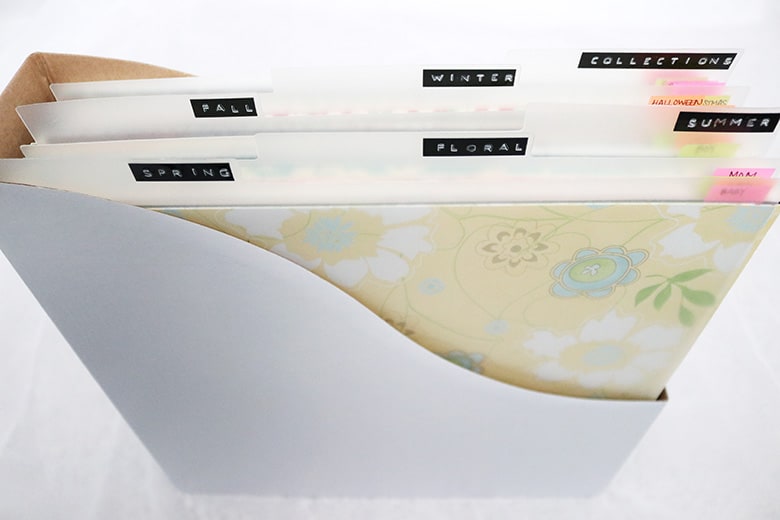
- spring
- floral
- summer
- fall
- winter
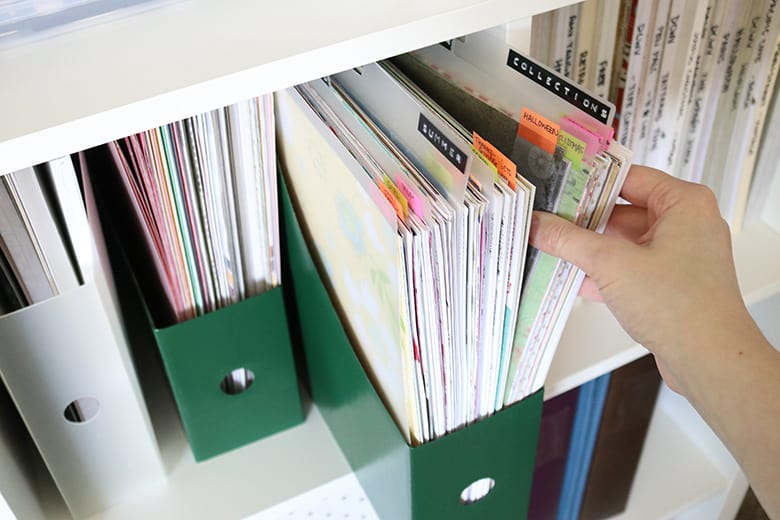
- collections (this is for kits, such as my Cosmo Cricket and SEI)
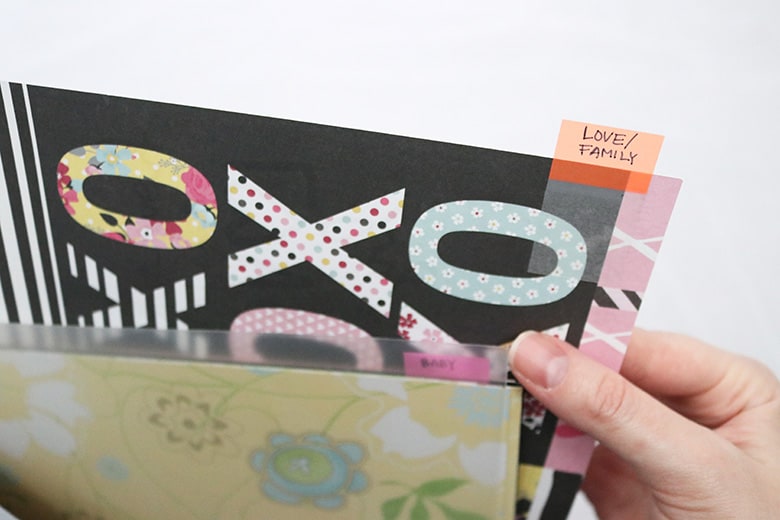
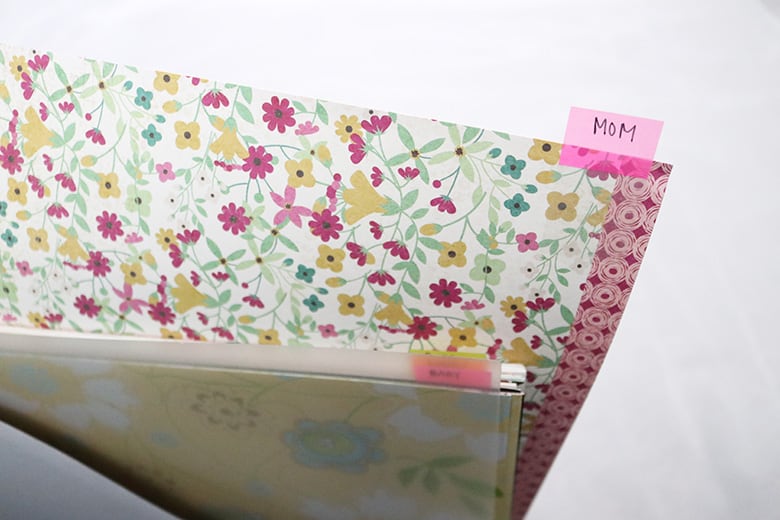
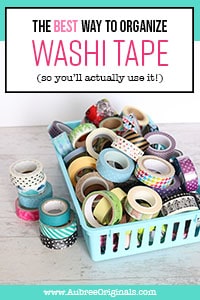
I further divide the season categories (bolded above) as follows (by using a removable sticky tab on the first page in each of the subcategories):
- spring: generic spring, baby, love/family, girl, mom
- summer: generic summer, boy, dad, travel
- fall: generic fall, school, Halloween, wood projects (because I bought some fall paper specifically for mod-podging to some wooden blocks), Thanksgiving
- winter: generic winter, Christmas
These are the exact categories and labels I use in my boxes, but your needs are going to be different. It may take you a few days to really sit down and categorize your paper, but I challenge you to make the effort! It will be so nice knowing exactly what you have and where to look for it. If I want to make a Mother’s Day card for my mom or scrapbook about a school event, I will know exactly where to look.
That’s why I recommend organizing your paper by theme and use. You can either choose to alphabetize by keyword (“boy,” “Halloween,” “winter”) or lump them together by holiday/season, like I did. No, “girl” isn’t necessarily a spring-only category, but I tend to associate those girly, pastel colors with spring. Also, Mother’s Day is in the spring and I decided to keep “girl” next to “mom.” I applied the same thought process to “dad” and “boy” being in summer.
For more specific themes, such as “animals” and “music,” I recommend giving them their own bigger section (or just include them alphabetically if you choose that method). For me, I know I’m only going to use these papers for very specific things (a zoo trip, a piano recital, etc.), so I wouldn’t include them in a “boy” or “girl” category, for instance.
How to store scrapbook paper pads
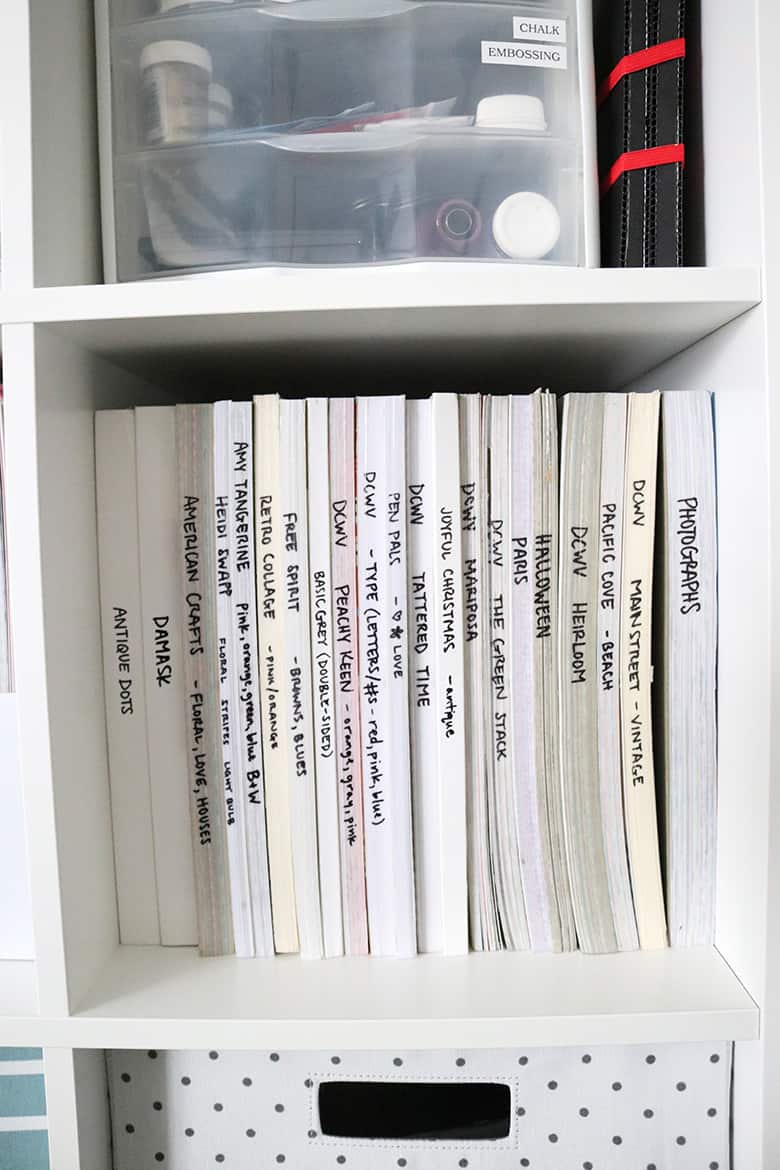
Outside of the storage boxes, I also store pads of paper upright with the title written on the spine (or hints about the contents and colors). At this point in time, it’s not worth it to me to take apart the pads to organize by theme (nor would I want to, because most of them are matching collections anyway).
Whew! That was a lot of information! Okay. Ready to move onto scraps?
How to organize scrapbook paper scraps
Ugh. The dreaded scraps. There’s always so many of them!
I originally had my scraps stored in plastic sheet protectors standing upright in an old cardboard box. (I don’t have a great before picture, but if you scroll to the very last photo in my DIY Gratitude Jar post you can see the box in the background–and a very cute puppy in the foreground. 😄)
The box actually worked okay for a lot of years, but it wasn’t my favorite to look at. And…sometimes it was really hard to find what I needed without having to dump out the whole sheet protector.
So, I graduated to this solution:
Ideas for storing scrapbook paper scraps
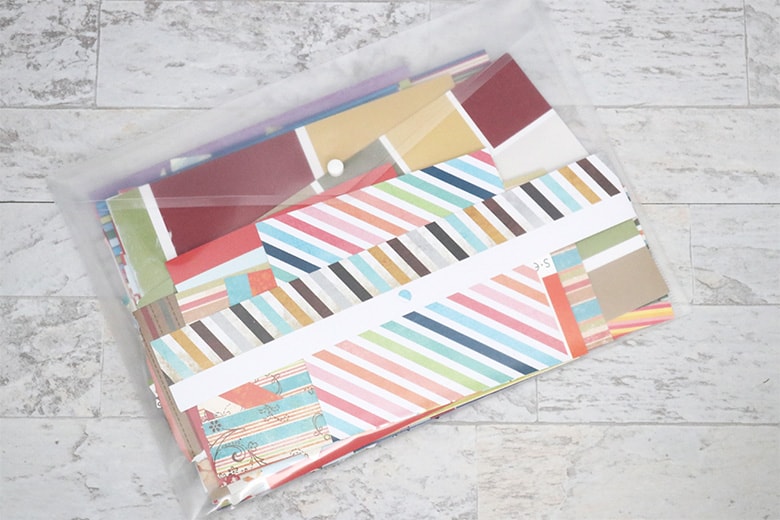
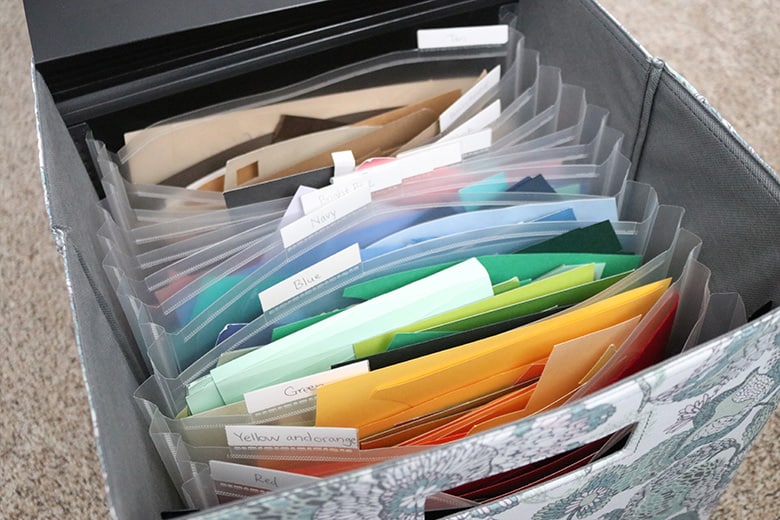
I found these plastic envelopes with a snap closure that have been working great for dividing patterned paper scraps by color or category (the original folders are no longer available, but the link takes you to an almost identical product).
The only downside is that they don’t fit 12×12 paper (I tried really hard to find inexpensive plastic envelopes that would, but no luck). However, they fit at least a 9×12 piece of paper and 99.9% of my scraps aren’t bigger than that, so this storage solution has been working for me.
(I like the clear envelopes for being able to easily see what’s inside, but there’s also colored envelopes that might make it easy to grab a certain color of scraps at a glance. Or these zipper folders with colored tops might be the best of both worlds! (I’d probably go with whatever looks the most sturdy.)
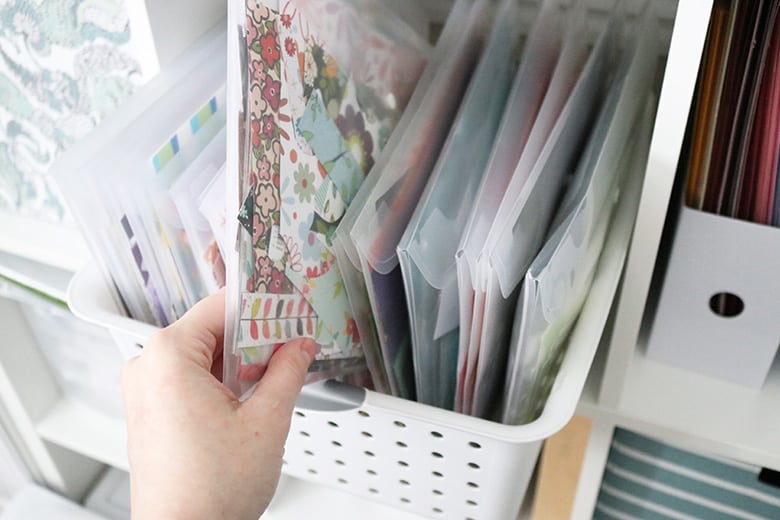
I store the folders sitting upright in an open Sterilite bin, and I’m actually super pleased with how nice and clean it looks on my shelf.
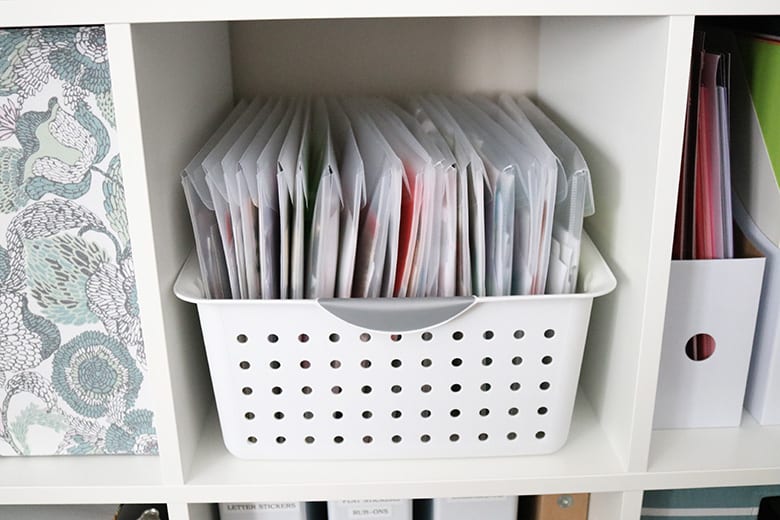
You could do this same thing with cardstock scraps, but I’ve had an expandable file folder that’s worked well for me for a lot of years and I decided to keep it. I made it “pretty” by sticking it in a fabric bin, which didn’t affect the accessibility of the scraps at all.
If you’re looking for something similar, you might be interested in one of these options:
Storage Studios Expandable Paper Holder
Storage Studios Expandable Paper Organizer
Storage Studios Expanding Paper Folio
I am not affiliated with the brand linked above, those just seem like some good options if you want your paper organizer to be able to fit 12×12 paper. Of course, there are a LOT more expandable file options in shorter sizes, such as this file folder–which is very similar to what I’m using.
How to Organize Scrapbook Paper Efficiently
Ah, I love looking at how organized my paper is now. I love that, between whole sheets and scraps, it only took up five of the storage cube spaces. Vertical is the way to go!
Let me know in the comments how these posts are helping you and inspiring your own organizational updates!

Don’t forget to pin and save for later!
Other posts on craft room organization:
How to Store Wood-Mounted Rubber Stamps
How to Store Clear Stamps Vertically
Aubree, I so enjoyed your article on storing scrapbook paper. And some others also.
I signed up & also followed you on Pinterest. Thanks for all your great info. You are really talented. I look forward to more from you. Many thanks, Stephanie
You are so kind, Stephanie! I appreciate you being here. 🙂
Hi Aubree,
As I was searching for a way to store my 12 x 12 cardstock, I found your page. I think the magazine box idea will work for me. I’m at the beginning stages of learning to use the Cricut Maker. My creativity would flow better if I had easy access to the various paper prints and colors. Some of the stackable trays I found cost more than I want to pay–and I would break the bank buying enough to accommodate the many variety of paper colors, prints, and patterns. Thank you for posting your ideas!
You’re so welcome, Judy! I’m glad this helped. And you will love your Cricut Maker!
Hi Aubree! Loved the ideas. I would love to see where your scrapbook paper is located and where your flat workspace is. (is the shelf from IKEA? I have one wall to work with that will be scrapbooking and office!
Hi Sue! You can see more of my craft room here. I’ve moved since but I still use the same paper organization in my new craft room. The shelf is an IKEA Kallax, I think it’s a great option to maximize space!
Thank you for your tips and suggestions. I’m finally doing something about my scrapbooking supplies in bags and travel Cases in my laundry room and in one small cabinet. I bought a crafting desk but will need some verticle cubes.
I’m glad this helped, Liz! It feels so good once you get things organized. Every craft situation is unique so just take the suggestions that work best for you and fit your space! 🙂
Thank all you nice and clever people. I will use some of these tips in my craft, and ‘junk’ room. Maybe it won’t be a junk room any more! I have two open shelving units, two dressers and a couple of those plastic drawers. I seem to just throw things in drawers and may never see them again!! It will be a good project during the winter months. We get a lot of snow here.
Thanks for reading, Mary! Yes, that’s a great winter project. And so satisfying once you get organized!
I love the vertical paper storage, I have come back to your post several times as I have acquired a ton of paper and needed to sort and resort. I am lucky enough to have carpenters in my family Who can help me build things. So I was using the Totally Tiffany 12×12 holders but they just don’t hold up and I travel to scrapbook weekends and so I wanted them sturdy and supportive so my da dudes the template of that and built me custom 12×12 holders!! I also love (EOOUT 24pcs Plastic Envelopes Poly Zip Envelopes Files Zipper Folders, A4 Size, Letter Size, 10 Colors, for School Office Travel Storage Supplies https://amzn.to/3YTvF8S). On Amazon! They have colored zippers that I correspond with that color scrapes, and the. I file them with my solid 8.5×11 papers by color. I do this mostly so I remember to re-use my scrapes instead of ruining a whole solid sheet of paper!
Those are great tips, Aimee! And I love that your family helped build you custom paper holders, those sound amazing! Thanks for sharing. 🙂
Great question, Marie! I don’t have a ton of 8.5×11, but what I do have I store with the 12×12–you can keep it separated (so just aside the 12×12) or organize it by color/pattern, whatever makes more sense to you. If you have a lot of 8.5×11 paper, you could also get smaller magazine file holders (they’re much easier to find in this size!) and repeat the same organization method you did for your 12×12 (I still recommend vertical because it saves so much space, but check out my stamp storage posts because those containers, or similar, might also work for your smaller paper and scraps https://www.aubreeoriginals.com/how-to-store-rubber-stamps/ and they could possibly be stored vertically, just a little less accessible than magazine holders). Congratulations on the new house and have fun organizing! 🙂
I just found your blog and it is so helpful! We just bought a house so I finally get to organize all my scrapbooking stuff. I do have one question for you. How do you organize your 8×11 paper. Do you put it in the envelopes? I have that size in scrapbook paper and in cardstock and I’m not sure what to do with it.
Some great ideas here. I store my 12″ paper in the horizontal plastic cases. I prefer to keep them protected from sun & dust & etc. One thing that has helped me is using 12″ scrapbook page protectors to keep my paper sorted in the boxes. I used the ring binder strip to put my labels on. As a look through what I have the groups of paper stay together & I can pull 1 group sleeve & paper keeping it all organized together. Larger cut up pieces can go back in the page protector with the full sheets saving time when you need a smaller piece of a paper you want to use. The narrower plastic containers hold alot of paper & weigh quite a bit. I found a metal desk organizer that was sturdy enough to hold these vertically under my craft table if you have space to do this. FYI
Hi Edith. Those are great ideas! I always struggle knowing what to do with the scraps that are almost a full size sheet of paper, I might have to try the sheet protector idea!
Where did you find the decorative bins for your Kallix? I have the same one and I’m working on the paper organization, but those would work great for other stuff. Your suggestions are terrific, now if only I can follow through. My struggle is how to transport (what to take when I go on a retreat).
Hi Jaymie! I got the fabric storage bins at Target. I love them for organizing other things I want out of sight! I use a lot of smaller containers within them to keep small things organized, like these: https://amzn.to/35UyVtX
I hope that helps!
This is so useful. My daughter has just moved out of the family home, so I am enjoying planning my new craft room – (it’s been a long time coming! ) I want to make sure all my craft supplies are sorted and arranged in the best way possible before I move them into the new room, vertical paper storage is clearly the way to go! 🙂
Planning a new craft room is the best! Have so much fun, Alison!
Hi,
Thanks for all the hints. I am getting back to scrapbooking after years of ill health etc. how do you get the creative ideas going again? I have several that are not finished. Mainly family books? Plus I am a senior citizen and I have lots of supplies etc
Tips and hints appreciated
Thanks
Hi Marcy. That’s a great question! It’s actually been awhile since I’ve scrapbooked regularly, too.
First, I think it helps getting your pictures printed and/or pulling them out and grouping them into layouts you’d like to make. Sometimes pulling out some fun coordinating supplies (or even buying a couple new embellishments) can get you excited about those pages again. Scrapbooking trends change over time, so if your books are older, it may be fun to look for some new inspiration: I like searching Pinterest or Instagram for scrapbook layout ideas, or you could look through a scrapbook magazine, like https://scrapbookandcards.com/spring-2021/ (you can view it for free–I’m going to have to come back later and spend more time going through it, I used to LOVE looking through scrapbook magazines!)
If you’re feeling really bogged down by old photos that have accumulated for years, remember it’s okay to do non-traditional layouts or even simple photo albums to get to a place where you’re not so overwhelmed. Recently, I’ve been doing some Project Life pages, but you can create similar collage layouts through most photo-printing places. Or, if your photos are already printed, crop a bunch into squares and line them up on your page in a simple grid-like collage–leave one or two squares blank for a title or journaling.
One final tip that’s helped me a lot when I’m lacking motivation: sometimes momentum is more important than motivation. Just START one small task and you might find that the action/momentum puts you in the groove to keep going. Along with that, don’t be hard on yourself if your first few layouts don’t look great. Sometimes it takes time to find your creative groove again. And take breaks as needed! If something’s not coming together right, set it aside, come back a few hours later or in the morning with fresh eyes and the ideas may come.
I’m glad you’re able to get back into scrapbooking! Creating is the best therapy!
Excellent ideas! Thanks so much…taking a side trip to Ikea today! Linda Sorell
Yay! I’m so glad this helped, Linda! Have fun organizing. 🙂
Hi Aubree – your post is very helpful. I’m currently redoing my entire scrap room (my husband calls it the “crap room”) because I’ve had to turn it into an office so I can work from home. Serious purging and re-organizing. I’m wondering how you store paper punches, if you have a lot? Thanks for all the great ideas!
Hi Wanda! I’m sorry that I’m so late in responding to your question! I don’t have a ton of paper punches, but I’m currently storing what I have in a Sterilite drawer unit and that’s been working well for me. It kind of depends what kind/size your punches are. You could also store them in Iris project cases (the ones I use for storing rubber stamps might not be deep enough, so measure what you have and research some options). Another idea is displaying them on a wall or pegboard using a narrow floating shelf of some kind. Whatever you end up going with, keep in mind the weight of your punches–now that I think about it, the thin Iris project cases may not be strong enough to hold heavy punches, so that’s something to think about. I hope this helps. 🙂
Oh, and “craft room” and “crap room” are pretty synonymous in my house too. 😆
How about organizing stickers?
Hi Jennifer! You can see how I organize stickers in this post: https://www.aubreeoriginals.com/sticker-storage/
I hope that helps!
Hi there!! I was just wondering where/ what size sterilite basket you used! Is it the ~16 inch one?
Thank you so much for the tips, this has been SO helpful for organizing my scrapbook supplies!
Hi Lilah! I’m so glad you found this helpful! The sterilite bin I use is for holding the paper scrap envelopes and measures about 16x13x6. I’ve updated the post with a link to the size I’m using if that helps.
Aubree, thank you for your quick response & ideas! You really should try the paper flower crafting. It’s so much fun & can be used on so many ways.
Thank you SO much for sharing this organization plan. While I’ve had my scrapbook paper in vertical holders like you use for years, I’ve been stuck trying to figure out the best way to sort within my system. Also, I was unsure what to do with kits & paper pads, so the kits just sat on the shelf & I broke down each pad, then got lost with how to sort from there AND with the different weights of paper/cardstock in each pad. UGH! I do have 1-2 questions. Do you work with projects where you need a specific weight of paper? If so, how to you consider that requirement in your paper organization? I make paper flowers, boxes, & other things besides just scrapbooking with my paper. The flowers (which are my biggest production aside from scrapbook pages) require a very specific paper weight for best results. When searching for a large amount of paper to make a HUGE paper flower wall for a wedding backdrop, I came to realize that most of the paper in paper pads is actually (based on Paper Paper’s website) of a cardstock weight & too thick to make nice paper flowers. SOB! So, I’ve hit a wall. Since I use many of the same papers in scrapbooking that I use in flower & other paper craft making, I’m at a loss about how to address the paper weight issue. To say the least, my shelves are a bit of a mess. I need to get better organized! I’d sure appreciate any help or ideas if you have had similar issues. Thank you!
Hi Beth! I’m so glad you’ve found this post helpful! I don’t currently use my scrapbook paper for projects that require different weights (but may in the future, flowers would be really fun!).
When it comes to organizing paper, I would say it really depends on what your priorities are (or what makes most sense for your crafts). If most of your frustration comes from not being able to find the right weight of paper, I would make this your first organizing category (so, for example, your first box has thin paper that’s perfect for flower construction and you label it “flowers”). Then, you could organize by color/pattern within those weight sections. But, if you’re a visual person and look for color first, organize by color and create “weight” sections within the color sections. I think I would still use removable sticky tabs to identify sections (or you could make your own dividers).
It sounds like you have some overlap with what you use your paper for, so I would still store all types of paper together–*unless* you have a particular pack of thin paper that you know you’ll only use for flowers or something, and that way it’s super accessible. I find that having a home for EVERYTHING keeps the clutter at bay, so organize as compactly as possible and then purchase additional containers as necessary. And if your thin paper seems too flimsy to stand up on its own vertically (and you end up with curled paper), I would say that’s an exception to my “vertical is best” storage rule and you could store it horizontally.
I hope this helps! Send me an email if you’re still stuck. 🙂