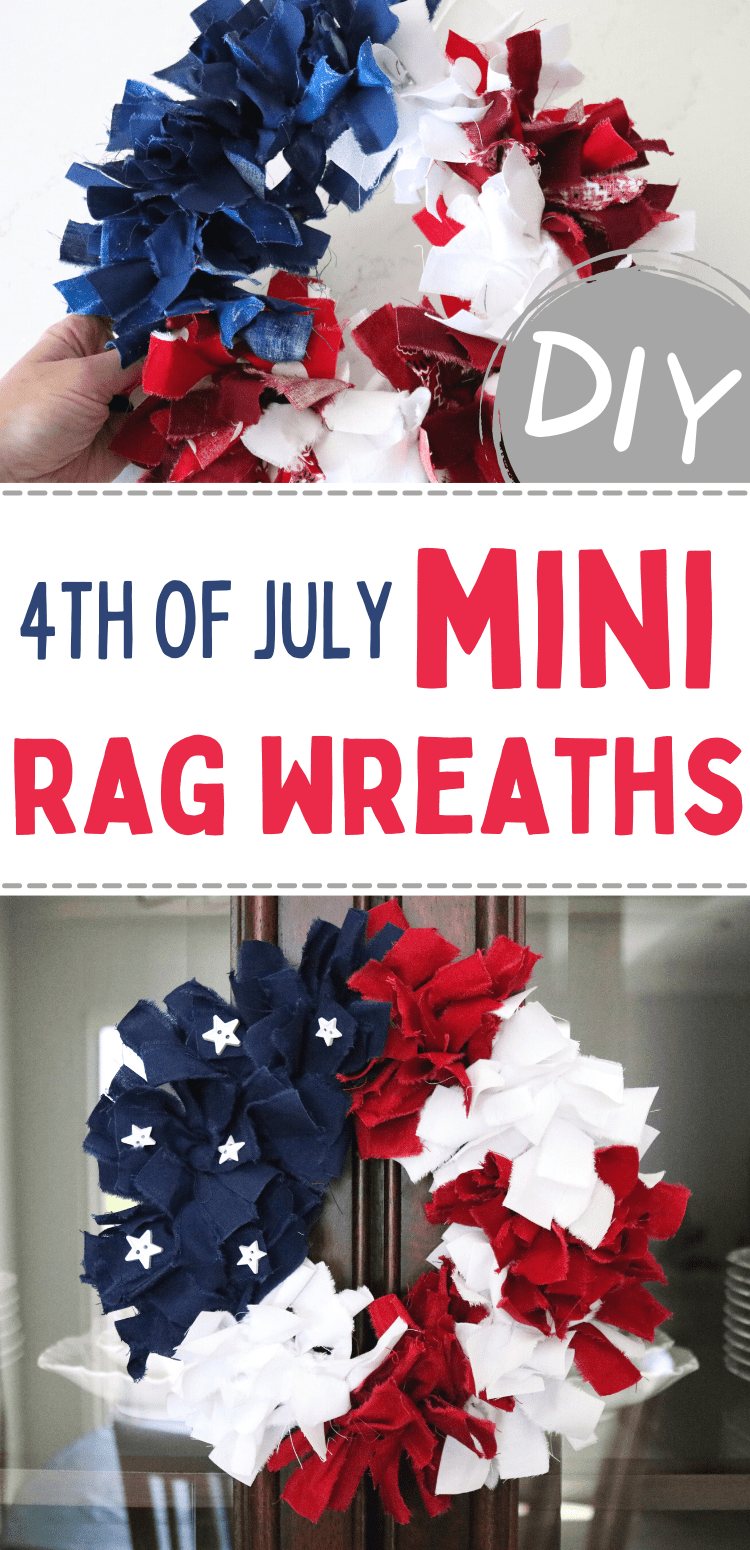
How to Make Mini Rag Wreaths: Easy 4th of July Decorations
Learn how to make a mini rag wreath or fabric scrap wreath in this tutorial! These 4th of July rag wreaths are so cute, especially in miniature form!
I was brainstorming camp craft ideas for my niece and nephews a few months ago and had hoped to make these mini flag rag wreaths with them. Then everyone’s summer got too busy and we never actually went camping (I was very disappointed). But I still made these mini wreaths for my 4th of July decorations and I love them!
Rag wreaths are simple and don’t require a lot of supplies, making this a pretty inexpensive decoration (especially if you have a bunch of fabric scraps already)! Make them in any color pattern or theme you want—they make great DIY holiday decorations!
This post contains affiliate links. For more information, see my disclosures here.
What do you need to make a mini patriotic rag wreath?
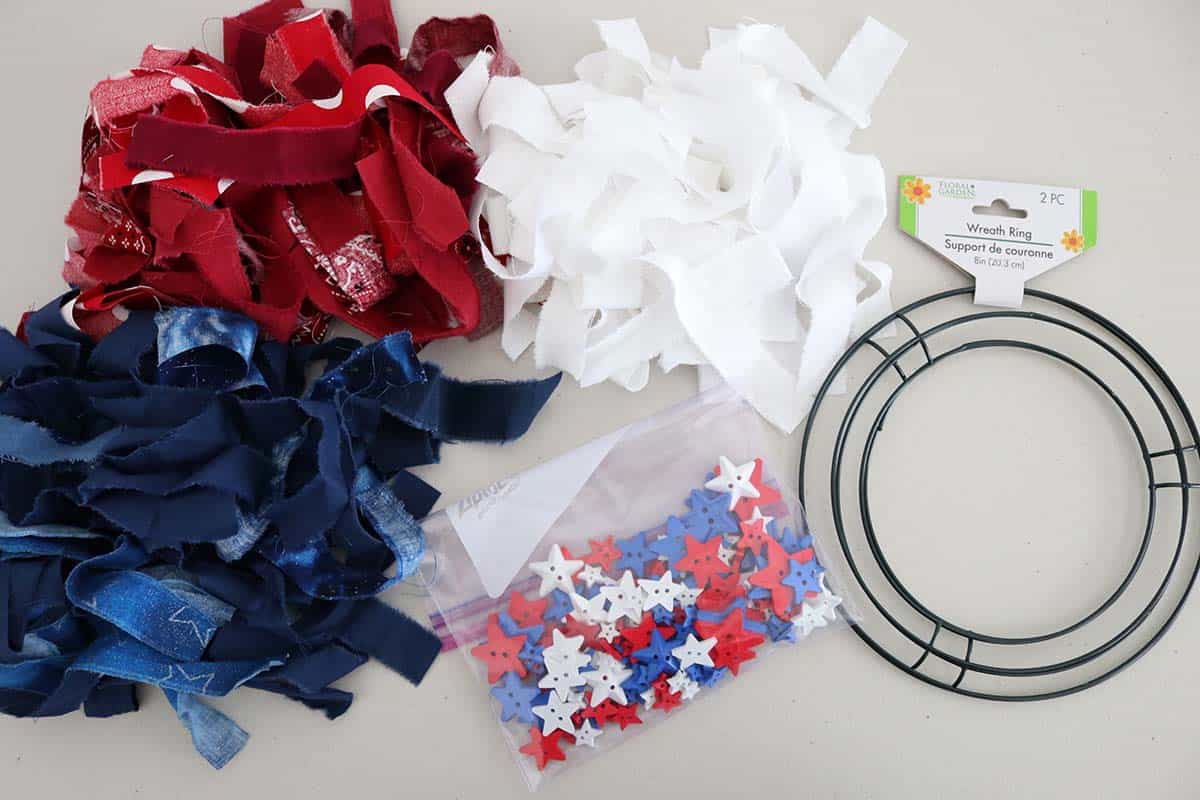
- 8” wire wreath frame: you can get these from Dollar Tree in a 2-pack
- fabric scraps or fat quarters in red, white, and blue: shoot for low-volume (non-busy pattern) prints or solids (I’ll show you how to cut or tear the strips below)
- star buttons or stars cut from stiff felt, optional
- hot glue (to glue the stars on)
- twine or ribbon for the wreath hanger
- rotary cutter, ruler, mat, and fabric scissors
How much fabric do you need to make a mini rag wreath?
For these mini rag wreaths, you need a lot of strips, at least 105 (35-40 of each color, more or less depending on how full you want your wreath). You’ll be cutting 1”x8” strips. You can get at least 40 strips from a fat quarter so this comes out to about 2.75 yards of fabric total for a mini rag wreath.
If you have a lot of fabric scraps like me, this is a great scrap busting project, so just keep cutting/tearing more strips until you have enough!
Should you pre-wash fabric for a rag wreath?
I always pre-wash my fabric before a project in case it shrinks. Also, washing tends to soften the fabric a little which I like for these rag wreaths. But, I realize you’re not going to be laundering your wreath so shrinkage isn’t really an issue. This is an optional step, I guess, so I won’t come at you if you want to just jump right into tearing your fabric strips.
What size strips for a mini rag wreath
For these mini rag wreaths on 8″ wire wreath forms, we’re going to be cutting strips that are 1″ x 8″. This is the perfect size—big enough to make the wreath fluffy, but not too wide that it’d be hard to tie on. Try to make your strips as uniform as possible, but it’s not a big deal if a few are slightly shorter or longer (or skinnier or fatter)—no one’s going to notice minor differences in size.
How to cut or tear fabric for a mini rag wreath
The great thing about rag wreaths is that they’re intentionally meant to look a little rugged, so tearing your fabric is the best (and fastest) way to get strips. For a cleaner look, I suppose you could also cut all your strips with a rotary cutter if you wanted to (some of my fabric scraps were too small to tear easily so I did just that).
Tearing fabric is easier than you might think (but you’ll probably feel like a she-hulk while doing it anyway—I’m hearing my toddler’s dinosaur roar in my head while I type this). Just know that fabric will tear in a straight line along the grain of the fabric, so pay attention to where your grain is when you’re starting. (Fabric grain is the direction of the fibers—if you look closely, you’ll see they’re woven in a grid-like pattern.)
First, you need to cut a couple of inches with some fabric scissors to get it started*. For this mini rag wreath, we need 1″ x 8″ strips, so measure out an inch and then cut a few inches up the fabric. Now grip the fabric in both hands on either side of the cut and pull to tear. Riiiip! (That’s the sound effect.)
To save time if you have a larger piece of fabric, do all your little cuts along the bottom of the fabric edge all at once, then you can tear one after another.
*If your fabric has a selvage, you can start by tearing that off first and then make your 1″ wide cuts after that.
Once you have 1″ strips, line them up on your self-healing mat and cut them into 8″ lengths. To make this go faster, you can line up multiple strips and use a ruler and rotary cutter to cut them at the same time.
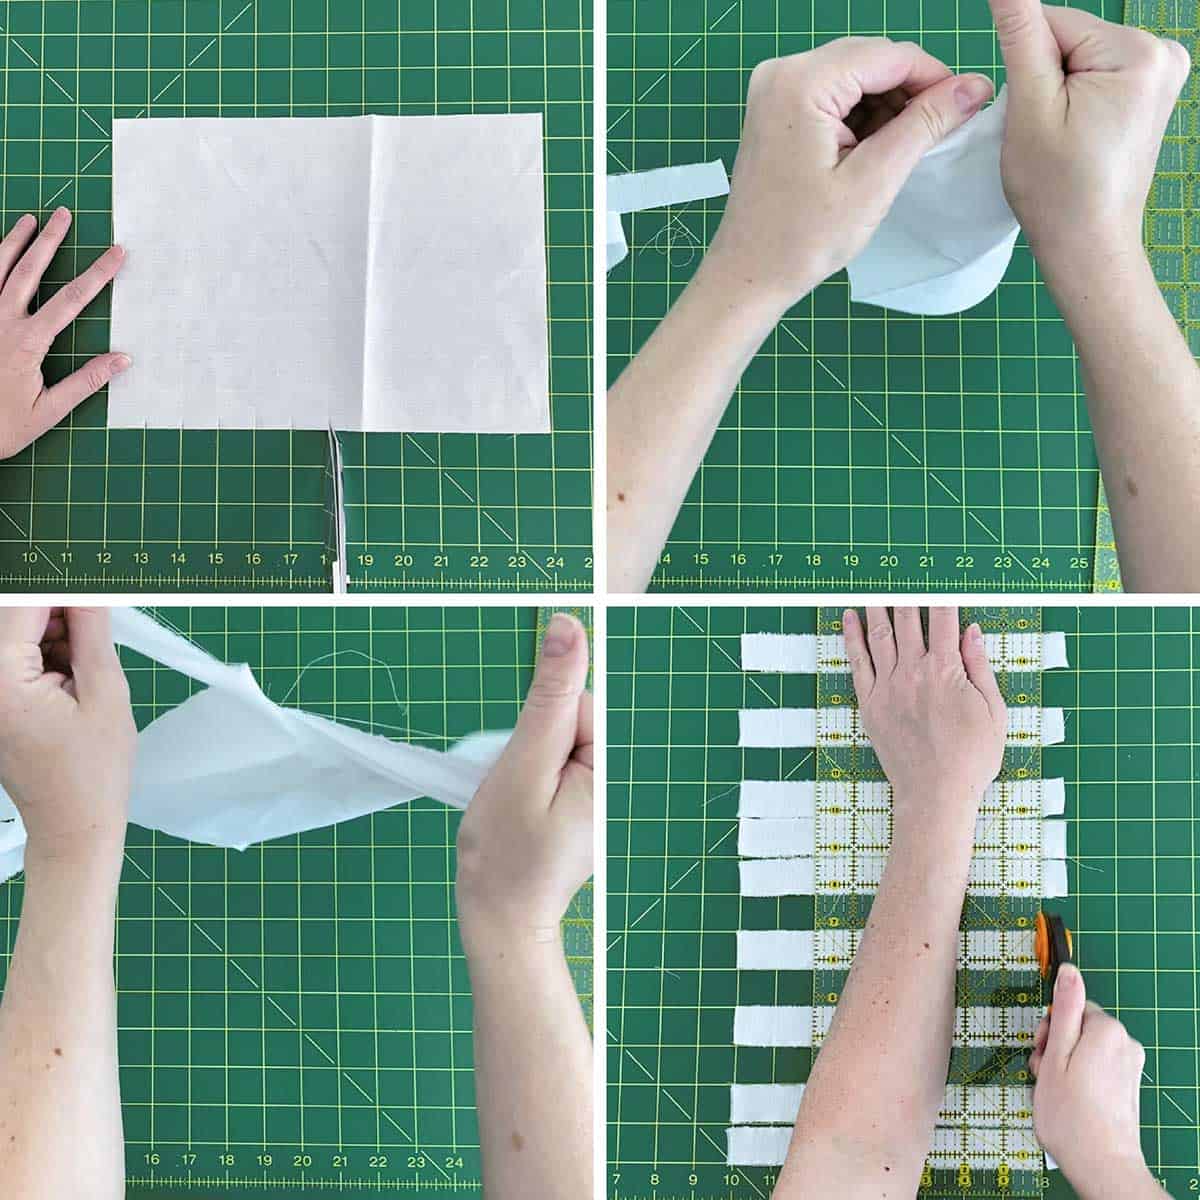
If you’re getting rid of small scrap pieces of fabric, you can tear the fabric if it’s long enough, otherwise just line the scraps up on your mat and cut them to size with your rotary cutter.
How to tear a fat quarter into strips
If you’re starting with a fat quarter, consider the dimensions of your piece of fabric before tearing strips so you can maximize the number of strips you can get out of it. After washing my fat quarters, they shrunk down to about 21″ x 17″. Since I was making 1″ x 8″ strips, I knew I could get at least 42 strips out of it, but there would be 1″ of wasted fabric. So, I cut 1″ off the long side first so I could get two more strips out of that side (see the image below for a visual—I realize it’s not to scale but it’s the best Canva would let me do).
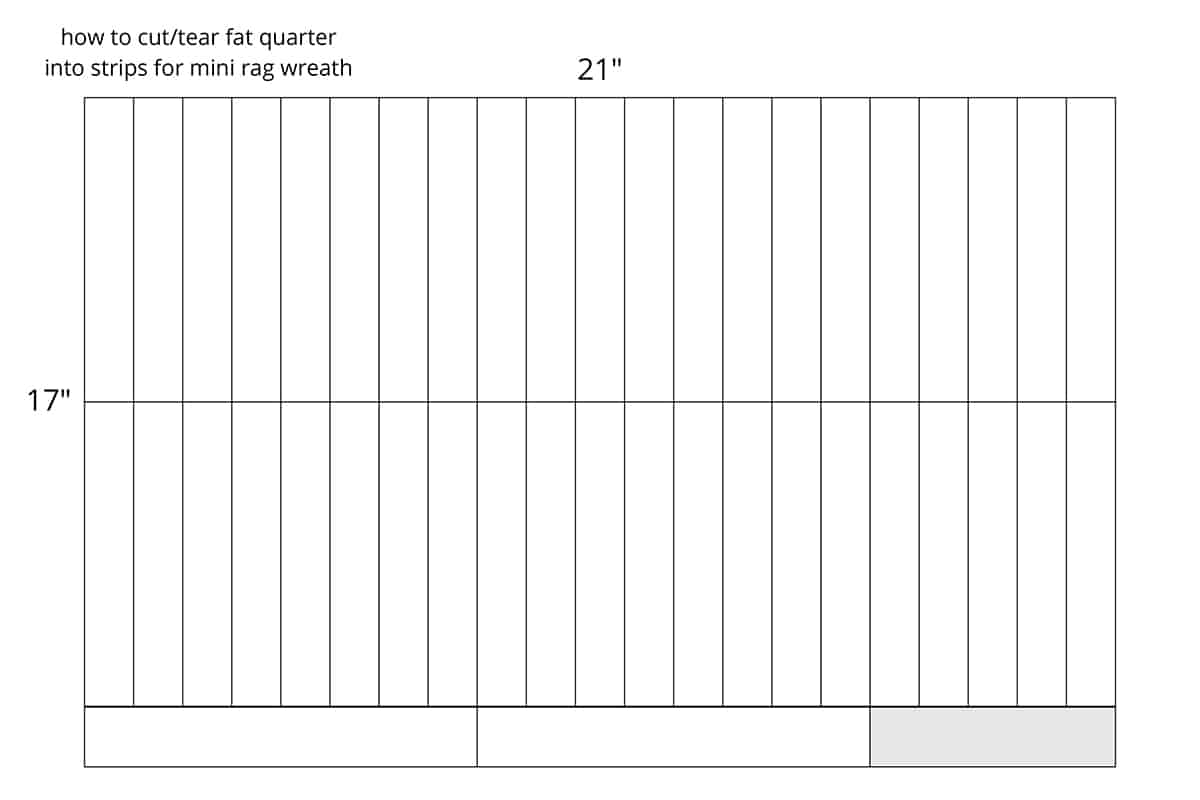
Your fat quarter might not be the exact same size as this, or you might have a different size piece of fabric altogether. I’m just trying to demonstrate the planning process I do in my head so hopefully you don’t end up with tons of tiny scraps that could’ve been whole strips if you had just oriented the fabric differently before cutting. I hope that helps. 😊
How to make a mini flag rag wreath
Tie on fabric strips
Once you have all your strips (or at least enough to get started, you can always make more as you go), start tying them onto your wire wreath form.
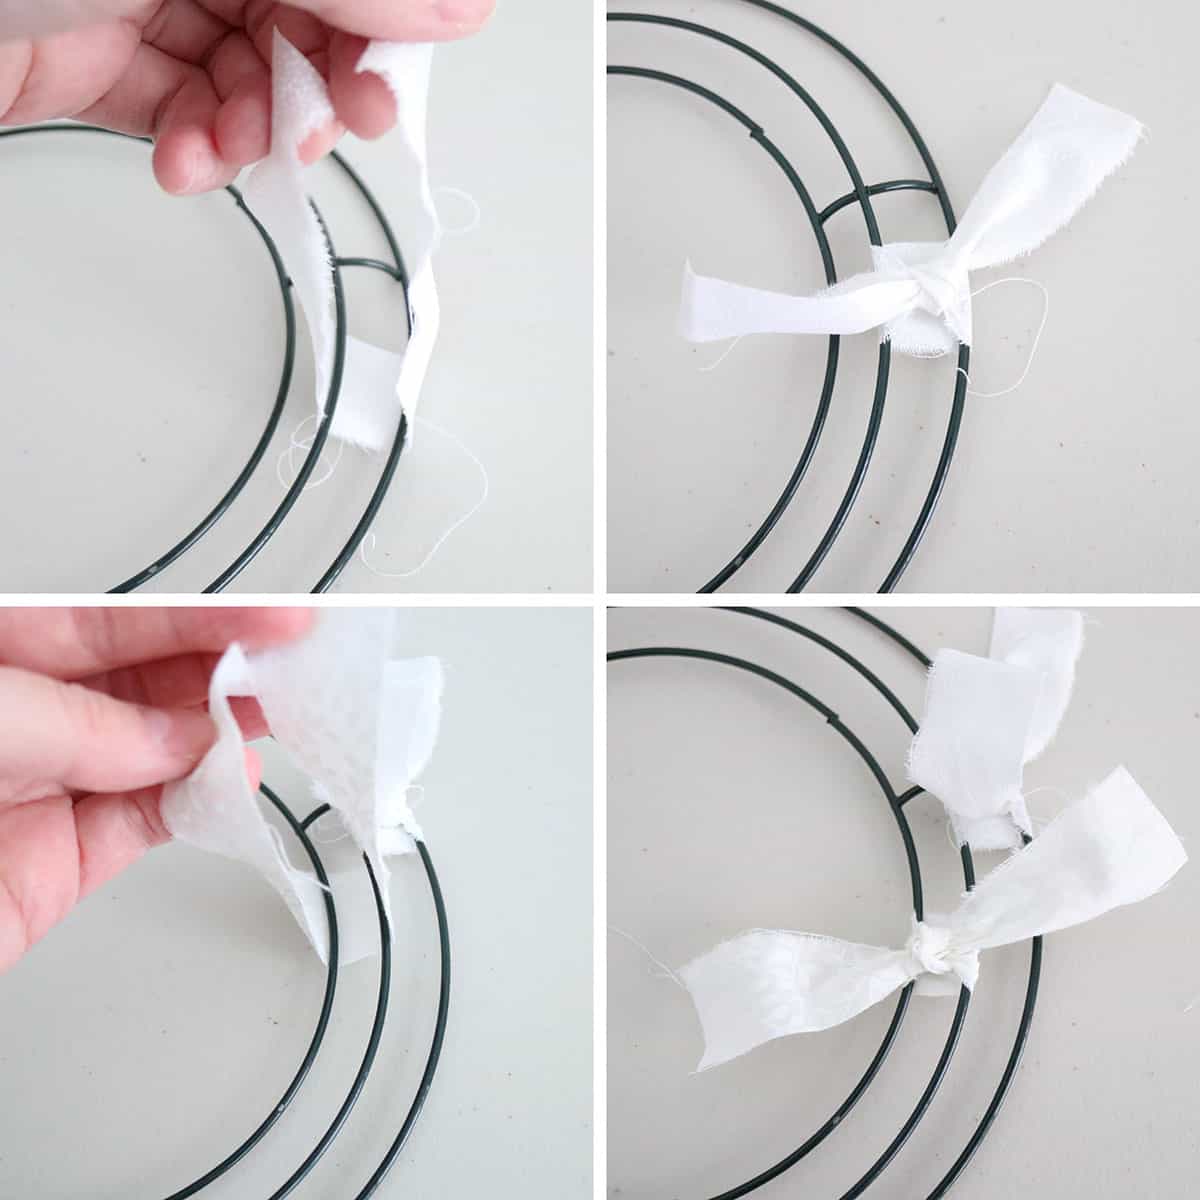
Loop a strip around the outer two wires and tie a knot. For the next strip, loop it around the inner two wires and tie a knot. Continue this pattern, alternating between the outer wires and inner wires, pressing the ties close together as you go.
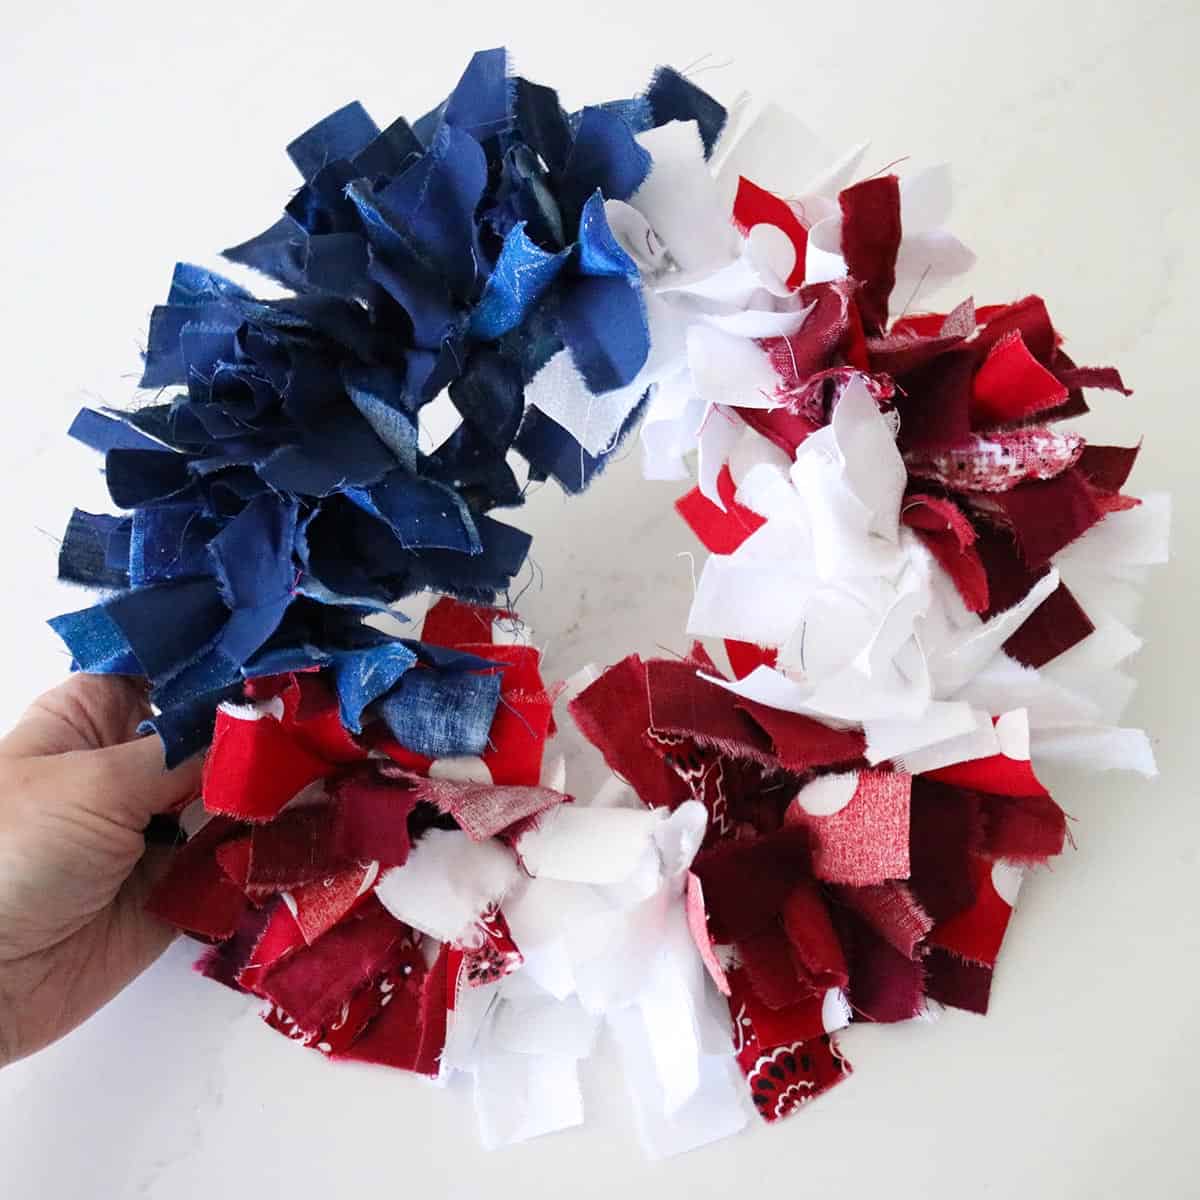
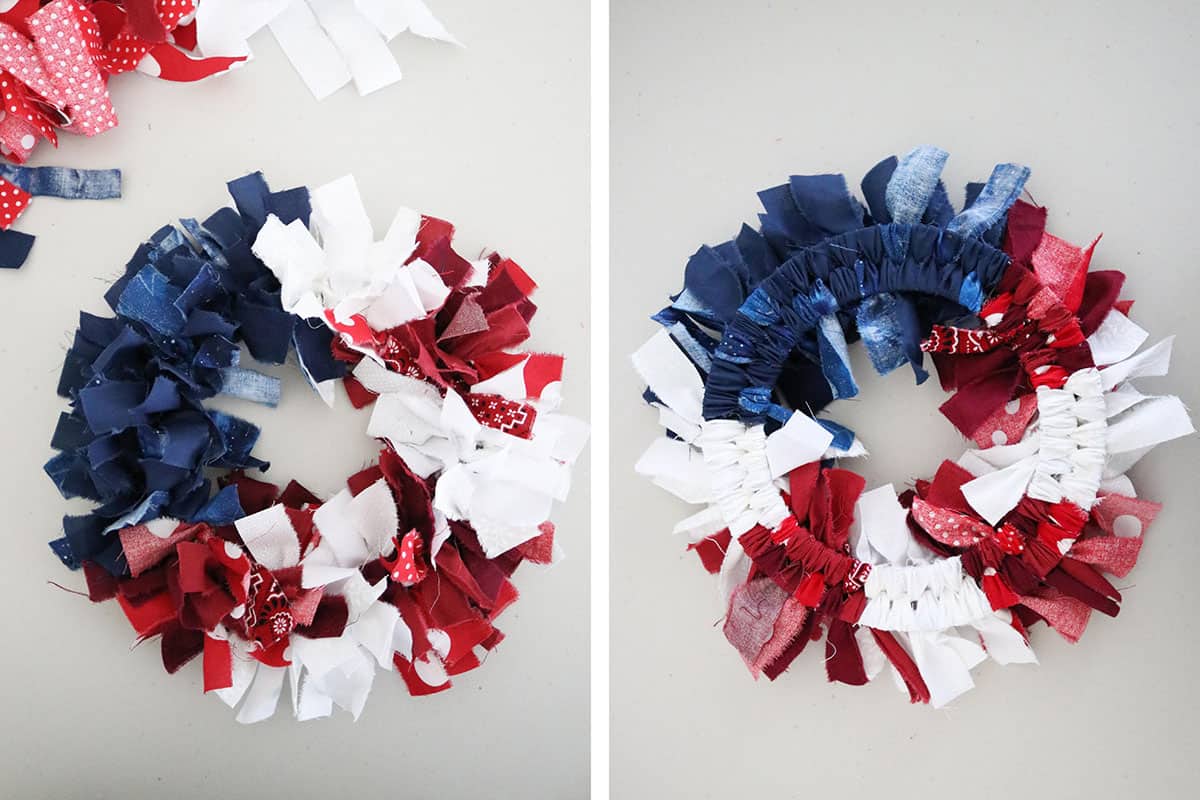
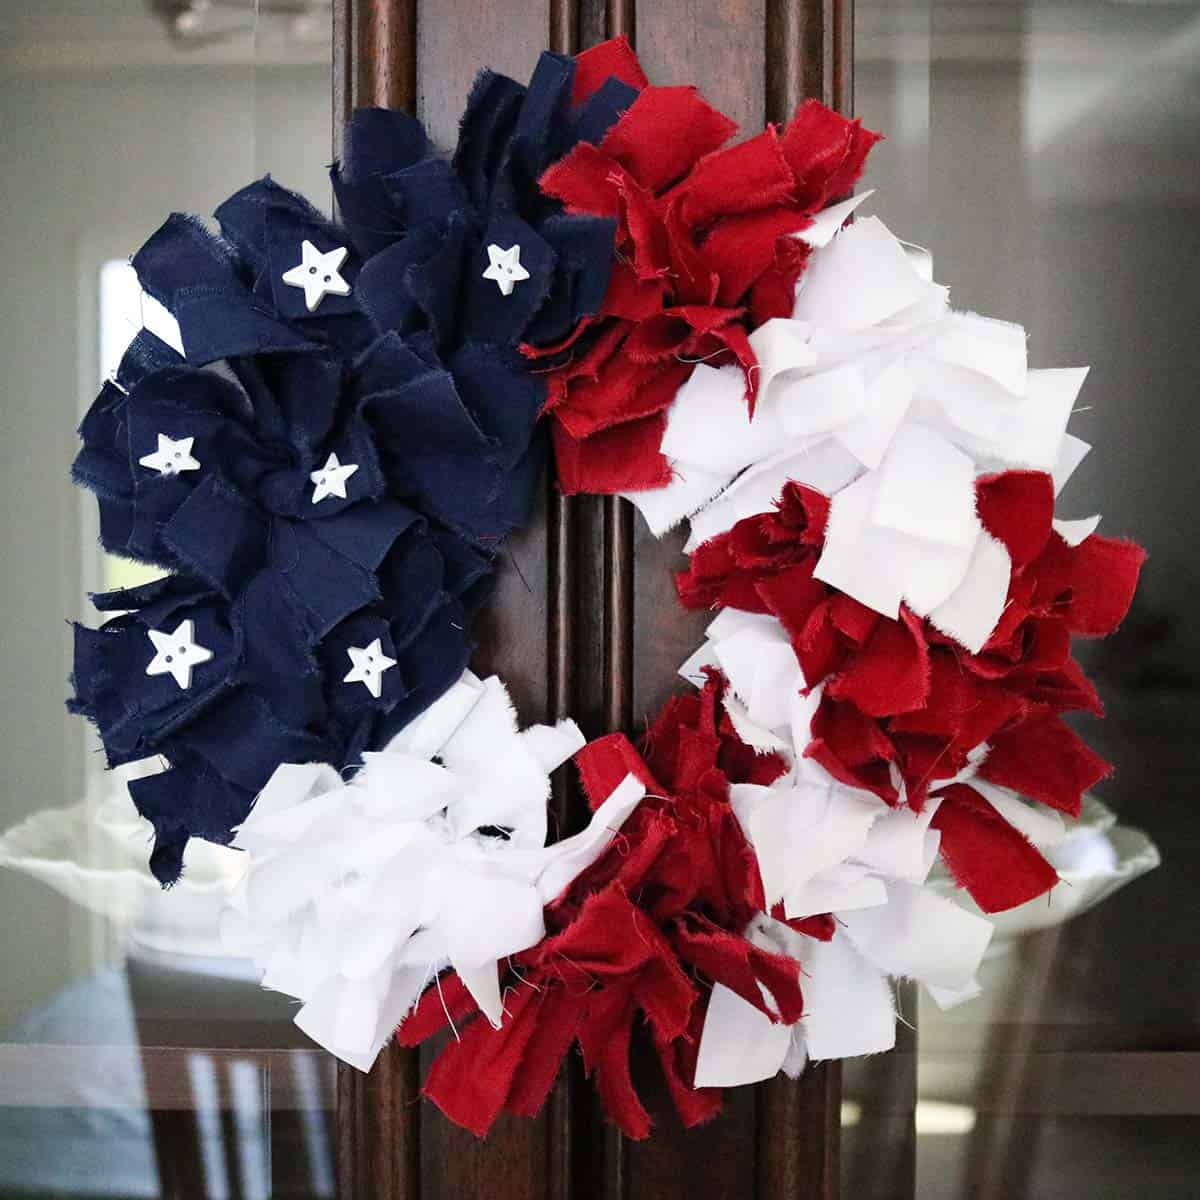
These mini wire wreath forms have three “sections.” For this flag pattern, fill one section completely with blue strips. Then split both the 2nd and 3rd sections into thirds, alternating red and white (so you’ll end up with B, W, R, W, R, W, R). Keep adding strips until you’re satisfied with how full the wreath looks (I used between 35 and 40 of each color total).
Add decorations
You can leave your wreath as is or you can add some button stars*. I left two of my mini wreaths plain (the ones with patterned fabric), but my solid-fabric-only wreath was pretty boring and looked a lot better after adding the buttons.
Simply hot glue the stars to a few blue fabric strips to complete the flag pattern. Use the smallest amount of glue you can so it doesn’t ooze out the button holes and look messy (and try not to touch the glue until it’s totally dry, otherwise it turns opaque which is more noticeable on the dark blue fabric). I highly recommend hot glue finger protectors too!
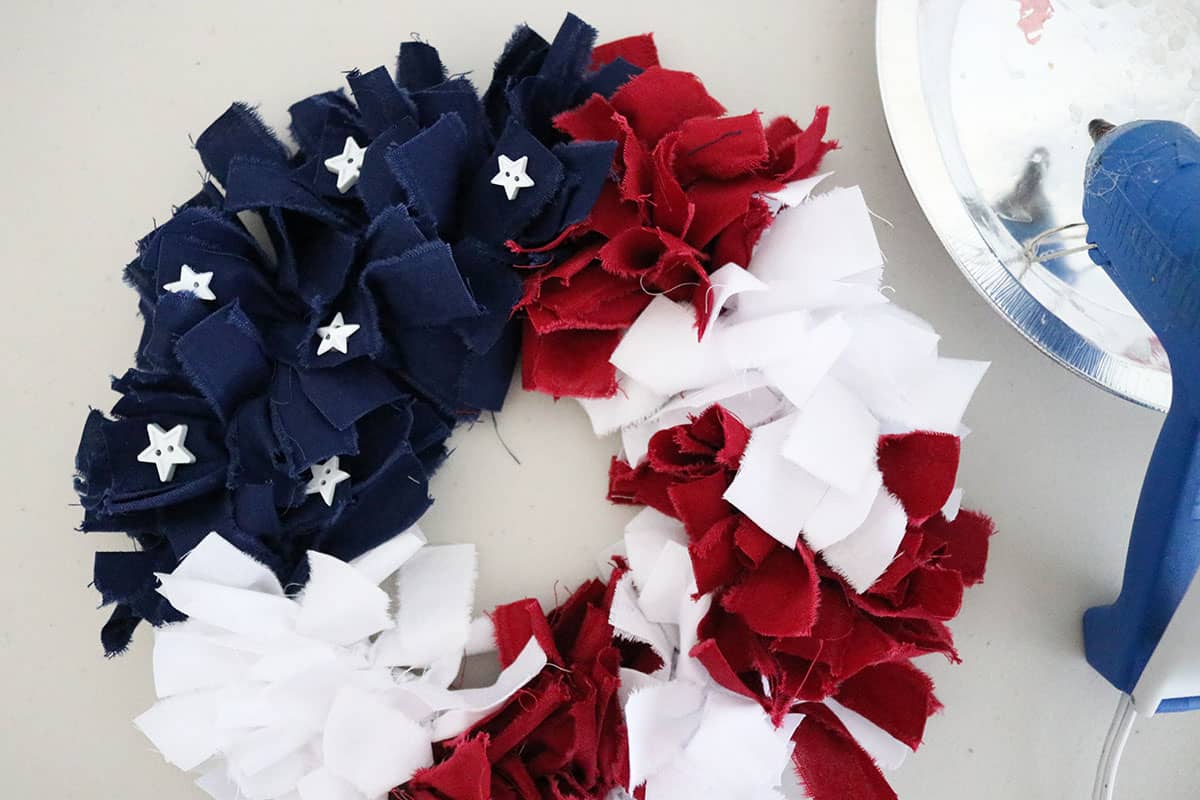
*You could also cut small stars from stiff felt, you just want whatever you use to be small and lightweight so it doesn’t make your fabric strips flop over.
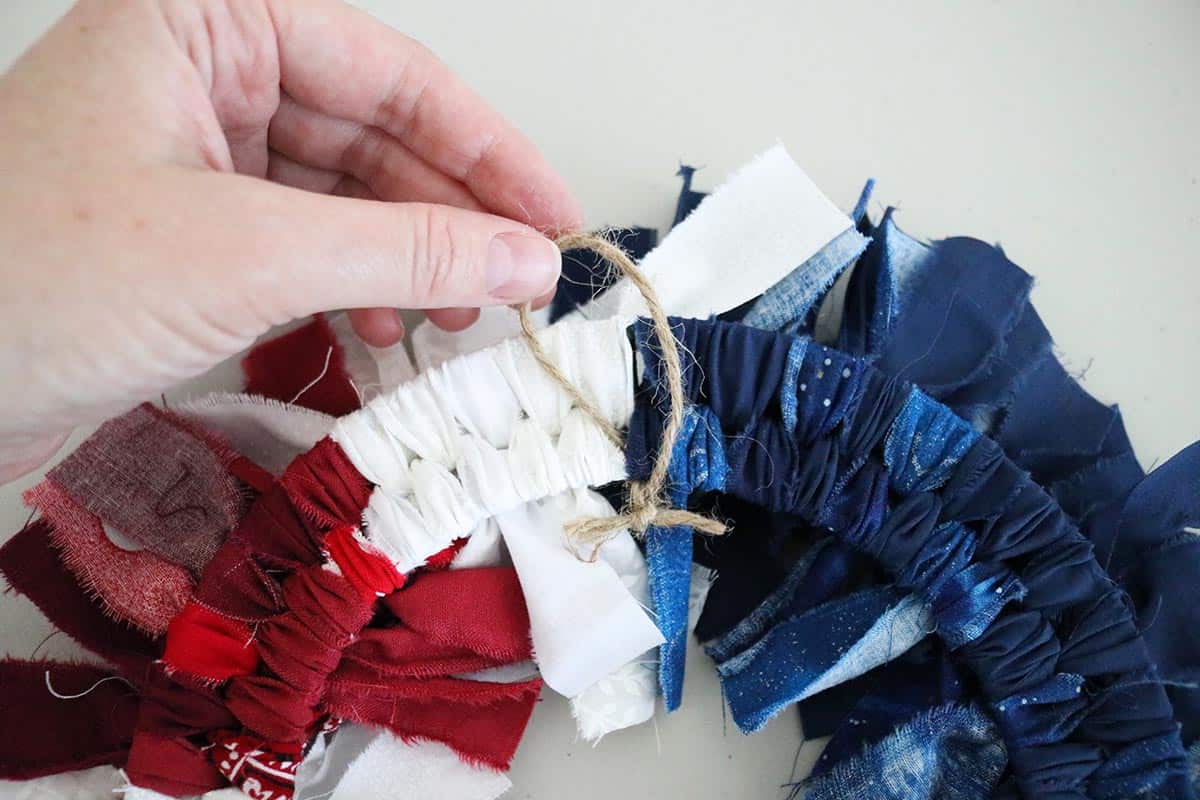
Make a hanger & hang your wreath
To make a hanger, tie a small piece of twine or ribbon around the top of the wreath form (I went around just the inner wire) and make a knot. Slide the knot towards the wreath form so it’s hidden behind the fabric ties.
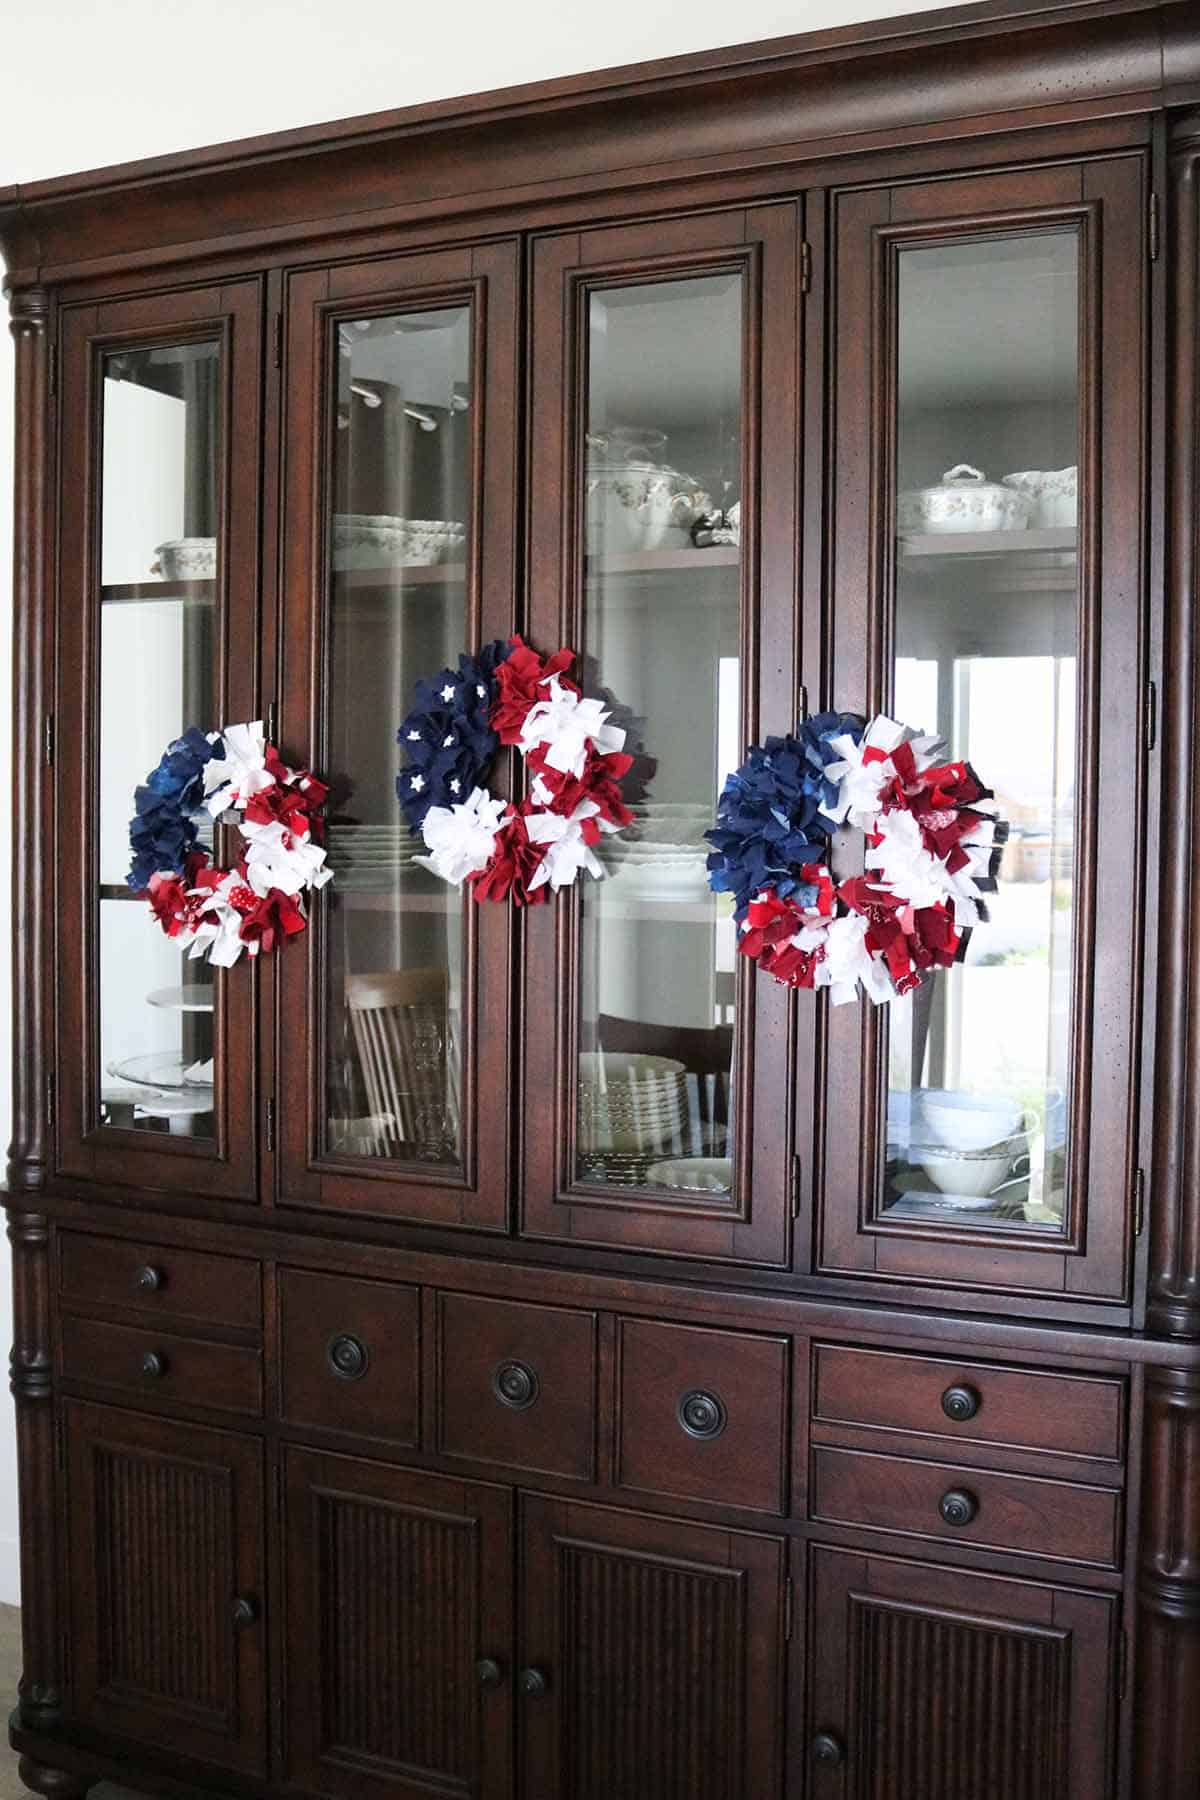
Fluff your rag wreath and hang it for everyone to admire! (Okay, I was probably the only one admiring my rag wreaths so proudly, but I loved seeing that pop of color on my china hutch!)
How do you make a full rag wreath?
If you want your rag wreath to look really full, just keep adding more strips, squishing the previously tied strips closer together. You can add as many strips as you want as long as there’s still room on the wreath form.
How to store your rag wreaths
These rag wreaths are easy to fluff out if they get smashed—just fluff the ties or pull them in different directions until the wreath looks full again. You’d probably be fine to store your wreaths in a box with the rest of your holiday decor…but just to be safe and keep them looking their best, I decided to store my wreaths by hanging them on hangers in my craft closet. If you’re worried about dust, you can easily cover them with a plastic bag as well.
DIY mini patriotic rag wreath
I love my new 4th of July wreaths! They are so fun to see every time I walk in my kitchen. You could also display your mini rag wreath on a wall or door, tied over a banister or kitchen cupboard, or even hang it from a doorknob.
I hope you try this easy summer craft! Let me know if you have any questions in the comments.

Don’t forget to pin and save for later!
Thank you !! These are perfect !!!
You’re welcome, Joyce! I’m glad you like them!
I actually cut mine with a pinking rotary wheel, on a bias, because I hate having to deal with the fraying. These look amazing! Am making some minis for gifts to use as candle rings (for jar candles) so I’ll use 7” strips instead just to be safe. Thanks so much!
Cutting on a bias is a great idea, I might have to get myself a pinking rotary wheel too! Candle rings will make great gifts. Thanks for reading! 🙂