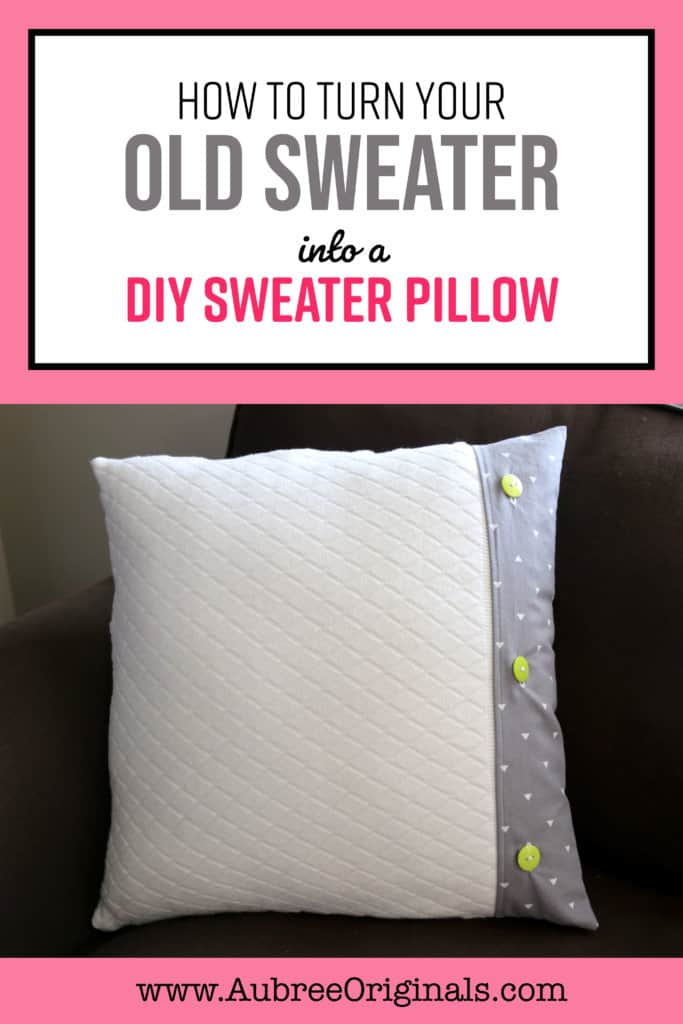
Recycle Your Old Sweater For a DIY Pillow Cover
Don’t throw away your old sweater! Turn it into a DIY pillow cover with a quick envelope style closure. An easy and thrifty sewing project for beginners!

This post contains affiliate links. For more information, see my disclosures here.
I’ve been doing some major spring cleaning at my house. It started in my craft room, but it’s affecting my closet, too. I just get so sick of the clutter sometimes. And the wastefulness of owning things that I don’t use or love enough to use frequently. (Maybe I’m watching too much of Marie Kondo‘s Tidying Up show.)
I’ve come to realize that my clothing choices revolve heavily around if they’re comfortable to wear. And if it doesn’t fit that description, it gets donated to the DI. Because it feels less wasteful if these gently-used items get a second chance at life.
Like this sweater:
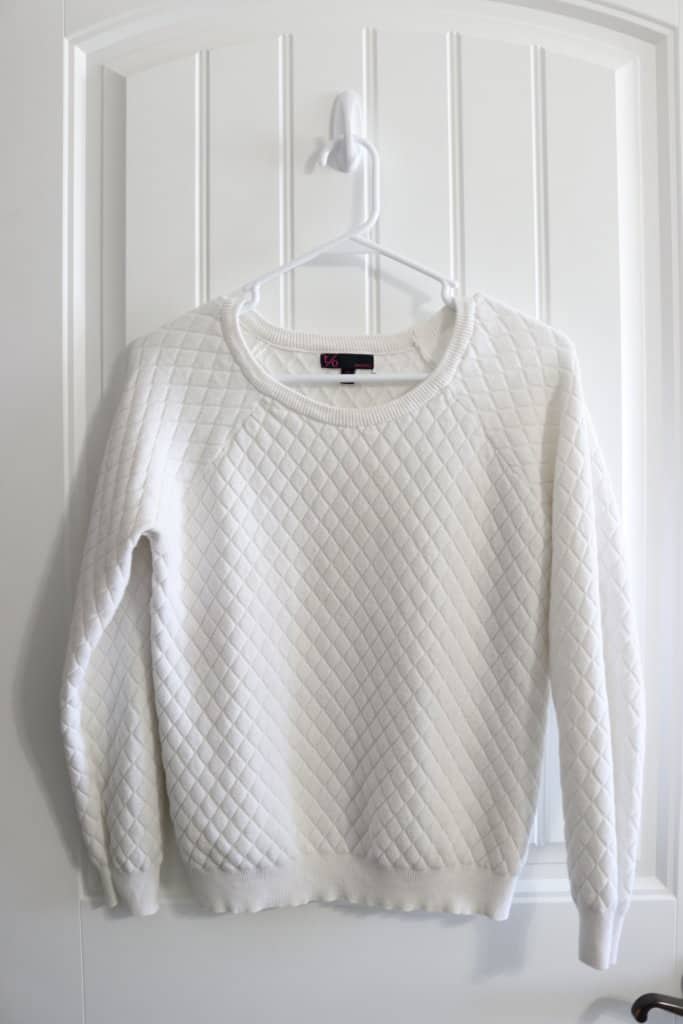
Though it doesn’t look it, this sweater has gotten a lot of love and wear in the last few years. But, sadly, it no longer fits me quite right. And after a few too many times of trying it on, only to then change into something more comfortable at the last second, it got tossed in the donate pile.
Now, this is the part where I dash your dreams of finding this cute sweater at your local thrift store. Because…true to my hoarding habit, it didn’t make it out of the house.
“But…what if I could use this someday for a craft project?” the girl wondered innocently. And then they found her body buried beneath a heaping pile of old fabric, a collection of emptied-out containers, and mounds of newspapers that she hoped would one day become beautiful craft projects.
That’s how my epitaph will read. Except for the newspaper part, I don’t collect newspapers.
Anyways, moving on…
How to make a DIY pillow cover from an old sweater
What you need to make a sweater pillow
- old sweater (or find one at the thrift store!)
- pillow form or fiberfill and needle/thread
- additional fabric
- buttons
- sewing machine
- serger (highly recommended)
- cutting mat (this one‘s a little bigger than mine, which would be the perfect size)
- Omnigrid ruler
- rotary cutter
How to make a sweater pillow
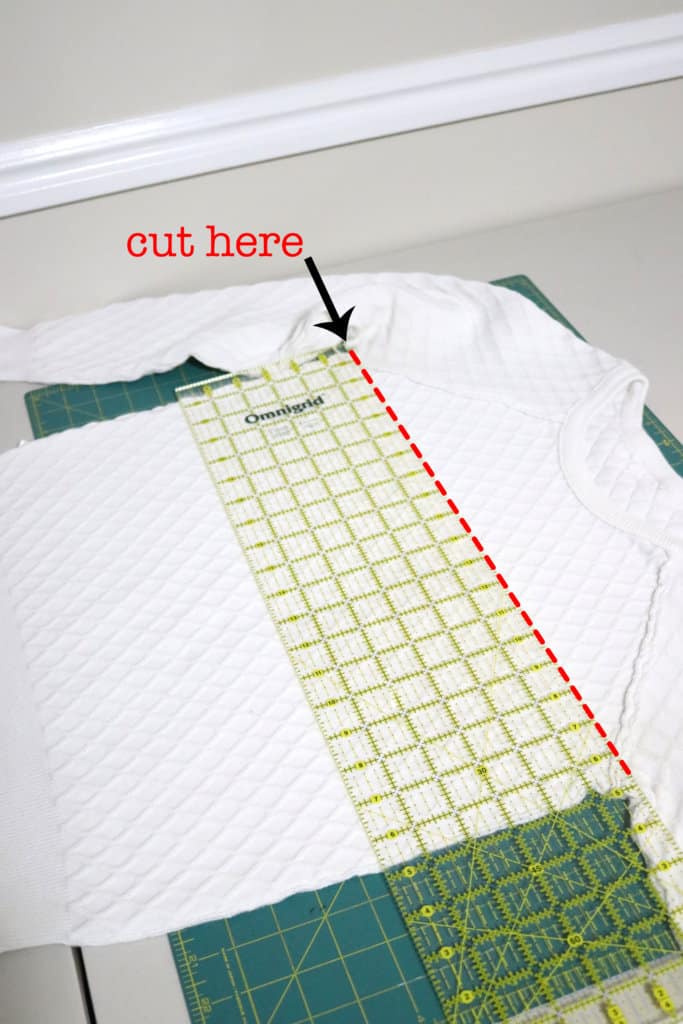
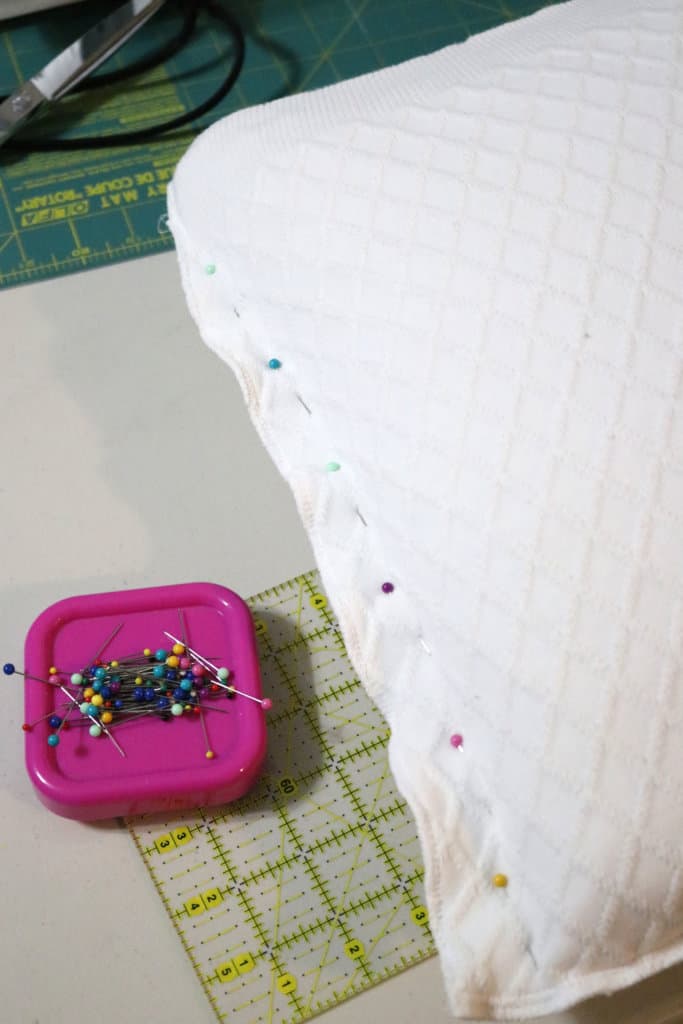
First, cut your sweater straight across at the armpits. I highly recommend investing in a cutting mat, rotary cutter, and some quilting rulers. I wouldn’t even attempt to cut a straight line without them. Plus, the markings on the ruler are super helpful to see if your fabric is lined up straight before making the cut.
Next, you have a couple options:
Option 1
This would be for those of you planning on using fiberfill to stuff your own pillow.
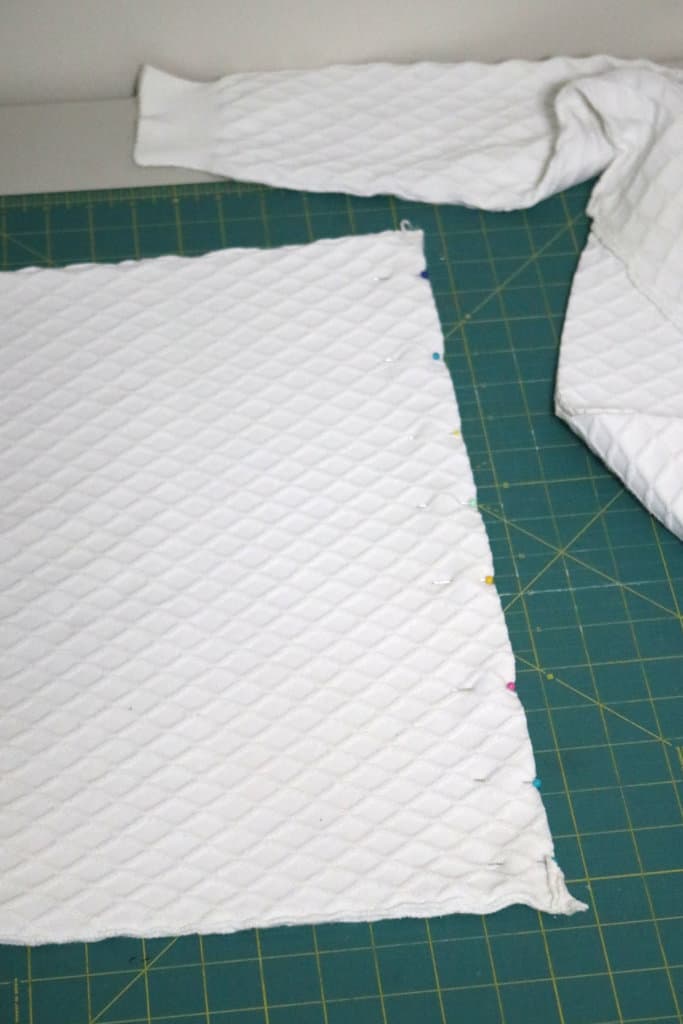
Simply cut the sweater at the side seams so you have two squares. Measure and cut each of the squares to measure 1/2″ bigger than your desired finished size.
Sew the squares right sides together using a 1/4″ seam allowance, leaving an opening in one side big enough to stuff the pillow. (If you’re worried about the strength of your seams, you could cut your fabric 1″ bigger than the finished size and sew with a 1/2″ seam allowance instead–or anything similar, just making sure you double the measurement to account for each side.)
Turn your pillow cover right side out and stuff with fiberfill until it’s as full as you want it. Slip stitch the opening closed by hand with a needle and thread.
Option 2: the method I’d choose (and then you can skip over the rest of this ridiculously long post!)
Make a simple envelope pillow cover. (I recommend reading that post first if you’re unfamiliar with envelope pillow covers.)
Cut the sweater at the side seams. Cut two rectangles from one of the sides. These rectangles will form the overlapping envelope closure on the back of the pillow, so cut them as wide as possible while still keeping them equal in size.
With the other side of the sweater, cut a square measuring the same width/length as the long side of the rectangles. Then, follow my tutorial for how to sew an envelope pillow cover.
If you don’t have enough sweater material for both the front and two back panels, you can use regular fabric for one or both of the back panels and you’ll still get the cozy sweater effect!
Option 3
Create a slightly more complicated envelope style closure. Which I don’t really recommend, but of course it’s what I ended up doing. And of course I failed to get pictures near the end.
See…at first, I thought I could stretch my pillow cover and force it to fit a larger pillow form with a button closure on one end. It failed and the buttons didn’t hold like I had hoped. So, I was forced to add some extra fabric to one end of the pillow to lengthen it. (But I wasn’t sure if this idea would work either, so I stopped taking pictures, but I’ll do my best to explain.)
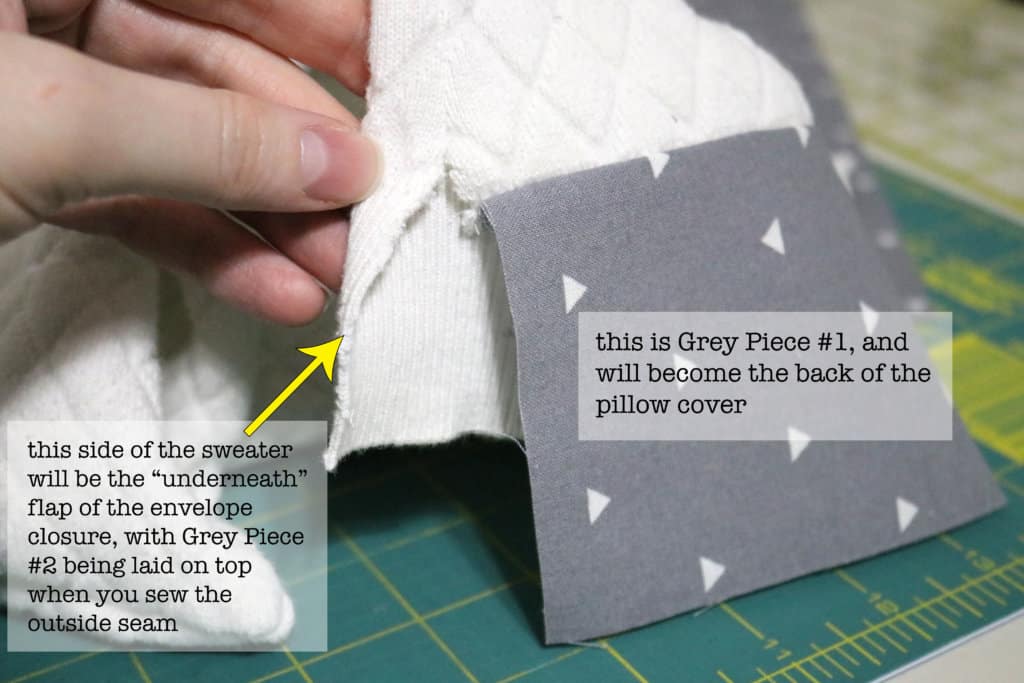
It would be easiest to add extra fabric to your sweater material prior to sewing any of the squares/rectangles together (make sure when you’re cutting extra fabric to account for seam allowances between the sweater and new fabric, as well as on the outer edge). However, I had already sewn all but one side, so I simple unpicked a few inches on each side of the open one, and sewed the grey fabric to the sweater, right sides together.
Clarification: at this point, I’m only sewing one piece of the grey fabric to one side of the sweater. We’ll call this rectangle of grey fabric Grey Piece #1.
Grey Piece #2 is going to become one flap of the envelope closure, with the other side of the sweater being the other flap of the closure. I tried to label the photo below to explain better. When you cut Grey Piece #2, you need to add additional width to finish and turn the edge, the way you do for each of the flaps in an envelope pillow cover. My sweater edge was already finished (as you can see below), so I did not need to finish that edge.
*Okay, now is when might be easiest to sew buttons and buttonholes (before you get the sides all sewn together), but I will explain those instructions after the next part so it makes more sense where to sew them on.
I may totally lose you with this next part, because it’s hard to explain without pictures (though I took a few once the cover was finished). If you have experience with envelope closures, hopefully this will still make sense. You just have to think of this now like a regular envelope closure except that it’s far off to one side of the pillow.
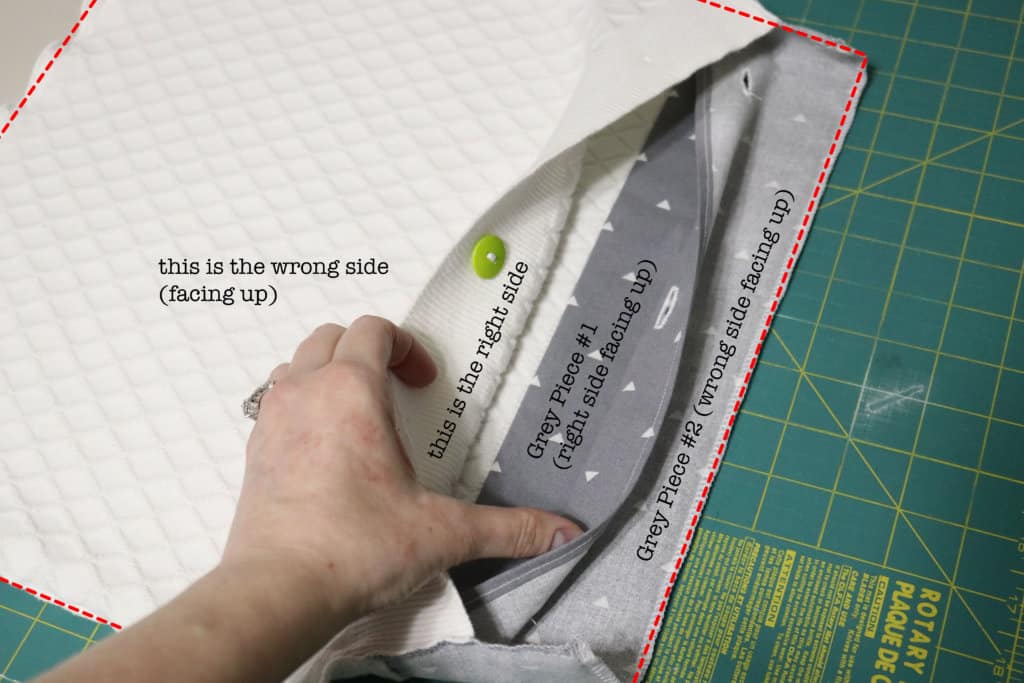
Turn the pillow cover inside out if you’ve already sewn some of the edges like I had. Lay the cover so that the sweater sewn to Grey Piece #1 is face up. Lay Grey Piece #2 on top of Grey Piece #1 so that the edges are aligned and make sure right sides are together. The envelope-closure sweater side should now be laying on top of Grey Piece #2, wrong side facing up. Or, if you haven’t sewn any of the edges, lay this piece on top, wrong side facing up. Hopefully these images explain the layering a little better:

*Back to the buttons. Because the envelope closure is so far off to one side and there’s not much overlap of the envelope flaps, you will need to sew on buttons to hold it shut over the pillow form.
I chose to use 3 buttons, but you can use more or less depending on the size of your pillow and how many are needed to keep the cover closed shut. Reference the images above. Sew your buttons to the sweater side, so they’re face up on the right side of the sweater. Sew buttonholes to the right side of Grey Piece #2.
You can sew these by hand, but it’s way easier by machine. If you don’t know how to sew buttons and buttonholes, see if your sewing machine’s user manual has instructions (it should, and I look up things like this all the time to remember what to do!). Also, practice on scrap fabric first. Your sewing machine might be slightly different, but here’s what I do:
How to sew buttons with a sewing machine
- Change the stitch setting to the one that looks like a button.
- Remove your presser foot and lower your feed dogs.
- Center the presser foot ankle (what holds the presser foot) over the button and lower the presser foot ankle. It should be sitting centered just slightly above the button holes. Adjust your stitch width so that the needle is aligned with the left button hole.
- Turn the handwheel to lower the needle and double check that it will go through the first button hole. Then begin sewing slowly and make sure that the needle goes through the other button hole without hitting the button (or else your button will chip or break, which I have done more than once!).
- Sew/hold down your pedal until the button has a good amount of stitches back and forth and looks secure, and press the backstitch button to stop your machine. Don’t forget to raise your feed dogs when you’re finished!
How to sew buttonholes with a sewing machine
I recommend practicing on scrap fabric if this is your first time! Practice the exact length you’ll need for your buttons, and then make sure the buttonhole is the right length (by actually sliding your button through it) before sewing on your actual fabric.
- First, mark the location where your buttonhole needs to be on the right side of the fabric. An easy way to do this is lay the buttonhole fabric on top of the button fabric (with buttons already sewn on) and line up the outside edges where they will be sewn together. Feel for where the buttons are and mark the top and bottom edges in the center of the buttons (where you can feel them) with a fabric pencil or disappearing ink pen.
- Change the stitch setting on your machine to a buttonhole option and attach the required presser foot (mine is presser foot C).
- My machine starts sewing at the bottom left of the buttonhole, goes up to the top, and then back down to make the right side and bottom of the buttonhole. Set up your fabric in the machine so your marking (where the center of the button will be) is just slightly to the right of the stitching.
- Begin sewing and sew until you reach the top marking.
- Press the backstitch button so your machine switches directions and starts sewing the top and coming down the right side.
- Once you get to the bottom marking (where the first stitches started), press the backstitch button again so your machine starts sewing the bottom and finishes off the buttonhole. Keep your pedal depressed until the needle starts going up and down in the same spot: this is how you’ll know the buttonhole is finished.
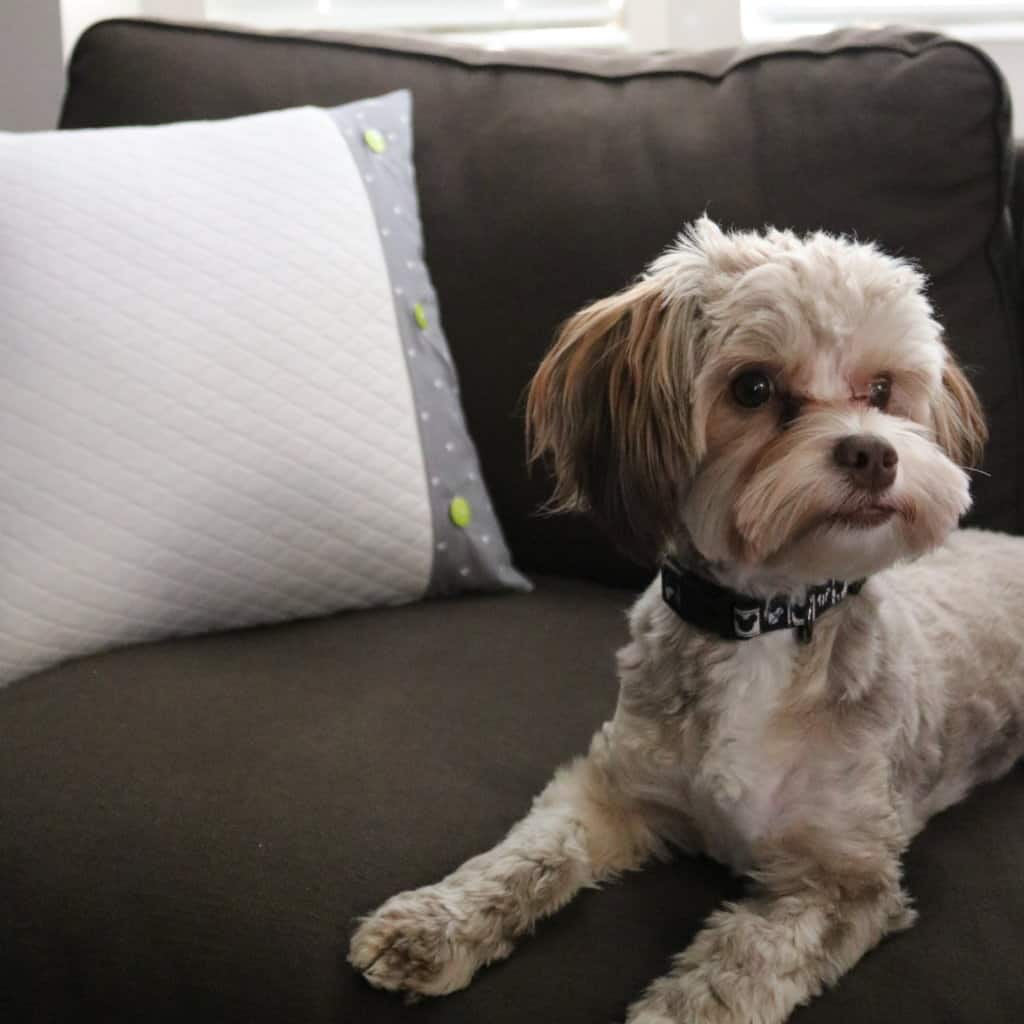
Yay! Finally done. Whew! That was a lot of explaining. And I’m still not sure it’ll all make sense. But I hope so, because this pillow turned out super cute, and is such a great option if you’d like to get one more use out of an old sweater!
If you have any questions at all, leave a comment or send me an e-mail and I’ll see what I can do to help!
Basically, follow my tutorial for an envelope pillow cover, and if you can, cut your front and back panels from the sweater. And if you don’t have enough sweater, sub one or both of the back panels for regular fabric that coordinates. 🙂
Chip decided he wanted to be part of the photo shoot…and he’s so cute, how can you be mad?

Thanks for reading and don’t forget to pin and save for later!