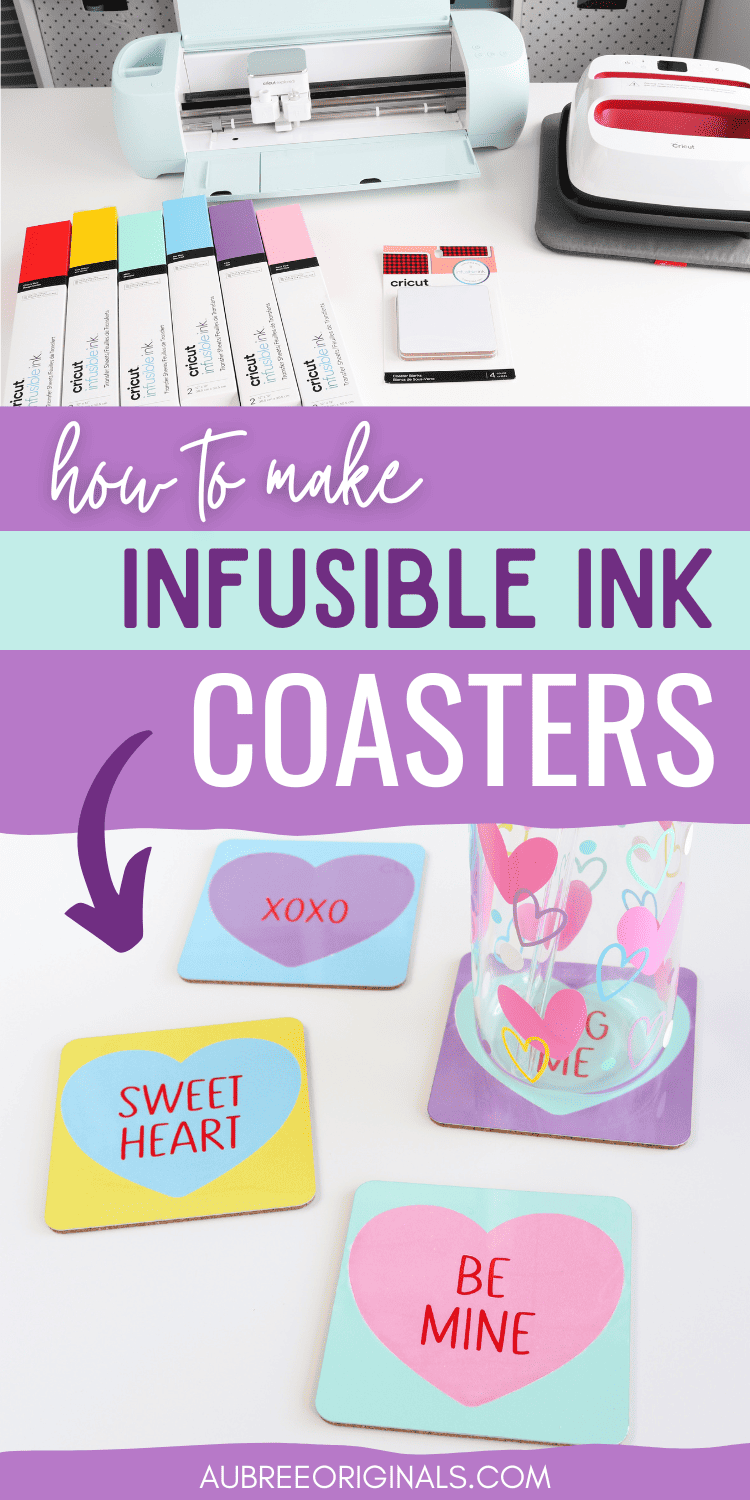
How to Make Conversation Heart Valentine’s Coasters
Learn how to use multiple colors of Infusible Ink to make these fun DIY conversation heart Valentine’s coasters with Cricut.
I love making craft projects for fun that I have no real use for. Because, let’s be honest, I don’t actually use coasters in my home…where chocolate milk is the beverage of choice and you might have to brush the Pop Tart crumbs off the couch before sitting down to watch Bluey…
But I still think making Cricut coasters is one of the most fun and satisfying craft projects. And it’s fine, I can just gift them to someone who will use them more than me, right? (Because I’m not going to stop making them. 😁)
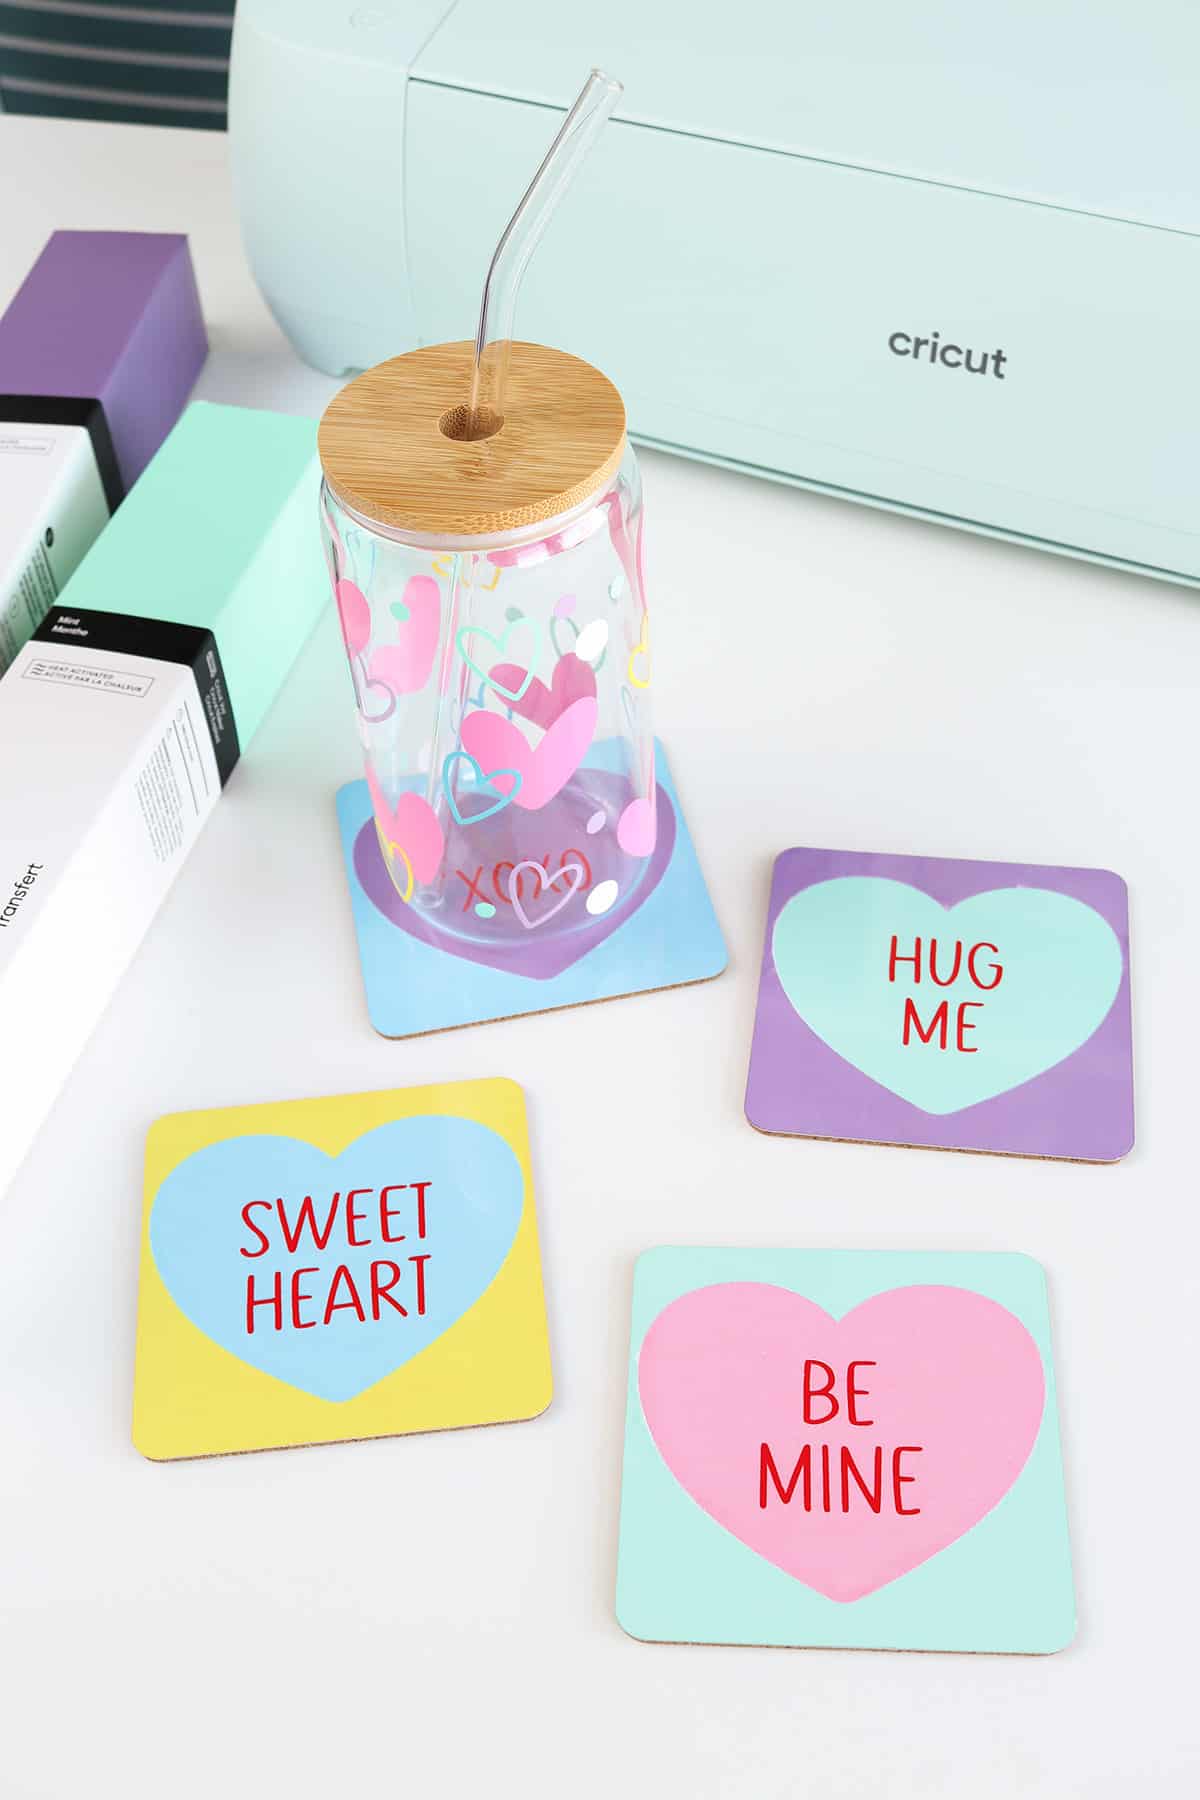
These conversation heart coasters are perfect for Valentine’s and would make great…conversation pieces (see what I did there?).
You can customize the text to say anything you want. (Check out my conversation heart Valentine’s banner for all the funny phrase ideas.)
And if you’ve never used multiple colors of Infusible Ink in the same design before, I’ll show you how to do that too!
This post contains affiliate links. For more information, see my disclosures here.
What you need to make conversation heart coasters
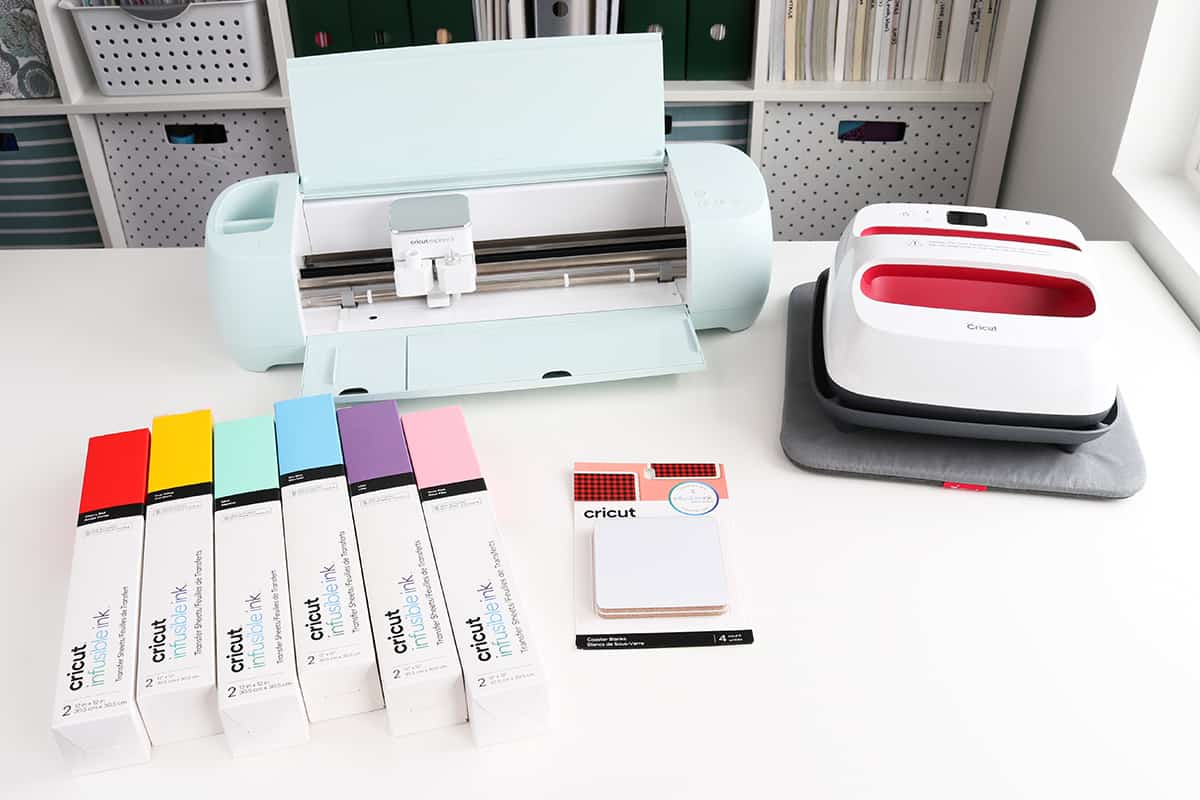
- Cricut coasters: I used square ones for this design
- Cricut machine with a fine-point blade: I used my Explore 3, but any current Cricut machine will work
- a StandardGrip or LightGrip mat that fits your machine
- Cricut EasyPress and pressing mat
- Infusible Ink transfer sheets: I used Cherry Red, True Yellow, Mint, Sky Blue, Lilac, and Rose Pink (the colors aren’t as pastel as I hoped, but you still get the “conversation heart” idea)
- butcher paper (you should get a couple sheets in each box of Infusible Ink)
- a lint-free cloth (you should also get a small white cloth with your Infusible Ink, this is what I used)
- white cardstock to protect your pressing mat
- BrightPad Go (optional, but super helpful!)
- heat resistant tape (optional, but also helpful)
- brayer
Can you layer Infusible Ink?
You can’t layer Infusible Ink the same way you would with adhesive or iron-on vinyl. But you can use multiple colors of Infusible Ink in the same design by doing what Cricut calls the “Slice and Set” method.
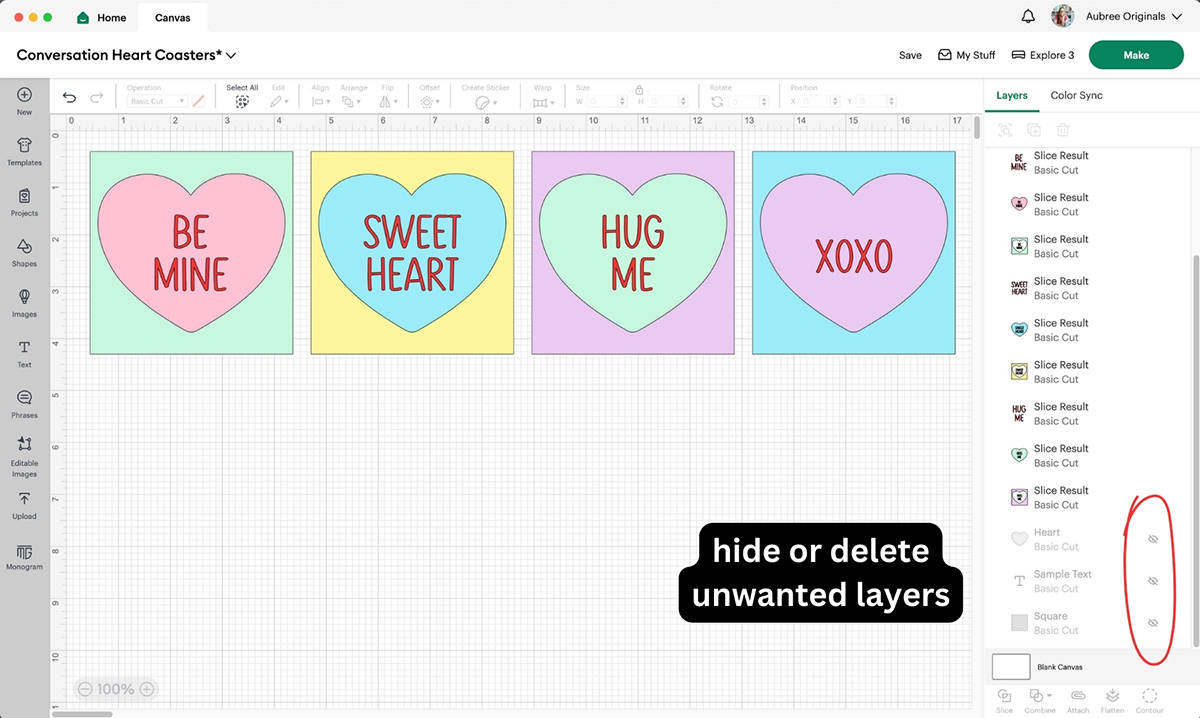
To make this work, you have to slice your layers in Design Space, wherever they overlap, before cutting your project (you can see how all my layers are sliced in the image below).
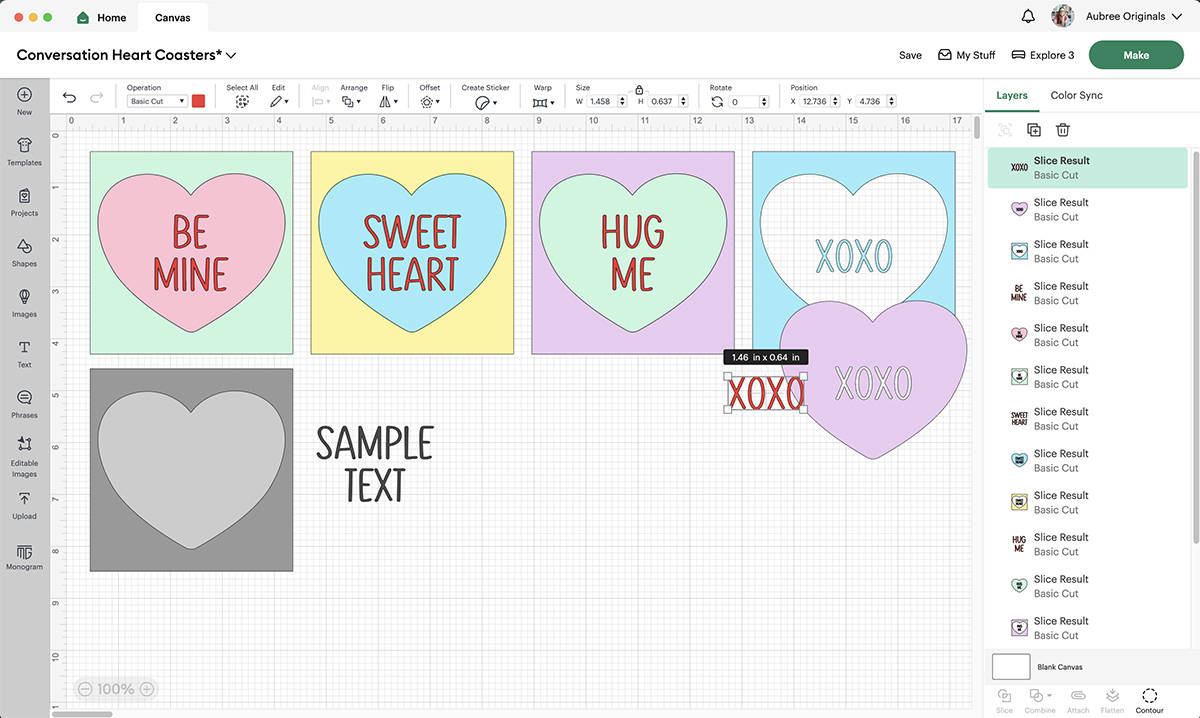
Then, when you go to make your project, you assemble the Infusible Ink colors onto one liner sheet, only keeping the colors you want and removing any extra pieces.
This is actually pretty simple to do, but I will warn you that your results may vary. Some of my “layered” coasters turned out great, and others had small imperfections where the heat didn’t apply as evenly to certain color layers*. Sticking with a single sheet of Infusible Ink, especially on something like coasters, has much less room for error.
But, I’m stubborn, and I had this conversation heart idea in my head for awhile and really wanted to try it. Overall, I’m pleased with how these coasters turned out!
*The Slice and Set method is like doing a puzzle, but some of the pieces don’t sit as flush as you’d like, due to minor imperfections in the cutting, weeding, or assembly. And there’s no way to really preview it while pressing, so you just have to wait until everything’s pressed and cooled to see the final result.
How to make coasters with Cricut
Customize in Design Space
Open my Conversation Heart Coasters project in Cricut Design Space. If you want to edit the text or create new conversation hearts, first duplicate the sample text and heart layers so you always have an original to work with.
Then you can double click on the sample text box to type your new phrase. (I’ve got tons of good conversation heart phrase ideas here.)
Center the text over the blank heart by selecting both and click Align–Center. While they’re both still selected, click Slice. Now select that slice result and the blank square and Align–Center. Click Slice.
Delete the extra layers so you’re left with three pieces: the background square with a heart cut out and text, the heart with text cut out, and the text by itself. If you want the text to be the same color as the background, you can delete the extra text layer.
Note: The inside of the square piece, once cut out, will just be a scrap of Infusible Ink since you won’t be using it for your coasters. But you can actually save the cut pieces to use for another project. If you’d rather the scrap heart be solid without the words cut out, you can either contour the square piece to remove the letters (with the square selected, click Contour–Hide All Contours, and then click only the heart shape so that still gets cut out). Or you can slice the heart and square first, then slice the text over the heart separately. If I’ve totally confused you, disregard this whole side note!
If you’re using different colors of Infusible Ink, I also recommend changing the colors on the Canvas to match before cutting your project–there’s a lot of pieces and it’s easy to get confused on which color to load on the mat.
Cut Infusible Ink with your Cricut
Once you’ve finished editing the design as needed, hide any layers you don’t want to cut by toggling the eye icon in the layers panel, then click Make.
Choose On Mat, For any material.
On the Prepare screen, be sure to select Mirror for all mats, since Infusible Ink must be mirrored!

You can also rearrange any pieces if needed on the Prepare screen (if you’re not using full sheets of Infusible Ink, you can move the pieces to fit the scraps on your mat, etc.).
Click Continue and select your material settings (Infusible Ink Transfer Sheet).

Load your Infusible Ink on a cutting mat, paper/ink side up, smooth liner side down (I like to use my brayer tool to make sure the sheet is adhered well to the mat).

Load the mat into your machine and click Go when prompted. When done cutting, remove the mat.
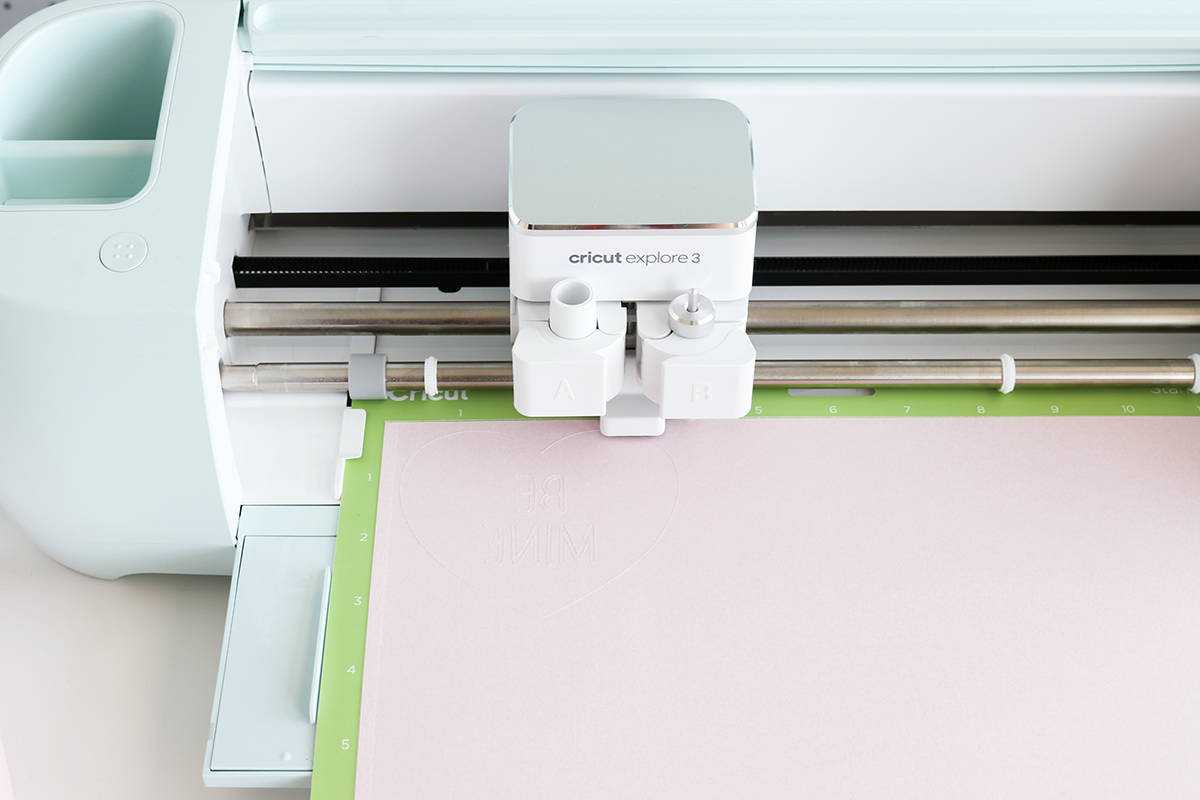
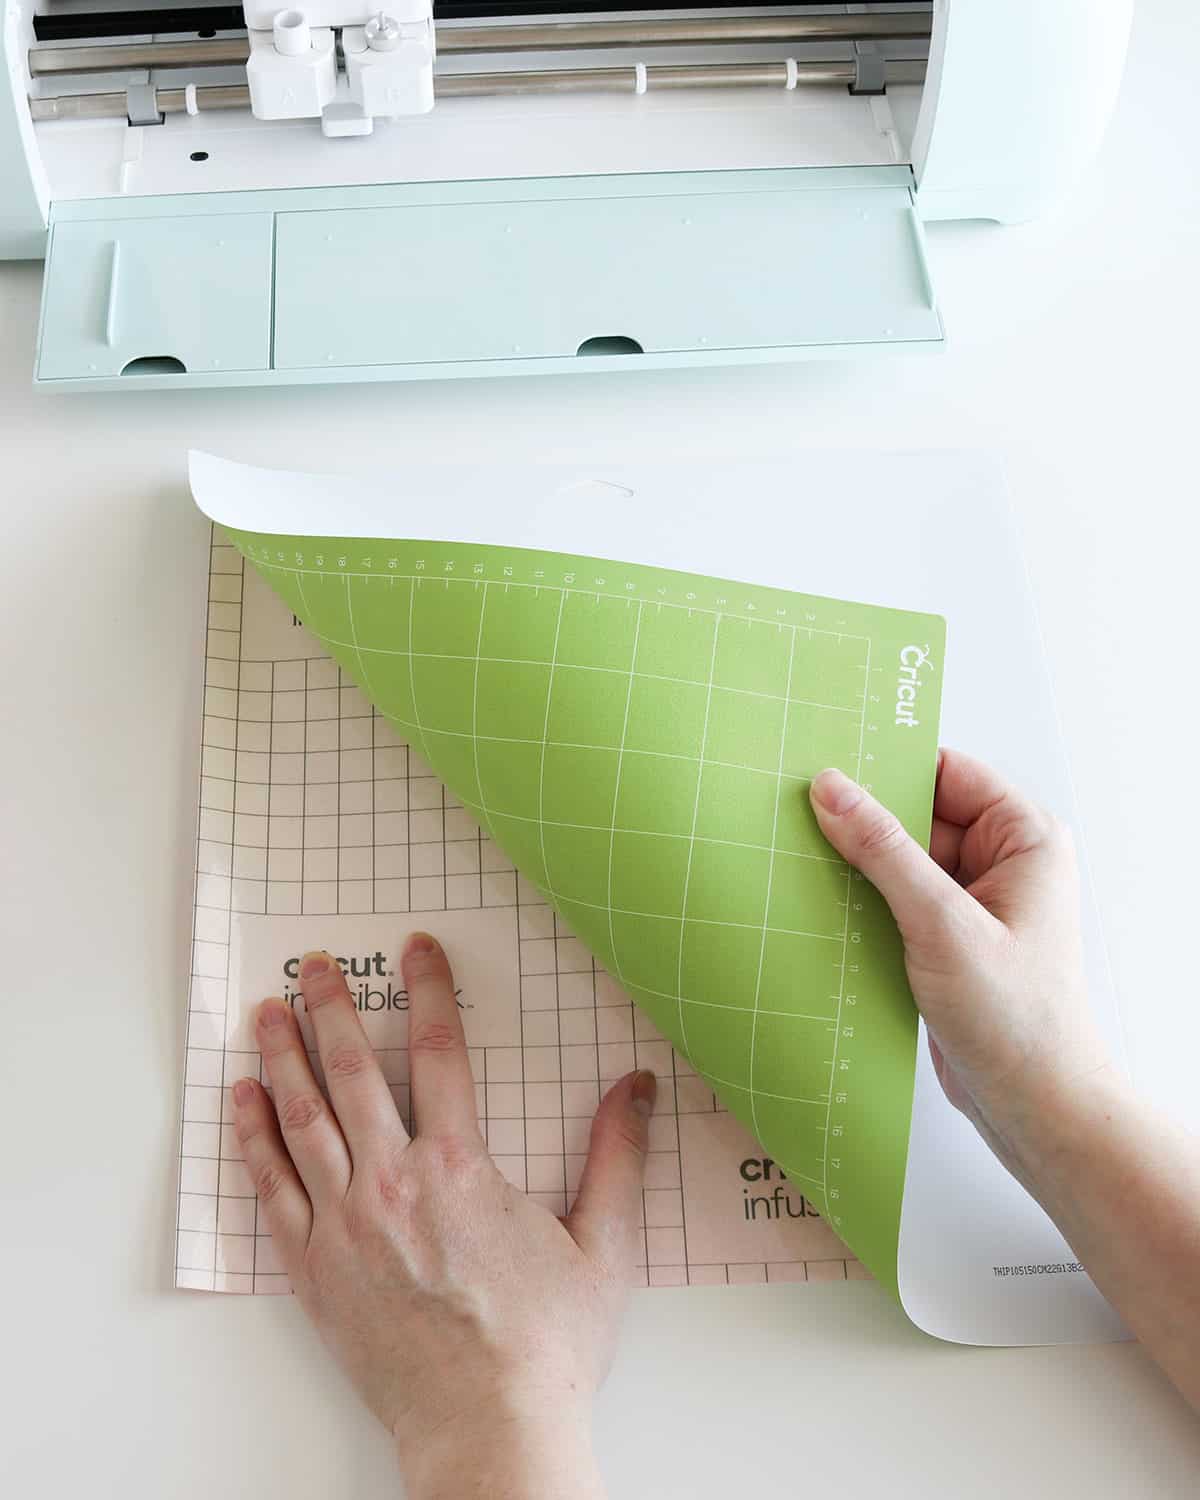
Flip your mat upside down on your table and peel the mat away from the Infusible Ink, keeping the Infusible Ink sheet flat to not wrinkle it.
Continue loading and cutting mats until all your pieces are cut.
Weed and prepare Infusible Ink
You have to pay attention for this next part and how you weed the hearts (I may have gotten distracted and weeded the wrong thing the first time).
If it’s a heart by itself (not in a square), you can weed it out by peeling it away from the liner with your fingers. I flipped the Infusible Ink sheet upside down and peeled carefully, especially around the text–Infusible Ink can tear if you’re not careful!
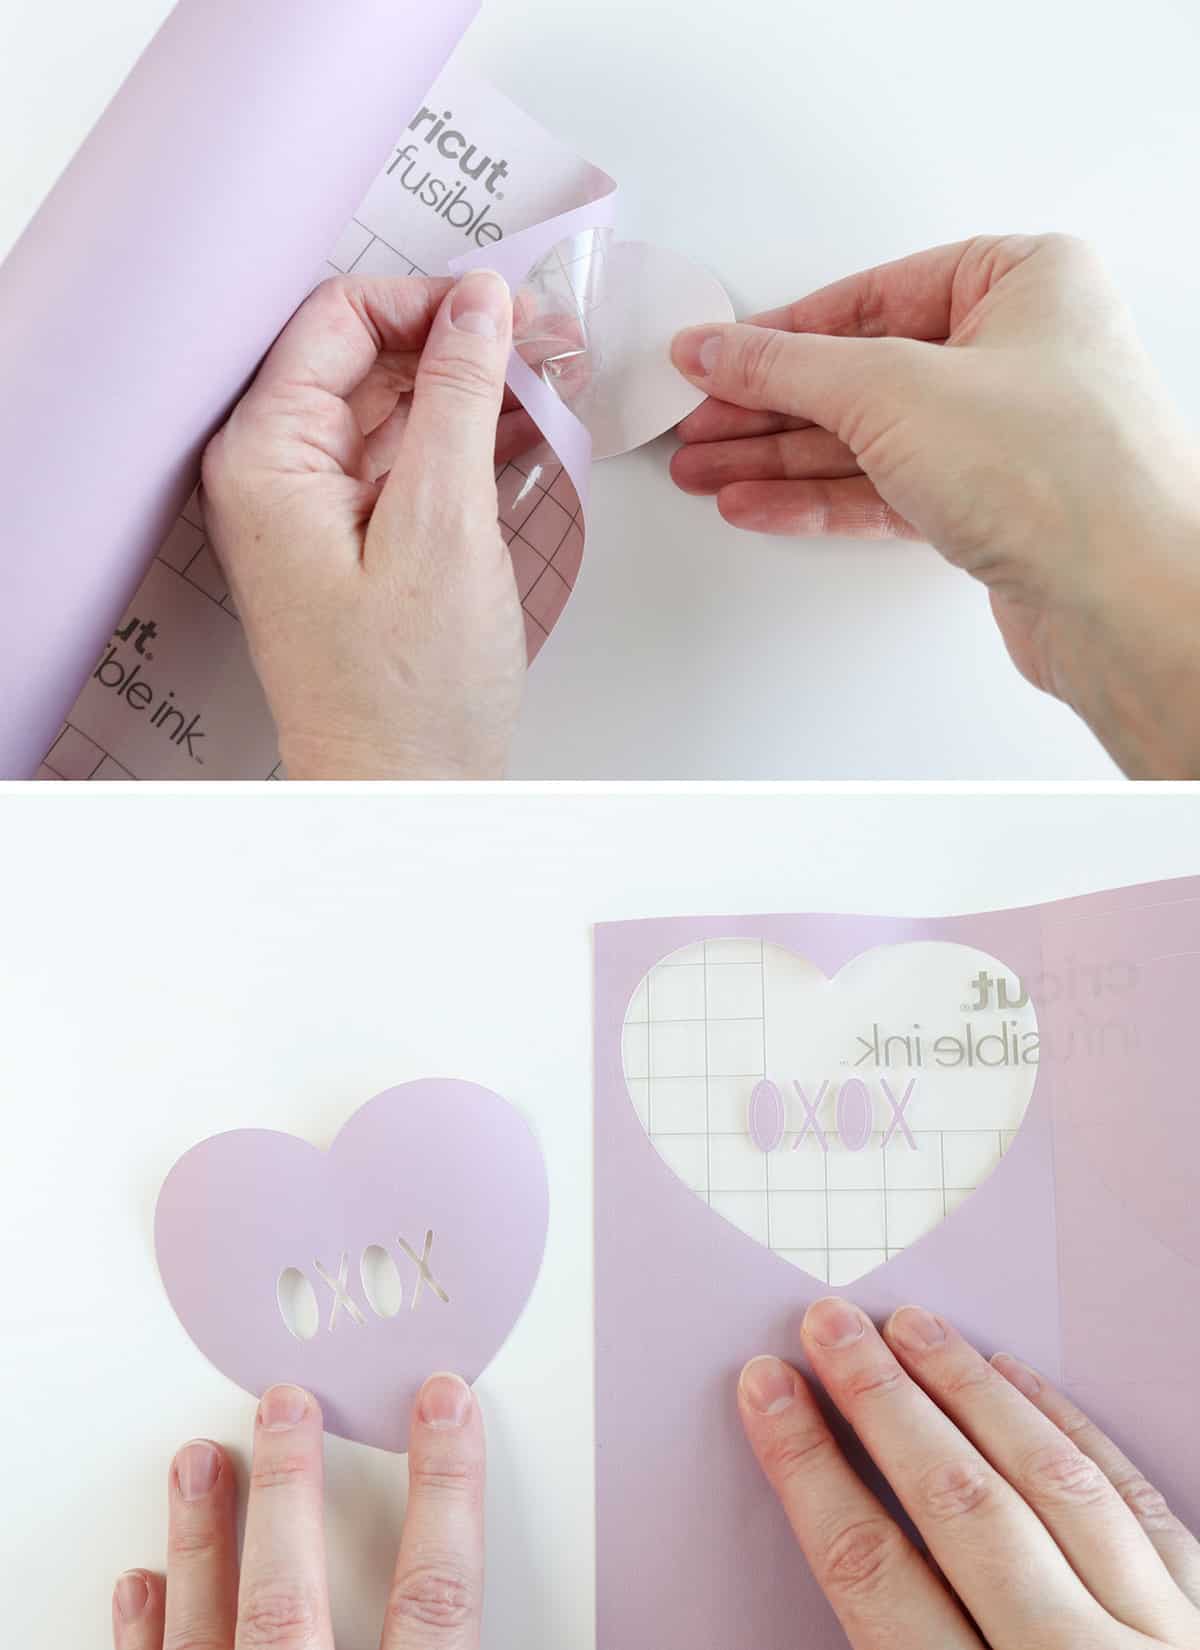
When weeding these hearts, be sure to save the insides of the letters (to fill in the “O”, etc.). You can leave them attached to the liner sheet until you’re ready to use them.
If it’s a square, you want to leave it on the liner. Cut around the shape, giving yourself a small border, then weed the border (just peel it off with your fingers). You can then weed the heart out by peeling it off, as well as the text…unless you’re keeping the text the same color as the background square, then you’d leave it on the liner.
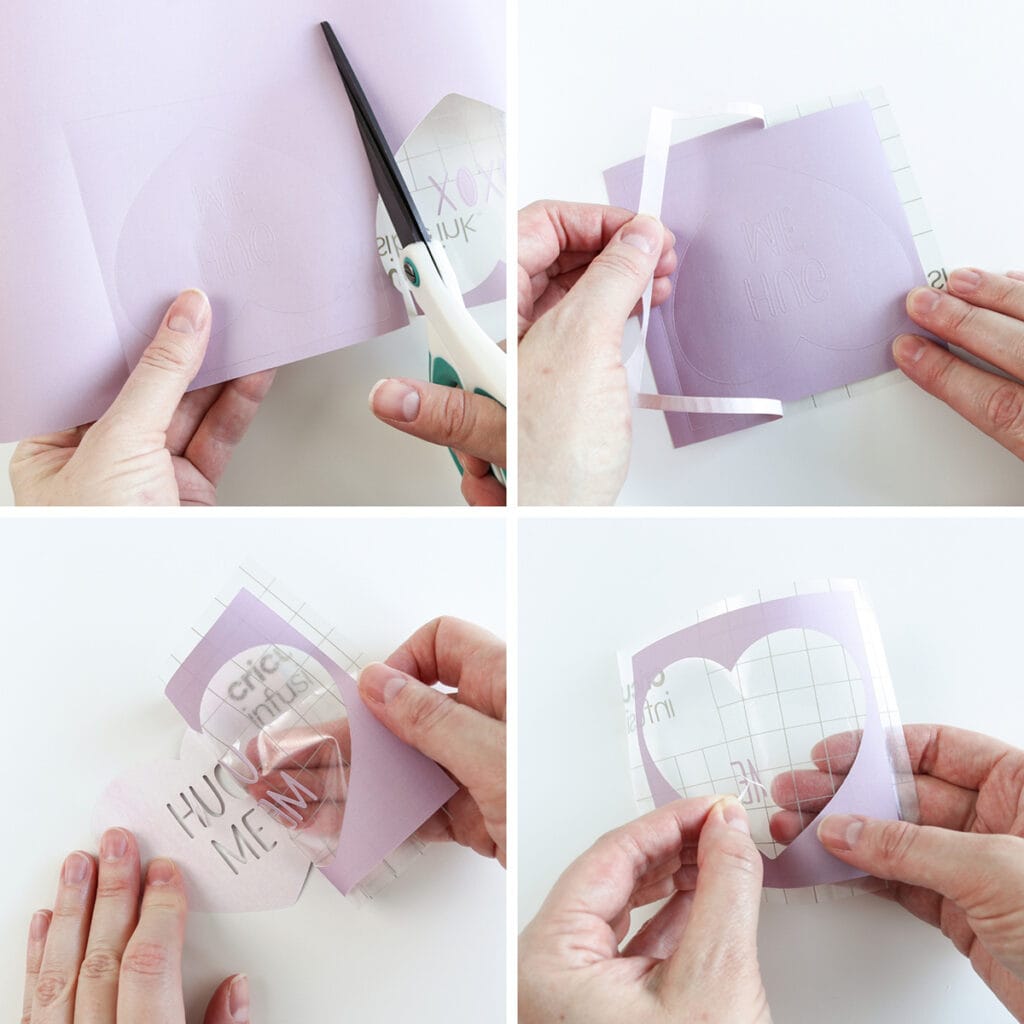
If all your text is red, like mine (or whatever color you chose), then leave it un-weeded for now.
Take your first weeded square (on it’s liner sheet) and lay it ink/paper side up, so the sticky liner is exposed in the middle. Place its corresponding heart on the liner, fitting it inside the heart “hole”–be sure the ink/paper side is face up (you don’t want to stick the ink to the sticky liner or it’ll get ruined…ask me how I know…and then obviously it wouldn’t transfer correctly either). Your text should still look backwards at this point.
Next, peel your text letters away from their liner sheet, one at a time, and place in the “holes” in the heart (ink/paper side up). Fill in any letters that have insides (these pieces will be the color of the heart, which you should have saved on their original liner sheet).
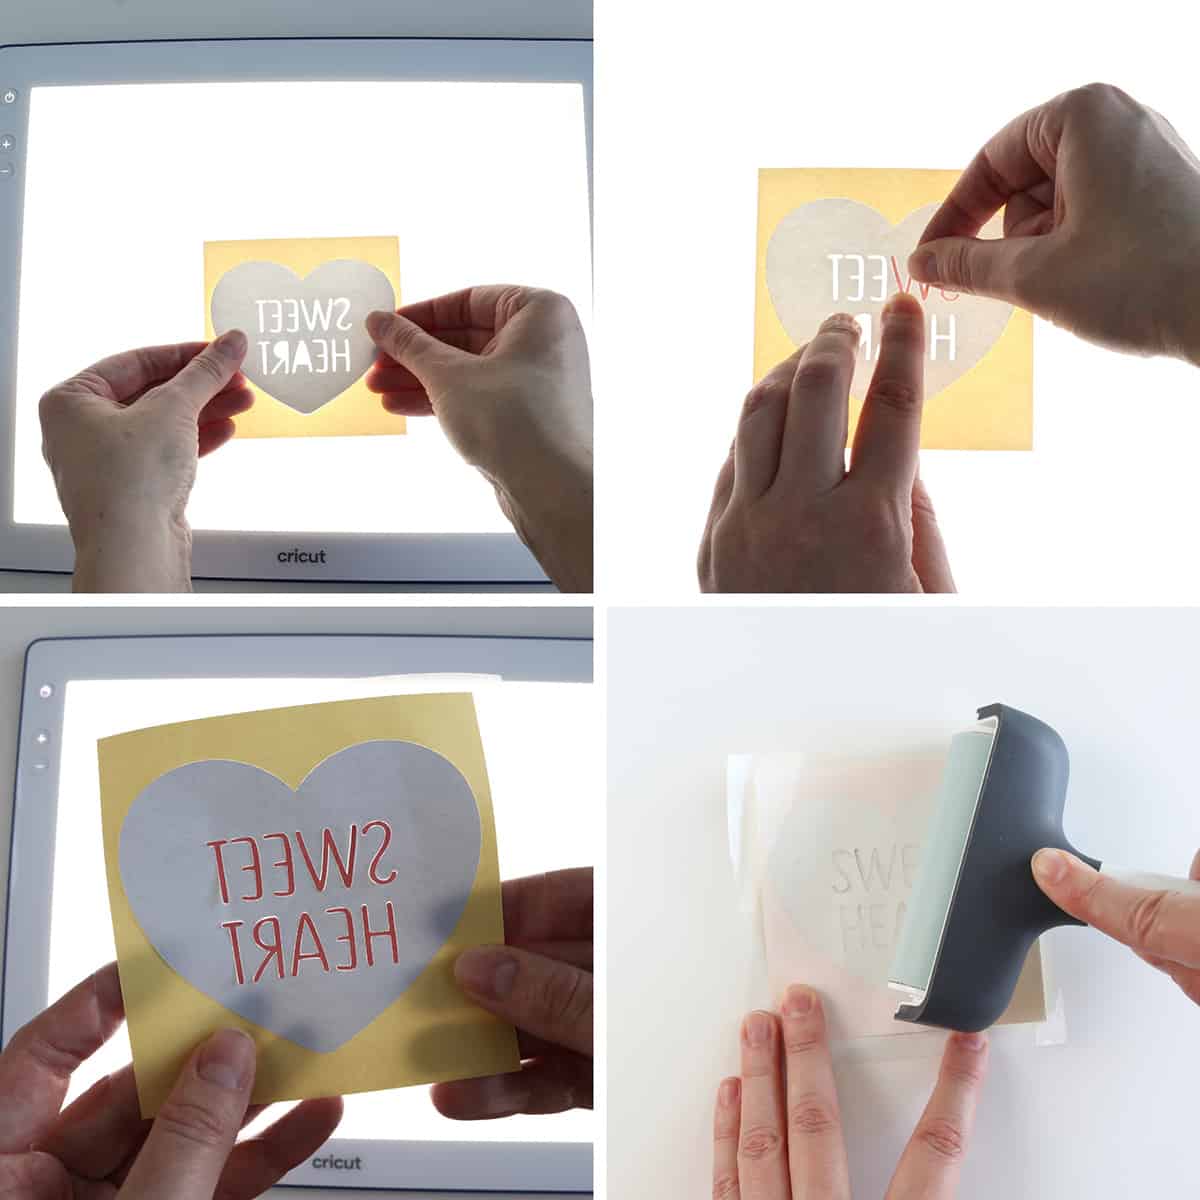
For the “layering” assembly, I highly recommend using a BrightPad! It helps so much to lay your pieces on it and be able to see where you have gaps in the Infusible Ink, if you need to reposition the layers one direction or another.
(A window or other light source would work too, it’s just way less convenient than the BrightPad. Check out my BrightPad review here for more reasons why I love it.)
Some of the pieces didn’t want to stick to the liner sheet, so I flipped the sheet over and rolled over it with my brayer to press it down better (you could do this right before heat pressing, too).
Prepare the coasters
Wipe your coaster with a lint-free cloth to remove any fingerprints or dust. (If you skip this step, any small pieces of lint or debris will show up in the final coasters!)
To make sure your heart design is centered on the coaster, keep the layered Infusible Ink heart with the ink side up and lay a coaster upside down on top of the sheet. Eye the edges and position the coaster so the overlap is equal on all sides.
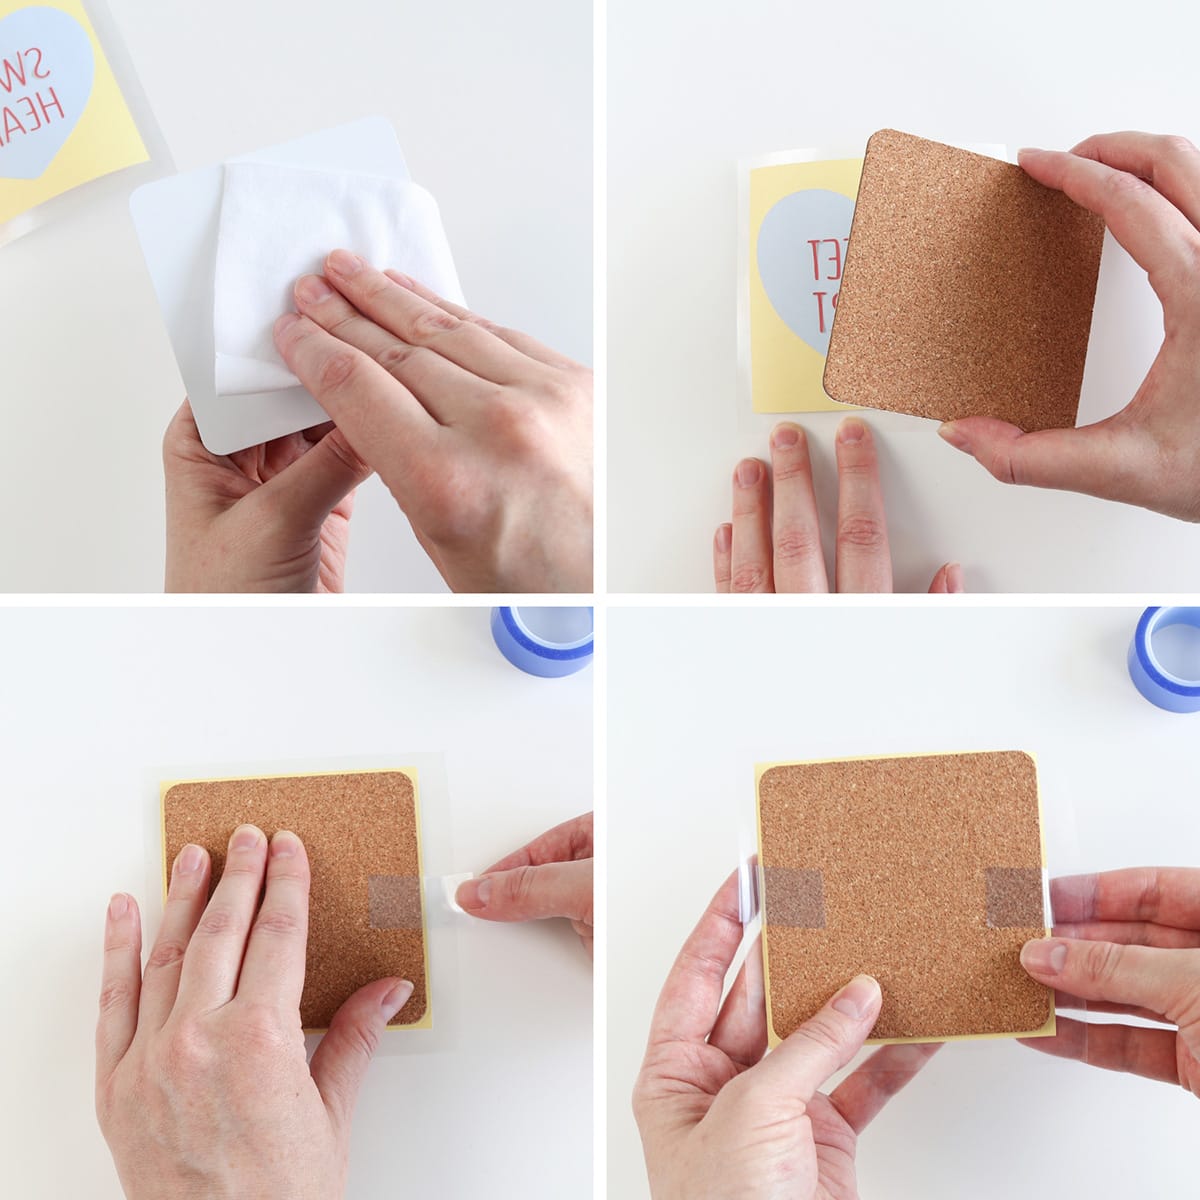
Apply a piece of heat resistant tape to at least two of the edges to hold the Infusible Ink in place (this also helps keep the letters and other pieces from shifting).
Heat press Infusible Ink to coasters
Plug in your EasyPress to heat it up. Since I used square coasters, the EasyPress should be set to 400° F and the press time is 60 seconds. (You can always refer to Cricut’s heat guide if you forget this.) Set your EasyPress to these settings.
Place a blank white sheet of cardstock on your pressing mat to protect it from getting ink on it.
Next, lay the coaster face up on the cardstock, with the Infusible Ink sheet on top of it (the clear liner should be face up and your design should not look backwards now).
Lay a sheet of butcher paper on top of the coaster. (Cricut says you shouldn’t reuse the butcher paper for more than one project, but I used mine for multiple coasters without any issue.)
Once your EasyPress is to temperature, you’re ready to press.
Note: If you’re using a larger EasyPress, you can actually press multiple coasters at the same time. Just make sure the heat plate covers each coaster completely. For this project, I just did one at a time, prepping the next one while the first was pressing, etc.
Lay your EasyPress on top of the mat/cardstock/coaster/butcher paper stack (there’s no need to apply any pressure, so just lay it down carefully and let it go). Push the “C” start button on your EasyPress to start counting down 60 seconds.
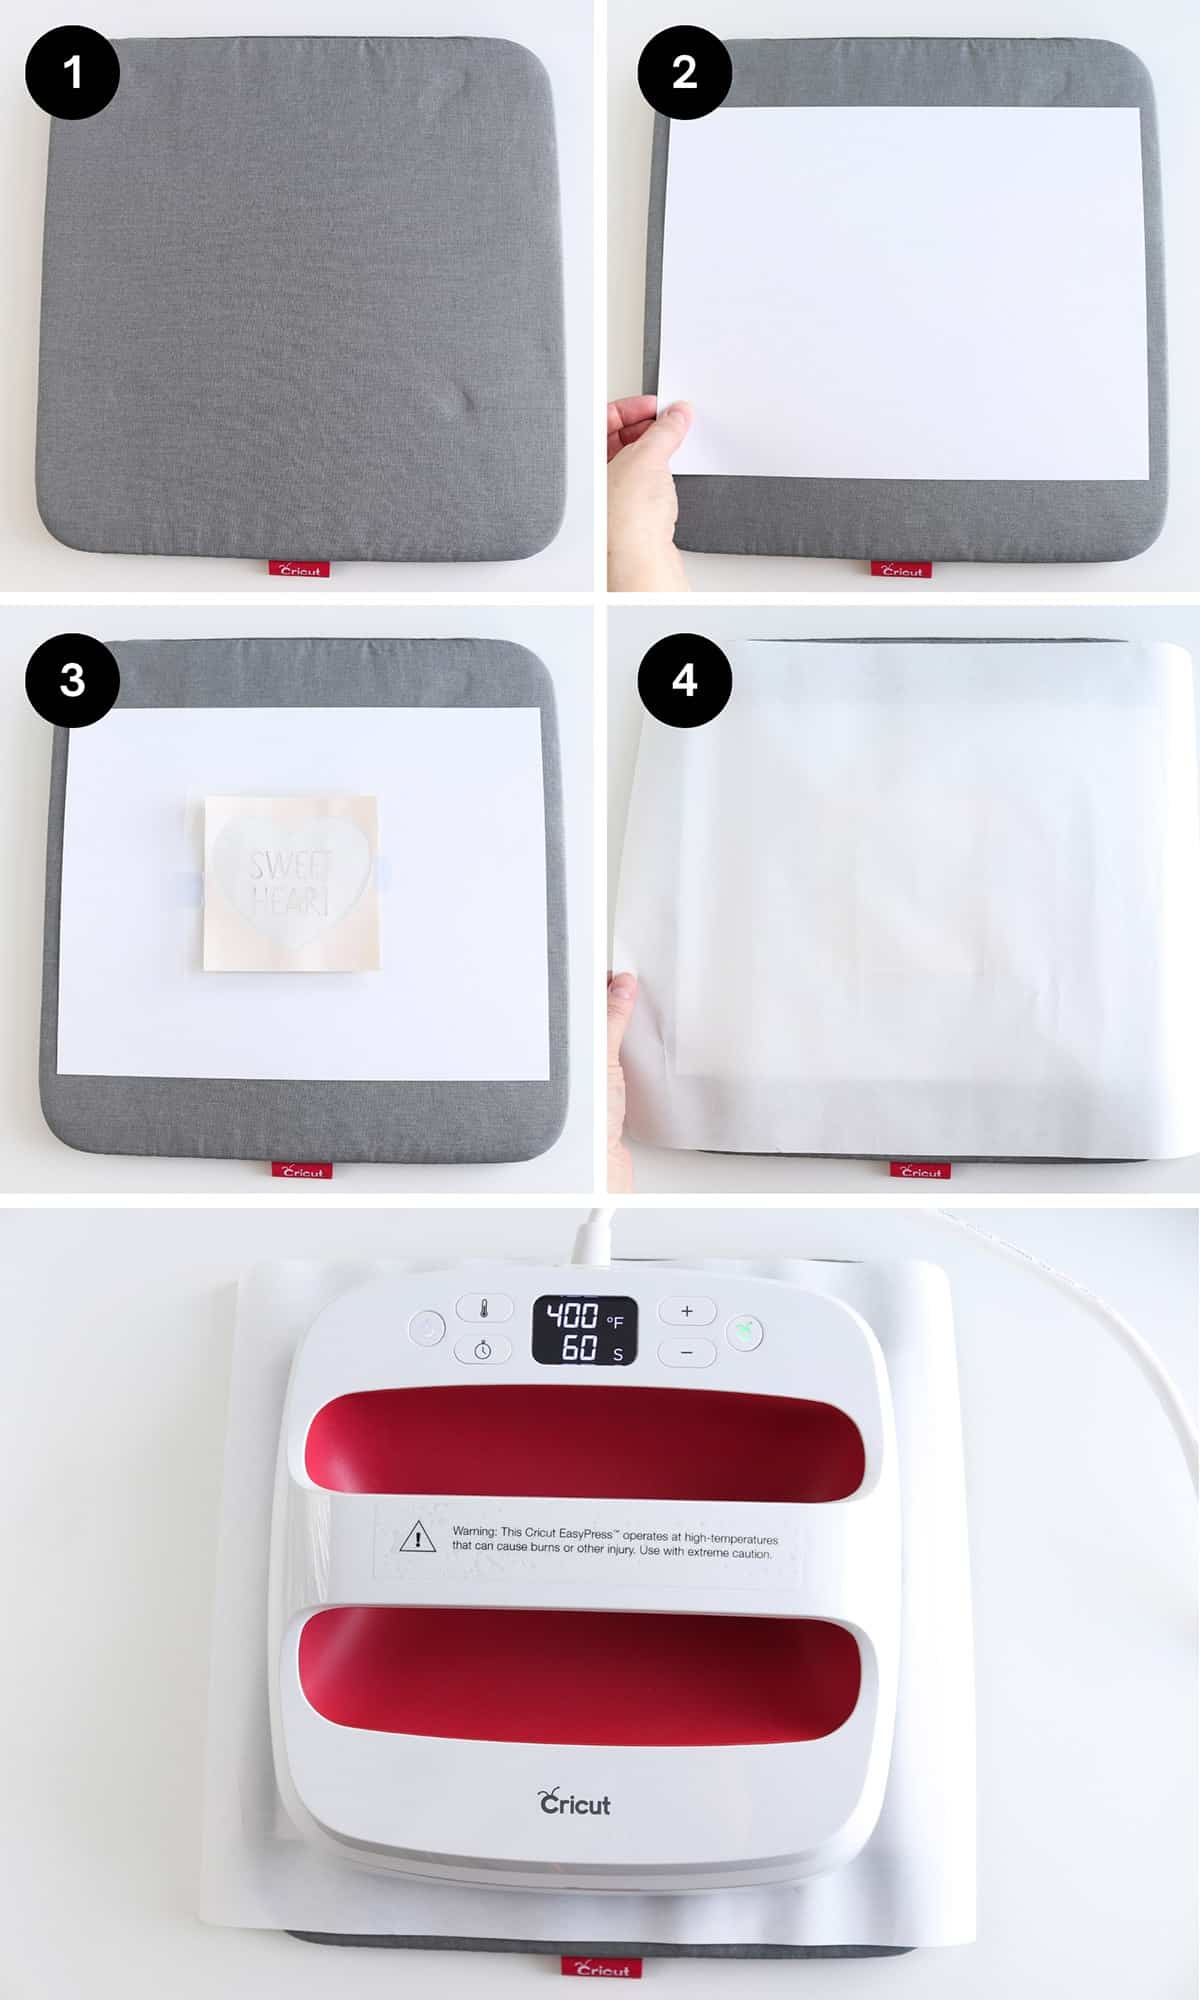
When the time is up and your EasyPress beeps, lift the EasyPress straight up carefully. Do your best to not shift the coaster stack, including the butcher paper. Leave everything as is and let cool completely (it will be very hot!).
Once cool enough to handle, you can remove the butcher paper. Then peel the tape off the coaster/Infusible Ink liner (if you used tape) and remove the Infusible Ink sheet. If any part of the design sticks to the coaster, carefully remove with tweezers.
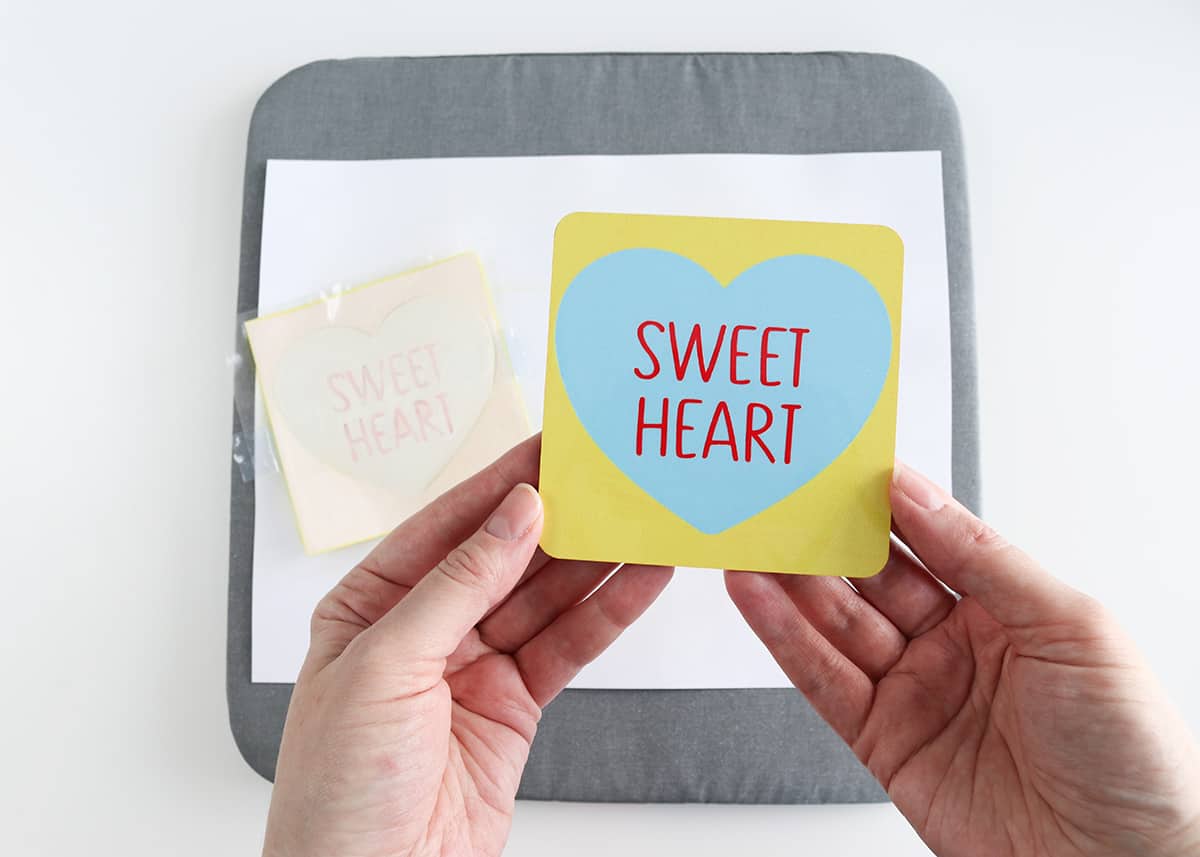
Enjoy your gorgeous new coasters!
DIY Valentine’s coasters with Cricut

I hope you have fun making this Valentine’s project! The coaster reveal of the vibrant Infusible Ink colors gets me every time…it’s so satisfying!

Don’t forget to pin and save for later!