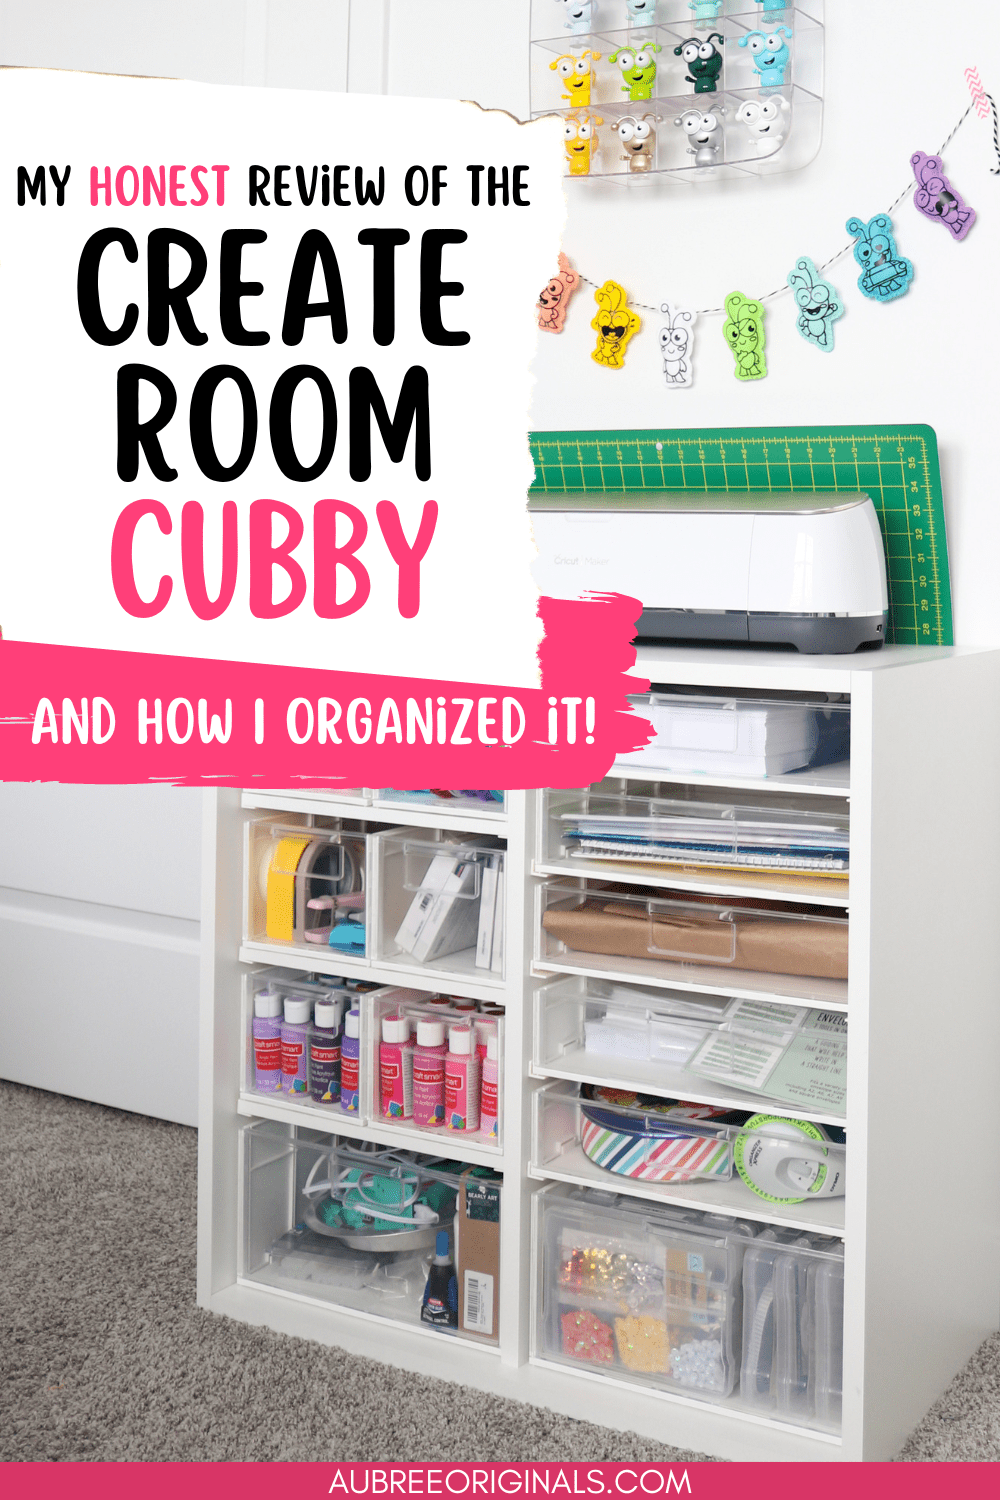
My Honest Review of the Create Room Cubby–and Coupon Code!
If you’ve had your eye on the Create Room Cubby, this post has everything you need to know, including details about the Cubby, how to set it up, ideas of what to store in it, reveal photos of my own Cubby with DiviDrawers, and a coupon code!
This post contains affiliate links. For more information, see my disclosures here.
2024 Update: The Cubby is no longer available but you can still use my coupon code AUBREE for $200+ off the DreamBox or coupon code AUBREEDBC for $150 off the DreamBox Center – both great craft room storage options!
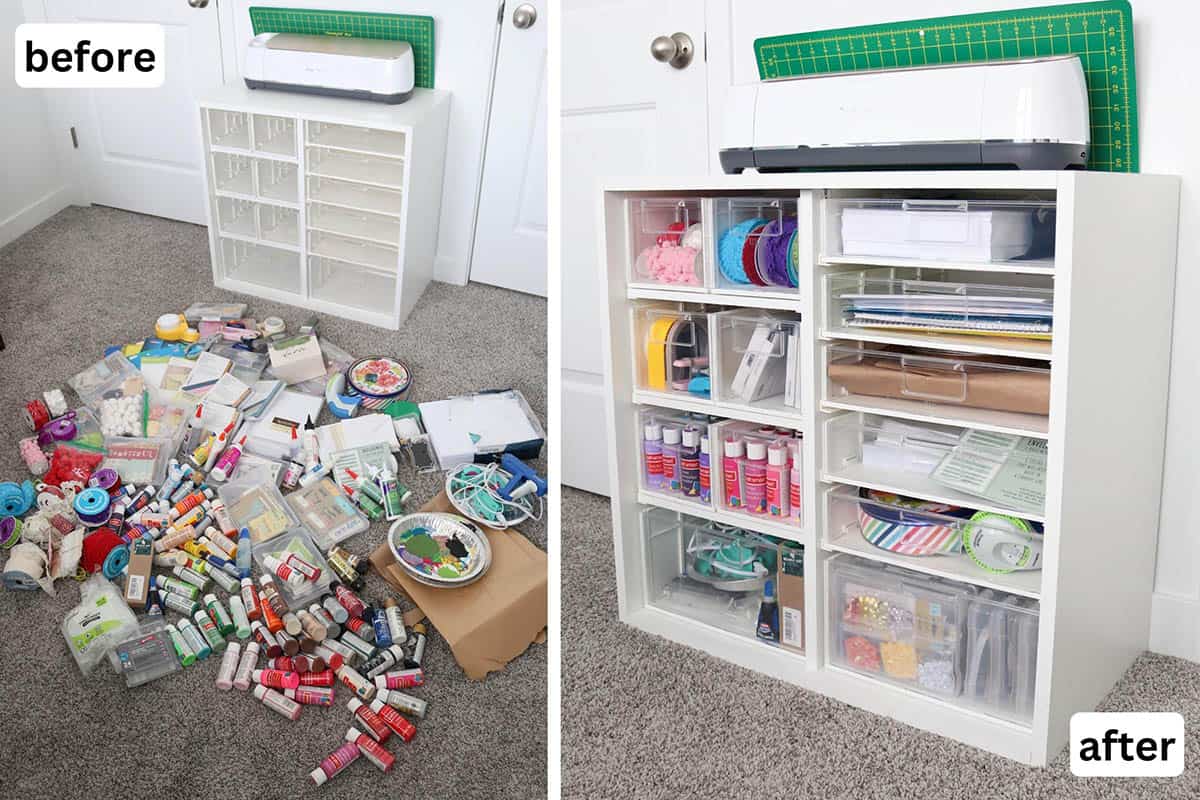
We moved recently and my craft room got downsized, sadly. And let me tell you…as a craft hoarder, it’s a struggle. Luckily we have an unfinished basement that I can store a lot of my overflow craft supplies in and eventually we’ll build me a large craft room down there. But, for now, I’ve got to be creative with my storage solutions. So, you can imagine how thrilled I was when Create Room offered to send me a Cubby to review and share with you!
If you’ve been in the crafting space for awhile, you’ve probably heard of or seen Create Room’s awesome DreamBox (literally a dream storage piece for any crafter!), but one of their companion products is their Cubby–a smaller storage cube with interior organizers (drawers or totes) that surprisingly holds a lot of stuff!
The Cubby is great for small spaces and also much more affordable if you’re not quite ready to invest in the DreamBox. The Cubby is also stackable and it perfectly complements other furniture that Create Room offers if you do decide to expand your storage later on (I’d love the Sew Station–now called the DreamStation–one day…and obviously the DreamBox…and really just the whole set up 😄).

Though product for this post was provided by Create Room, all thoughts and opinions are entirely my own.
Setting up the Create Room Cubby with DiviDrawers
What comes in the box?
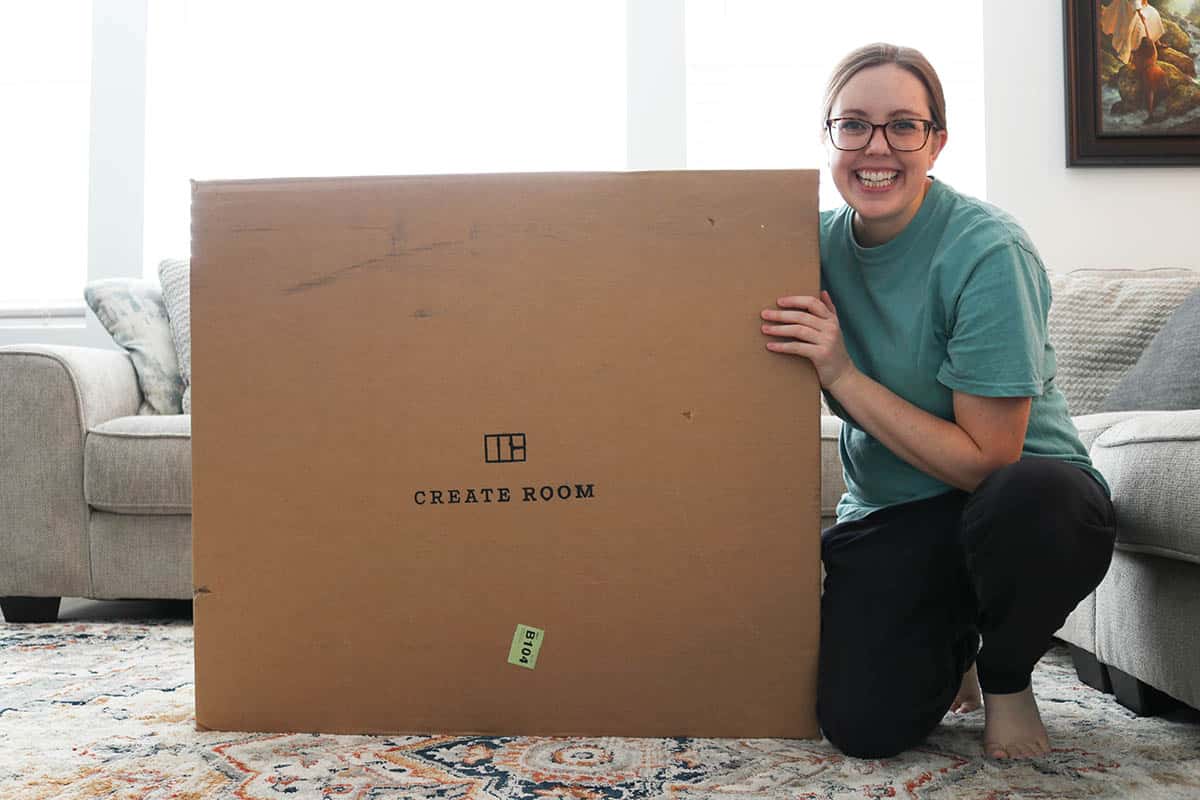
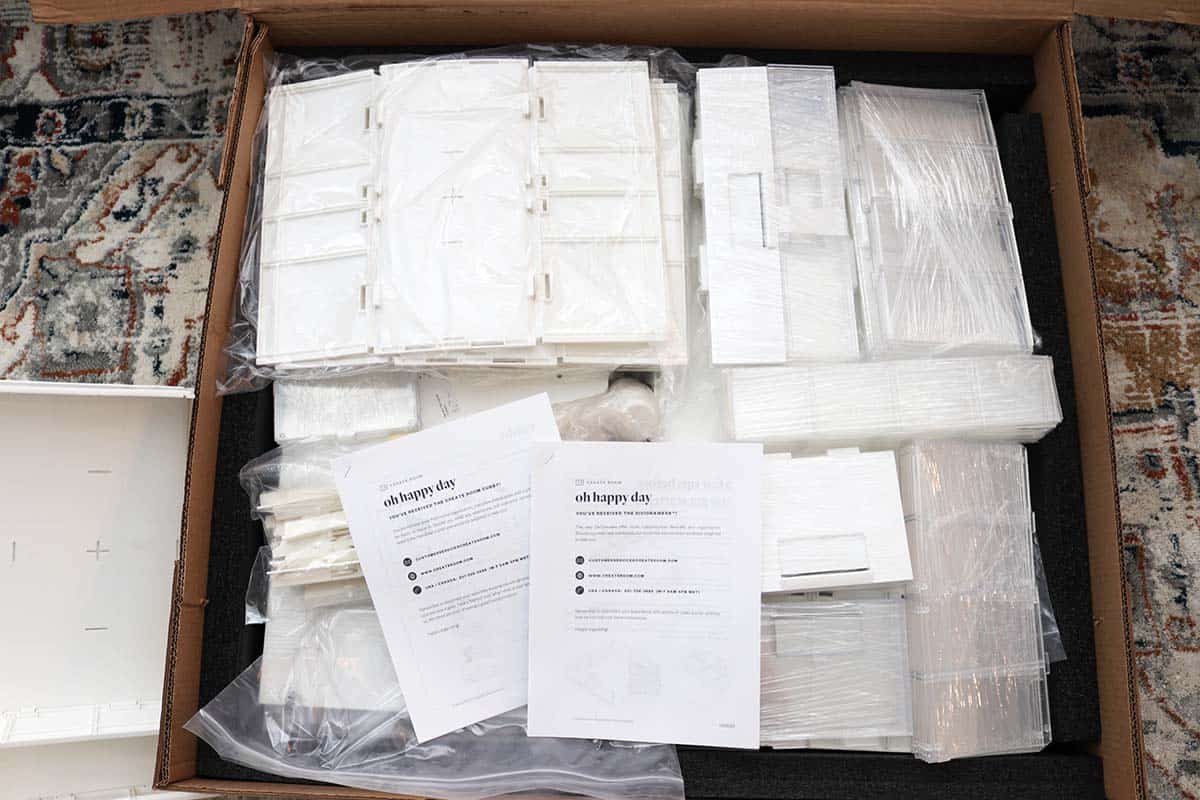
In the box, you’ll receive:
- instruction manuals
- the Cubby “base” pieces (sides, top, bottom, and back)
- DiviDrawers (2 XL, 5 large, 6 medium): each DiviDrawer will have a “base” piece (which makes up the bottom and sides), a solid front, and a clear front (don’t worry, assembly’s easy!)
- DiviDrawer dividers (13 long, 22 short)
- 3 shelves
- 16 DiviDrawer tracks
- a rubber mallet
- hardware
If you ordered the Cubby with InView Totes, you’ll receive all of the above except the DiviDrawers and dividers, and you’ll receive the totes instead. Set up for you will be very similar with just a couple less steps.
How to set up the Create Room Cubby
How to assemble the Cubby base
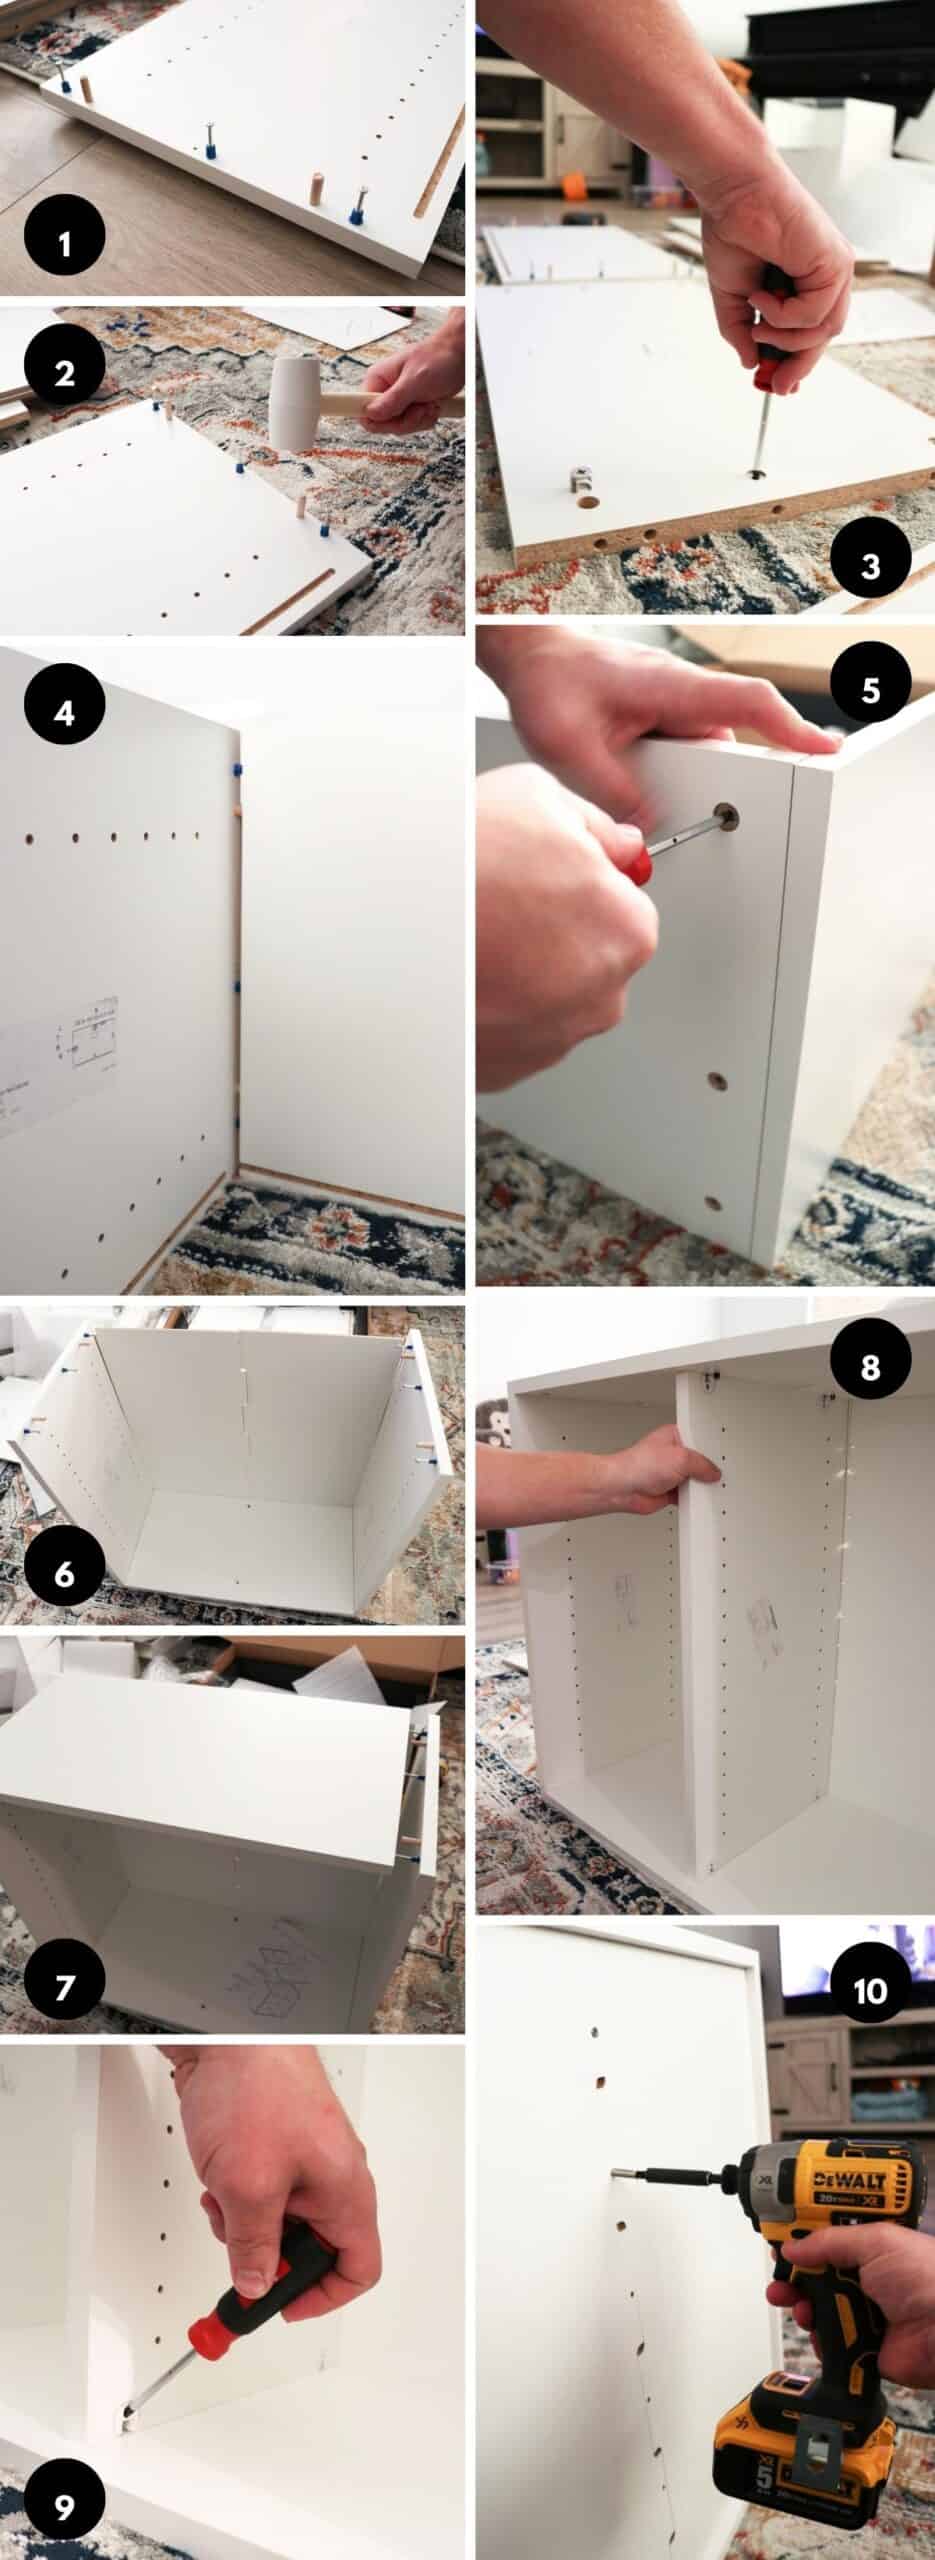
Create Room has a great video on assembling the Cubby base, which I’d definitely recommend watching before or while you’re assembling (it also goes over how to connect two Cubby units together and how to anchor them to the wall).
Your Cubby will also come with instructions (instead of reiterating them here, I’ll just refer you to those). And if you’re lucky like me, you can bribe your handy husband to build the base for you. 😉 (The instructions do say you need two people to assemble, but you’ll see in Create Room’s video that it is possible to assemble by yourself.)
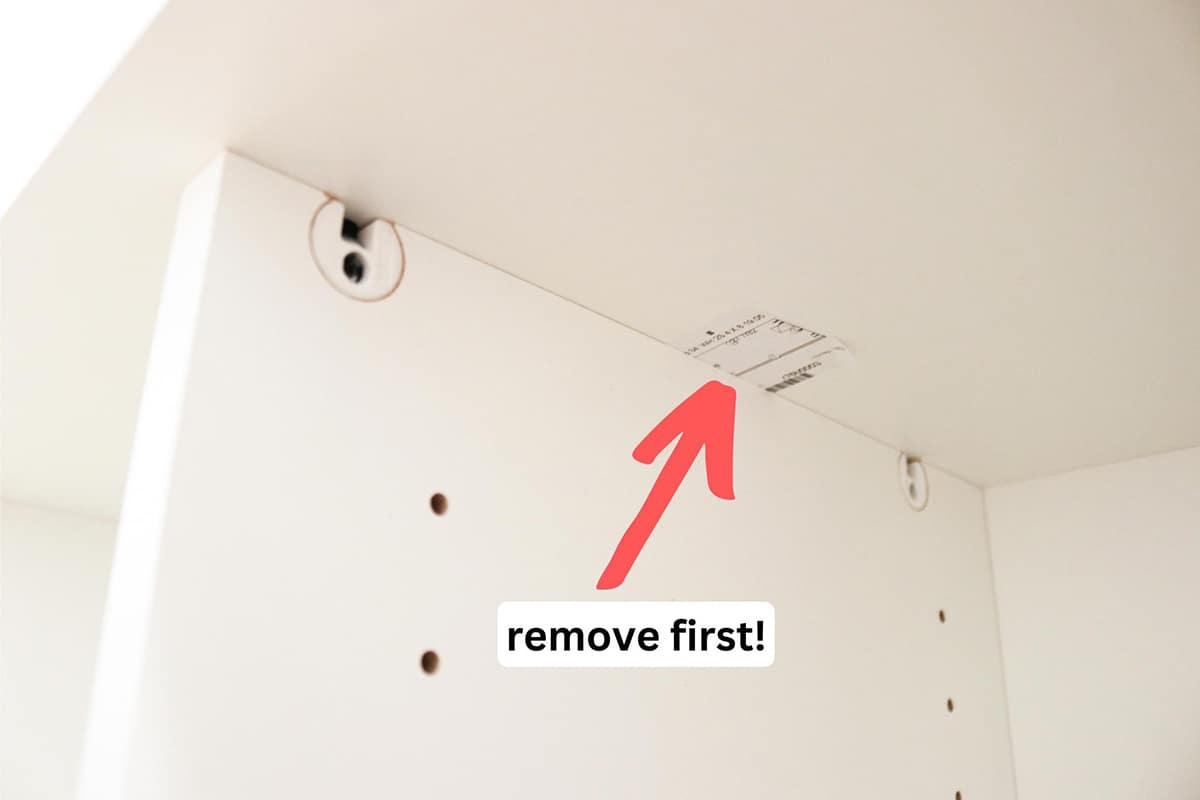
Before inserting the DiviDrawer tracks and shelves, you’ll want to decide what arrangement you’d like. I chose the opposite of what the instructions show: medium DiviDrawers on the left, large on the right, and XL on both bottoms since they’ll naturally end up being the heaviest.
The only thing I’d add to these instructions is to remove the sticker on the top before inserting the middle divider! Otherwise it’s kind of tricky and you might not get all of it removed and your OCD will forever remind you that it’s there (even though no one else would ever know). 😆
How to assemble the DiviDrawers
You’ll have three different sizes of DiviDrawers, but set up is the same for all of them.
Fold each side of the “base” piece towards the middle until you feel (and hear) each side snap into place. Make sure all the notches are locked by pushing firmly on the sides.
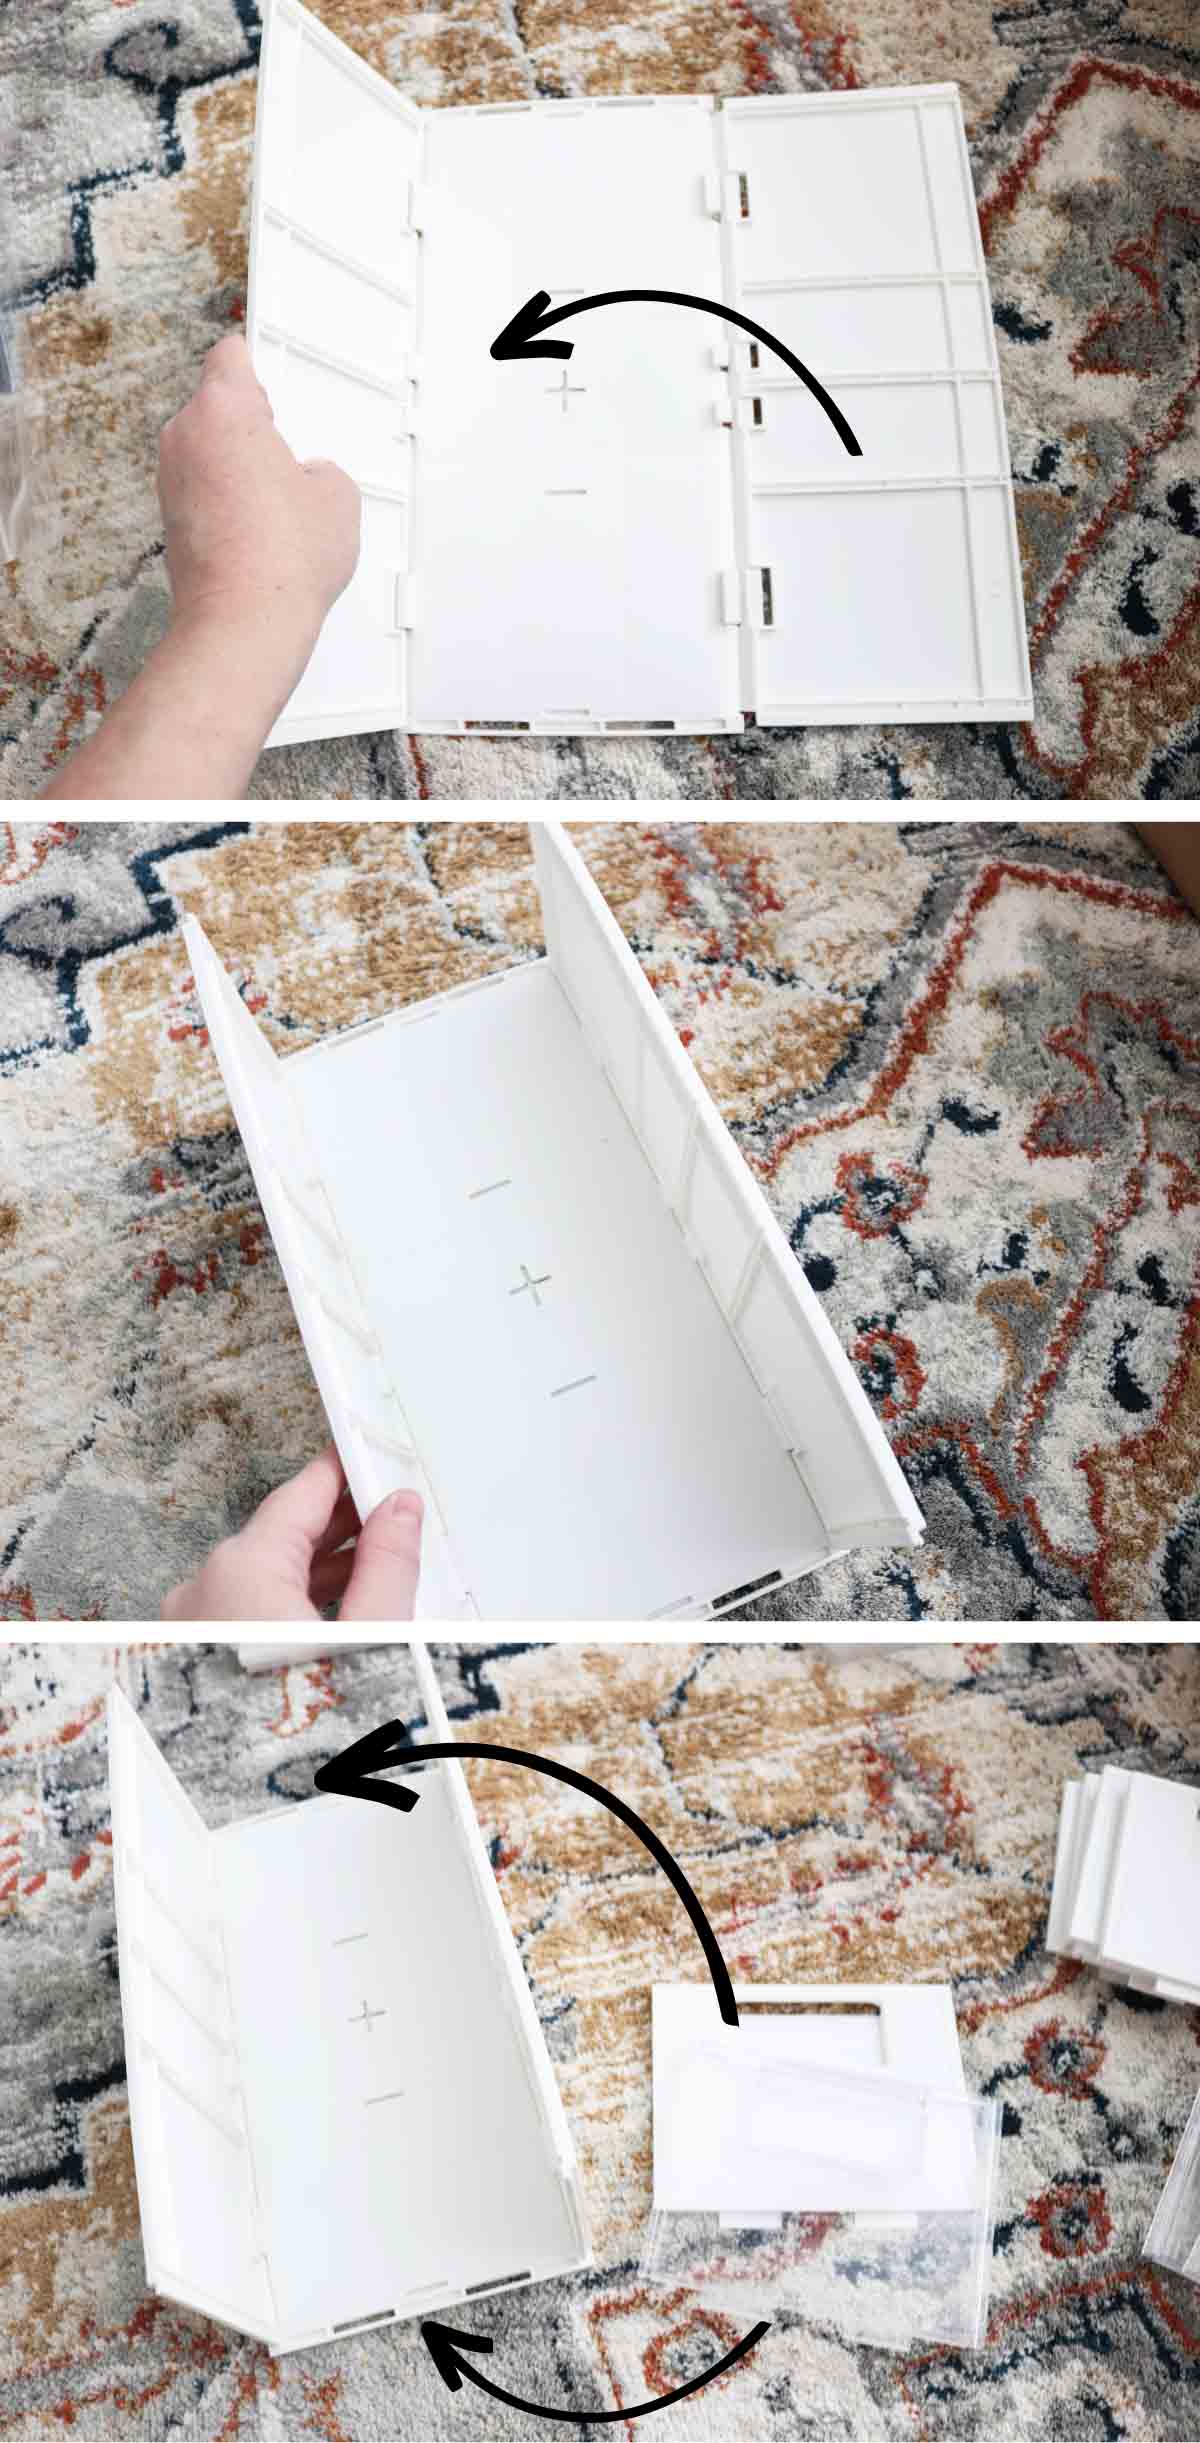
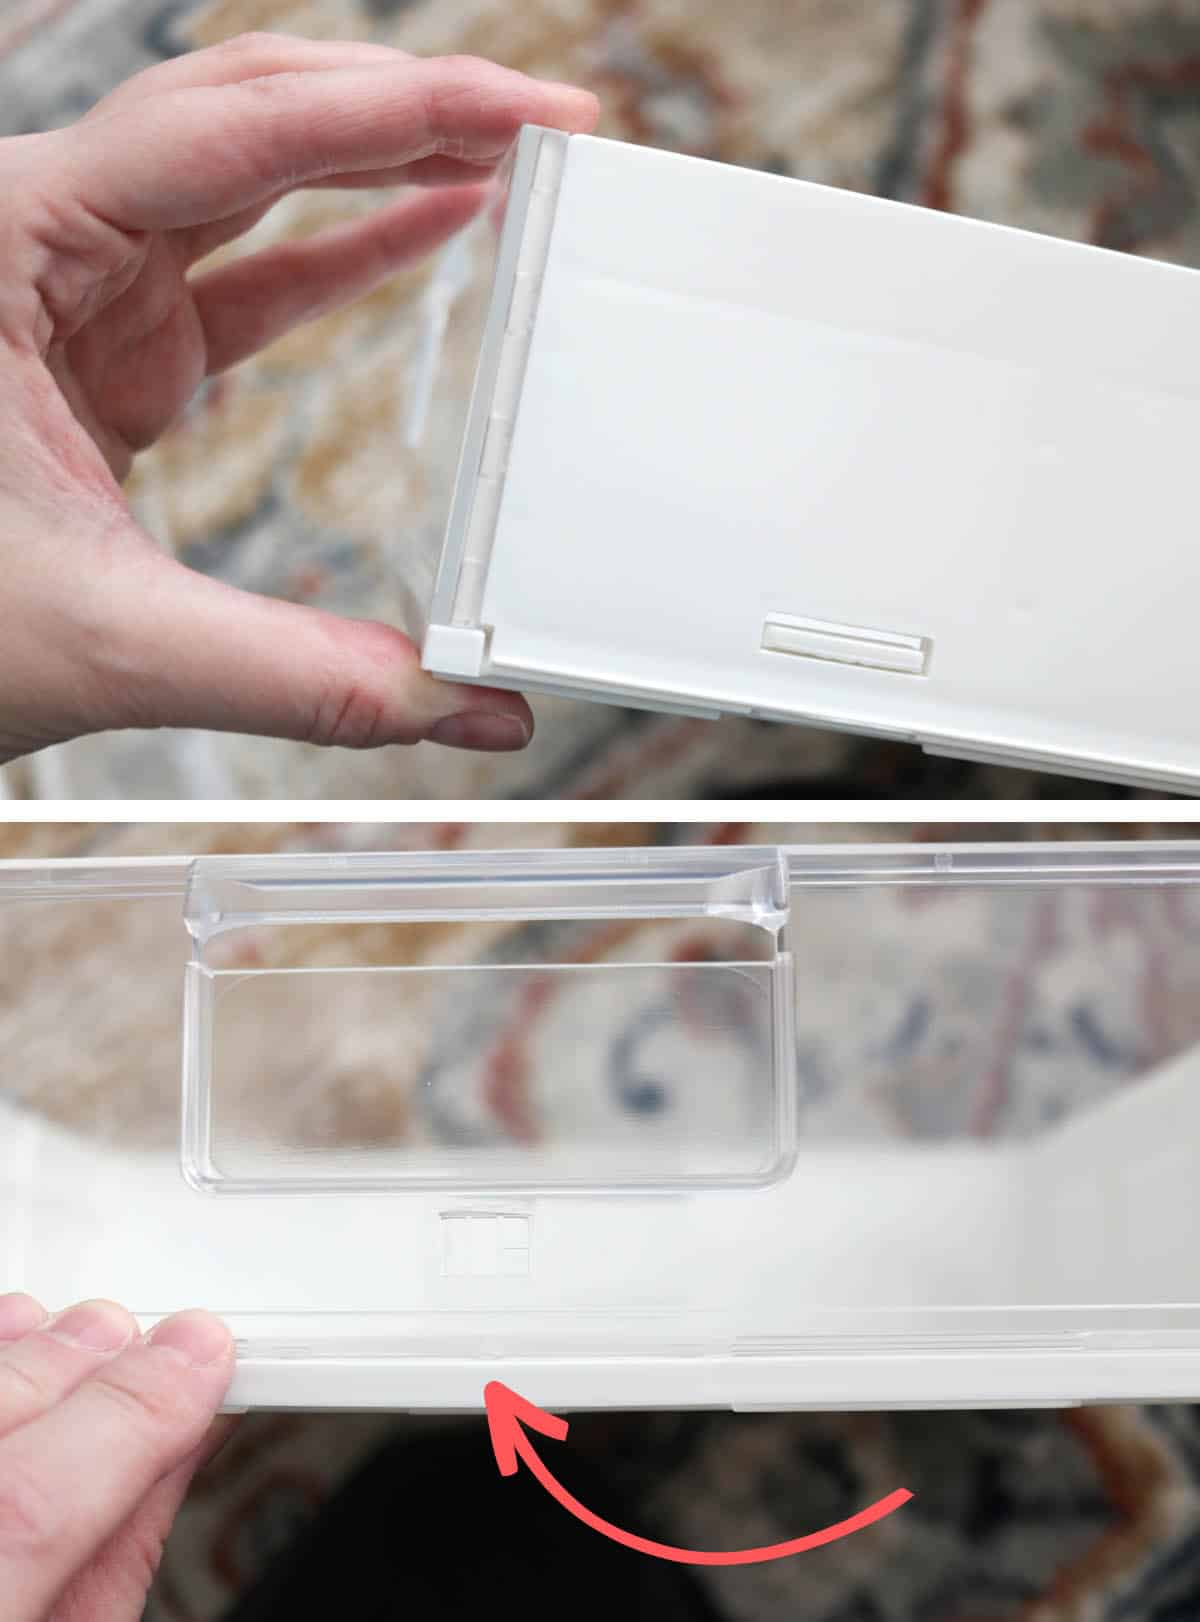
Next, insert the faceplates (each DiviDrawer should have one solid/opaque one and one clear one). Match up the bottom notches and push into place. Use your mallet to tap the sides into place. There is a small notch at the bottom center of each faceplate, double check that it has clicked in by pushing on it firmly.
If you want to add dividers to your DiviDrawers, you can do that now—they are great for making even smaller compartments to keep small supplies organized. My DiviDrawers actually had a bit of a bow to them which made the dividers keep popping out of place (and the bow got worse with the dividers), which was annoying, so I opted not to use them.
Wahoo! All done with the assembly part! Relatively easy to put together overall…but it does still make me want the Prebuilt Service if I ever get the DreamBox!
How to make insert cover cards for the DiviDrawers
If you want to create your own cover cards to put in the front of the DiviDrawers, these are the sizes you will need:
Medium: 5 11/16″ wide by 4 13/16″ high
Large: 12 3/8″ wide by 2.75″ high (if 12×12″ paper is the largest you have, 12″ wide will work, you’ll just have slightly bigger gaps on the side—this is what I used and you can see below that it still looks great!)
XL: 12 3/8″ wide by 6″ high (again, 12″ wide will still work great)

You can use patterned paper, cardstock, glitter cardstock, poster board, etc. Use a paper trimmer to cut the covers to size. (I just grabbed a patterned paper stack and selected a few coordinating prints, plus some matching cardstock to get this cute look! I love that I can change it out whenever I want.)
To insert the covers, make sure you’ve first installed a divider in the front of the DiviDrawer: you’ll see a notch in the bottom middle, make sure it has clicked all the way in on the bottom and the sides. Then just slip your cover in between the front of the drawer and the divider.
(To be totally transparent here…I really struggled with my dividers: even after getting them to click in and I pushed the sides in like the instructions say to do, the DiviDrawers still bowed out. So, in this photo, most of the covers are just resting in the front. If you’re having the same problem, you might be able to use a tiny piece of tape or mini glue dots to adhere them to the faceplate so you don’t have to use the divider. Otherwise I love this idea and the covers make the Cubby look so cute!)
What can you store in the Create Room Cubby?

You can store any number of things in the Cubby, it all just comes down to how you like to organize and how much you have of any particular craft supply (because I’m a huge advocate of storing like items together in your craft room for the most efficiency and smoothest workflow).
I do think the Cubby is especially good at organizing smaller supplies and random items that might not have a designated home in your craft room, but it may also work great as a specific “categorized” work station: for example, a “sewing notions station” (the drawers would be great for organizing zippers, trim, sewing patterns, etc.) or a “shipping station” for small business owners (the drawers would be great for storing envelopes, labels, and other packing supplies). It would also make a great organizer for kids’ craft supplies or if you only have a handful of craft supplies that you’d like to get out of your linen closet and into a more organized home.
Can you fit rolls of vinyl in the Create Room Cubby?
Yes, standard rolls of 12″ vinyl fit in the Cubby, but it can be a little snug, especially at the center of the DiviDrawers since the drawer has a handle that cuts into the interior space of the drawer. Comfortably, I’d say you could fit 6 rolls of vinyl across the large drawer, and possibly another row of 5 on top if they’re skinny or partial rolls.
The old packaging style of Cricut vinyl that’s a little taller DOES NOT fit in the drawers, so you’d need to remove the vinyl from the packaging before storing it in the drawers.
I personally don’t think the Cubby is the best storage solution for vinyl…but that’s coming from someone who would need about 4 Cubby units to fit my entire vinyl collection. 😆 If you only use vinyl every once in awhile and have just a handful of rolls, it might be a great storage option for you!
Can you fit Infusible Ink in the Create Room Cubby?
No, full-sized boxes of Infusible Ink transfer sheets are too tall to fit in the DiviDrawers. You would be able to fit the smaller Infusible Ink designed for the Mug Press.
Does 12×12″ paper fit in the Create Room Cubby?
Yes, the DiviDrawers are designed to fit up to 12×12″ paper. However, I personally find it hard to remove the paper and find what you’re looking for (both because the interior of the drawer isn’t smooth and also because storing paper horizontally in a drawer can be awkward). This is how I prefer to store my cardstock and scrapbook paper instead.
Can you fit fabric fat quarters in the Create Room Cubby?
Yes! Fat quarters fit great in both the medium DiviDrawers and the XL DiviDrawers…but it kind of depends how they’re folded! If you pre-wash your fabric (which I always recommend) and you’ll be refolding the fat quarters anyway, then this isn’t an issue.
Does fabric on comic book boards fit in the Create Room Cubby?
No, if you like to store your fabric folded around comic book boards, these will not fit in the DiviDrawers, at least not in a vertical “filing cabinet” style (they’re even too tall for the XL drawers). If you want to make these work, you’d have to cut the boards down and refold your fabric around them, or you’d have to store the fabric flat in the drawers (which doesn’t make too much sense organizationally).
(If you can swing it, a narrow bookcase like the IKEA Billy bookcase works much better, and preferably one with glass doors to keep dust out.)
Can you fit crochet thread in the Create Room Cubby?
Yes, but it may or may not be the most efficient way to store crochet thread, especially if you have a large collection. I can fit 3 of my rolls in a medium drawer, but some of the space gets wasted, so I chose to store other things in the Cubby instead.
Can you store yarn in the Create Room Cubby?
Yes, but regular-sized skeins of yarn will most likely only fit in either the medium or XL DiviDrawers, and I don’t think it’s a super efficient way to organize yarn.
Can you store acrylic paint in the Create Room Cubby?
Yes, and I LOVE storing my paint in the Cubby! I can fit 38 bottles of acrylic craft paint in a single medium DiviDrawer—10 more than the mDesign clear bins I was using to store my paints previously (and about 8 more than a medium InView Tote can hold). Be sure to check out my post on how to make labels for the tops of paint bottles so you can easily see the colors at a glance!
Can you store greeting cards in the Create Room Cubby?
Yes, A2 sized cards and envelopes fit great in the medium DiviDrawers. Use the dividers to further organize your cards by theme or occasion!
Can you store embellishments in the Create Room Cubby?
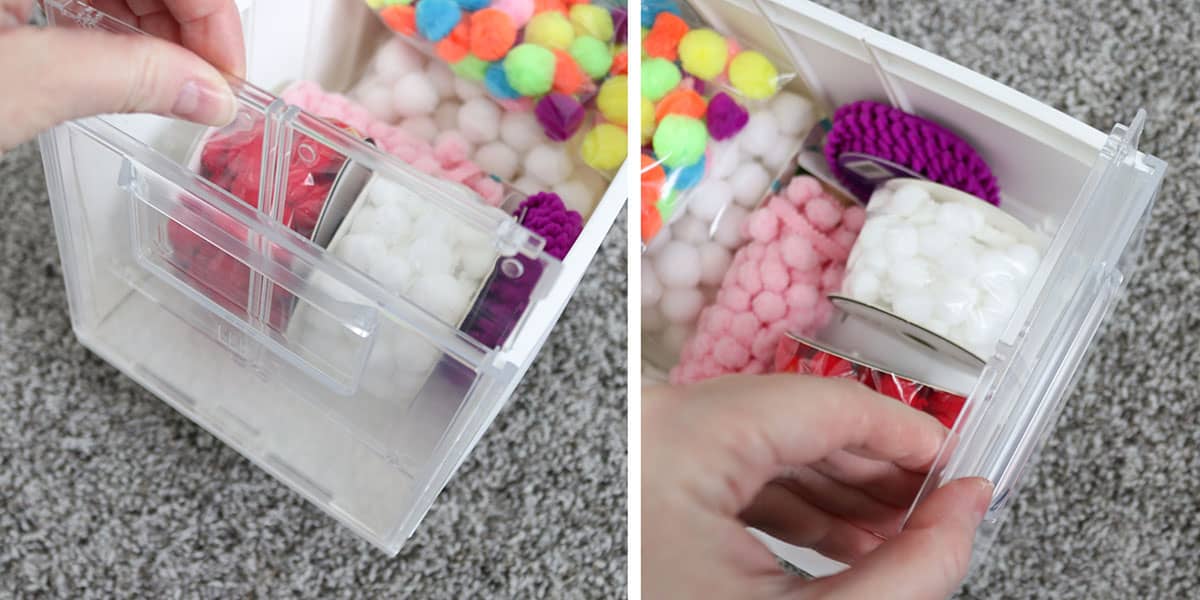
Yes! You can either store embellishments (and other small items) in containers like these in the XL DiviDrawer like I’ve done, or you can utilize the dividers that come with your Cubby to separate them into their own compartments.
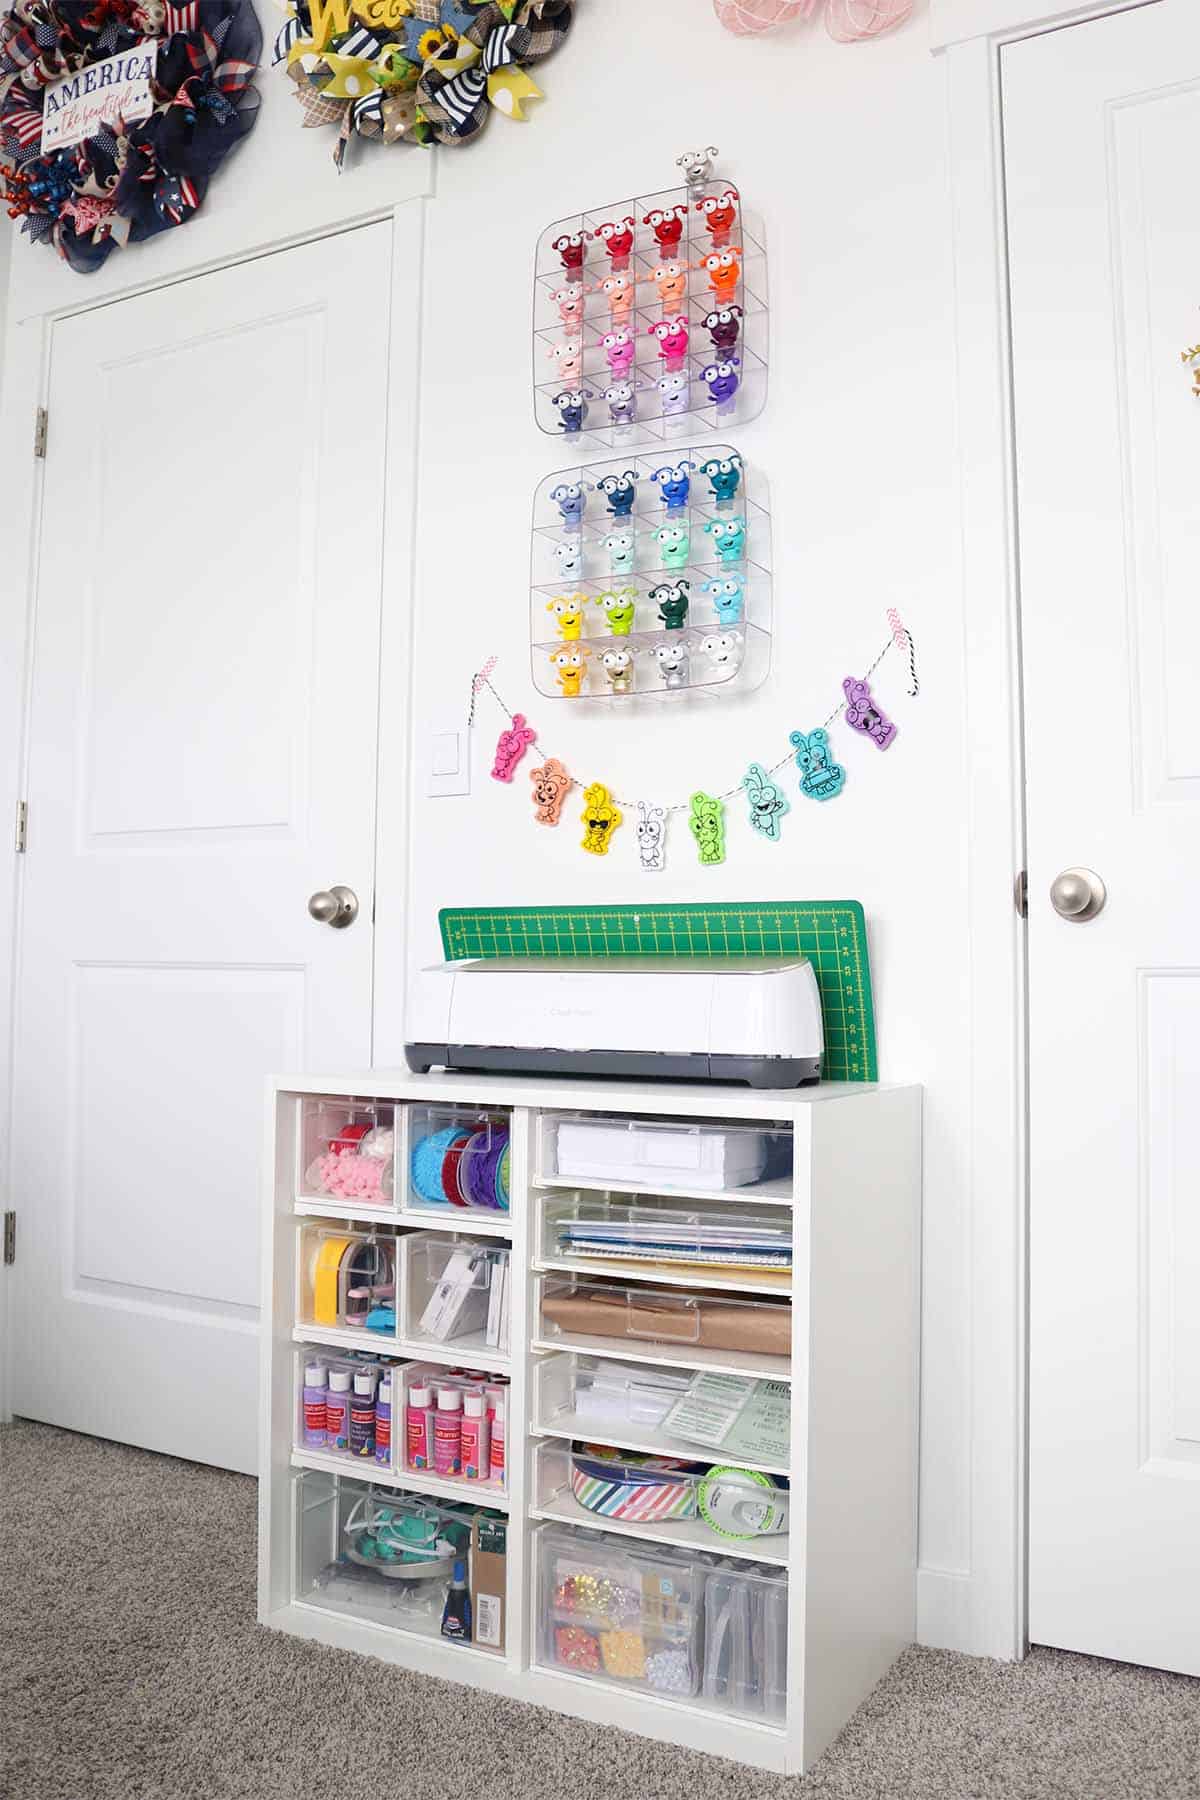
How I’ve organized my Create Room Cubby
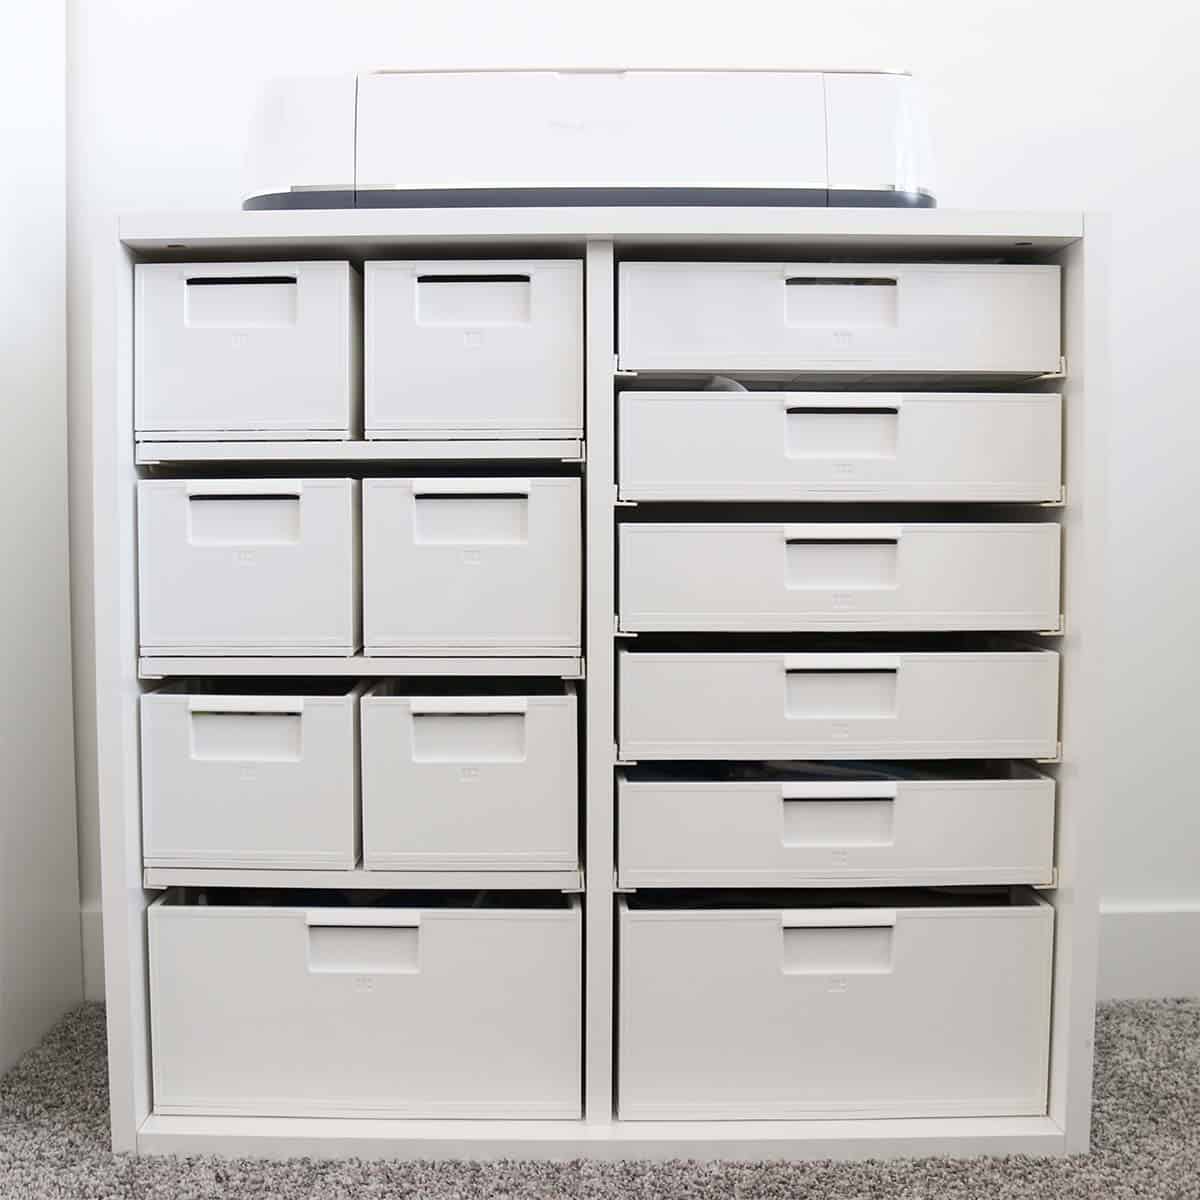
Like I said earlier, I built my Cubby with the 6 medium DiviDrawers on the left (with the 3 shelves underneath them), the 5 large DiviDrawers on the right, and both XL DiviDrawers on the bottom.
Here’s what I have stored in each of the drawers, from the top down:
Medium DiviDrawers #1 and 2: Pom pom trim and pom poms, lace trim and ric rac.

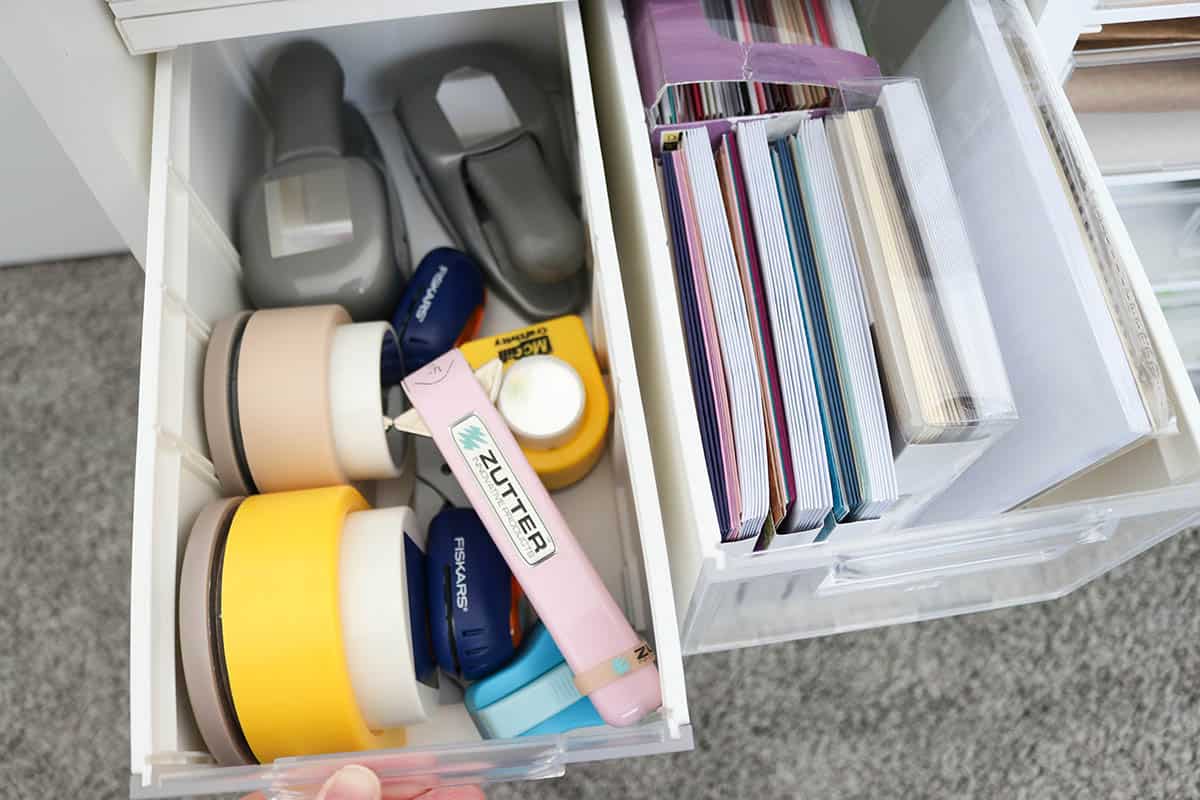
Medium DiviDrawers #3 and 4: Punches, cards and Cricut cutaway cards.
Medium DiviDrawers #5 and 6: Acrylic craft paint in both.

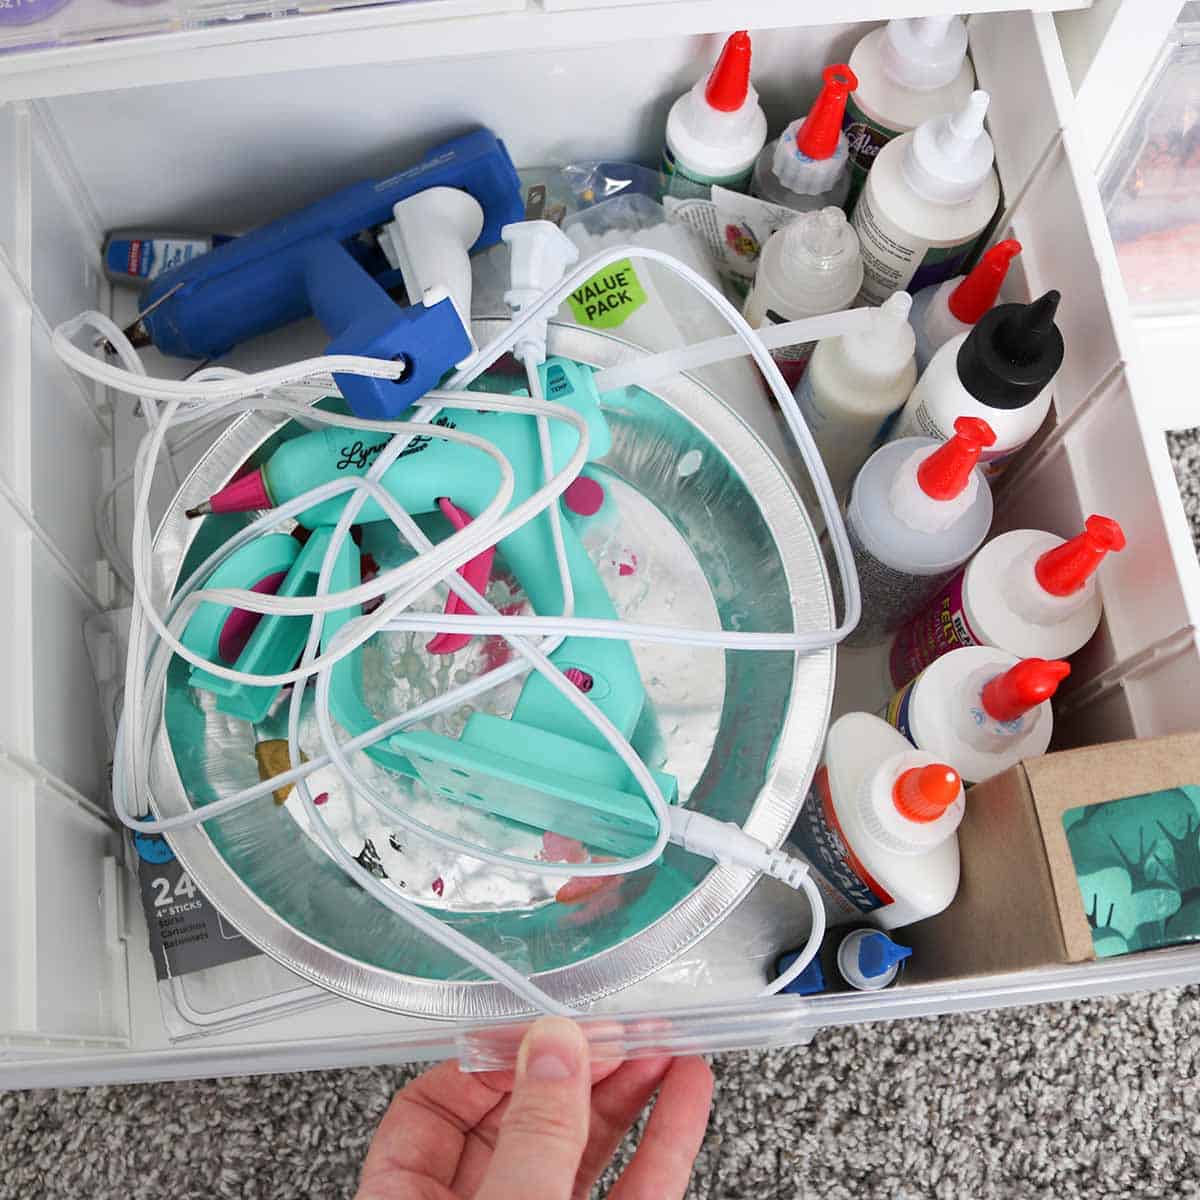
Left XL DiviDrawer: Most all of my liquid glues and hot glue (including refills).
Large DiviDrawer #1: Printer paper (boring, I know).

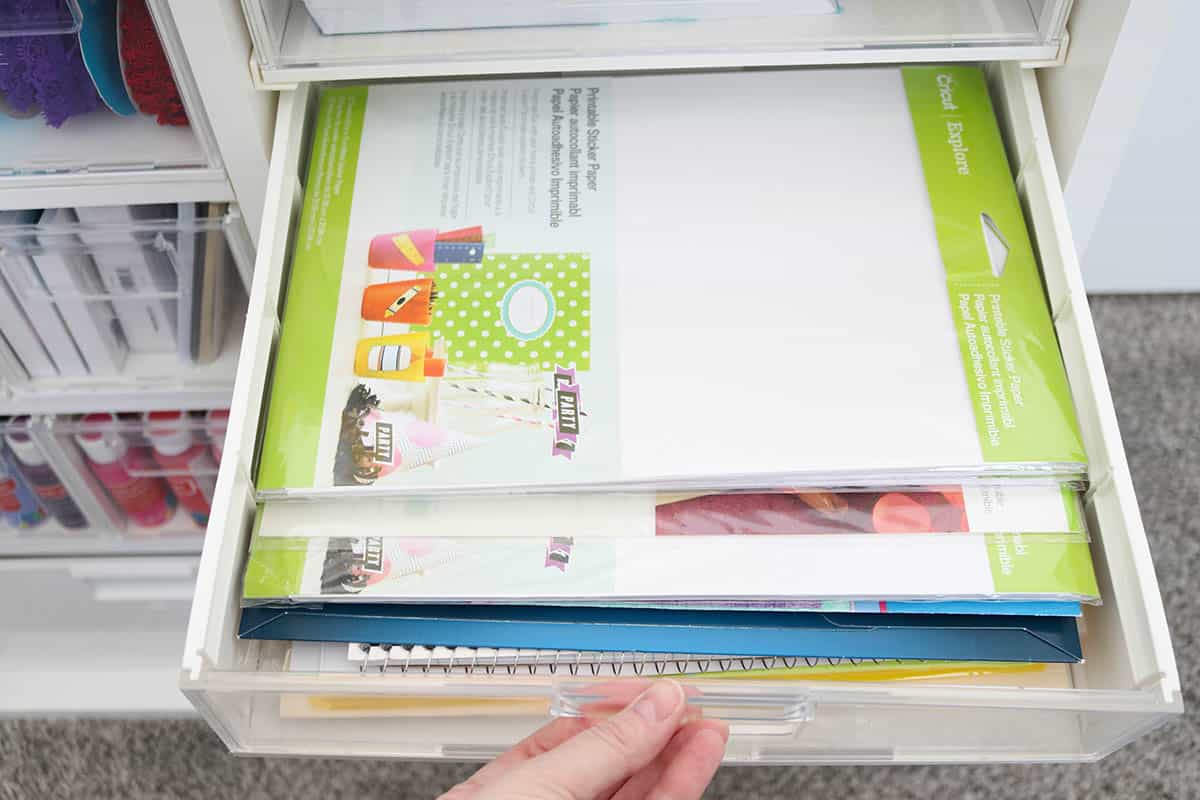
Large DiviDrawer #2: Some miscellaneous paper, notebooks, and Cricut printable vinyl and sticker paper.
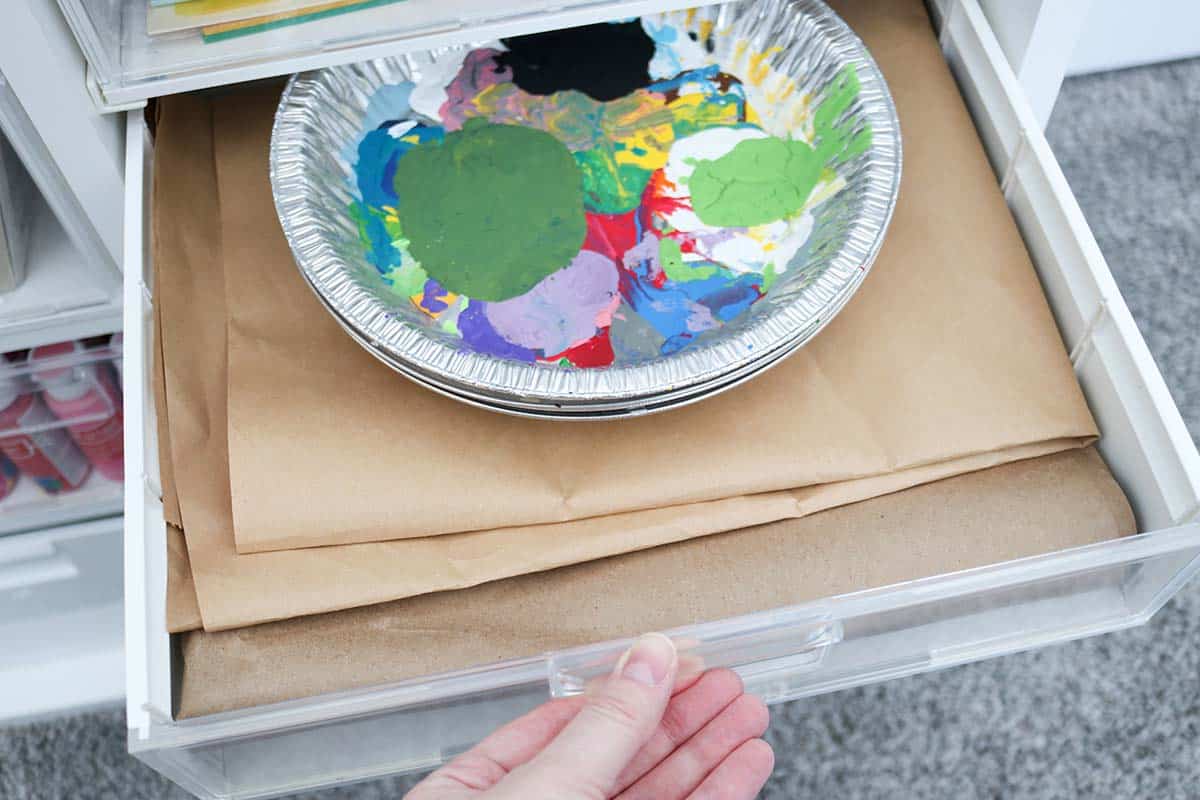
Large DiviDrawer #3: Scrap paper for painting (I love recycling clean packaging material to use to cover my table when painting!) and paint tins (recycled pie tins).
Large DiviDrawer #4: Miscellaneous cards and envelopes.

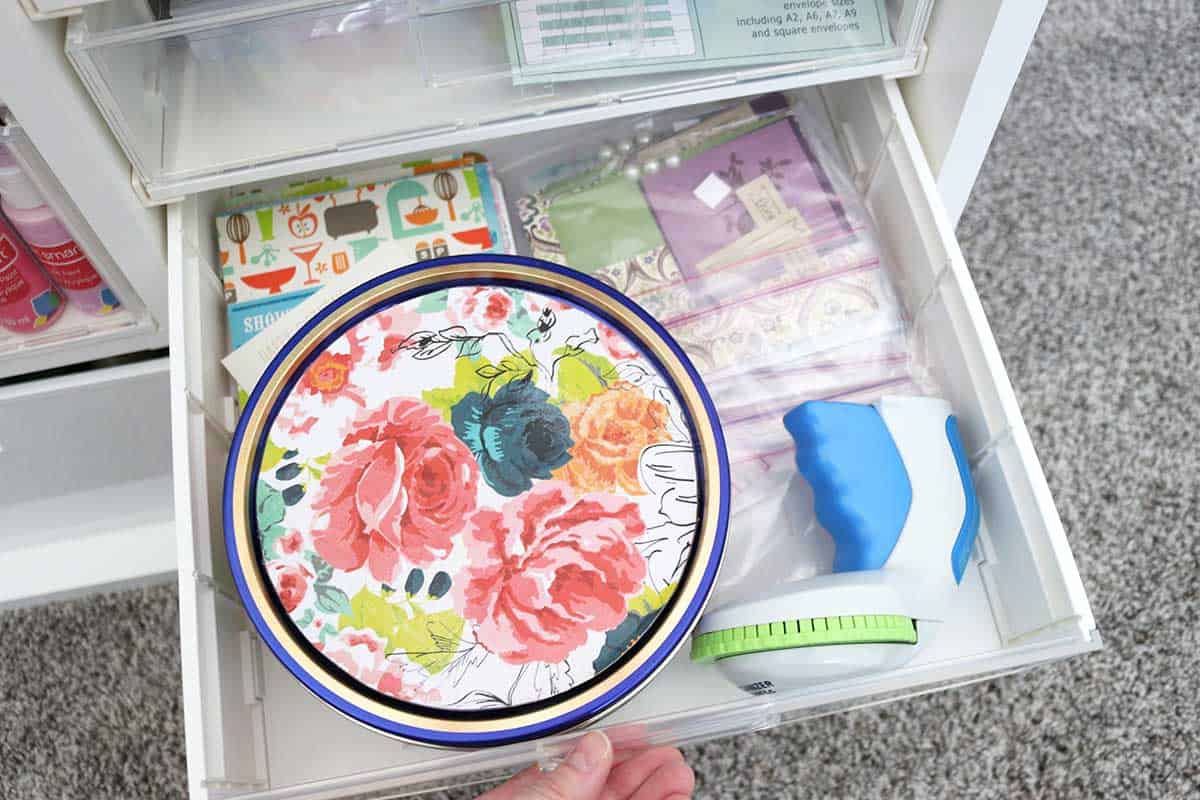
Large DiviDrawer #5: Miscellaneous card-making materials (the recycled Mod-Podged cookie tin holds some small paper cuts and scrap paper) and I also store my Dymo label maker in here since it didn’t have a home.
Right XL DiviDrawer: Most all of my small embellishments, organized in these containers.

My honest review of the Create Room Cubby
Overall, I think the Cubby is a good piece of furniture that will meet a lot of crafters’ organizational needs. In my opinion, it works best for smaller craft supplies and miscellaneous items you have floating around your craft room that just need a home. It would also work great as a small work station for more focused organization in a particular area, like the “categorized” work station ideas I mentioned above.
It took me a long time to decide what I wanted to organize in my Cubby (and I’m sure it will evolve over time, like all organization does). The hardest part for me was that I have a LOT of craft supplies (think LOTS of fabric and LOTS of each type of vinyl, etc.), so the Cubby wasn’t the best solution for those items given its small size and small compartments—and I don’t like splitting same supplies in different locations in my craft room.
Once I finally decided on what I wanted to organize in my Cubby and got it all organized, I ended up being really happy with it. I think the base is sturdy and well made and I LOVE having an extra tabletop surface in my craft room: it currently stores my Cricut Maker when not in use. The Cubby is also the perfect smaller size that helped me utilize an under-used area of my craft room (a small wall between the door and closet door) and get that much more storage space!
My biggest complaint of the Cubby is the DiviDrawers…which is funny because I waited extra long for them, thinking I’d like them more than the InView Totes. There are pros and cons…
Pros of the DiviDrawers: They utilize the entire width of the Cubby since they’re not tapered at the bottom like the InView Totes (the medium InView Totes are more noticeably tapered than the large InView Totes). The fact that the sides are straight means you can store more materials in them in a more organized way. I also like that each faceplate has a “handle” on it, making it easy to pull the DiviDrawer in and out of the Cubby. And the option of having a clear or opaque front is a huge pro, especially if I want to “hide” certain contents from my curious toddler. I also appreciate that the DiviDrawers package comes with two XL DiviDrawers, whereas the InView Totes package only has medium and large totes.
Cons of the DiviDrawers: Maybe it’s just me, but I’m not a huge fan of the interior of the DiviDrawers—I really wish they had a smooth interior. But, I get that they can’t be smooth because of the dividers, so that’s a trade-off (I just don’t really like storing paper in them for this reason, it just kind of feels like it “catches” on the sides). Also, I’ve been having some issues with the faceplates popping off, mostly on drawers that have a lot of weight in them (like my paint drawers, which, don’t get me wrong!—I love storing my paints in the Cubby. But I’ve almost dropped a whole DiviDrawer of paint because the faceplate popped off while I was carrying it…which, as I’m writing this I’m realizing this may just be user error…but, still, I’d prefer a sturdier drawer that doesn’t come apart when I need to move it to and from my work surface).
Another design flaw I noticed, at least with my Cubby, was the DiviDrawer tracks: it almost seemed like the holes in the Cubby base were too small because none of my tracks went in as smoothly as the Create Room assembly video shows—I had to tap them in with the mallet, but even then they weren’t quite flush with the Cubby base. Instead of tracks, I wish each DiviDrawer could have its own shelf (the drawer with my printer paper is a little heavy and the tracks seem to sag just slightly with the weight).
All of this is to say…I think you should think carefully about your needs as a crafter and decide carefully between the DiviDrawers versus the InView Totes. I think you sacrifice a little bit of functionality and appearance with the DiviDrawers, but you’ll also get a little bit more storage space than the InView Totes (and keep in mind that the InView Totes aren’t perfectly smooth on the inside either because they can also be divided).
Overall, I’m really pleased with this little piece of furniture and love that these random craft supplies now have a home. I love having an extra tabletop surface, as well as being able to have some extra storage in what used to be a dead space in my craft room. The Cubby would make a great companion piece to other Create Room furniture, but its simple design will also complement existing furniture in your craft room (like my IKEA shelves). I love that you can customize the appearance with clear fronts, solid white fronts, or custom-design your own covers to match your decor and style. And, at any given time, if you want to change it up (say you have a roaming toddler who likes to touch everything if it’s in his sight*), all you have to do is switch the direction of the DiviDrawers and you can have a different appearance!
*Don’t worry…I have a child-lock on my craft room door and keep a close eye on my son when my craft room’s open, but it’s been awesome to “hide” my drawer of adhesives from him—he hasn’t even been curious what’s in that drawer since the contents aren’t visible (I usually keep that one with the opaque faceplate out).
How much is the Create Room Cubby?
The Cubby starts at $349.00, but be sure to catch a sale and use my coupon code for a discount! There are also financing options when you go to checkout.
Is the Create Room Cubby worth the money?
This is such a hard question since it’s so individual! It really depends on your budget and what you can comfortably afford.
If the Cubby is easily in your budget and you think it will meet your organizational needs after reading this post, then absolutely go for it! If money is tight and this feels like a stretch, I think you can find other storage solutions that are just as good at a fraction of the cost.
I will say, however, that I haven’t seen anything quite like the Cubby on the market and its unique design will give you a lot more organizational options than, say, a regular 4-cube organizer from Target—in other words, it is something worth saving up for if you like the idea of smaller compartments and drawers to organize your supplies, rather than large, deep cubes where things tend to get lost and pushed to the bottom. And it’s also a lot sturdier (and prettier!) than plastic Sterilite drawer units (or other similar organizers).
Don’t forget, Create Room frequently has great sales and using my coupon code will also help you save money on the Cubby!
Create Room Cubby Set Up and Review
I hope you’ve found this review post helpful! If you know me very well, you know I LOVE organization and can’t function without it! The Cubby surprised me and is actually a key organizational piece to my craft room now and helped me utilize a dead space in my room—yay!
Let me know in the comments if you have any questions about the Cubby or if you already have one and love it!
Happy organizing! 😀

Don’t forget to pin and save for later!