How to Customize Ribbon With Cricut for Your Wreath Business
Learn how to put iron-on vinyl on ribbon with your Cricut machine and EasyPress Mini. This is a great way to customize your wreaths and help them stand out from the competition!
This is a sponsored post written by me on behalf of Cricut. All thoughts and opinions are my own.
This post contains affiliate links. For more information, see my disclosures here.
Did you know you can customize wreath ribbon with the help of your Cricut machine?
I love doing this for my wreaths, especially when I have a specific vision in mind for a wreath and can’t find the ribbon I need pre-made—either the ones I like are out of stock (which happens a lot), they’re out of season (because I’m making wreaths ahead of the season), or they don’t exist at all (because some holidays just don’t have a great selection of quality ribbon). Customizing ribbon also sets your wreaths apart from other shops where you tend to see a lot of the same ribbons over and over.
Also, you’ll see how fun and addicting this project is and want to do it all the time, just because you can. Keep reading to see exactly how I customize ribbon with iron-on vinyl and my EasyPress Mini!
Why You Should Customize Ribbon
Just like with my handmade wreath signs, the biggest reason I started customizing ribbon is it opens up so many new possibilities for designs. Sometimes it’s a struggle to get all the elements in your wreath to coordinate, but being able to create your own ribbon designs is so convenient. For example, maybe your wreath sign has a Christmas tree on it but none of your ribbons have any images that make you think “Christmas.” You could easily customize one of those ribbons with Christmas trees or a Christmas phrase using iron-on vinyl, perfectly tying all the elements together.
Customizing ribbon in your wreaths is also an awesome way to stretch your ribbon stash farther by being able to use one roll for multiple wreaths, themes and holidays. This can actually cut your ribbon costs by allowing you to buy a neutral/solid ribbon in bulk and still get a ton of use out of it.
Now, I know what you’re thinking…personalizing ribbon with HTV is time-consuming and HTV is expensive. Well…I’ll agree to the first one: this project will add some additional time to your wreath-making process. But I personally find it’s nice to switch crafty gears and work with my Cricut machine for a bit. It’s also the perfect project to do while watching a show or listening to your favorite podcast.
As for cost, you might be surprised how inexpensive this actually is: I priced out one of my wreaths that used glitter HTV (which we all know is a more expensive vinyl) and it only cost me an extra $1.33! That small amount is totally worth it to have beautifully-customized ribbon in my wreaths, and that’s something I would gladly pay for as a customer!
What You Need to Customize Ribbon
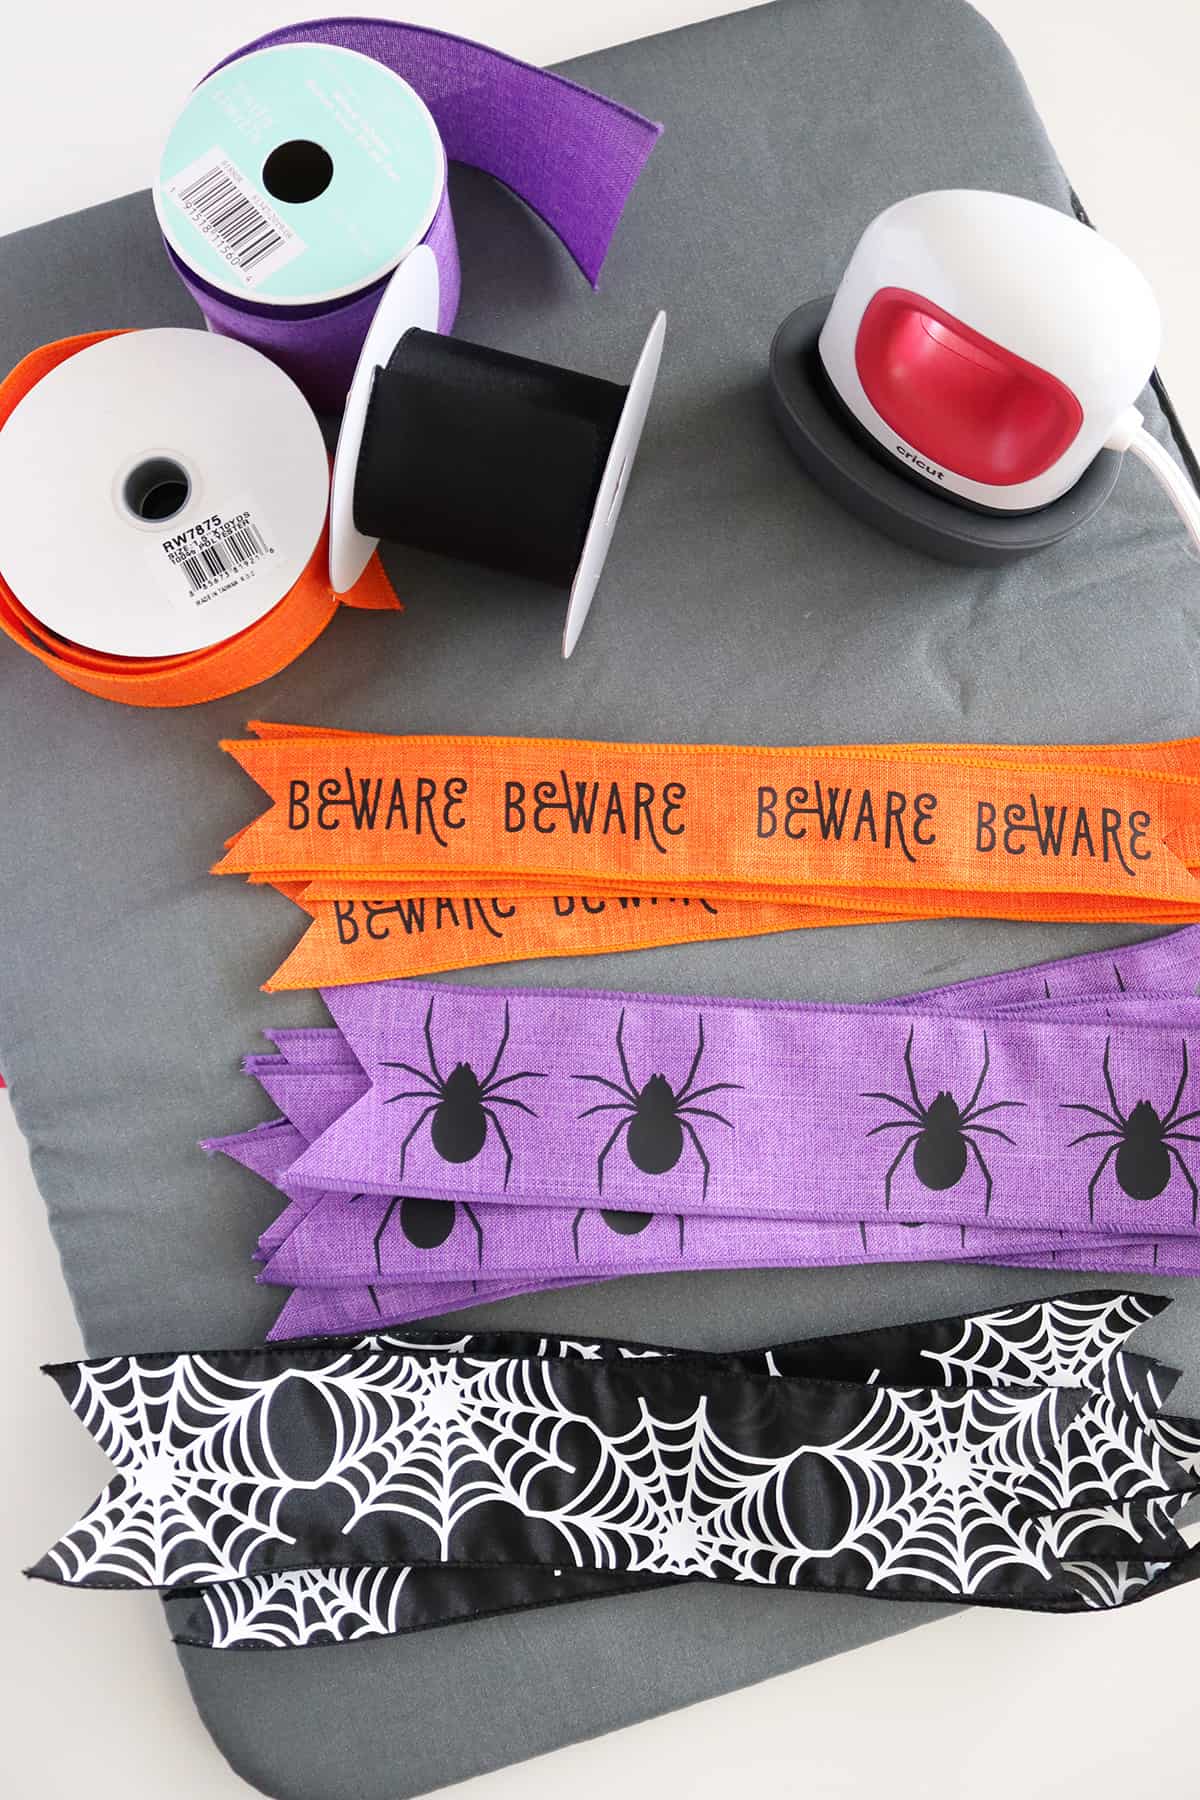
- Plain/solid-colored ribbon, 1.5” or 2” wide: This is my favorite place to buy ribbon for wreaths! I love linen-type ribbons for this but it also works on satin ribbon (you’ll just want to test new ribbons first to make sure they’re compatible with iron-on and the heat required to transfer iron-on—I’ve never had a problem with my ribbon melting, but I’d imagine lower quality ribbons could)
- Iron-on vinyl (I love using glitter iron-on for this, too!)
- Cricut machine: I have a Maker and Maker 3 and love both, but any machine would be great for this
- EasyPress Mini: I highly recommend investing in this! I wasn’t sure if it would be necessary, but now I can’t live without it! And I really only recommend this particular project if you have one!
- EasyPress Mat: comes in a few different sizes, I use it for all my iron-on projects to protect my work surface
- Cricut Access subscription: totally optional, but I LOVE having all those images at my fingertips whenever I sit down to make a design! Check out my post on Cricut Access for more details (and see if it would be a good fit for you!).
How to Customize Ribbon With HTV and a Cricut Machine
Step 1: Choose your ribbon and prepare your design in Design Space
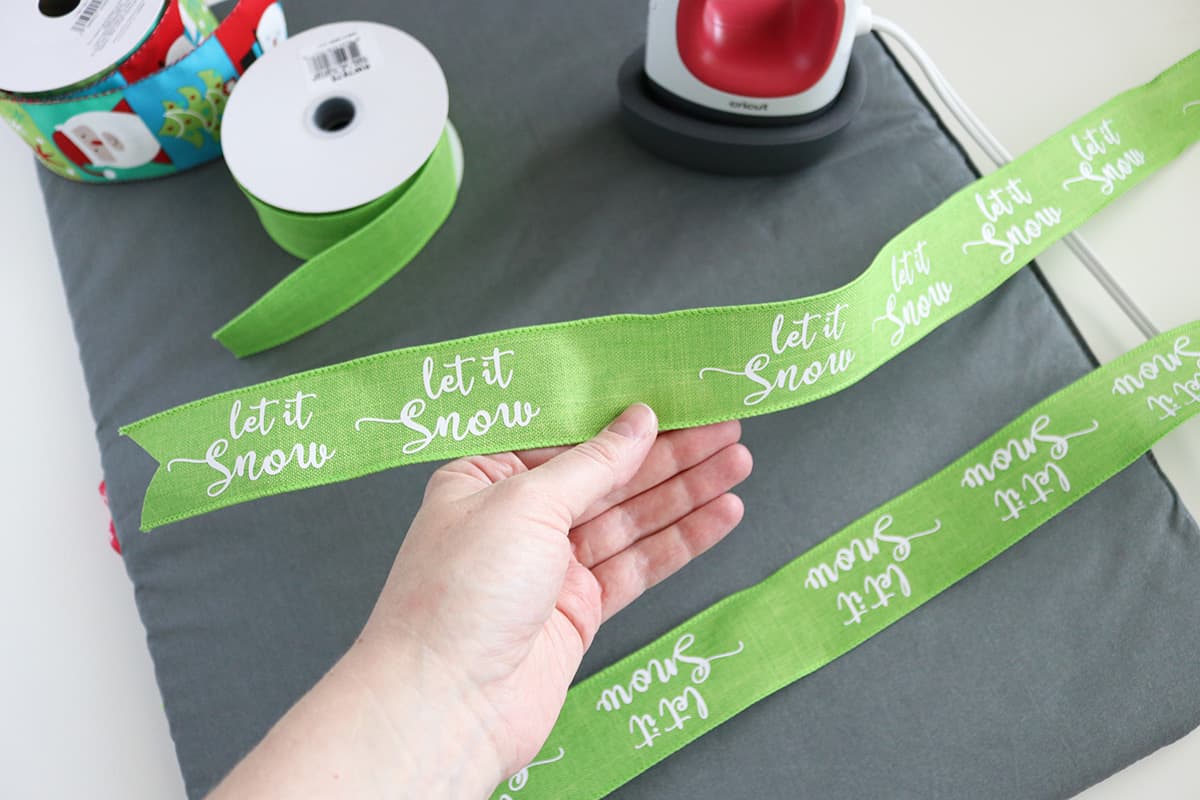
Select your ribbons for a wreath like you normally would. Choose one or more solid-colored ribbons that go with the rest and see what words or images might help complement your theme.
In Cricut Design Space, create a new project. Add a rectangle shape with the dimensions of one of the ribbons you’re customizing. If you dovetail your ribbon (the notched-out triangles at the ends), then keep in mind that your design won’t extend all the way to the end of the rectangle, so if it helps you visualize it better, you can slice a triangle out from each end of the rectangle (I skipped this step).
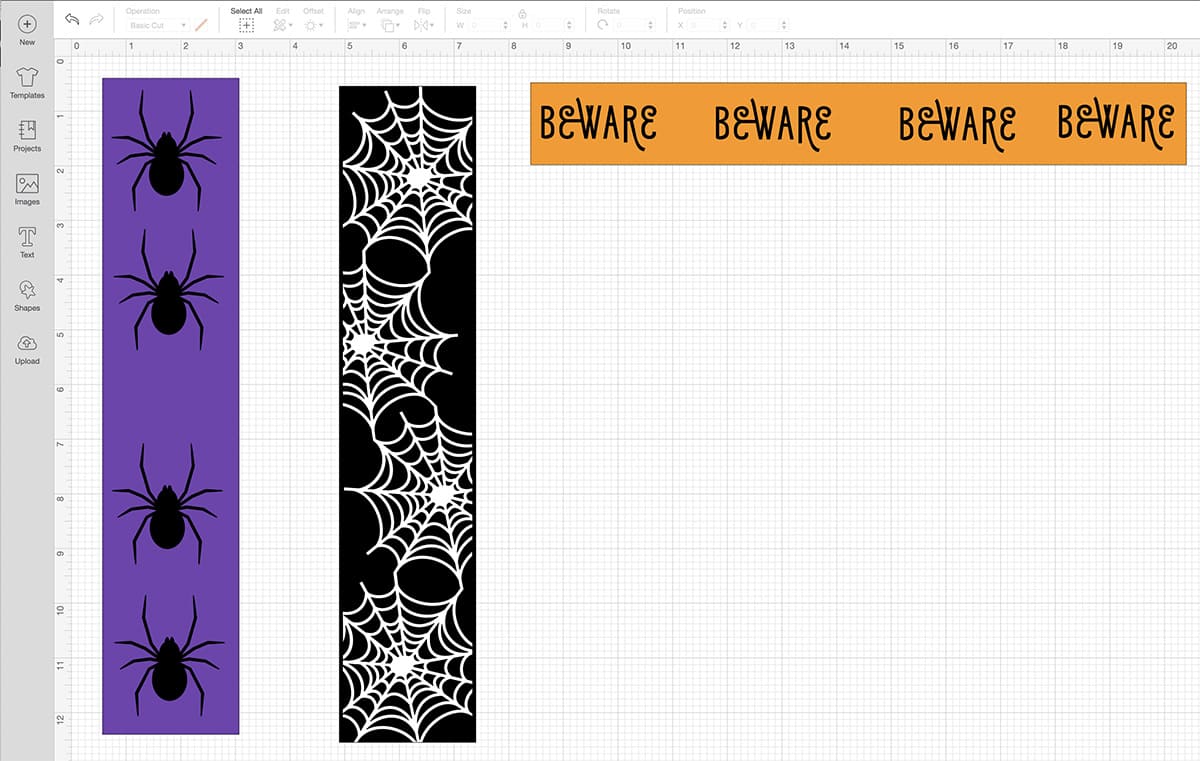
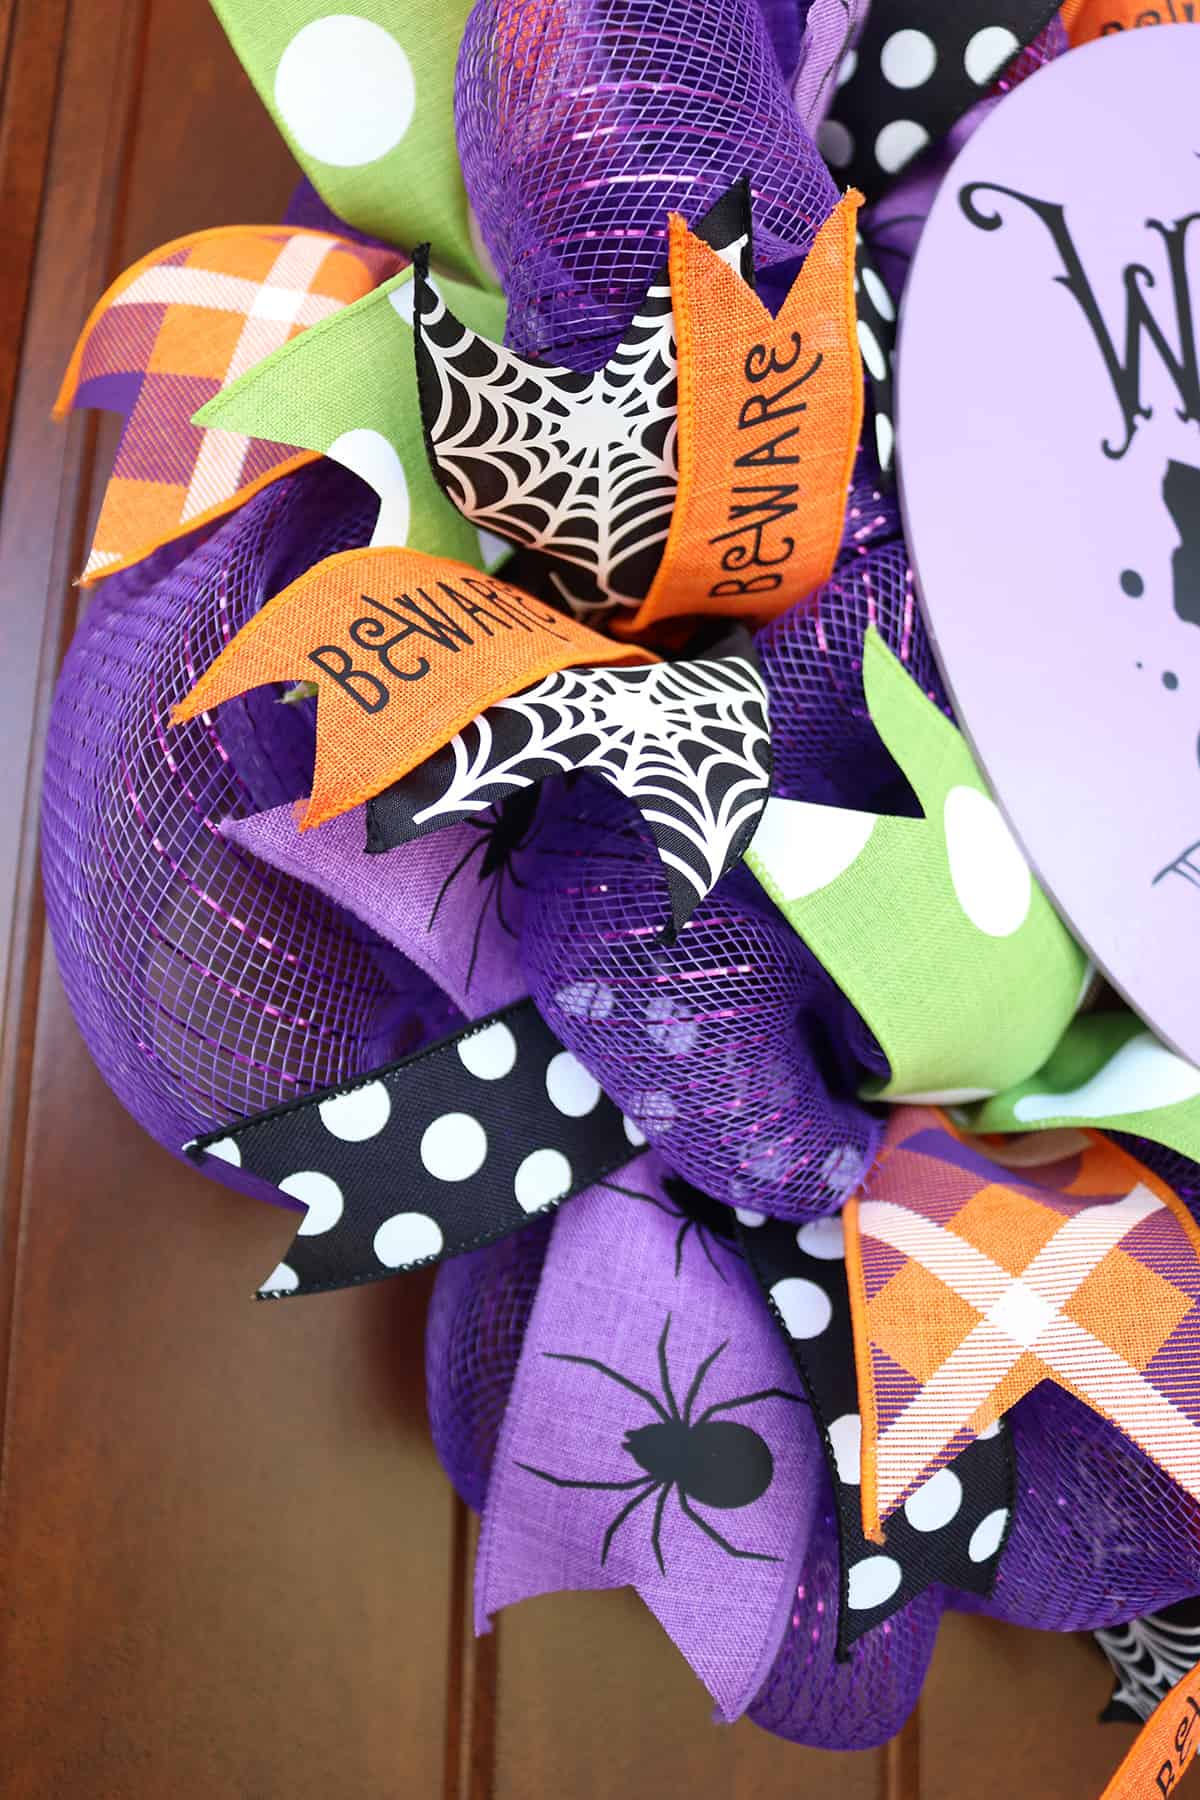
Once you’ve chosen your design or text, lay it on top of the rectangle to see how big you need to cut it. If you want your design to extend to the edges of the ribbon, you can slice the ribbon out of the design so it’s the perfect width (I did this with the spider web ribbon you see above, but I shaved off some of the width to account for the wire edge of the ribbon that I didn’t want to iron over—you can just create a “slicing” rectangle that’s the right width and then delete it afterwards).
If you attach your ribbon to your wreaths in the middle like I do, then keep in mind that the middle of the ribbon won’t be seen and doesn’t necessarily need iron-on in that part (which is why I only did 4 spiders even though 5 would have fit). Also, you’ll want an even number of designs so each side of the folded ribbon will be symmetrical.
Editing the colors of your rectangles and designs in Design Space is a great way to visualize and plan what materials to use!
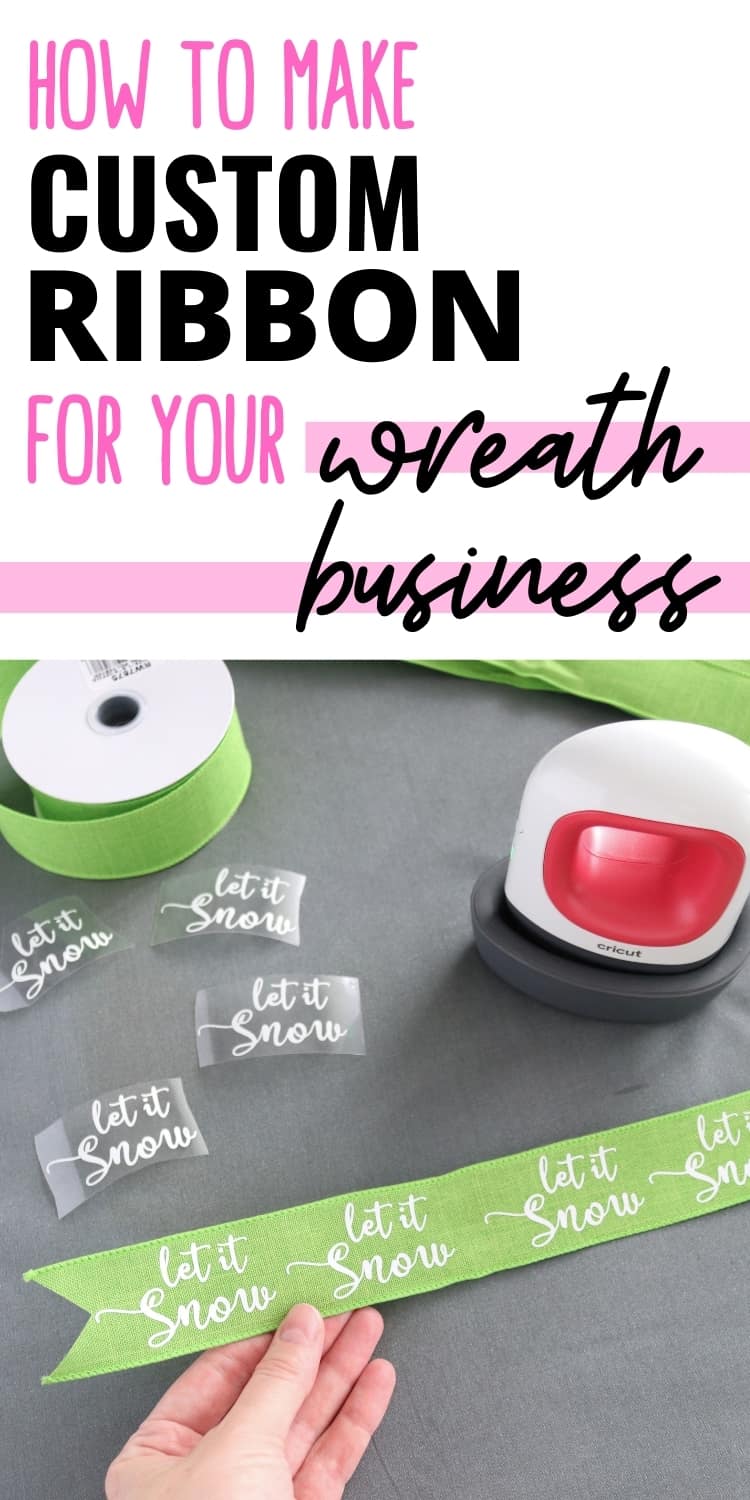
Step 2: Cut your iron-on vinyl and prep your ribbon
Once you’re finalized your design, hide the “ribbon” rectangles by toggling the eye icon in the layers panel (or delete them).
Load your vinyl onto a mat, shiny/carrier sheet side down. (I always use the brayer tool to help the vinyl stick to the mat better).
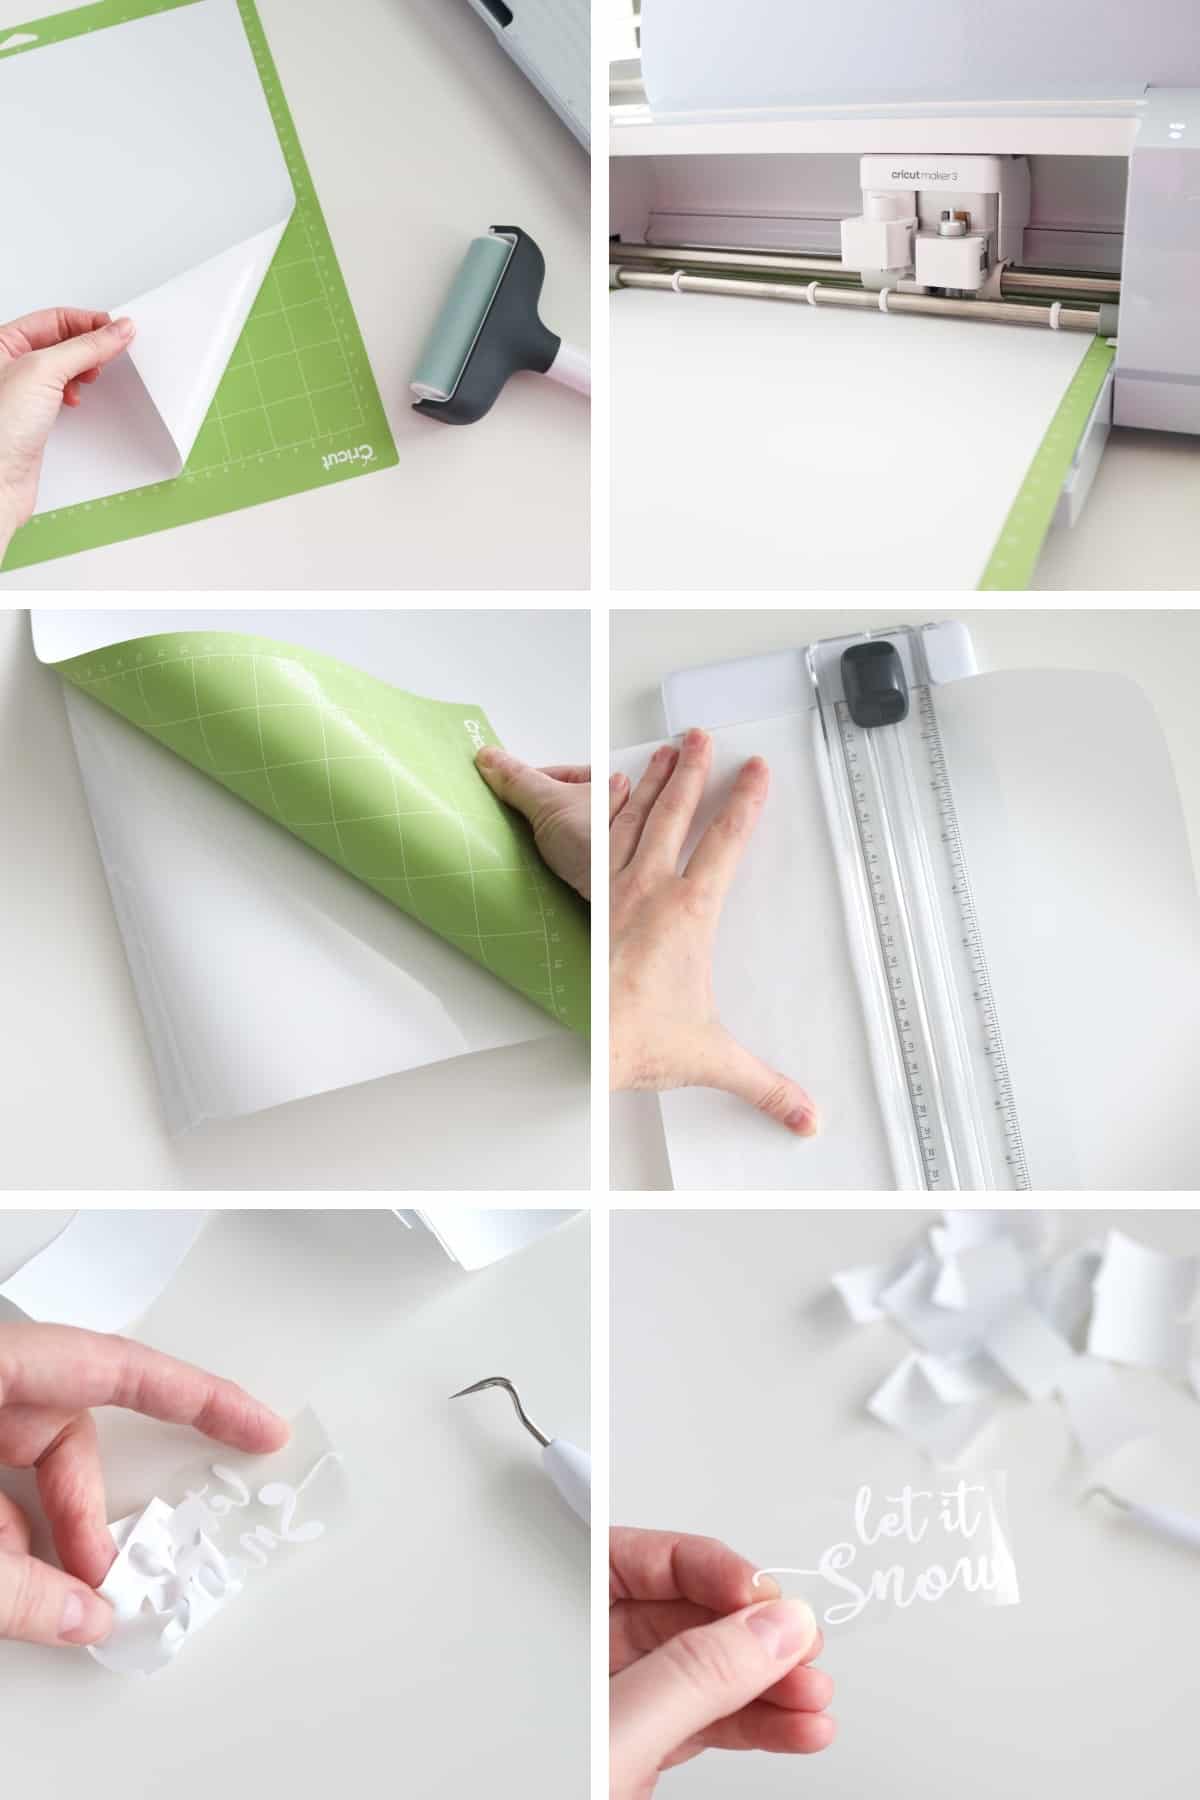
Click “Make It”, select “Mirror” (DON’T FORGET!), change “Project copies” to the number of ribbons you’re making, and adjust your images on the mats if necessary*. Select the appropriate cut settings and load your mat into your Cricut machine (or skip the mat if you’re fancy and use the mat-less cutting option with Smart materials and the Cricut Maker 3!). Then push the start button on your Cricut machine.
*I always recommend doing a test-cut the first time I use a new material or if it’s been awhile since I’ve cut it, just to make sure your machine cuts all the way through the iron-on. Because there’s nothing worse than cutting a whole sheet and realizing your blade was too dull or the setting was off. 😭 This is especially worth doing when you’re mass-producing a large quantity of customized ribbon for wreaths.
While your Cricut cuts your vinyl, prepare your ribbon by cutting them to the desired lengths and dovetail the ends if you choose. If you’re making a ribbon bow, also pre-cut the ribbon to the lengths you normally would use and dovetail the ends. Leave your bow unassembled for now so you’ll be able to press on your designs.
When your Cricut machine has finished cutting, unload the mat and remove the iron-on from the mat. Trim off any extra vinyl to save for future projects and then cut around each design (optional, but I find it’s easier to weed small sections versus a whole sheet). Weed your designs…and be glad that iron-on is usually a breeze to weed compared to adhesive vinyl!
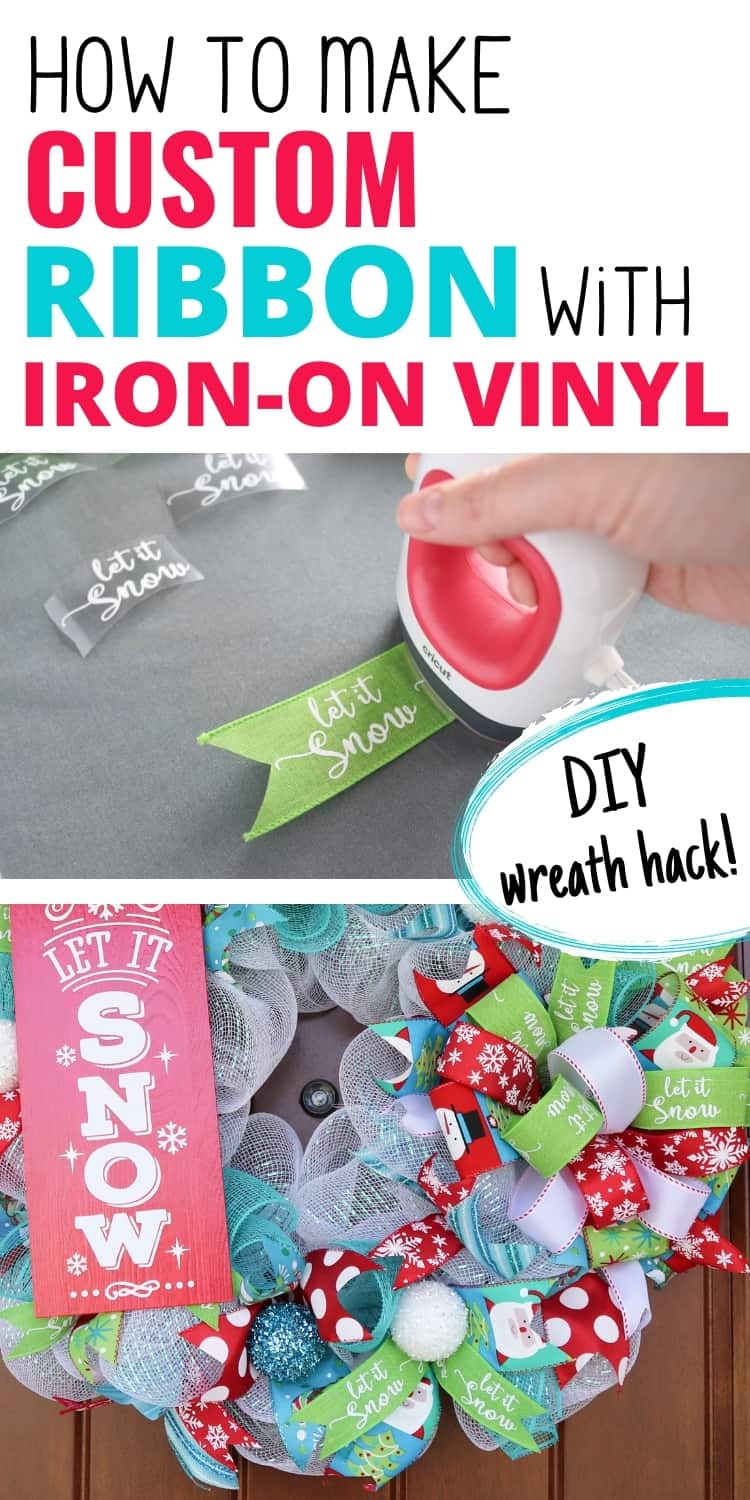
Step 3: Transfer your iron-on vinyl to the ribbon with your EasyPress Mini
If you’re new to the EasyPress Mini, Cricut has a super handy Heat Guide that tells you exactly what heat settings to use based on your HTV and the material of your ribbon.
I set my EasyPress Mini to the medium heat setting. Lay your ribbon on your EasyPress Mat. Preheat your ribbon for a few seconds, then line up your first iron-on image close to one dovetailed end of the ribbon. I like to work from the ends of the ribbon and go in towards the middle (because, again, the middle of the ribbon won’t usually be seen in the finished wreath).
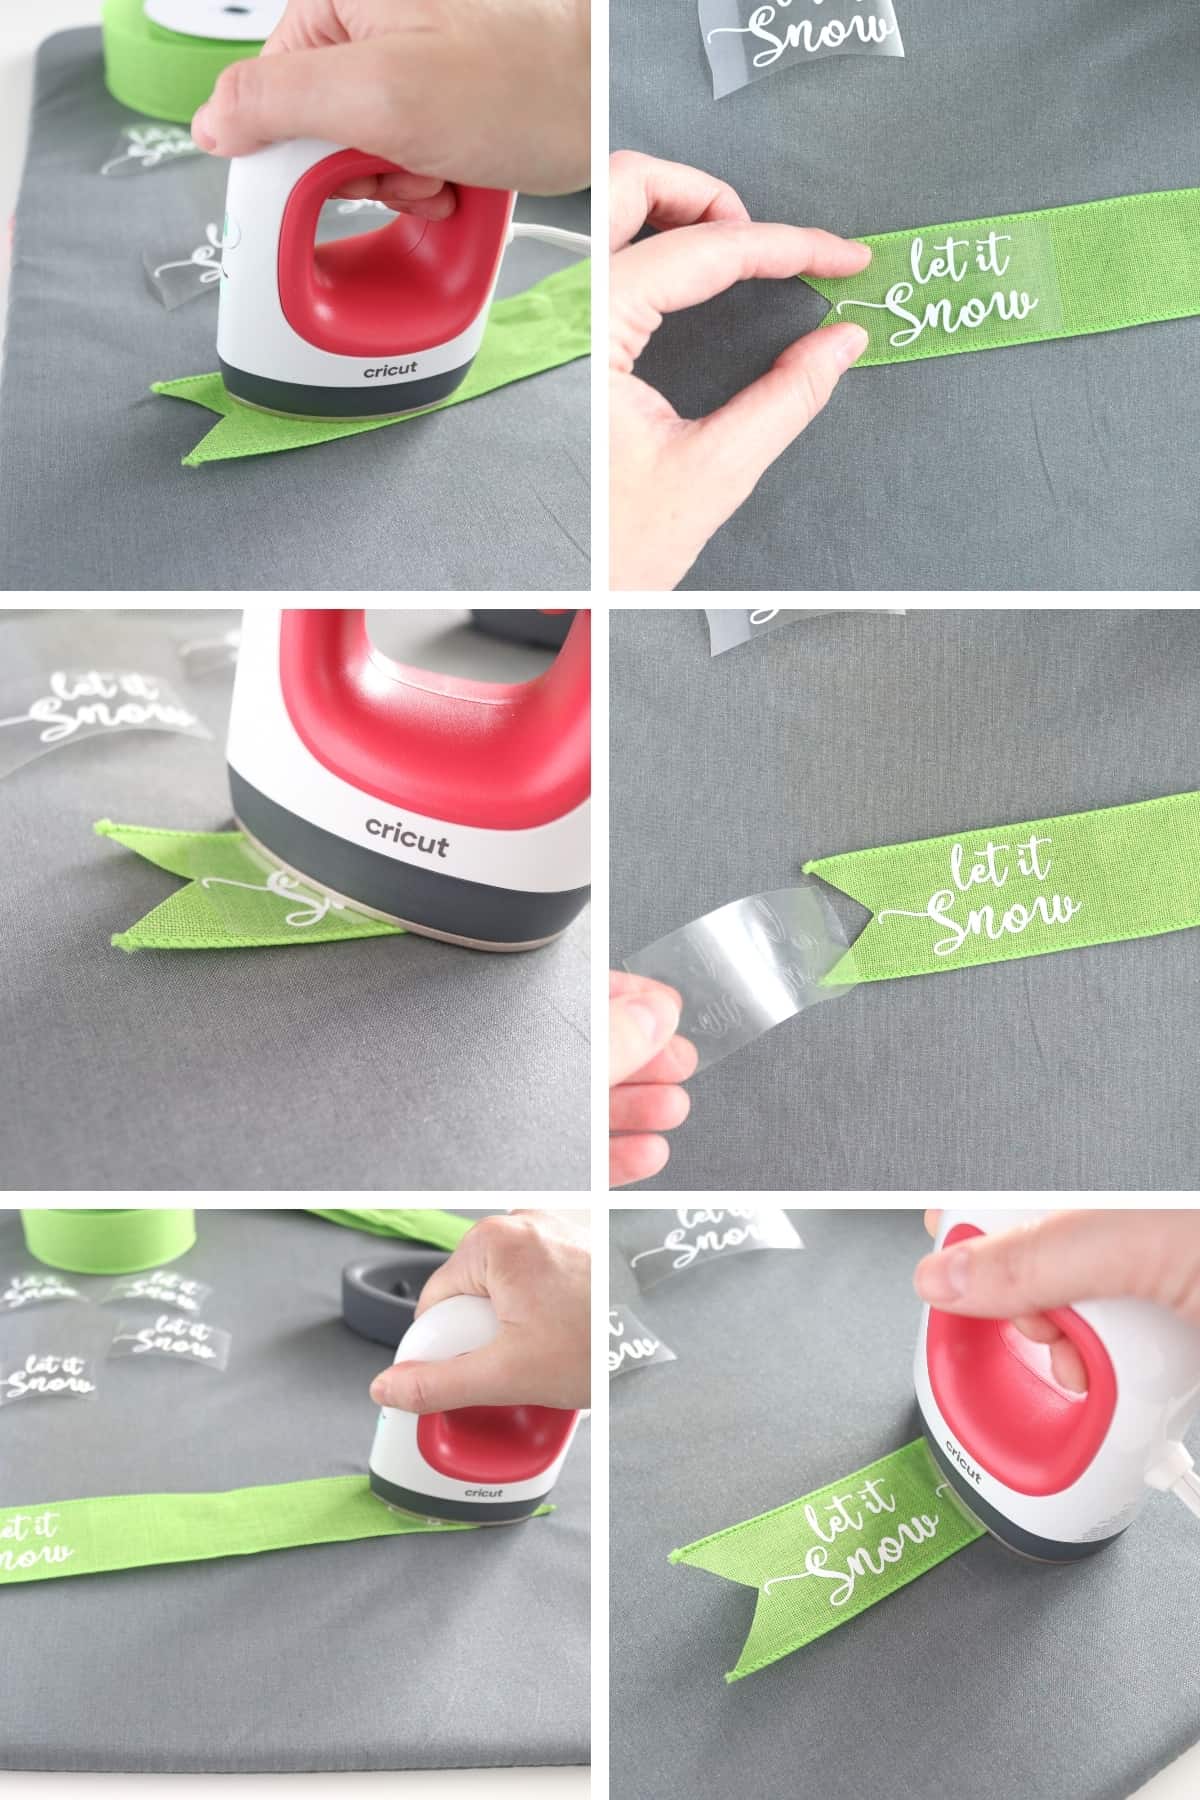
Start pressing, using continuous motion (move the EasyPress around in a circle) and light pressure (or whatever the Heat Guide instructs you to do). I only needed about 10-15 seconds of pressing for the regular iron-on, which was probably a little less than the recommended time (experiment to see what works for you and your materials—glitter iron-on requires more time, so I followed the Cricut Heat Guide exactly for that).
Flip the ribbon over (with the carrier sheet still attached to the iron-on image) and press for an additional few seconds. Depending on the HTV you’re using, you’ll either do a warm peel (peeling off the carrier sheet while the HTV is still warm) or a cold peel (waiting until it’s cooled completely before peeling).
Apply your next iron-on image to the opposite end of the ribbon.
As you work, make sure you’re not touching the EasyPress Mini to any previously ironed-on designs or they will melt (ask me how I know this). This is why I LOVE the EasyPress Mini and would only recommend this project to owners of one: the small size is SO necessary for small projects like this. Just watch your edges and turn the EasyPress sideways as you get close to other designs.
Finish applying the iron-on until your ribbon is filled.
If you’re making a ribbon bow, mark the ribbon where the tails turn into loops so you know which parts will be hidden versus which parts you’ll see (the tails and loops). I temporarily assembled the bow and then unassembled it, which left pinch marks so I’d know where those gaps would be. Then apply iron-on to the rest of the ribbon. (Or if that’s too complicated, you can just apply iron-on to the entire length of ribbon with even spacing between each image.)
Step 4: Admire Your Work
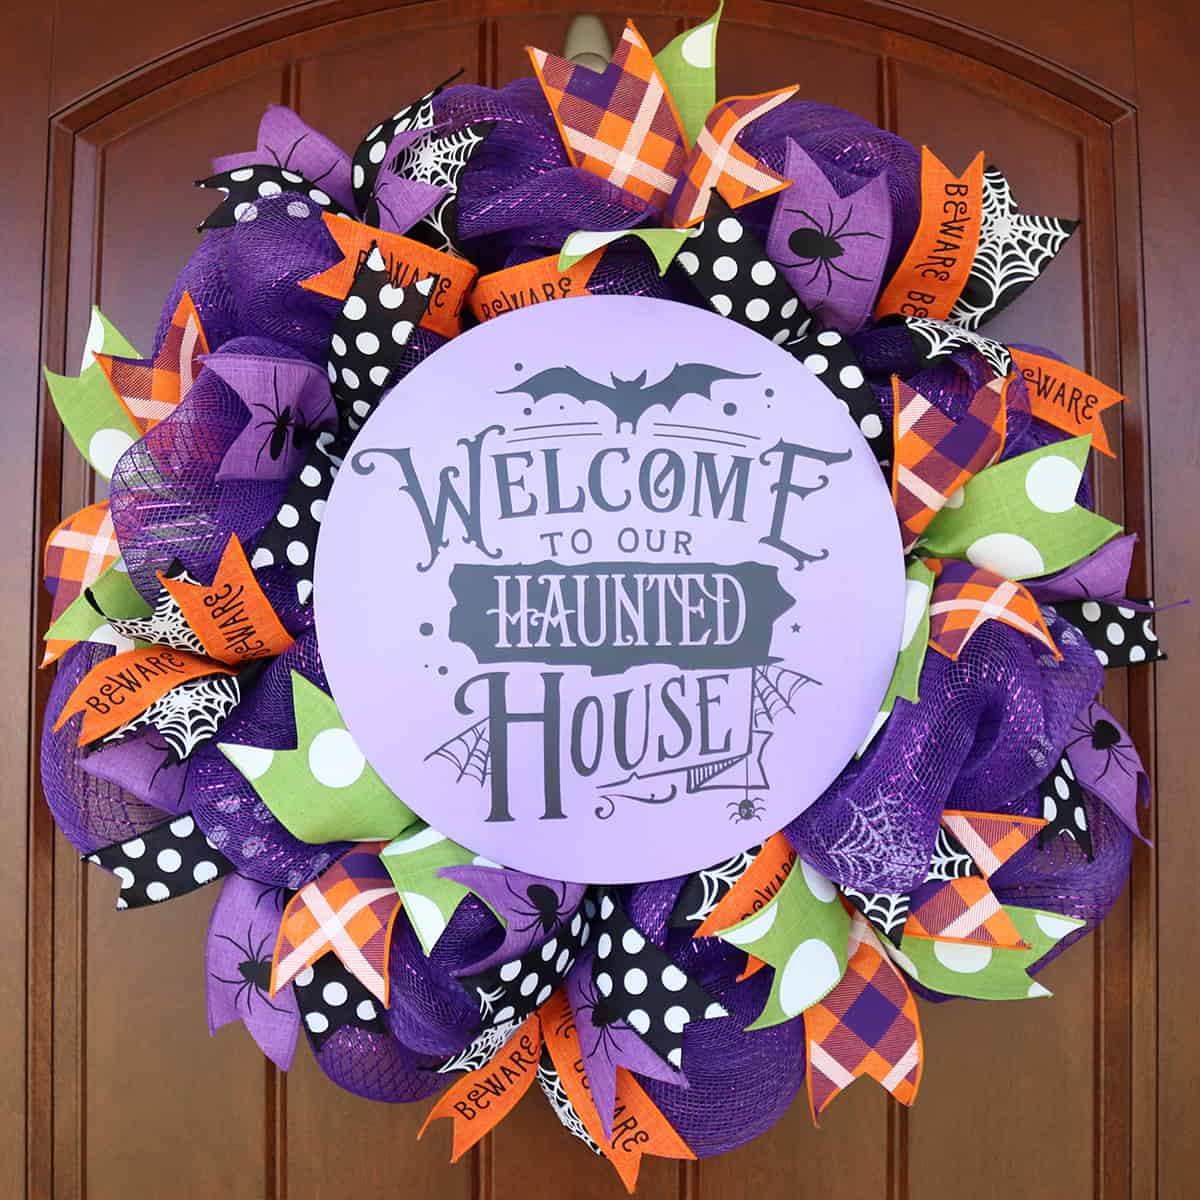
Okay, not an official step, but come on! Look how fun these finished wreaths are!
Check out How to Make Custom Wreath Signs With Cricut!
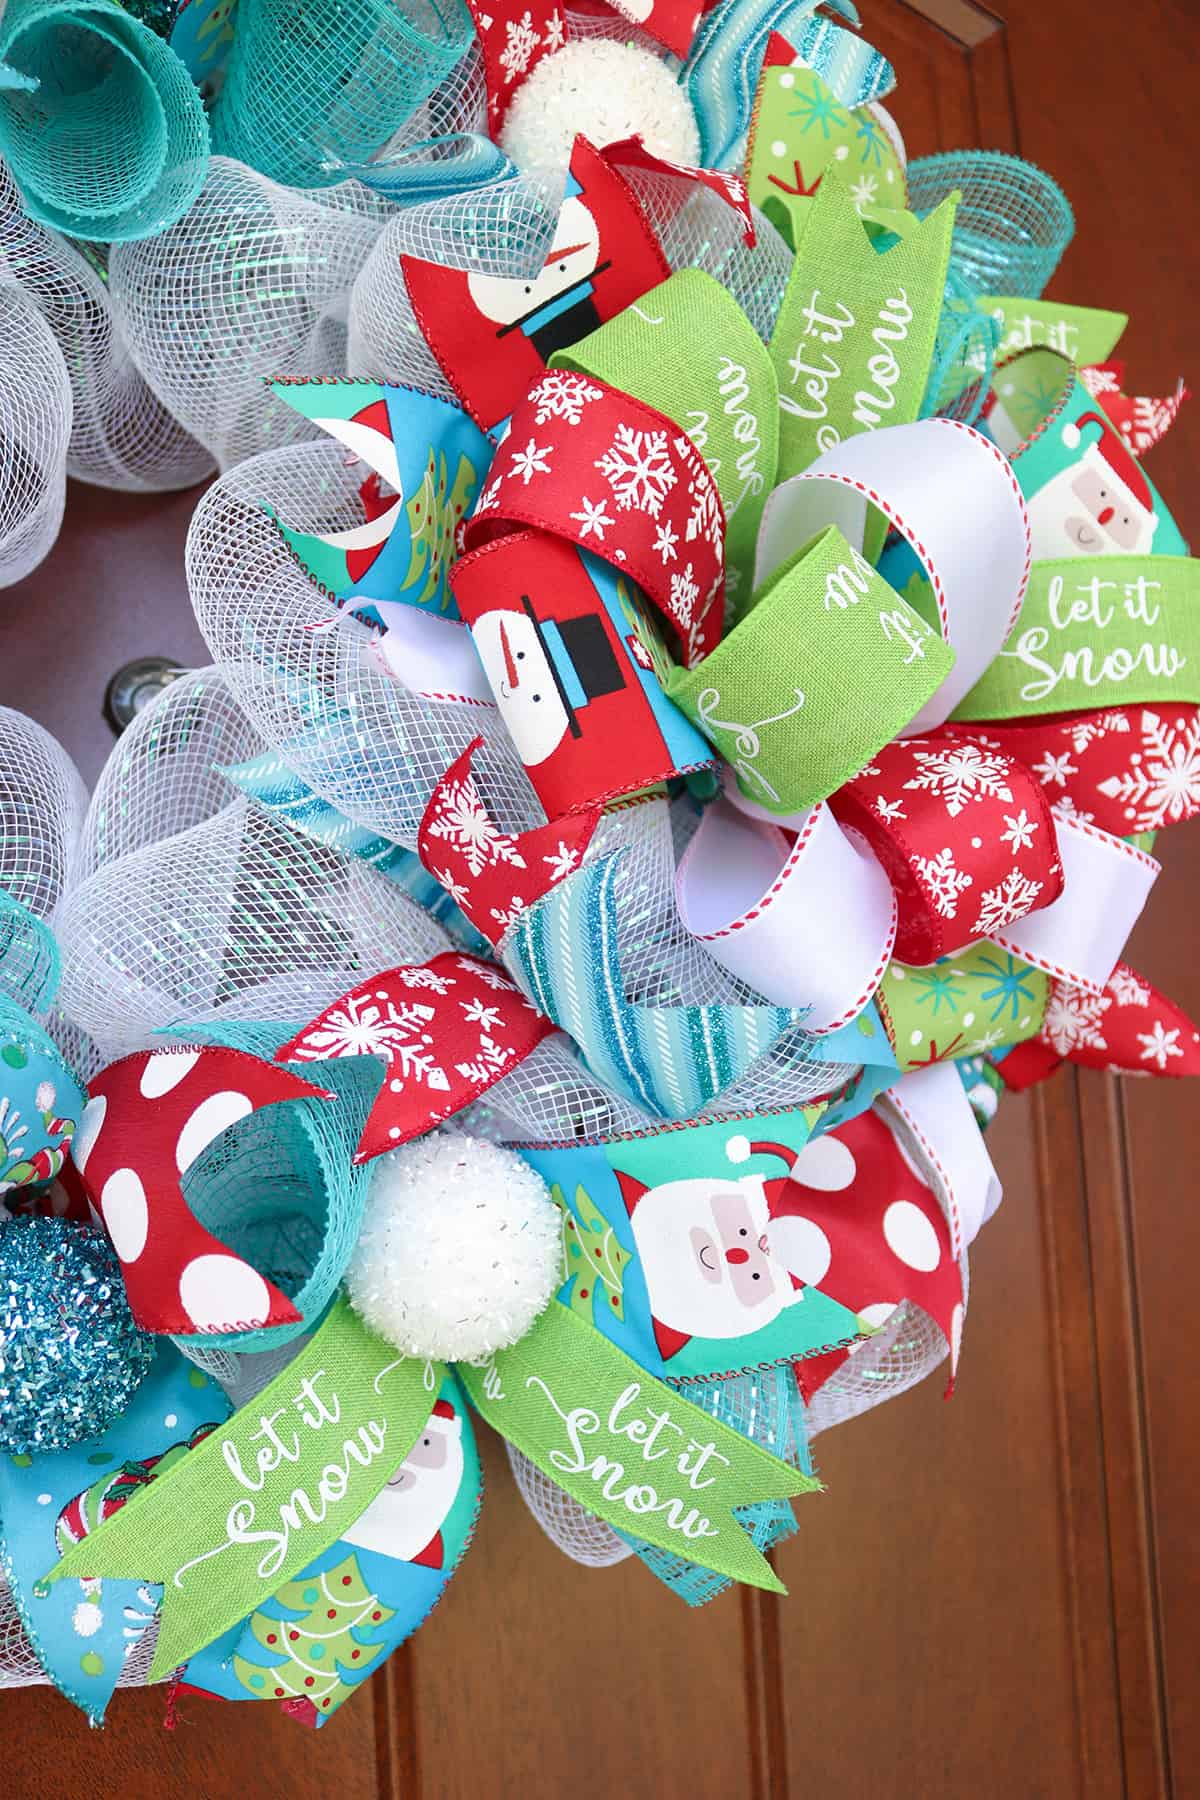
No one may ever guess that you customized these ribbons with iron-on vinyl, but it definitely helps the wreaths pop (look at this before and after of my “Let it Snow” wreath—that green ribbon was so boring before)!
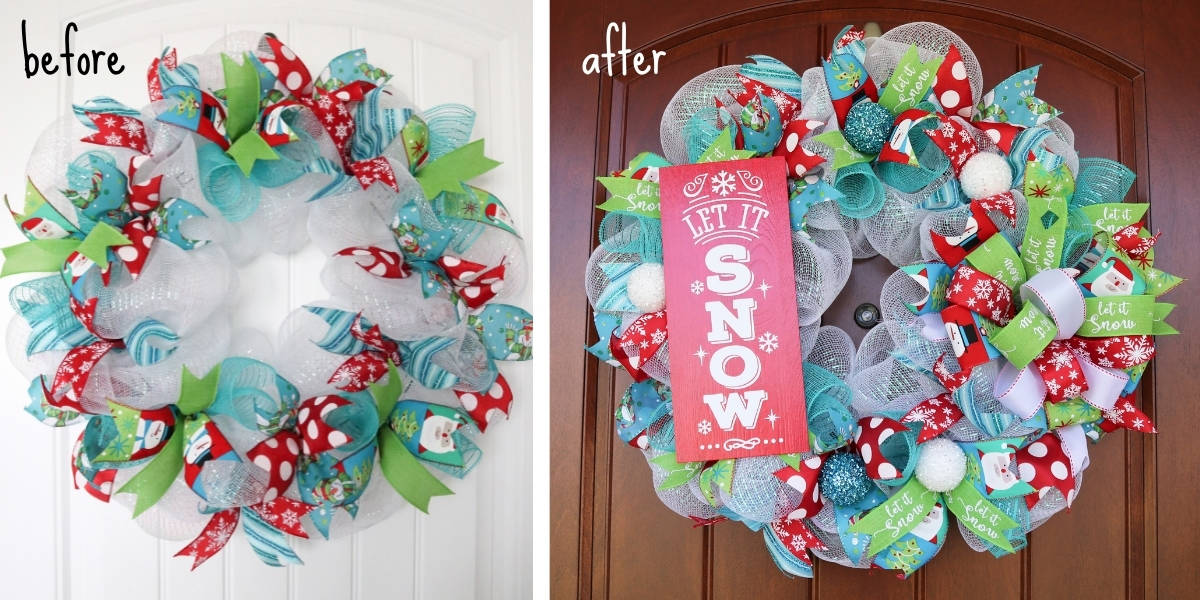

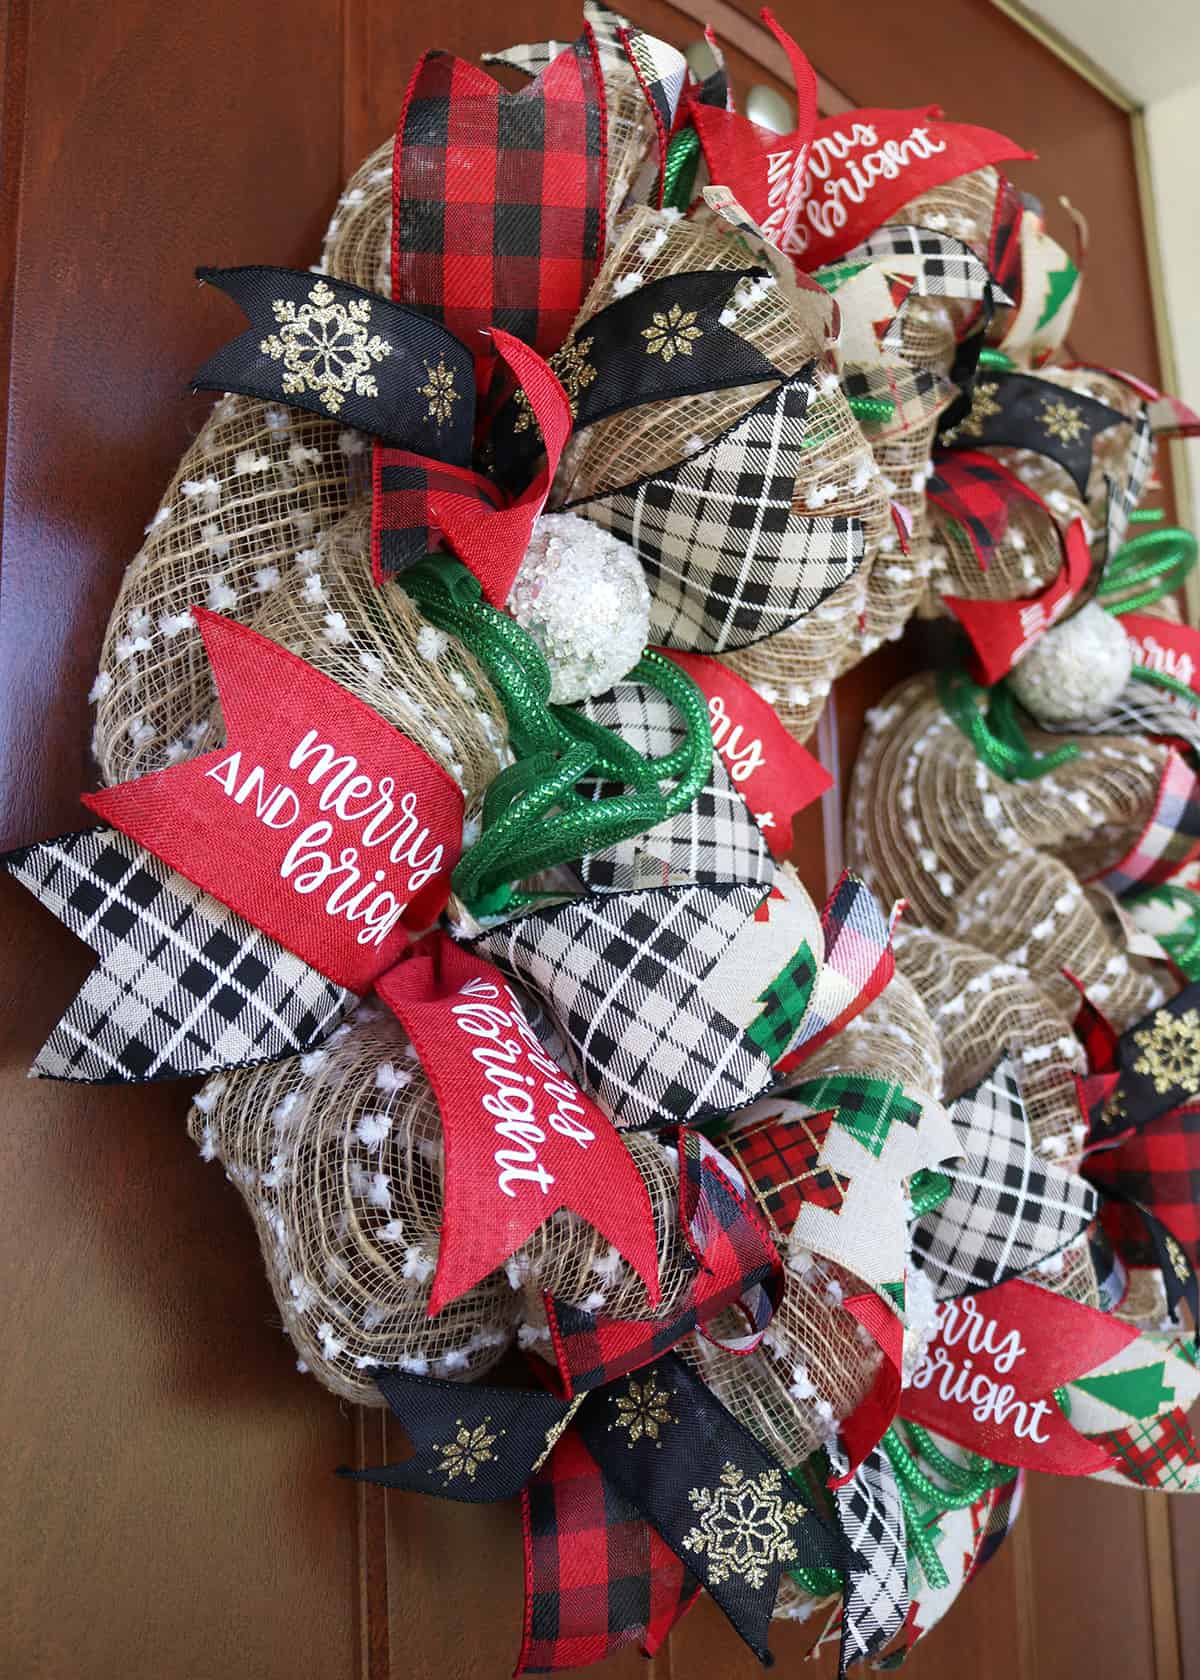
I love that the “merry & bright” text and the gold glitter snowflakes (both iron-on vinyl) added so much interest to this Christmas wreath that I didn’t even need to add a sign, just some ornaments and mesh tubing and it was complete!
See what’s currently in my Etsy Shop here!
How to Add HTV to Ribbon for Custom Wreaths
I hope you try customizing wreath ribbon with iron-on vinyl! It’s super fun and an easy way to set your wreath business apart!
There are so many fun customization possibilities with iron-on! I can’t wait to see the custom wreaths you come up with!

Don’t forget to pin and save for later!

Hello! Trying to customize some Halloween ribbon and I love the BEWARE font you used. Can you tell me what it is? I just found this tutorial on Pinterest and I know you posted this more than a year ago. Thank you!
Hi Iva! The Beware is actually an image in the Design Space Library, #M81C4D7E. If you have a Cricut Access subscription, you can use this for free (you’d also have access to all of Cricut’s Halloween fonts). Otherwise you might be able to find a font similar to it online, but I don’t have a good suggestion–sorry about that!
HOW DID YOU DO THE WHITE BACKGROUND RIBBON IT IS ONCE PICECE OF RIBBON WRAPPED AROUND THE WHOLE WREATH FRAME? THEN YOU ADDED THE BOWS? DO YOU HAVE ANY VIDEOS ON HOW YOU DO YOUR WREATHS?
Hi Nina! That’s a great question, and I’m so glad to hear you’re interested in that! I believe you’re talking about the white deco mesh on the Christmas wreath? Yes, it is one piece, it comes on a roll and you can use either 10″ or 21″ width. Then you can add ribbon and bows on top of that. I have plans to make some tutorials in the new year and eventually a more in-depth course. If you want to join my wreath making email list, I can make sure you get notified as soon as a tutorial is up!