How to Make Wreath Signs With Cricut (and Set Your Wreath Business Apart!)
Learn how to make custom wreath signs with your Cricut! It’s the perfect finishing touch to your one-of-a-kind wreath that will set you apart from the competition. I’m going to show you exactly how to make wreath signs, step by step. These are all the best tips and tricks for professional handmade signs!
This is a sponsored post written by me on behalf of Cricut. All thoughts and opinions are my own.
This post contains affiliate links. For more information, see my disclosures here.
As I’ve gotten more and more into wreath-making, I’ve discovered that I love making custom wreath signs with my Cricut. For a few reasons:
First, the pre-made signs you can find from wreath suppliers and craft stores are what every other wreath maker is using (a quick search of Etsy will show you what I mean as you’ll start to see some of the same signs over and over). Also, these signs tend to be available every year—for example, I purchased a fall sign from Hobby Lobby last year, and it’s available again this year. And while these signs are cute (and using them is definitely not a bad thing—I use several pre-made signs regularly), if you want your wreath shop to really stand apart, you should consider making your own.
Another great reason for making your own signs is being able to completely customize the design and colors to your particular wreath (or to your customer’s wishes). Using your Cricut machine and vinyl opens up a whole world of color schemes and options. If you want a Christmas sign that matches your pink/lime green/turquoise ribbon and says “Ho Ho Ho” and also has a Santa on it—guess what, you can totally make that!
Making custom wreath signs is also great when you’re working on a wreath out-of-season. As a wreath seller, you know that it’s important to work ahead of the seasons and even have out-of-season options available year-round. But your local craft store may not have what you need at that particular time (if ever). But your Cricut machine does, and it won’t even blink twice if you want to make a Halloween sign in April!
And my favorite reason to make your own wreath signs? Buyers appreciate it! They like the custom, one-of-a-kind touch to their wreath and knowing that you can’t find a similar wreath anywhere else.


Now let’s make some wreath signs!
Looking for the best wreath ribbon? This is my favorite place to buy it from!
What You Need to Make Custom Wreath Signs

- a sign base*
- a Cricut machine (I have a Cricut Maker and Cricut Maker 3 and both work great for this project! You could also use a Cricut Explore machine.)
- Cricut Access subscription, optional but something I definitely recommend for projects like this (I will link to all the Design Space images you see here at the end of this post). Check out my post on Cricut Access for more details!
- permanent vinyl and transfer tape
- sandpaper
- paint or stain
- a sealant such as polycrylic, optional (more details on this below)
- materials for attaching the sign: chenille stems or wire, E6000 glue or a staple gun
*There are SO many options for sign bases/blanks. Hobby Lobby is my favorite place to find these, but try other craft stores or even Dollar Tree, too. I mostly use wood (or particle board/MDF type materials), but you could use other materials as well. Try to choose something light-weight, especially if you plan to position your sign to one side of the wreath.
Save $10 on any Cricut machine or heat press with the coupon code AUBREE-10
How to Make Custom Wreath Signs With Your Cricut
You can do these first couple steps in the order that makes sense to you. I like to use Design Space to plan my initial design (and see what size sign I want to use with it), and I may also plan out my sign’s colors in Design Space. Then, I’ll prep my sign base and work on the vinyl part while it’s drying.
Step 1: Prepare Your Sign Base
Sand your base if needed (I always do if it’s wood), then paint or stain it. Once dry, apply a sealant (optional, and I talk more about this below). Let dry/cure fully.

If your sign base is pre-made or already painted, you may not need to do anything to prep it. Just make sure the surface is smooth for applying vinyl.
I’ll talk more about sealants at the end, but there are both brush-on and spray sealants. I prefer to brush mine on so I have better control of where it goes but this is totally personal preference.
This may be a no-brainer, but don’t let your sign dry on paper like I did with this one! I pulled my sign up after applying the polycrylic and the paper stuck to the edges where the polycrylic seeped under…so I had to redo this sign. I recommend using cardboard or even something plastic to protect your work surface, then move the sign to a completely dry spot before leaving it to dry.
Step 2: Prepare Your Design in Cricut Design Space
You can create your own design in Cricut Design Space using simple free shapes and text, or you can also upload your own designs/SVG files.
But my favorite, favorite thing is using the images included with my Cricut Access subscription! You can find TONS of awesome phrases and images to create the perfect, unique wreath sign (anything with a green “a” symbol next to it is an Access image). Having all those images at my fingertips saves me SO MUCH time—time better spent on other parts of my business. Of course, feel free to further customize the Cricut Access images using slice, weld, or contour to make them truly your own.
One very important note about images in the Cricut Design Space image library: you CANNOT sell any products you create that include licensed images (Disney, for example). Other images that are not either free or included with Cricut Access may also be subject to their own copyrights and may or may not be used in products for sale. See Cricut’s Angel Policy for more details.
Once you’ve chosen your image(s), add them to your canvas.
Now for one of my very favorite tricks! Add a shape to the canvas that’s the same size as your sign base. Unlock the dimensions if needed (to change the square to a rectangle, for example) and input the exact dimensions of your sign. Arrange this shape so it’s at the back (by right clicking “send to back” or dragging the layer to the bottom of the layers panel).
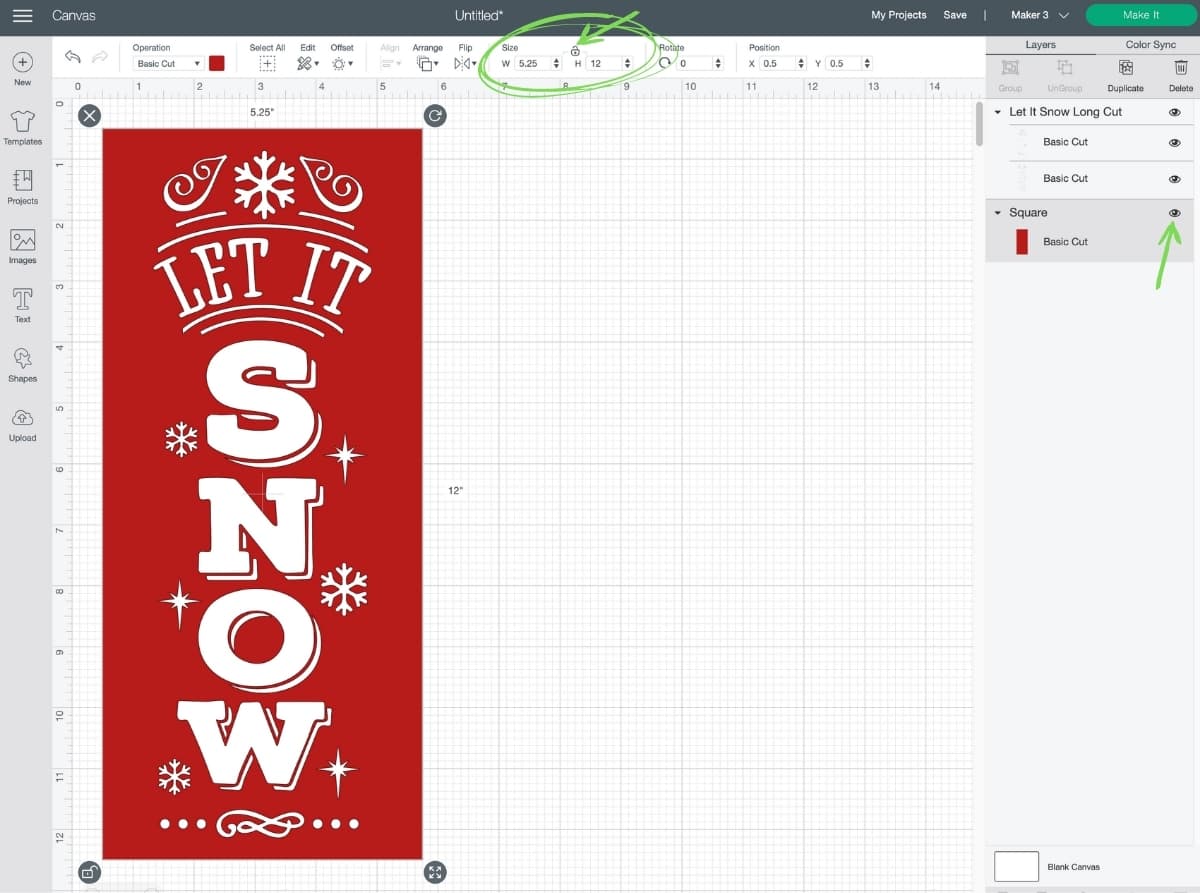
Now, resize your image(s) and position them over the shape. This is the best way to visualize your sign before you commit to cutting it out! Also, you can adjust the colors in Design Space to better help you choose combinations that will complement your wreath.
Before going to cut the design, make sure you “attach” any pieces that need to be cut together (otherwise Design Space will jumble everything up on the mats to save space). If you’re using a script font, be sure to “weld” your letters together (“attach” would only position them together correctly on the mat but they would still be cut as individual letters, which you don’t want).
Once you’re happy with your design, delete or hide the shape you made for the sign base and you’re ready to cut.
Step 3: Cut Your Design
Click “Make It.” Select your mat preferences (or no mat if you’re using a Maker 3 and smart material—one of my new favorite features!). Double check that everything looks correct on the mats and click “Continue.” Set your material and pressure settings.
Put your material on your mat (I love using my brayer tool to do this—it helps remove bubbles and also is great when your mat isn’t as sticky anymore), load the mat into your machine and cut your project.

I’m going to need to get more of this smart vinyl, though, because that mat-less cutting saves so much time! (I love my trimmer tool for getting straight cuts after cutting a project, but my next purchase may have to be the new roll holder. Also, you’ll notice that I also hand-cut around all my designs afterwards because I can’t bear to waste precious vinyl—maybe that’s quirky, but I do use my scraps!)
Step 4: Weed and Transfer Your Design
Yay, weeding, my favorite part! (I’m actually being serious because I think weeding is just so satisfying.) And, wow, can I just say that weeding this smart vinyl was a breeze! My Maker 3 cut it beautifully, which always makes for a better weeding experience. (I used permanent smart vinyl on all three of the signs you see in this post, actually, and it came out perfectly every time.)

When weeding, I like to start from the outside and work in—I find it’s a lot easier to tell what I’m supposed to be removing that way. Go slowly and trim off large chunks of vinyl as you go so it doesn’t stick to the rest of your design. Use a weeding tool to help keep small details in place while you weed.
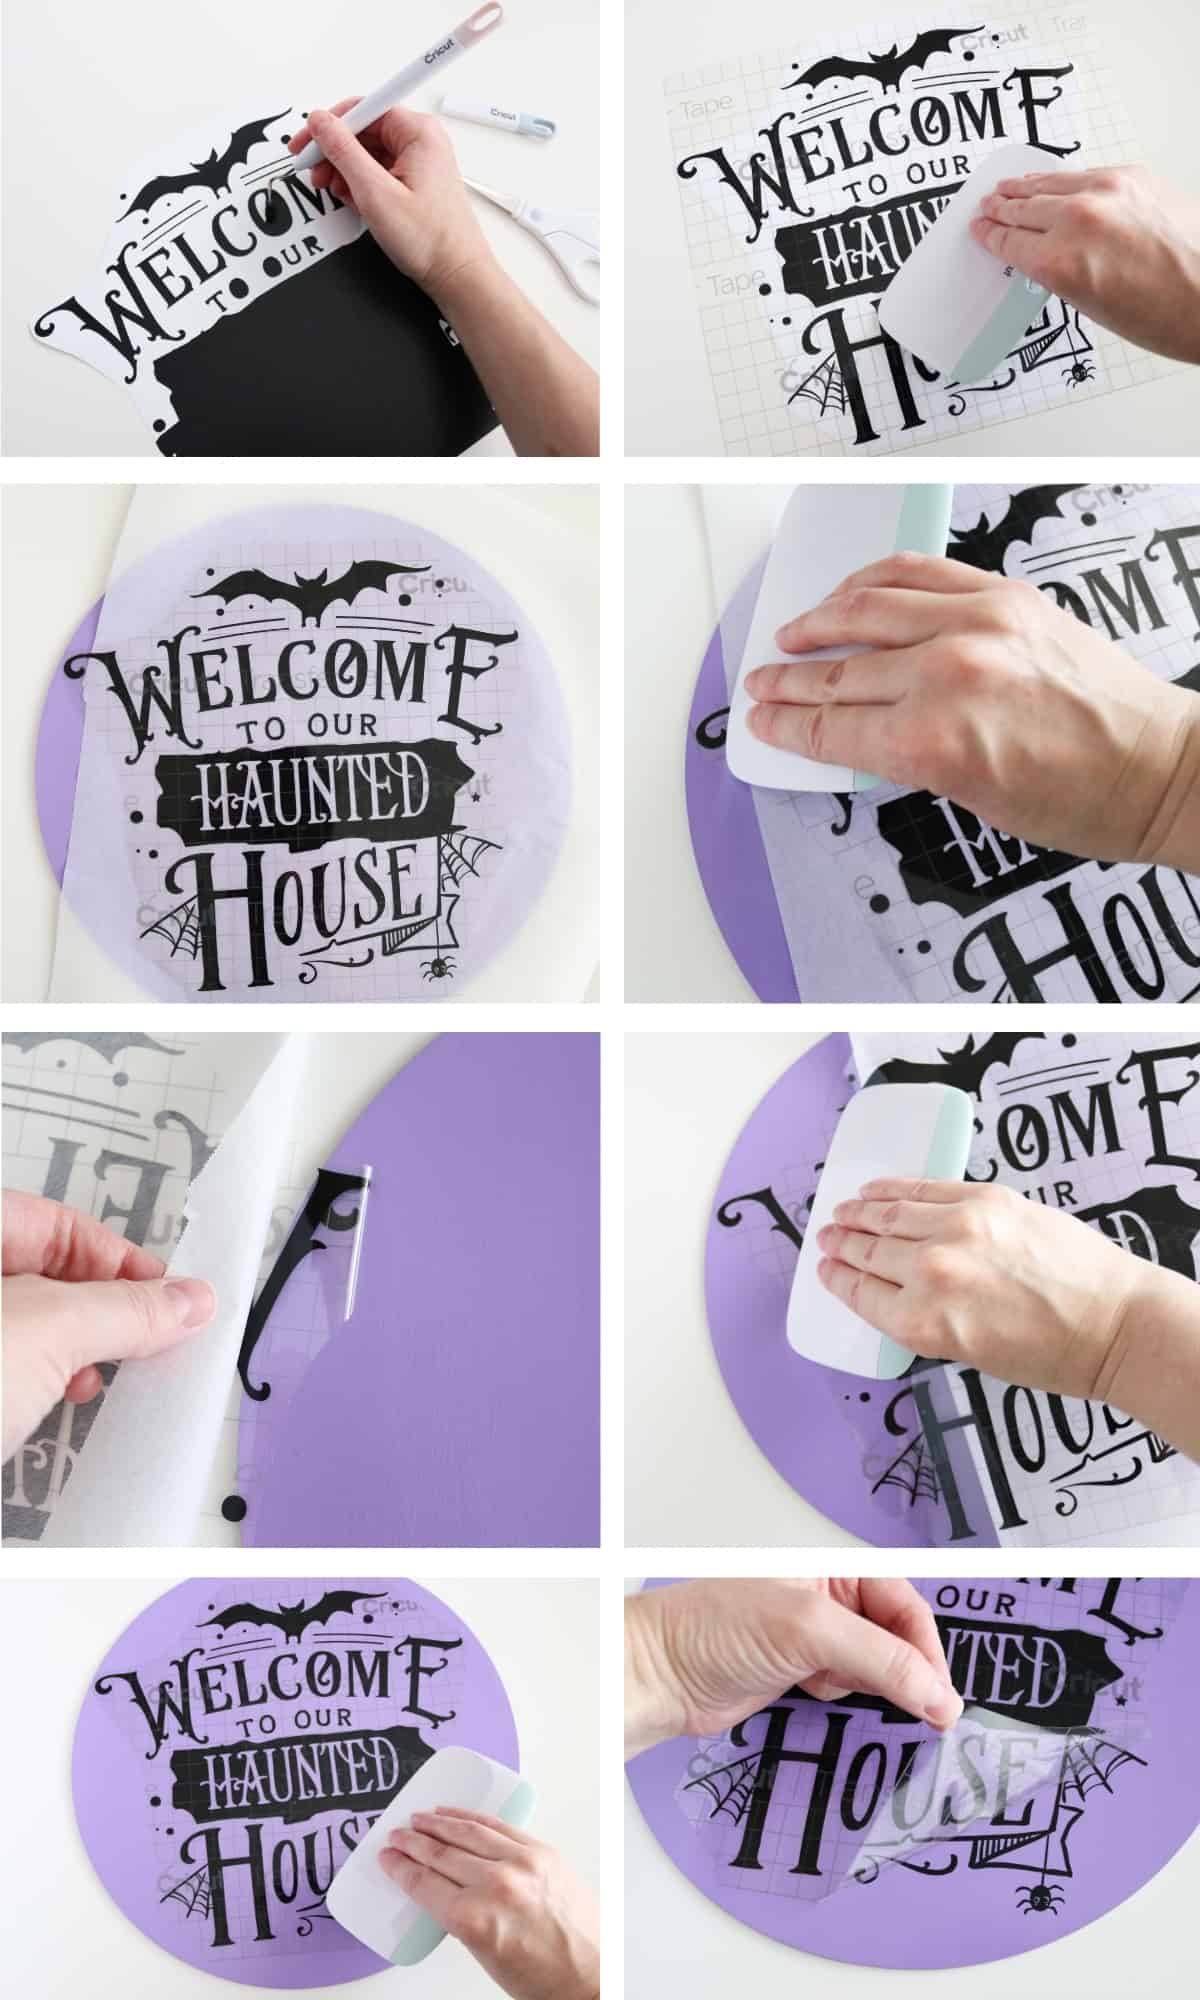
Once you’re finished weeding, cut a piece of transfer tape a little bigger than your design. Apply it to your design, starting in the middle (if you can, though sometimes transfer tape has a mind of its own), and burnish it well. With smart vinyl, you have to burnish a little harder than normal. If you’re still having trouble getting it to stick to the transfer tape, burnish from the back of the vinyl as well.
At this point, I like to trim the transfer tape down close to my design, just in case the stickiness of the transfer tape peels up the paint or stain on my sign base. Then peel the transfer tape up slowly from the vinyl backing, making sure all the vinyl pieces have stuck.
There are different ways you can transfer your design, but I like to use the parchment paper method (fyi, parchment paper is not the same thing as wax paper or butcher paper but you can find it in the same aisle). Cut a piece of parchment paper the size of your design. Lay it underneath your vinyl (don’t worry, the vinyl won’t stick to it) but leave a small section of the vinyl off the parchment paper.
Position the parchment paper and vinyl on your sign base. Once you have it centered, burnish the section of vinyl that’s not on the parchment paper to the sign. Flip the parchment paper/vinyl over so you can roll the parchment paper away from the vinyl. Continue burnishing the vinyl to the sign, rolling the parchment paper away as you go.
Voilà. Perfectly positioned vinyl and no bubbles.
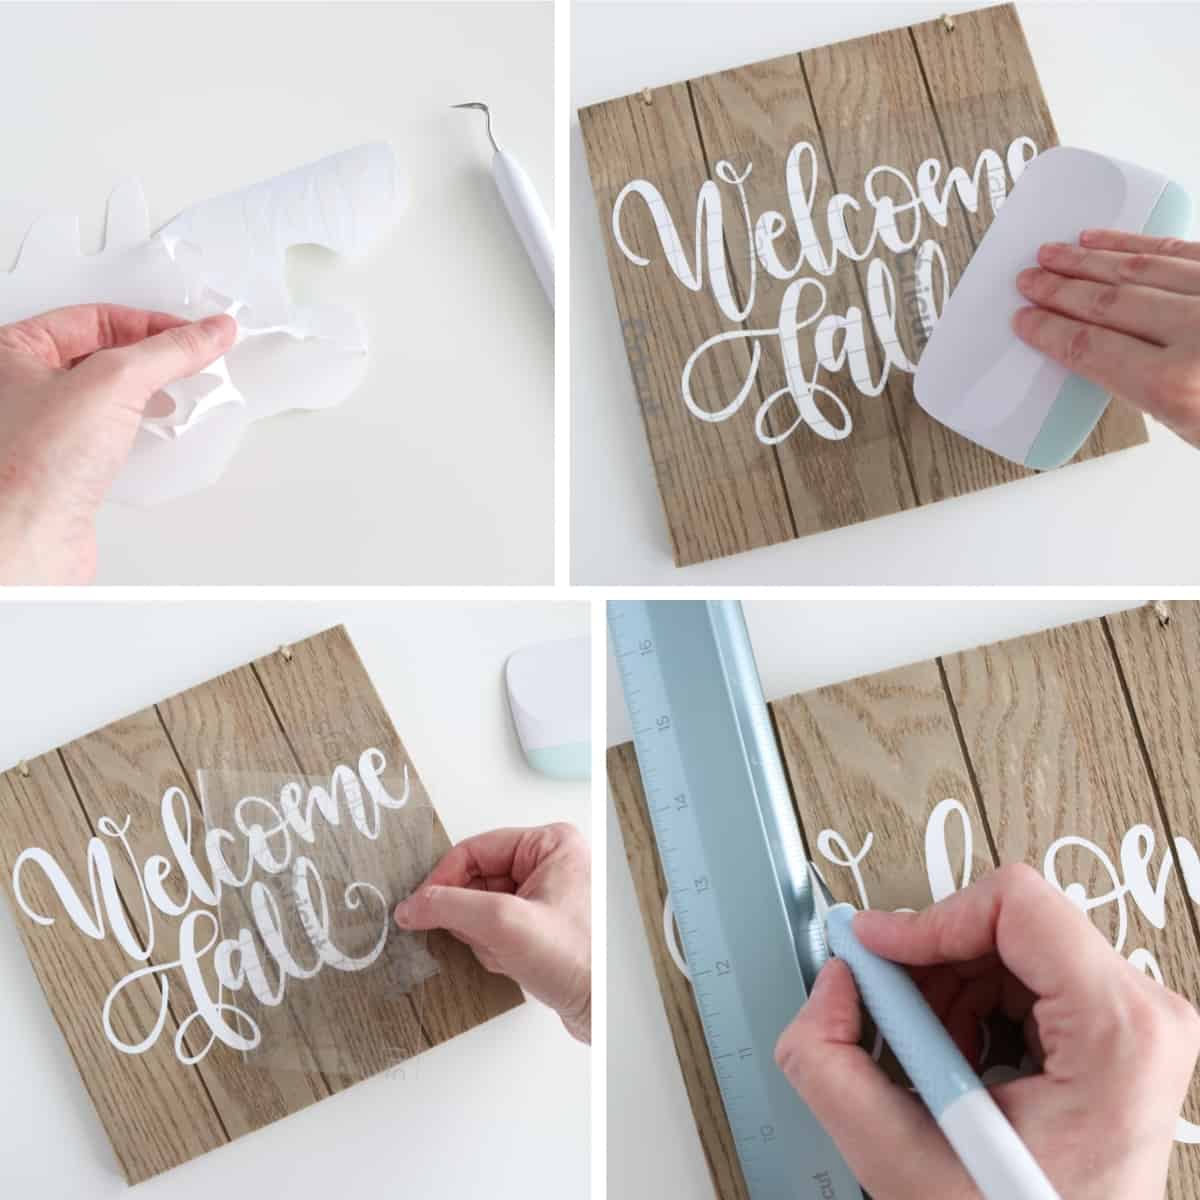
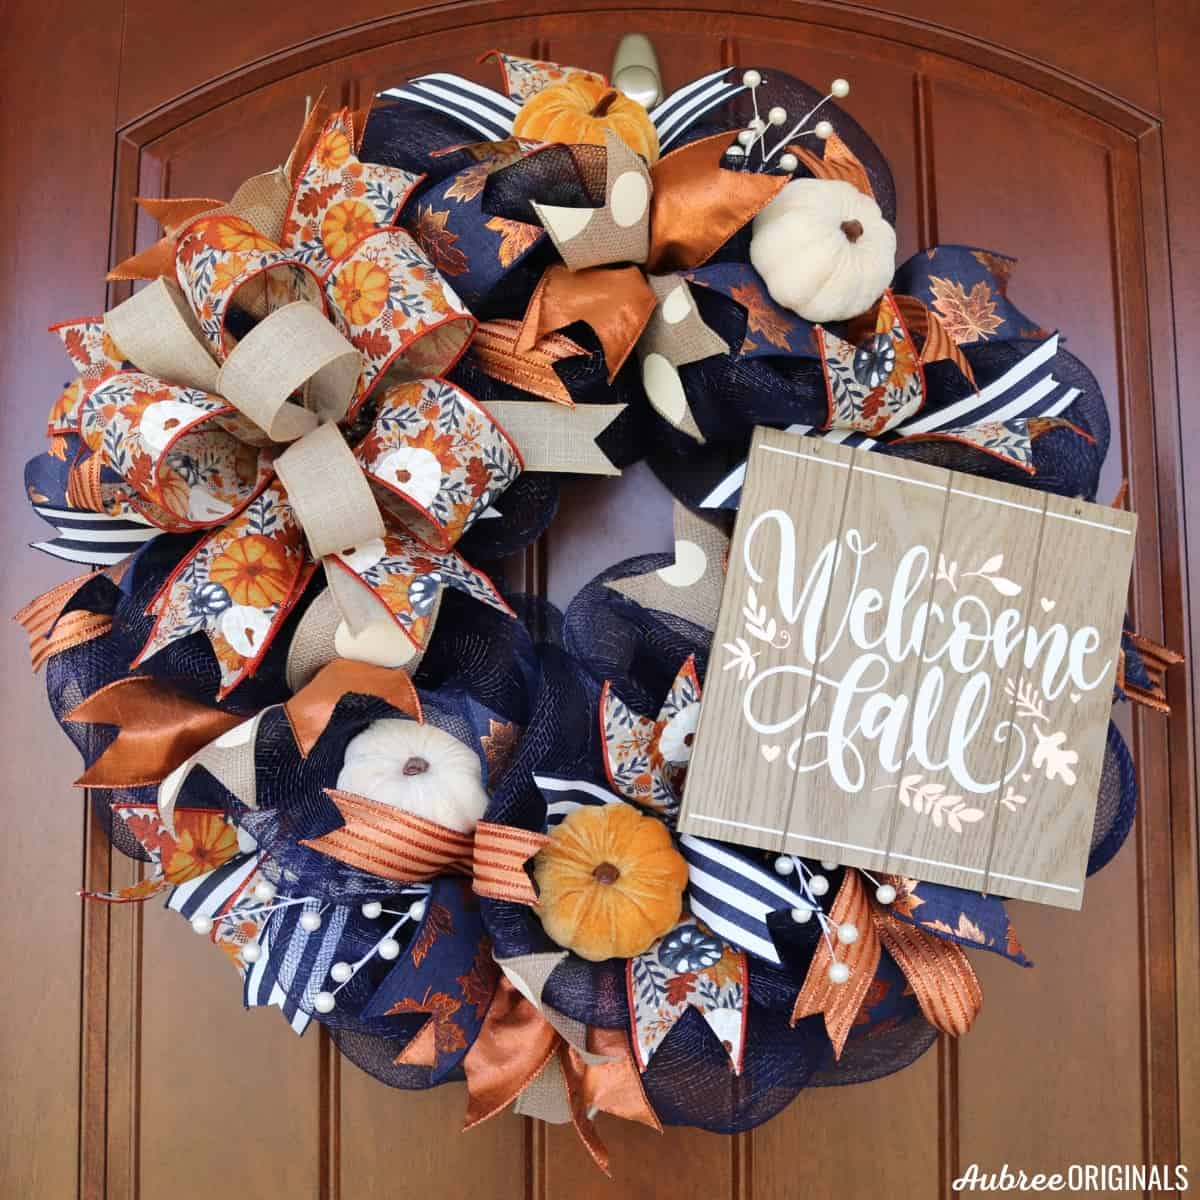
For this “Welcome Fall” sign, my base had several slats where the extra vinyl needed to be cut out. My TrueControl knife and ruler (that I actually received in a Cricut Mystery Box) made removing those pieces a piece of cake—and the result looks so professional! I then added the metallic vinyl leaves that perfectly complement the copper ribbon I used in the wreath.
Seriously, let’s just take a moment to appreciate the shine and texture on this metallic vinyl! So, so pretty!


Step 5: Attach Your Sign to Your Wreath
To attach the sign to the wreath, you will need to glue or staple chenille stems or floral wire to the back of the sign. Before doing that, hold your sign up to your wreath to see where it will hang and at what points you need to attach it (usually the sides or top and bottom of the sign).
If your sign is thick enough, I recommend using a staple gun to attach the chenille stems. But E6000 glue is your second-best option and I haven’t had any issues with signs popping off (just make sure your glue has had adequate time to cure—at least 24 hours). I have had issues with signs popping off from using hot glue so DO NOT use hot glue for attaching signs.
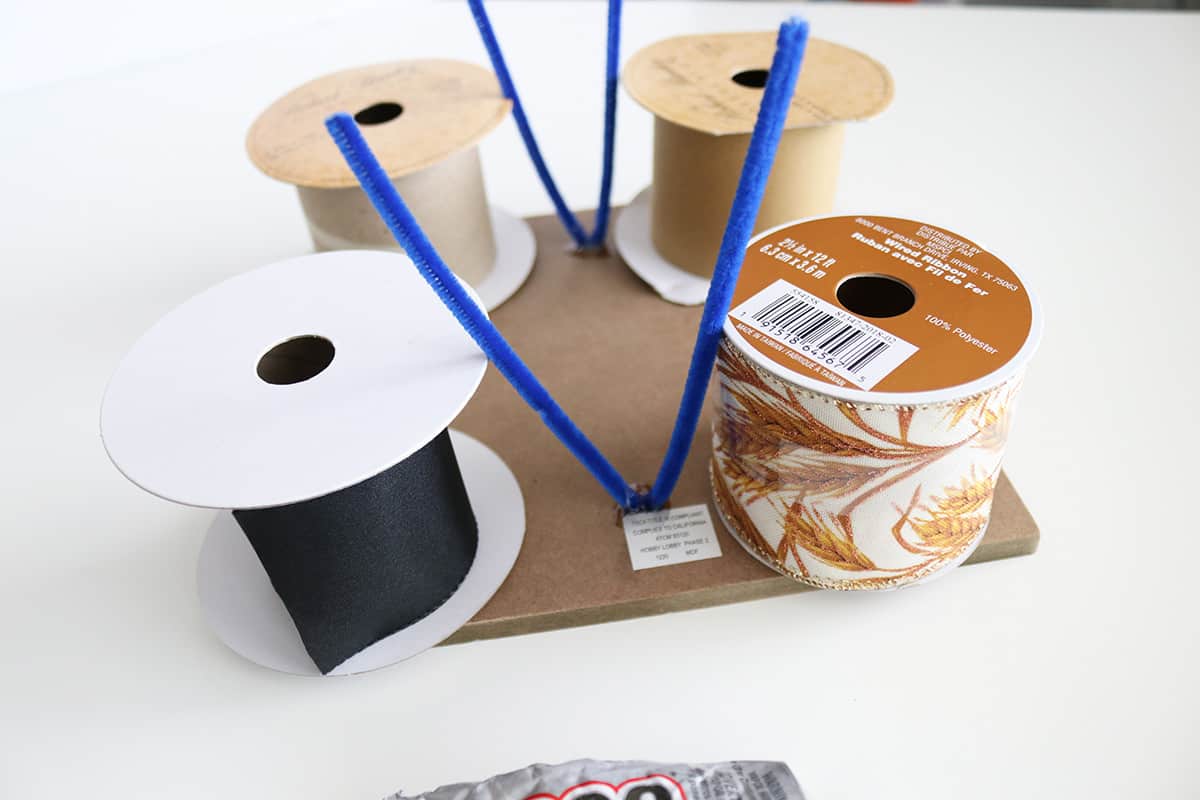
Fold a chenille stem in half, add a large bead of glue to your sign, push the chenille stem into it, and add more glue over the top of the chenille stem. It’s a little tricky to get your chenille stems to stand up straight while drying, so find something to prop them up: I usually use rolls of ribbon because that’s what I have close by, but you can also position each end of the chenille stems between two small bottles of paint (or something similar) to keep them from falling over.
Once the chenille stems are attached (and the glue has cured if using glue), position your sign on your wreath. Push the chenille stems through your wreath (I like to go through the deco mesh or around a ribbon tie if possible—however you can make the sign most secure). Twist the chenille stems around the wreath form to secure the sign, then trim and tuck in the ends so they don’t scratch the door.
I recommend attaching the sign while your wreath is hanging (either on a door or an easel), that way you know exactly how gravity will affect the position of your sign.
Should You Seal Your Wreath Sign?
I did a lot of research on this and there are quite a few different opinions out there, but here are your basic options:
- seal before applying vinyl
- seal after applying vinyl (or both before and after)
- don’t seal at all
I personally recommend the first option because a sealant will help give your sign a nice smooth surface for the vinyl to adhere to, as well as protect the paint or stain. If you’re worried about your vinyl peeling up, keep in mind that permanent vinyl is made to last without needing a sealant—as long as the base is smooth and flat to begin with and you burnish the vinyl properly. Sand your wood, apply two coats of sealant (lightly sanding in between if you choose to), and let it cure for about five days before adding vinyl (I’ll be honest—I don’t usually wait that long, but it’s not a bad idea if you have the time).
If you choose to seal your sign after applying vinyl, there’s a chance the sealant will cause your vinyl to bubble and peel up. I haven’t personally had this problem when putting a sealant over vinyl, but it’s something to consider. If you go with this method, I recommend light coats and letting it dry completely in between. If you want to be extra careful that your vinyl doesn’t bubble, wait about three days after applying the vinyl before sealing it so that any bubbles in the vinyl have a chance to work themselves out first.
If you bought a wood plaque or sign that has already been painted/prepped, you may not need to seal it at all. Just make sure the surface feels smooth and non-porous so your vinyl will stick well. You also probably don’t need to seal your sign if you plan on using your wreath indoors where weather isn’t a concern.
What Should You Seal Wreath Signs With?
There are a few different options for sealants (and different people will tell you differently), but I generally recommend polycrylic. I like this primarily because it’s so easy to use: it’s water-based (easy clean-up), it’s thin and brushes on well, and the odor is minimal.
If you’re looking for something more durable (if you need protection from very harsh weather conditions or frequent touching/high traffic), then you could go with either water-based or oil-based polyurethane (oil-based is the stronger of the two, but can leave a yellow tint and has a stronger odor).
I do not recommend using Mod Podge to seal your wreath signs*. It’s probably just fine if that’s all you have available, but there’s the possibility of Mod Podge yellowing over time and getting sticky again when exposed to heat. (There is an Outdoor Mod Podge and a Dishwasher Safe Mod Podge but I haven’t tried either so I can’t speak to their effectiveness—and I don’t plan on trying them anytime soon because I’m way too impatient for their 28-day cure time!)
*To be totally honest, I’ve used regular matte Mod Podge for wreath signs before and they’ve held up fine (even applying it after I’ve applied the vinyl and even on my west-facing door in a hot summer). But, if you can help it, I’d go with one of the other stronger sealants.
Images Used in These Wreaths
All the images used in these wreaths came from Cricut Design Space. (I love LOVE my Premium Access subscription!)
- Welcome Fall sign: The “Welcome Fall” is #M849816B. The leaves are from #M2804A11A, #MFB13861, and #M849815F. Click here for the project in Design Space.
- Haunted House sign: #M2790E296 Click here for the project in Design Space.
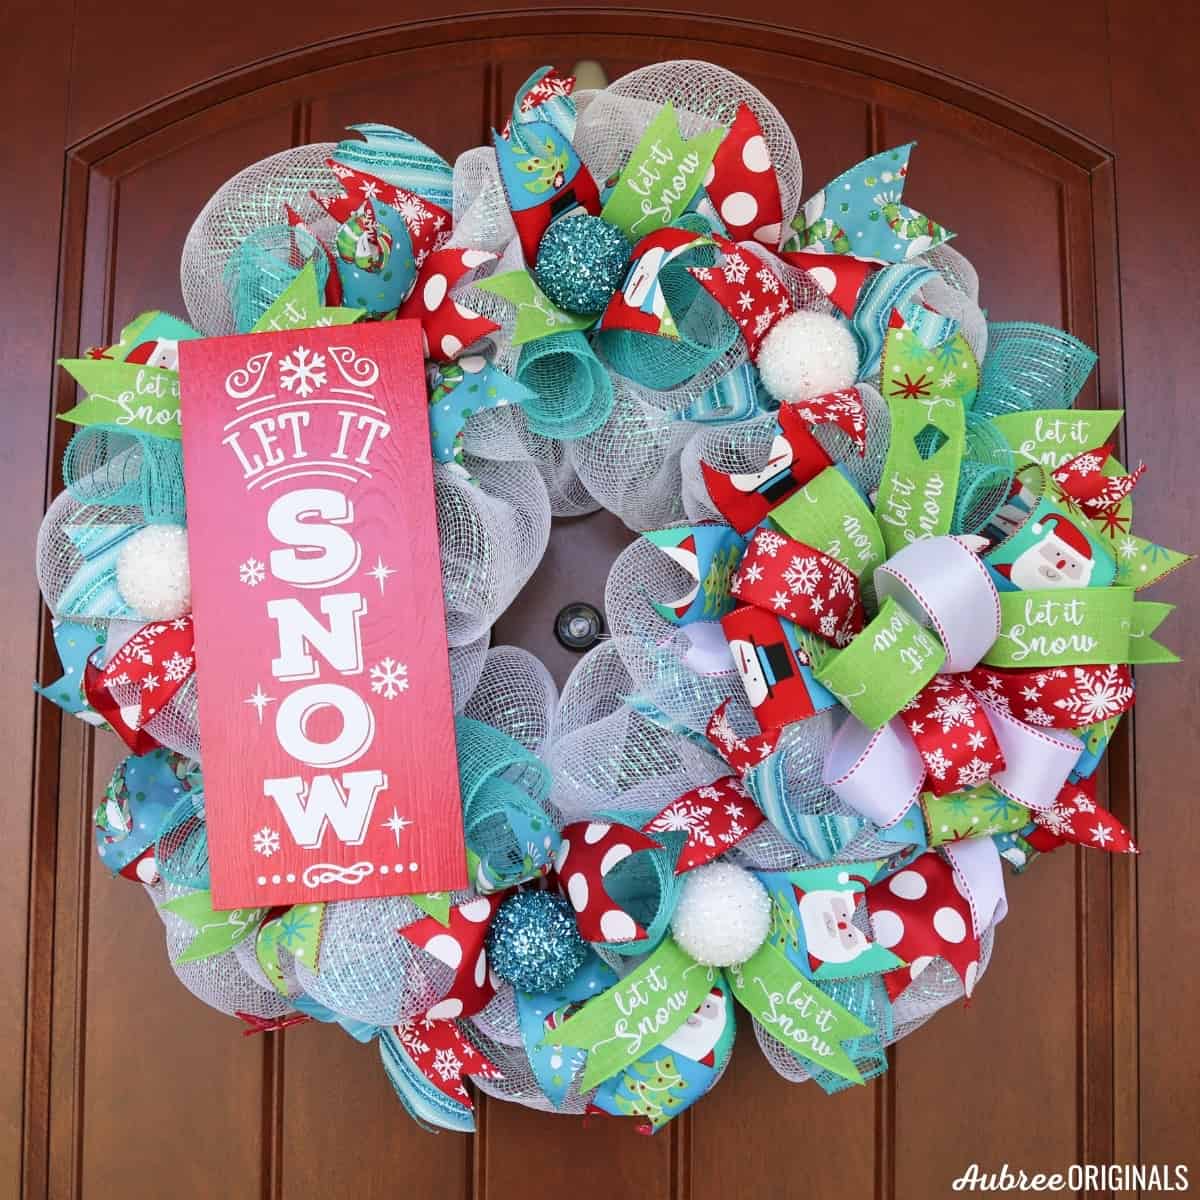
- Let It Snow sign: #M27DE9EE6 Click here for the project in Design Space.
See what’s currently in my Etsy shop here!
How to Make Wreath Signs With Cricut
And there you go! So many fun ways to make custom signs using your Cricut machine! I seriously could not live without my Cricut machine—it’s a game-changer for a small business. I hope you start making your own wreath signs. Once you do, you’ll see how much fun it is to have full creative reign over each wreath you make!
Let me know if you have any questions in the comments. Happy wreath-making!

Don’t forget to pin and save for later!