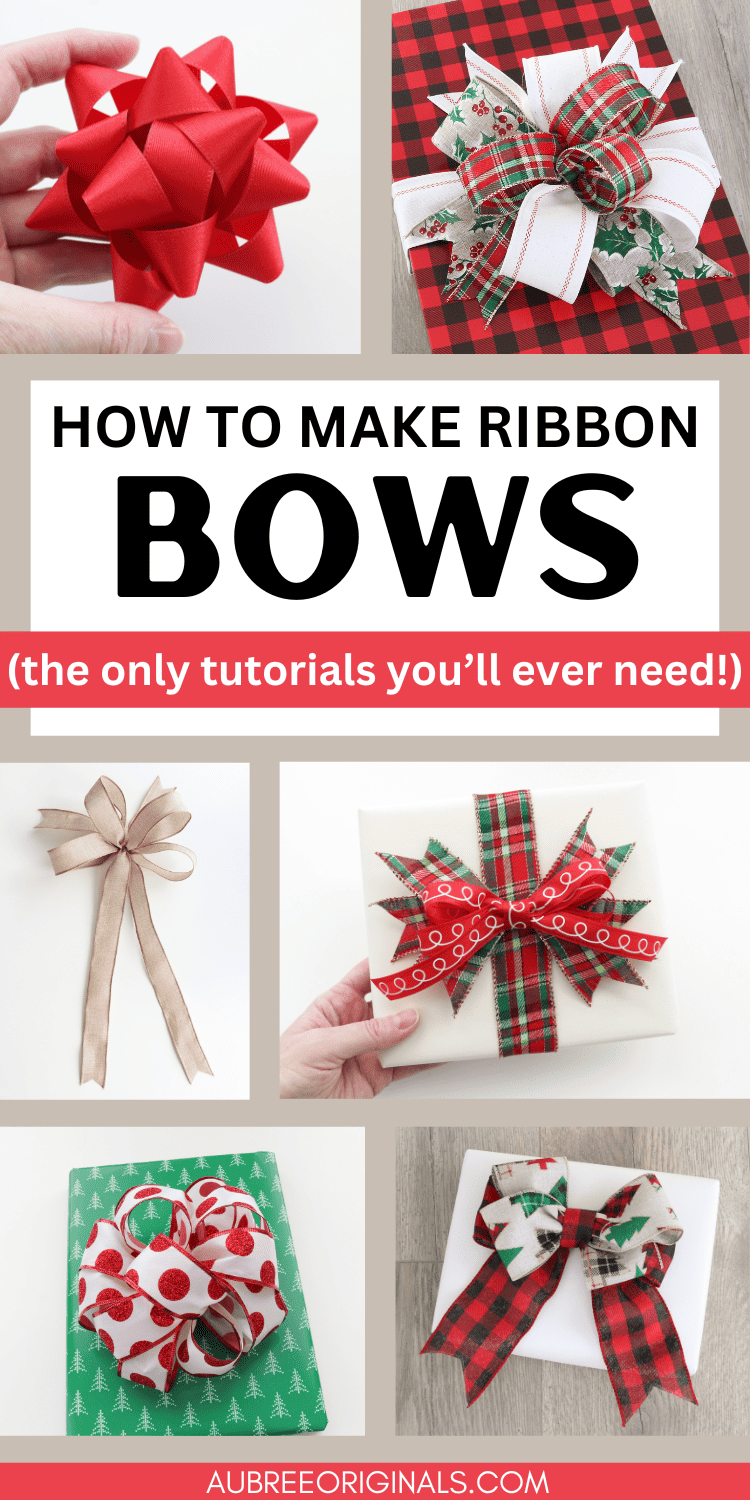
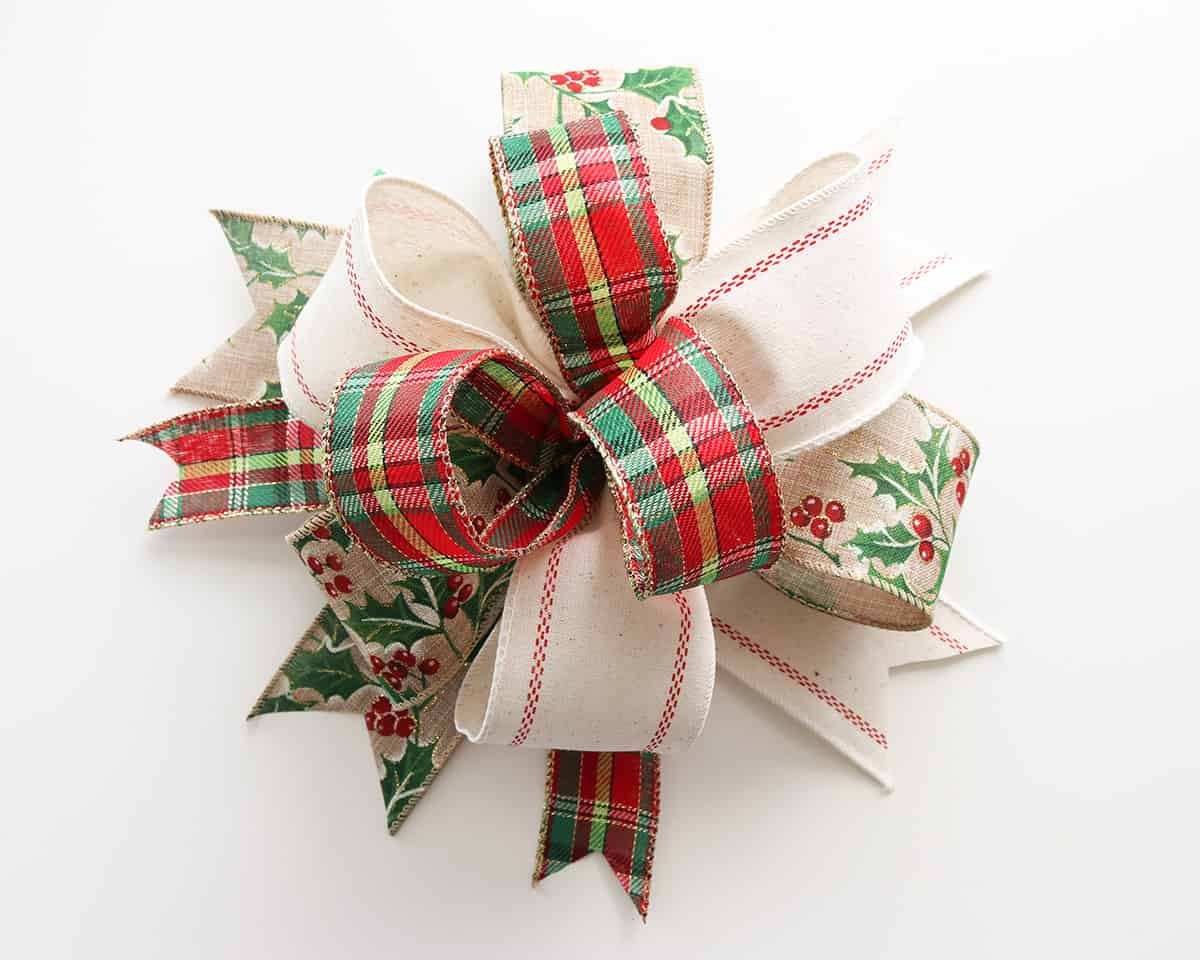
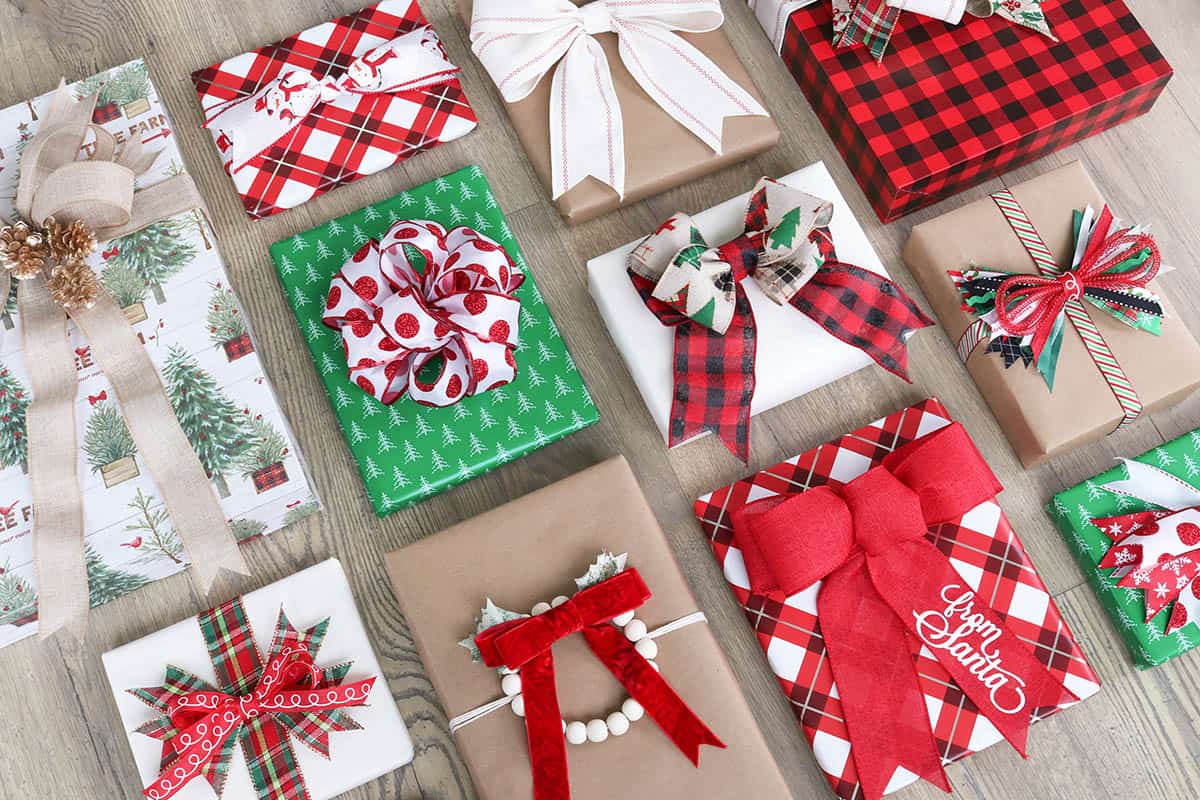
How to Make Christmas Ribbon Bows: 12 Easy DIY Bows
Learn how to make 12 easy DIY ribbon bows for Christmas and other occasions. Follow the step-by-step tutorials and enjoy ribbon bows in all your gifts and decorating this holiday season!
I love making ribbon bows! If you’ve ever wandered around the floral department of a craft store, you might have seen gorgeous pre-made ribbon bows. But the good news is you can make them yourself and for a fraction of the cost!
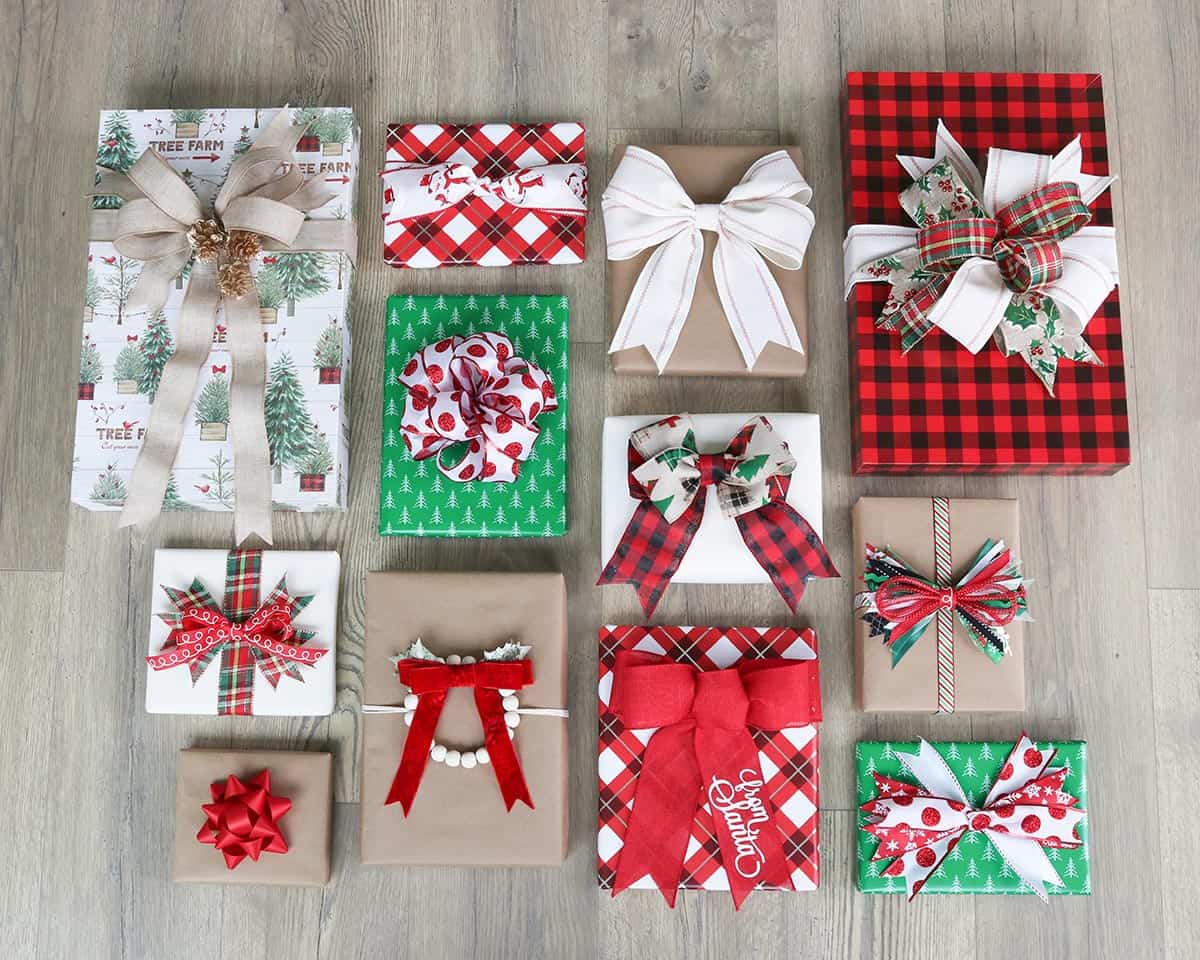
These DIY bows are perfect for gift wrapping, wreaths, Christmas tree toppers, garlands, and even hair bows. These ribbon-making techniques are also great year round, for any occasion, not just for Christmas.
There’s no need to be intimidated by ribbon bows anymore, thanks to the easy steps in these tutorials. You can follow along with me in the video below or read the written tutorial. And don’t forget to grab my downloadable guide for an easy reference in the future!
This post contains affiliate links. For more information, see my disclosures here.
More posts you’ll like:
What you need to make ribbon bows
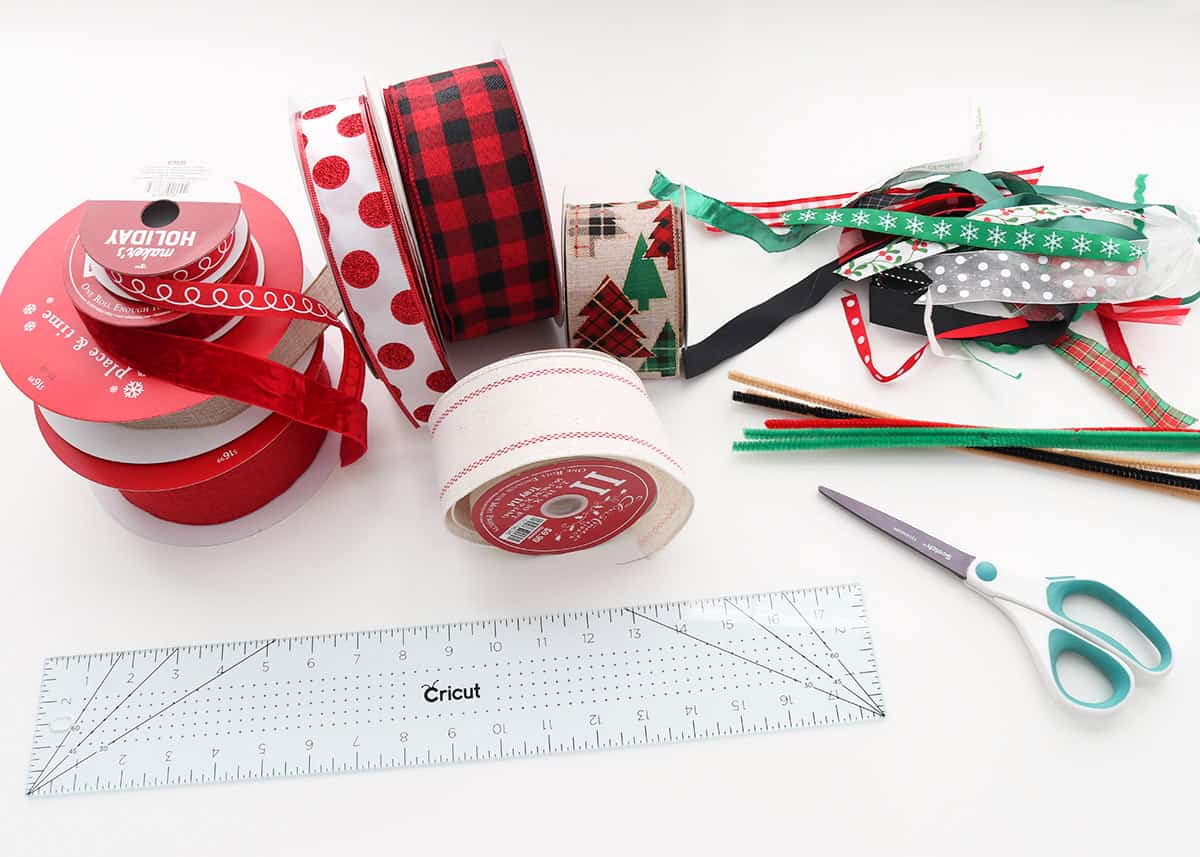
- ribbon: I used both wired and non-wired ribbon, some wide ribbon and some skinny, and even some scraps of ribbon
- chenille stems or floral wire
- a hot glue gun (and silicone finger protectors are always a good idea)
- scissors
- a ruler
- Fray Check: this is awesome for securing any ribbon ends that look like they might fray
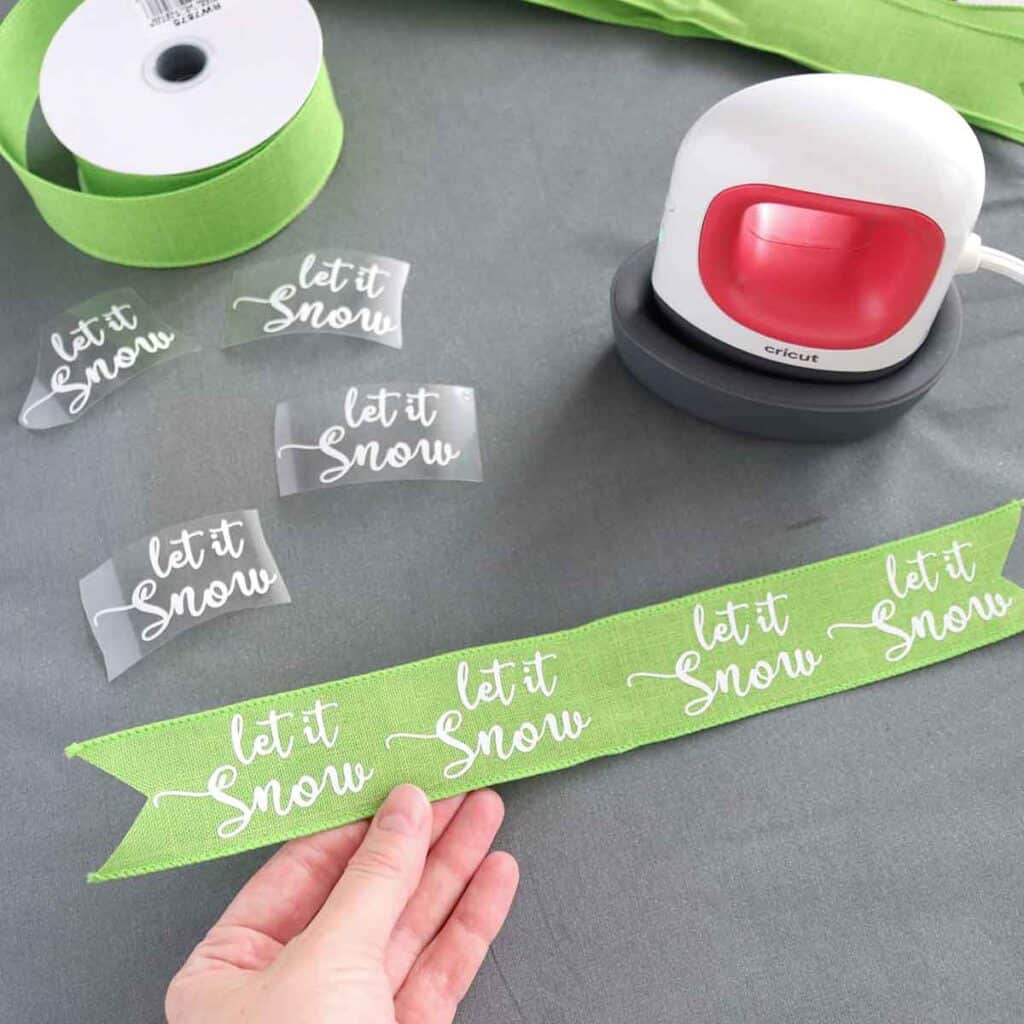
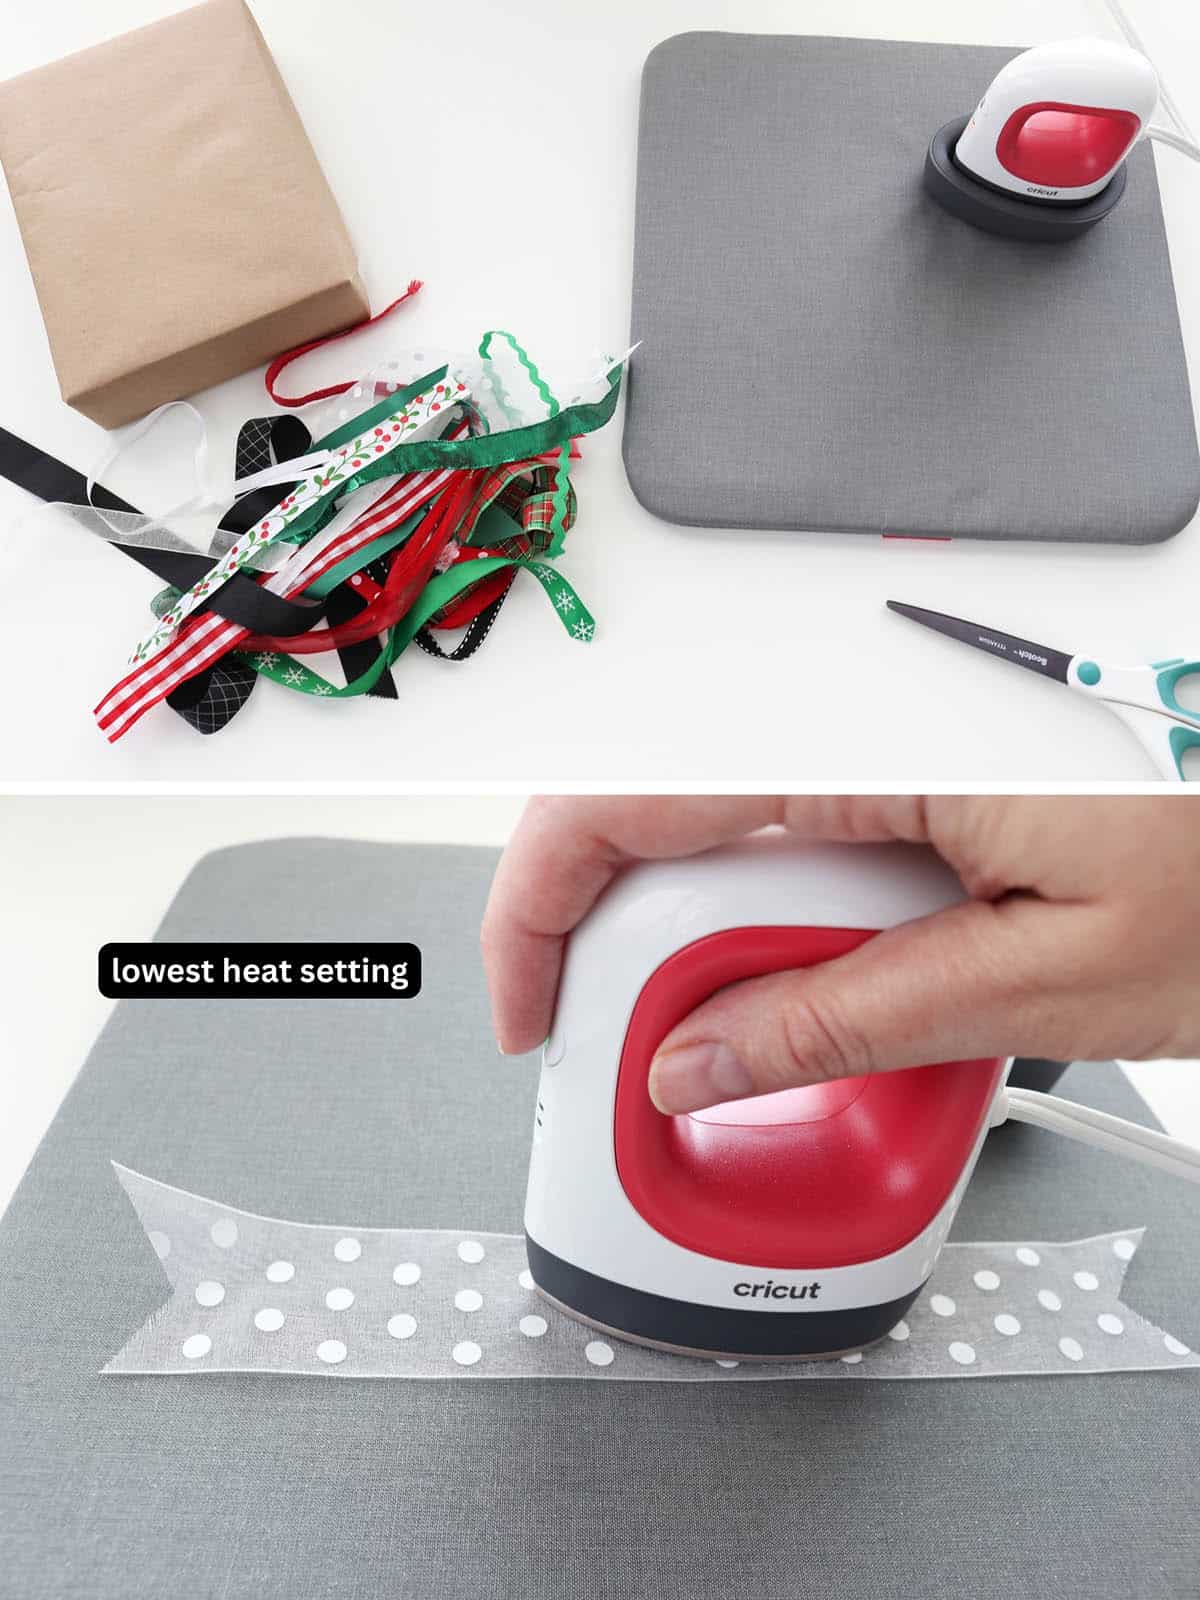
- Cricut EasyPress Mini: optional, I only used this for the Scrap Ribbon Bow to iron out some wrinkly ribbon and on the Double Bow With Middle Loop to personalize it
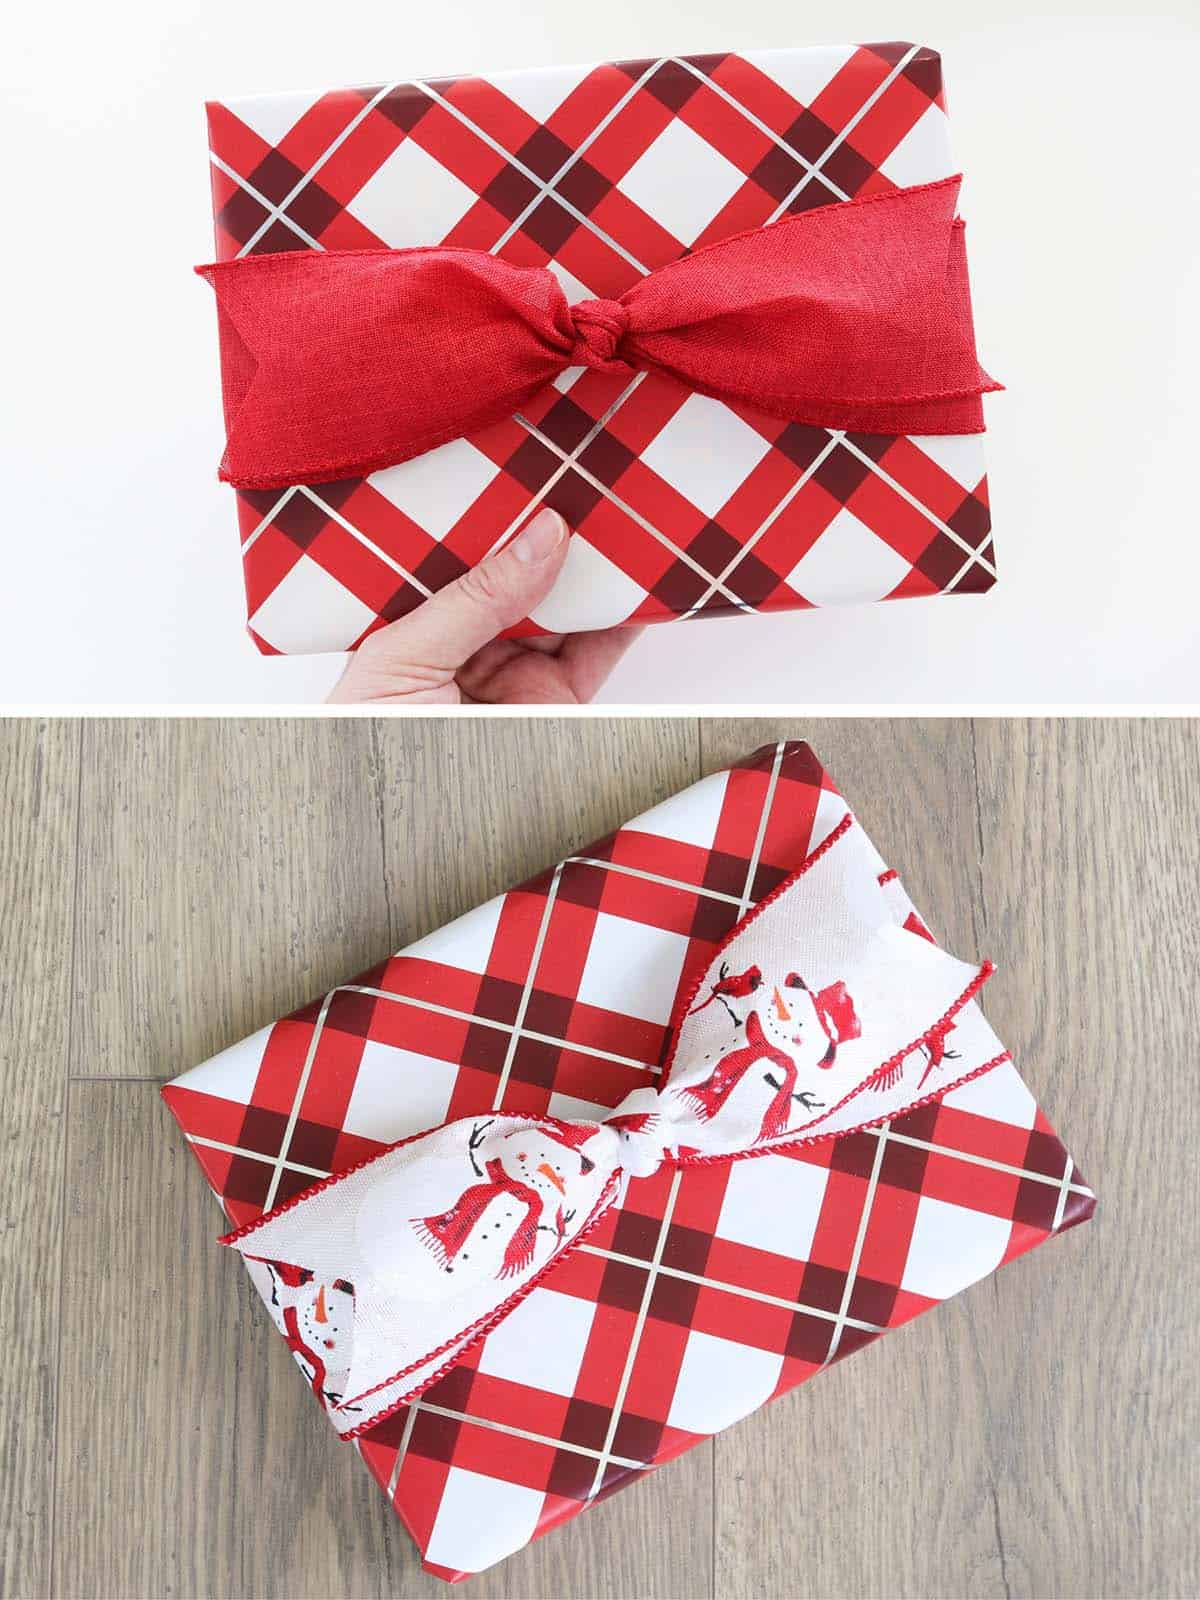
P.S. This is my favorite place to buy high-quality wired ribbon! And if you’re wondering where I got my wrapping paper, some of it’s from Hobby Lobby, some from Target (I think?), and I also used plain kraft paper.
Some extra tips for making these bows
There are multiple ways you can attach bows to gifts and wreaths, etc. I just recommend planning that ahead so, in case you want to use the chenille stem that you made the bow with to also then attach the bow, that you make it long enough. You’ll see I often use a small chenille stem that’s been cut in half or in thirds, just to save materials and because I usually plan on attaching the bow a different way. If I’m making a bow for a wreath, though, I usually use a full-size chenille stem.
If the bow has loops or tails, you can change up the sizes of those to adjust the overall size of the finished bow.
For most of these bows, you can also switch up the type of ribbon you use, as well as the width. The only bow this would not apply to is the Classic Gift Bow, only because I spent forever finding the perfect dimensions to get that one to look just right…so I wouldn’t mess with it.
Get the downloadable guide!
You can find all the information you need to make these 12 ribbon bows in both the video tutorial and written instructions below. But if you prefer something that you can download and easily print out, you can get my printable guide book HERE. I personally like to save files like this to my Kindle app on my phone or tablet so I can reference it while I’m working!
How to Make Ribbon Bows
I’d be thrilled if you liked this video, left a comment, and subscribed to my YouTube channel (because, holy cow, this was a labor of love). I’m so excited to be sharing these bow making techniques with you!
1. Pom Pom Bow
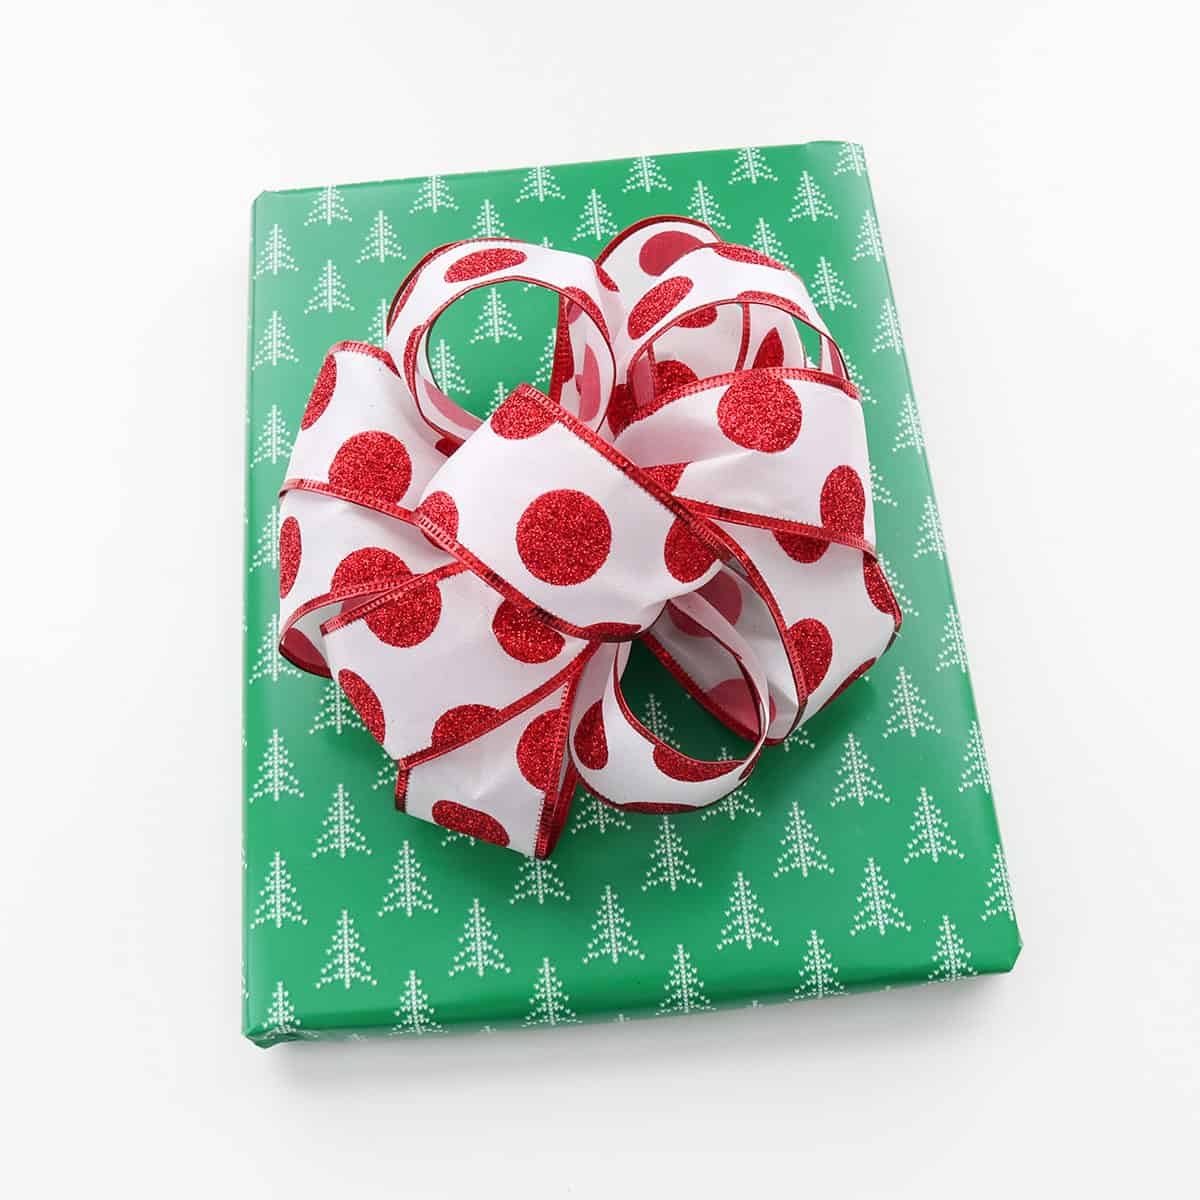
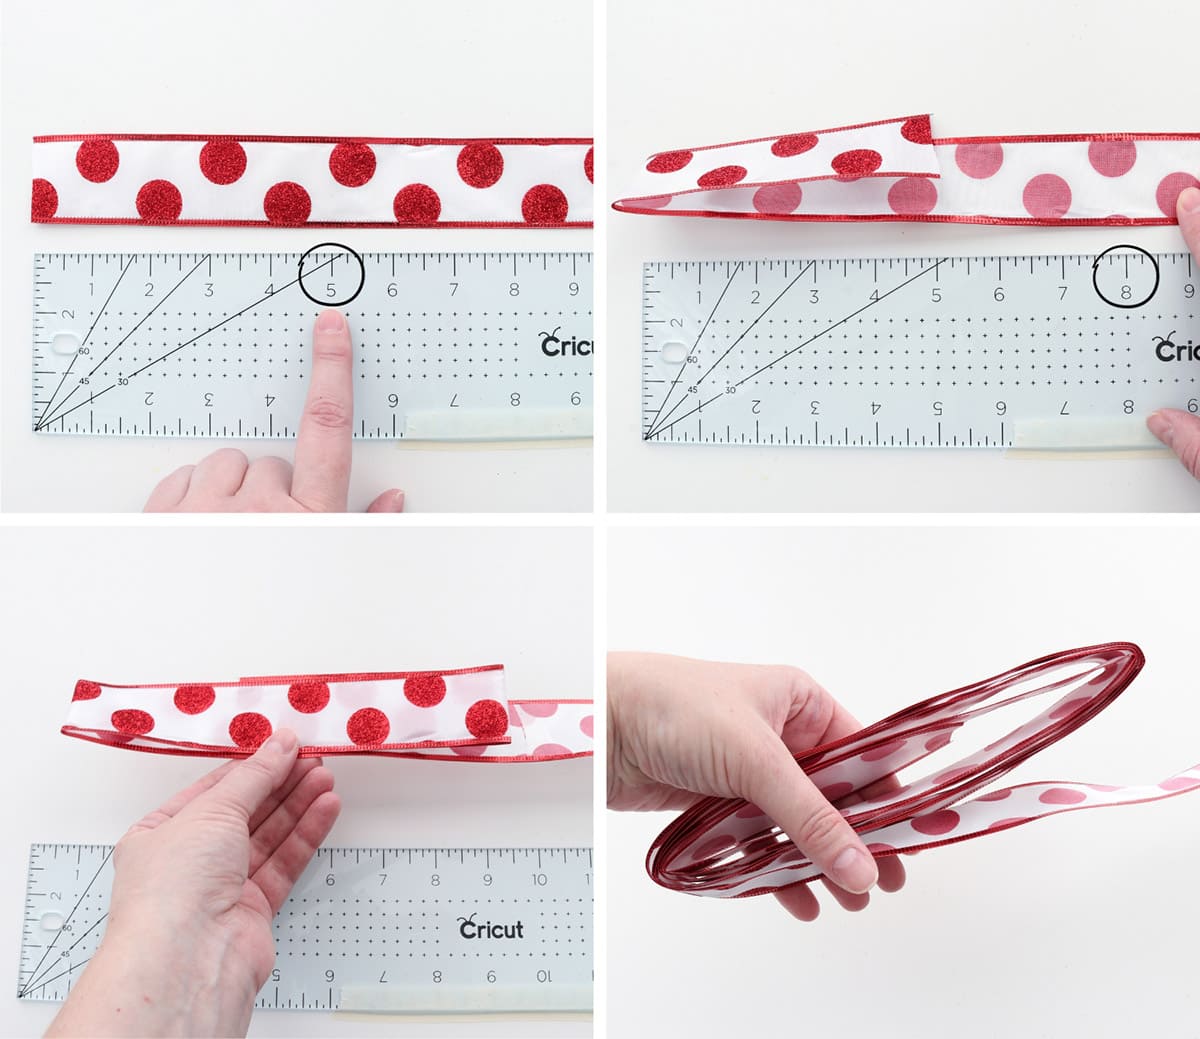
I used 1.5 inch wired ribbon for this bow. You may be able to use different widths, but wired ribbon is preferred.
You can adjust the size of the bow by changing up the size of your loops, as well as how many loops you do. I wanted my bow to be about 6 inches in diameter, so I made my folds 8 inches (to account for the dimension this bow has). You’ll have a tail at the beginning and end of the bow, and you want those to be hidden, so make them a little more than half the length of the folds you’re making (5 inches for my bow).
Start by making your first tail at 5 inches (this makes your first loop). Measure 8 inches and fold again (now that’s two loops). Keep folding until you’ve made as many loops as you want. My bow had 13 loops (first tail fold + 11 folds + final tail fold = 13 loops). You can do a little less than this, but I wouldn’t go any bigger or it’ll be too thick to cut in the next step.
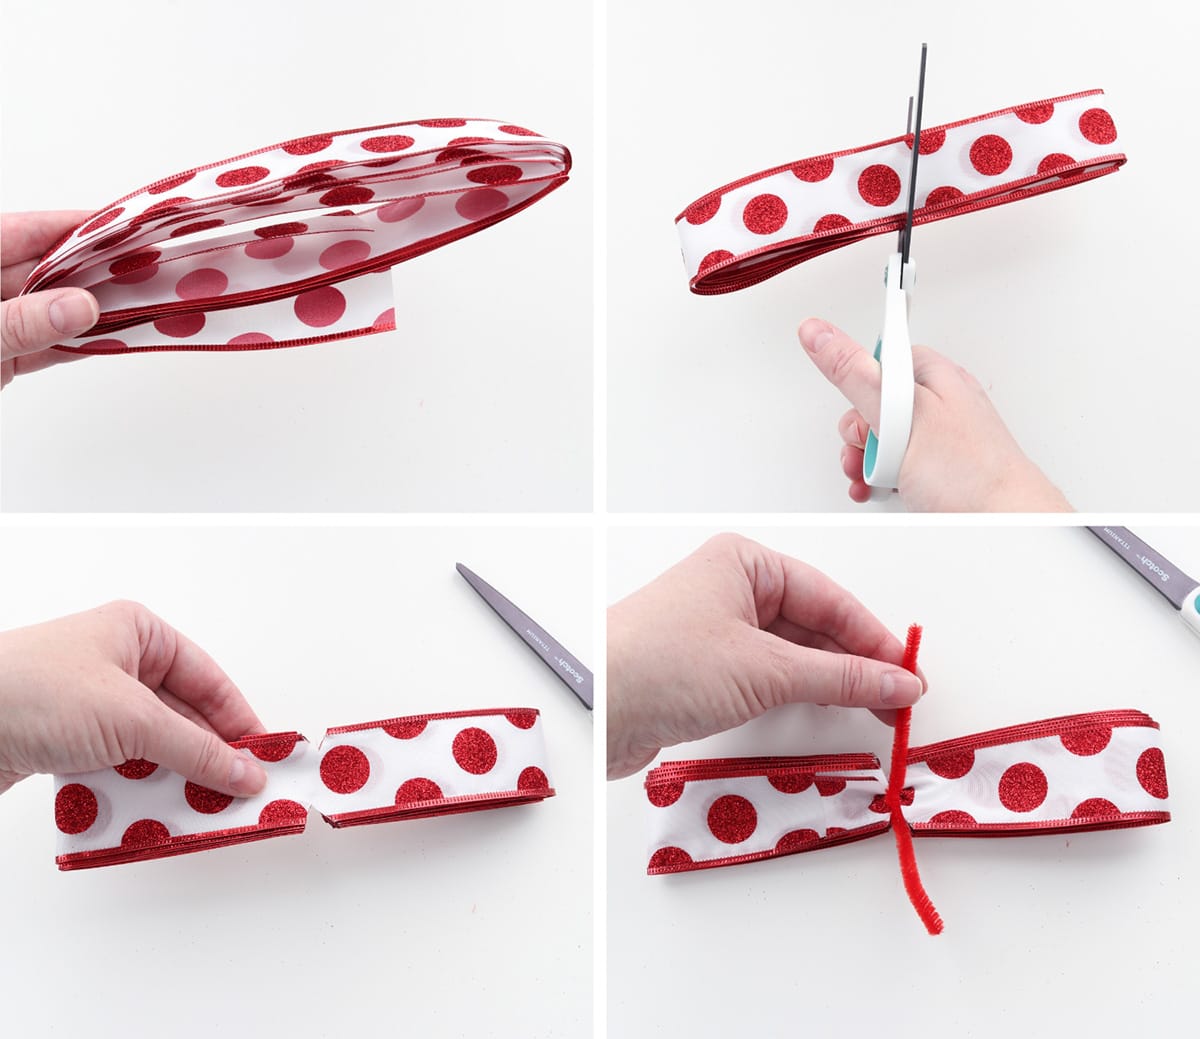
Cut the final tail to 5 inches. You can see that the tails extend just past the middle.
Cut out a triangle notch on each side of the bow, in the middle, to reduce bulk. Be very careful that you don’t go all the way to the center or the bow will just fall apart. This part can be a little tricky with all those layers, so use sharp scissors.
Take a chenille stem and twist tightly around the center, putting the ties at the bottom of the bow where the tail is (and now you can see why you need to make the tails at least half the diameter so that the chenille stem catches them here).
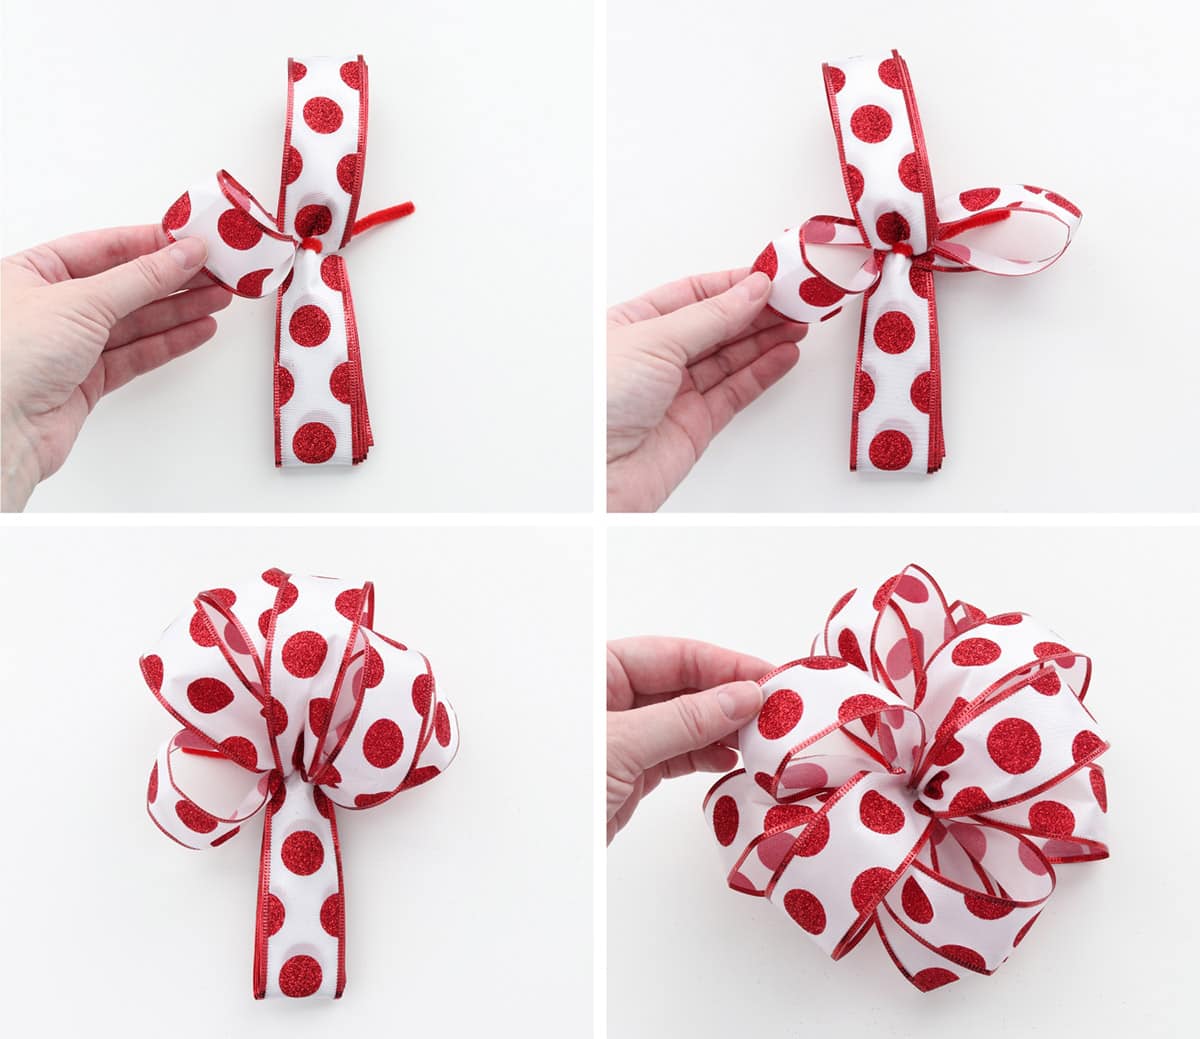
Starting at one side, fluff the bow out by taking the innermost loop and pulling forward, toward the center of the bow, and twisting a little. Take the next loop and pull forward to the opposite side and twist. Continue until all the loops are separated.
Repeat on the opposite side of the bow.
Now, you can play with the loops and fluff until you’re satisfied with how they’re sitting. And…you could probably do this forever, there’s no right or wrong way to do this. I think it helps pulling a few loops to sit in the center—but you can really twist and rearrange them however you need to.
You can use the chenille stem to attach the bow to your gift, or trim the ends short if you want to glue or tape the bow on, whatever works for you.
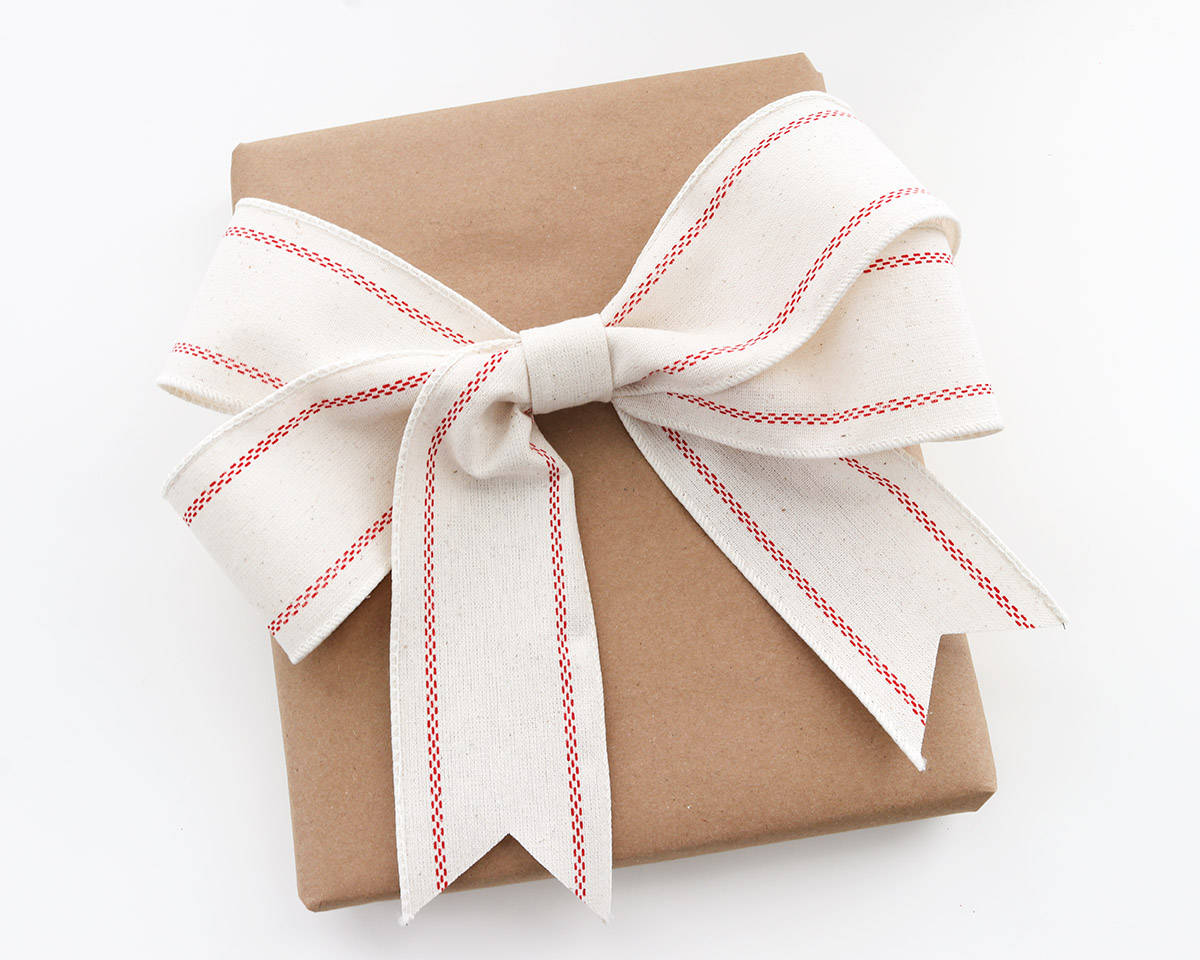
2. Double Bow
I’m going to show you two ways to make a double bow so you can decide which way you like better. I used the same 2.5 inch wired ribbon for both.
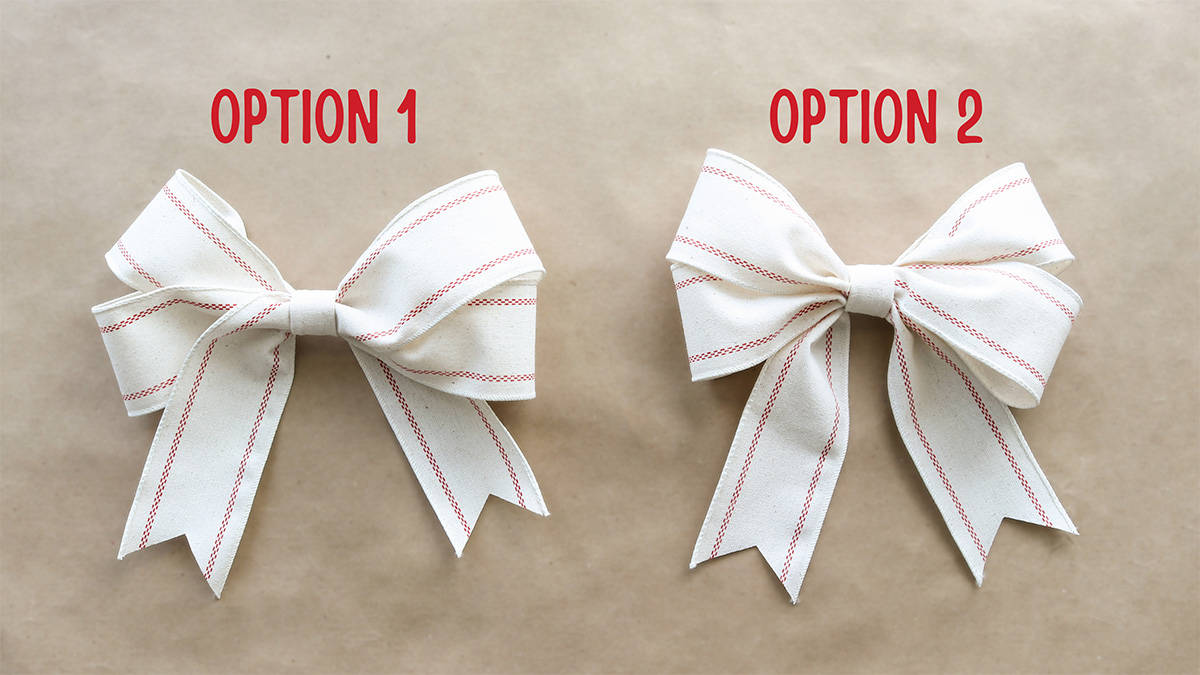
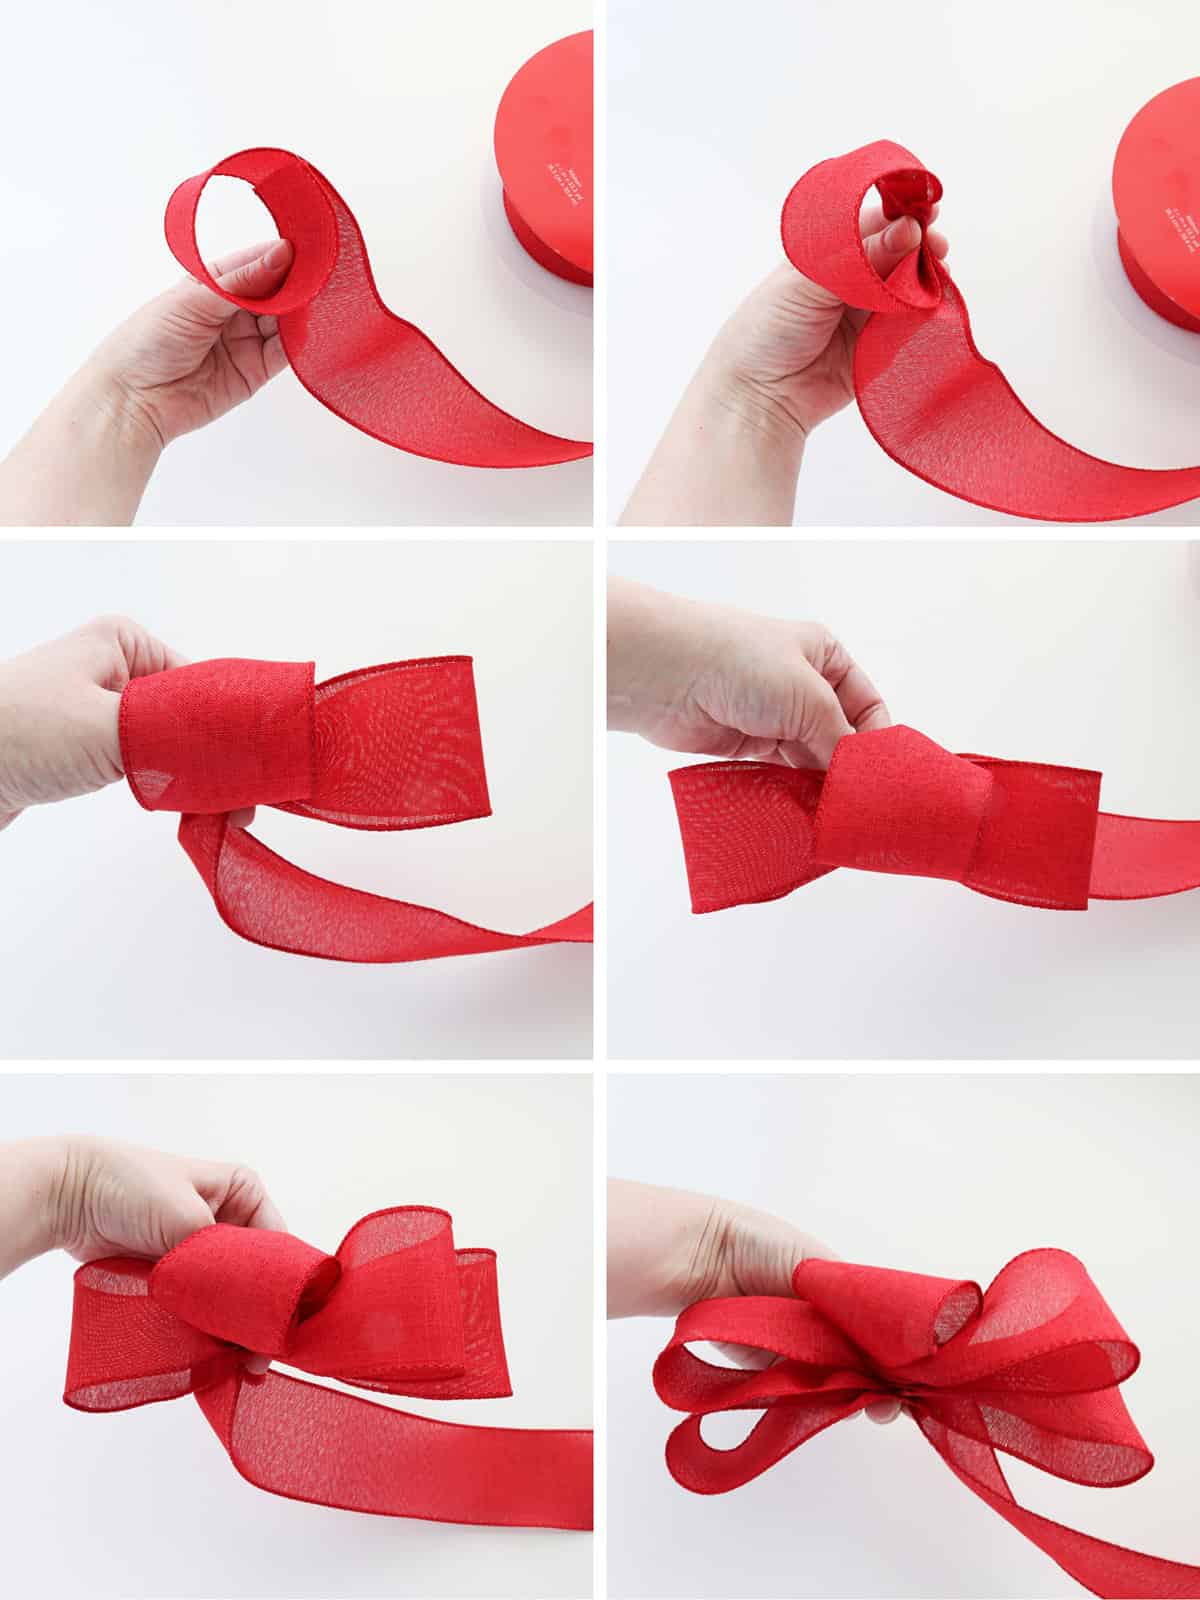
Option 1: Simple Crossover
Fold the ribbon as shown in the picture below (you can see the makings of loops at the top and tails at the bottom of the ribbon). Once you have the first loops formed, fold the end of the ribbon under and behind the bow, coming back out at the top to form the third loop.

Fold the ribbon over the top of the bow to make the final loop, and the rest of the ribbon will become the other tail.

Pinch and gather everything in the middle of the bow and wrap with a chenille stem, twisting at the back.
Trim the last tail. If you want to dovetail the ribbon ends like I did, fold them in half lengthwise and cut on an angle.

Next, cut a 3 inch piece of ribbon for the middle. Fold it in thirds lengthwise and hot glue it together. Wrap this around the middle of the bow, and if it helps, you can glue one end down first. Then tuck under the other end for a clean look, and hot glue it down. Use silicone finger protectors so you don’t burn yourself.
And I’ll be honest, this particular double bow didn’t turn out quite as nice as they usually do…the ribbon I used is pretty thick, so the left tail ended up laying kind of funny. Other types of ribbon will turn out better.
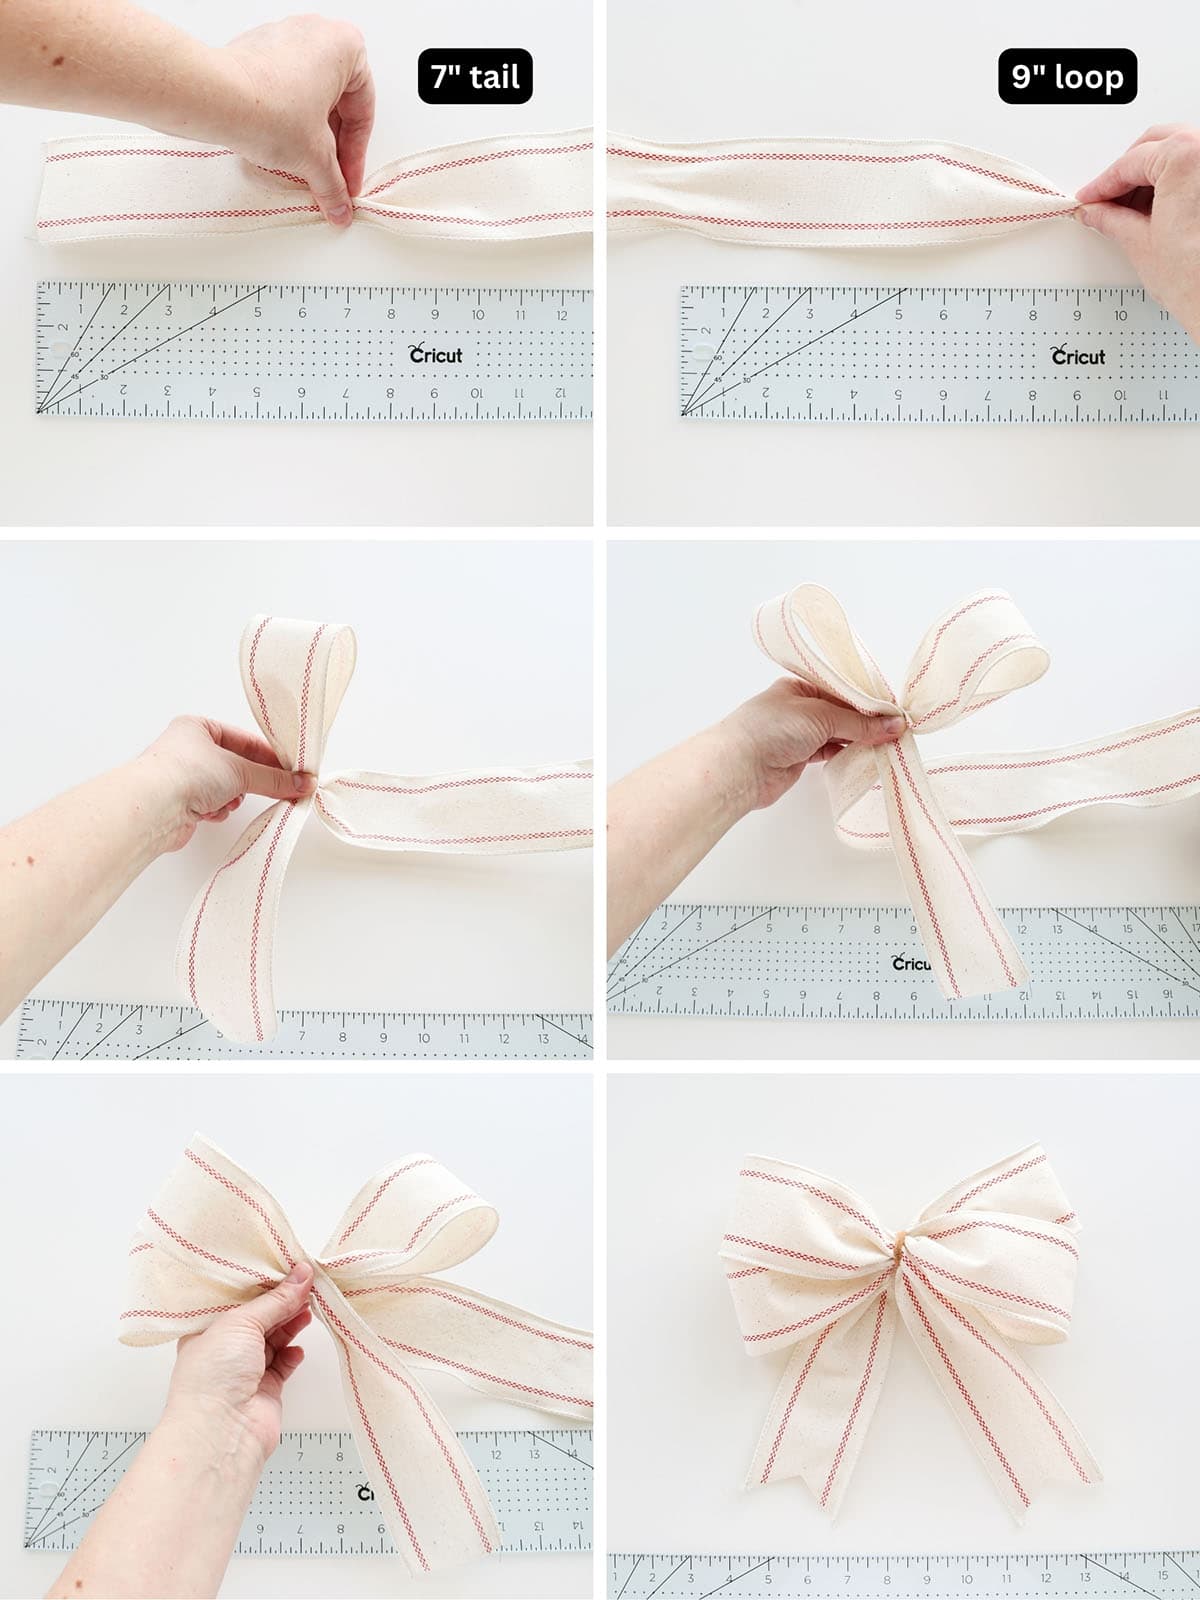
Option 2: Pinch and Twist
This is the same way I made the bow in my 4th of July clothespin wreath, and I think it turns out a little bit cleaner than the Crossover method, at least with wired ribbon like this.
First, measure how long you want your tails to be: I went with about 7 inches. So, pinch the ribbon at the 7 inch mark and make a loop (my loops were about 9 inches). Pinch that loop together with the tail, and twist so the “working end” of your ribbon faces forward. Make another 9 inch loop and pinch together. And bring that to the middle and pinch. Twist your ribbon so it’s facing forward again. Make another 9 inch loop, pinch and bring that to the middle. Twist your ribbon forward again and make a final 9 inch loop. Hold everything in the middle and twist the ribbon so your second tail will be facing forward.
Wrap a chenille stem around the middle and twist at the back. Straighten and adjust the bow as needed. Trim the ribbon and dovetail the ends.
Cut a 3 inch piece of ribbon for the middle, fold it in thirds lengthwise and hot glue it together, then glue it around the middle of the bow. (It would’ve actually been better if I had made this piece a little longer since this ribbon is so thick.)
In the video, I show you how to make this bow one more time with 1.5 inch wired ribbon, and it’s the exact bow I used for my kitchen cabinet wreaths. For that one, I had 11 inch tails and 6.5 inch loops. I used a 2.5 inch piece of ribbon for the middle, folded it in third lengthwise, glued it, and wrapped around the middle (same as the others). I cut the ends of the tails at an angle and then used Fray Check to make sure these bows would last for future Christmas seasons. And then my toddler later scrunched all the bows I had made into balls so apparently they only lasted one season (it’s fine…I did my best to smooth them out and they still work, just not quite as neat as before–it’s fine, I’m fine 🙃).
P.S. With any of these double bows, you can always stop at one set of loops and make a single bow instead if you want.
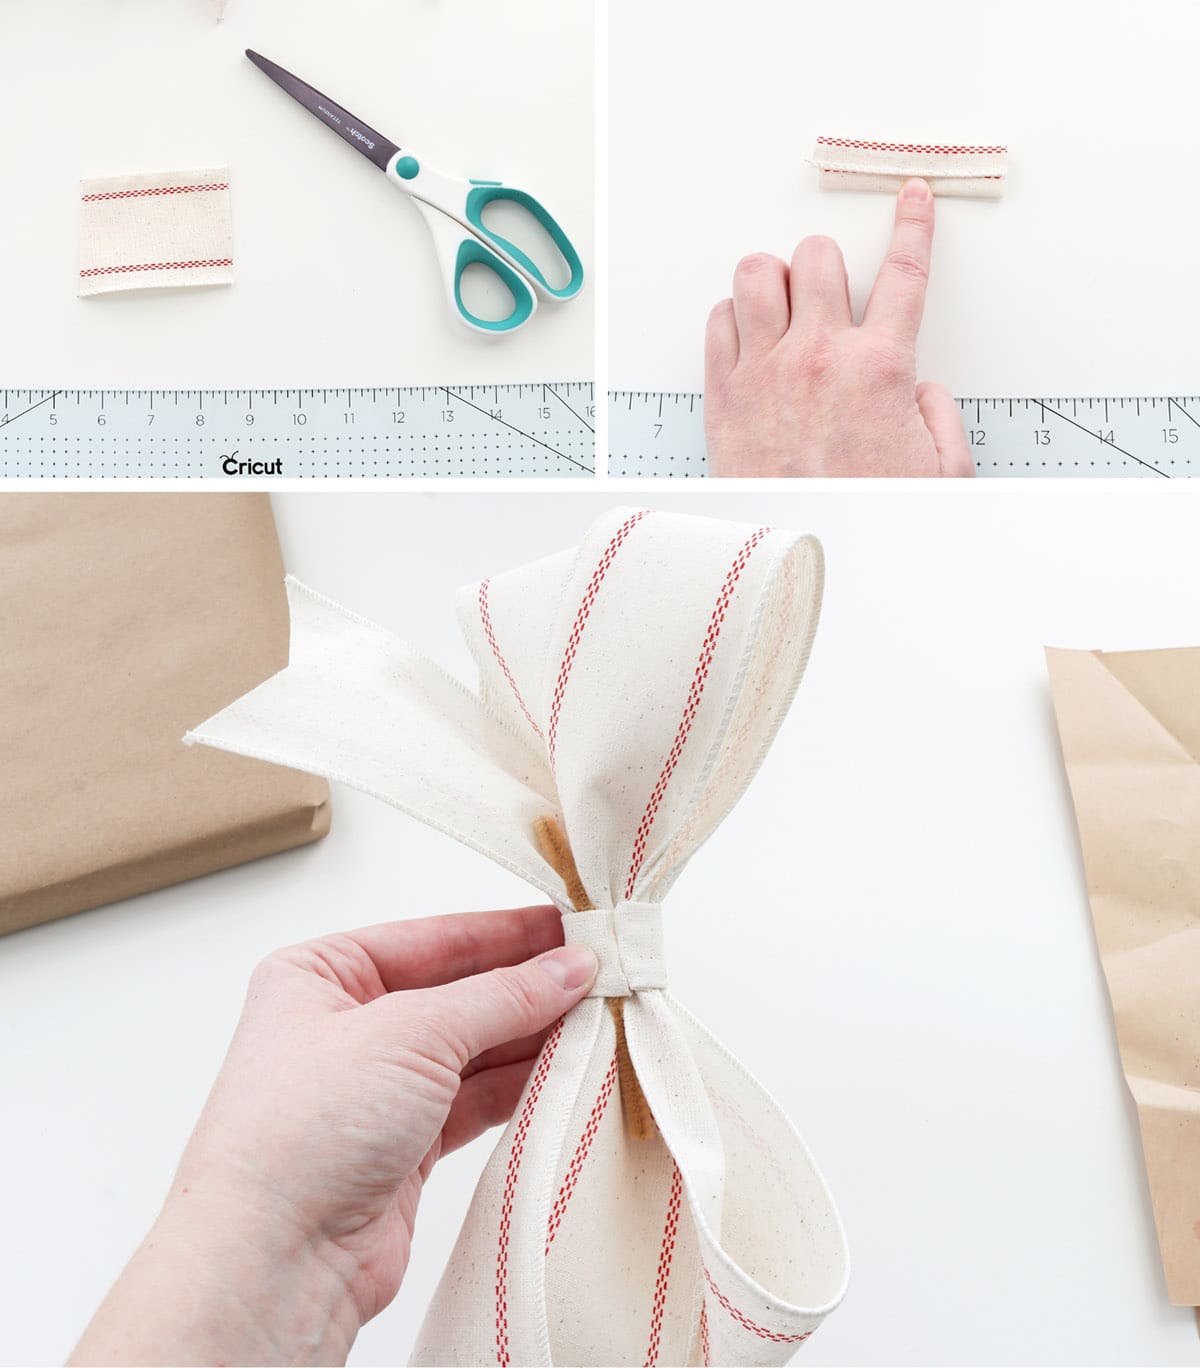
3. Stacked Boutique Bow
To make this bow, cut three pieces of 1.5 inch wired ribbon, each 7 inches long, and dovetail the ends.
Then, using a smaller width ribbon (I used 5/8 inch), make a double looped bow (this is made the same way as the Simple Crossover bow above).
Cross the end over so you have one loop and one tail. Make an opposite loop by crossing back over the middle on top. Make another loop, this time folding the ribbon to the back of the bow. And make your final loop by crossing over the middle again. Trim your tail.
Now, holding this bow in one hand, keeping it pinched in the middle, use your other hand to stack your 1.5 inch ribbon pieces. Stagger them so you have one horizontal piece and an “X” on top. Lay your double looped bow on top, pinching and gathering all the pieces in the middle. Grab a chenille stem and twist at the back to secure the bow.

Cut a small piece of ribbon, about 2 inches long, for the middle of the bow. I used the 5/8 inch ribbon, but you could also use your wider ribbon for a contrasting look, you would just want to fold it first to make it a little narrower. Wrap the ribbon around the middle of the bow, make sure the chenille stem pieces are spread out on either side of the middle, and hot glue the ribbon in the back. If you want a clean look, fold one end under before gluing it down.
I think this bow is so fun! It’d make a great hair bow, too.
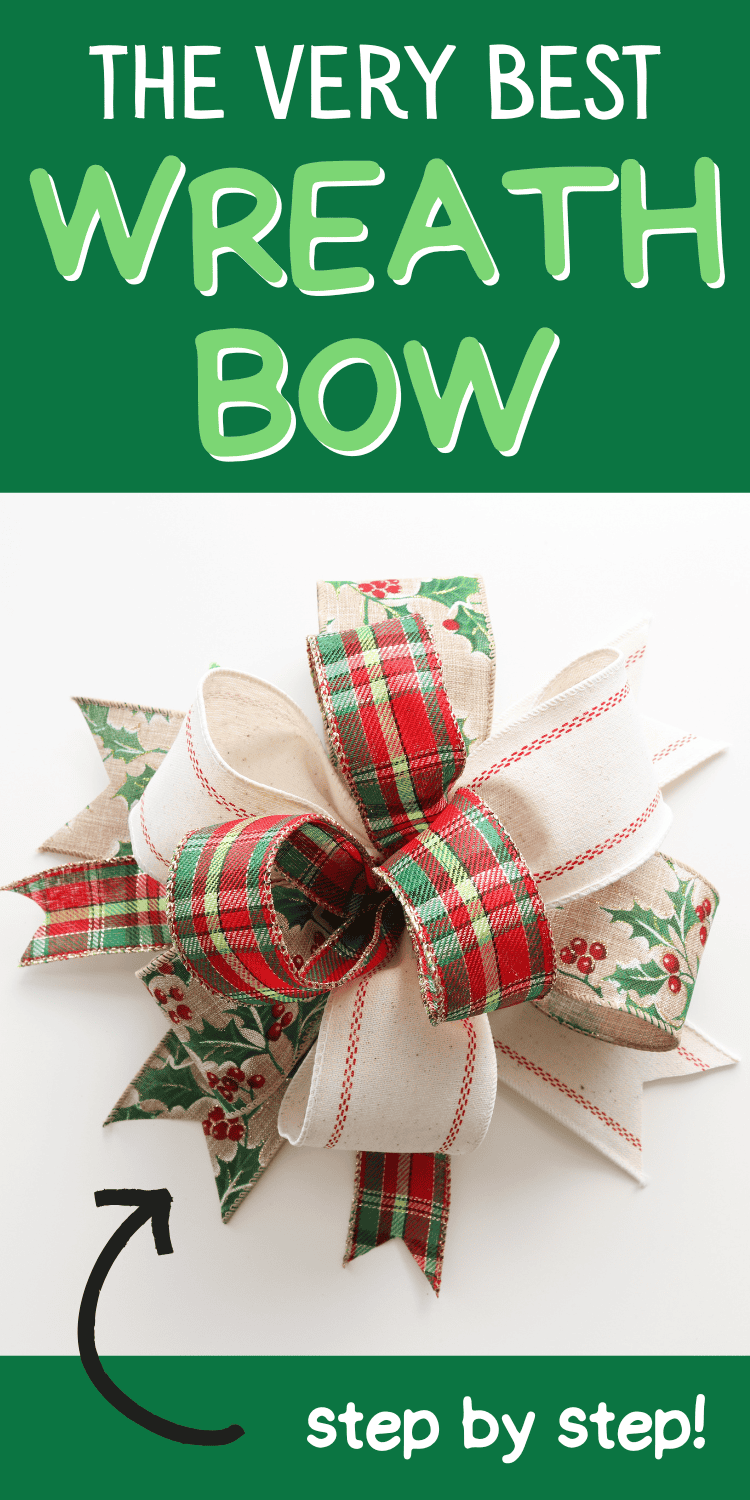
4. Favorite Wired Bow
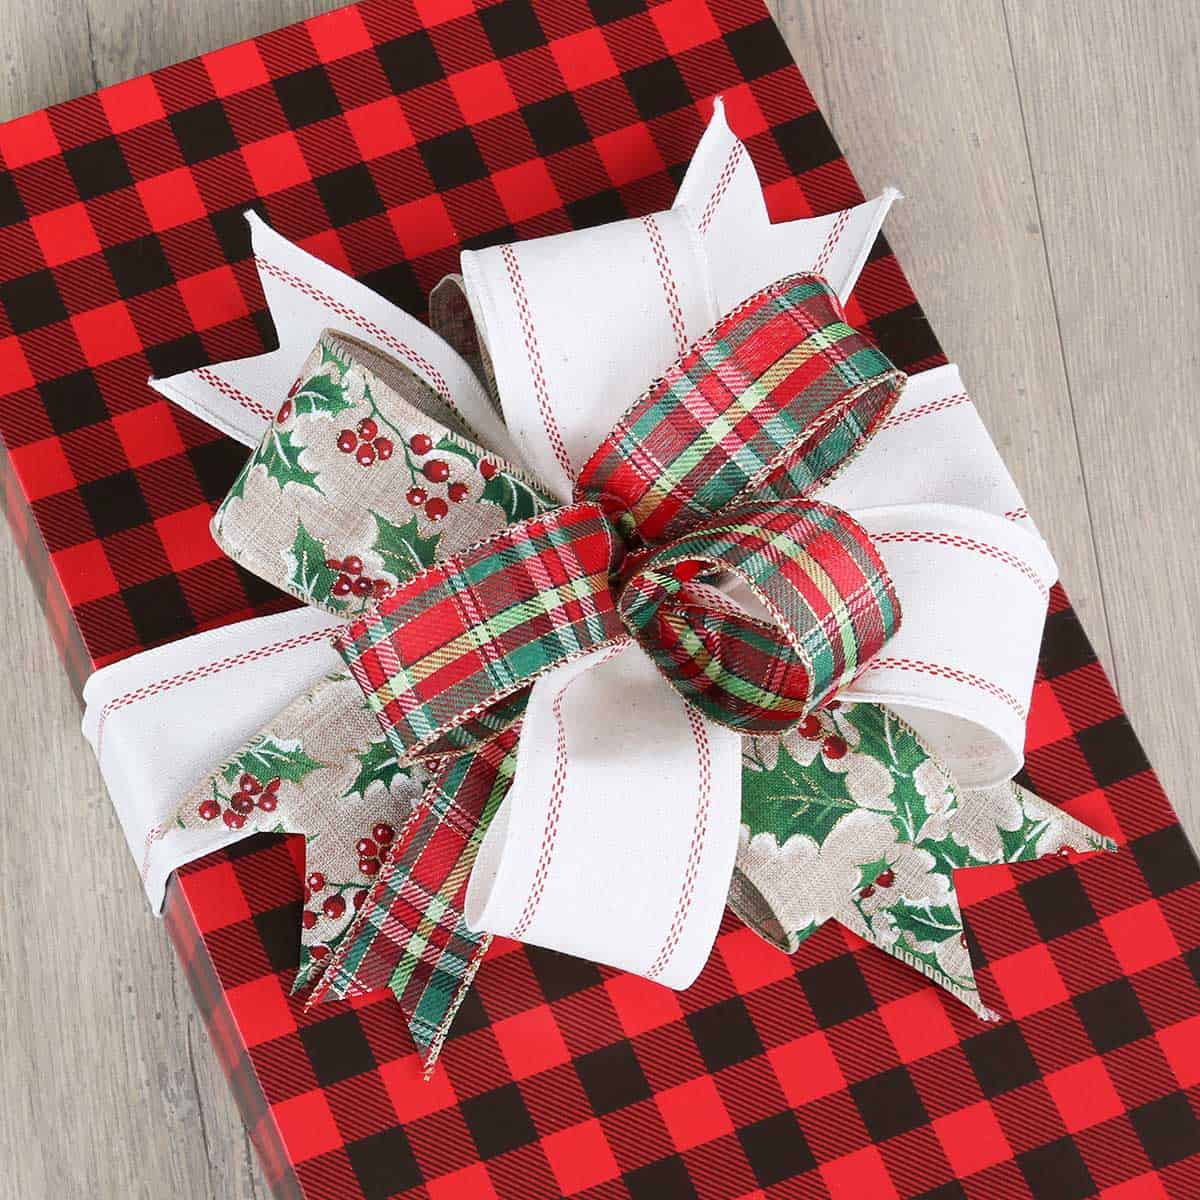
This is my favorite wreath bow! For this bow, you can use any combination of 1.5 inch or 2.5 inch wired ribbon, and you’re going to make three different pieces so you can use up to three different ribbons. You can go in any order, but I like doing the 2.5 inch ribbons first.
Measure 6 inches from the end of the ribbon and pinch between your fingers. Measure another 9 inches and pinch both together to make a loop. Twist the ribbon towards you (you always want the print facing you). If it helps to visualize it, you’re kind of working in a line with two sections, a top and a bottom, from where you’re holding the ribbon together.
Measure 9 inches to make a second loop, which will go on the bottom. Twist the ribbon away from you.
Measure 9 inches for a third loop, which will go on the top. Twist the ribbon towards you. Cut a 6 inch tail.

This bow can be kind of tricky to hold while you’re assembling it, so you can use a chenille stem to wrap around the middle once and just work in sections, setting this piece to the side. Or you can attempt to hold the first piece while working on the next (it gets easier the more experience you have with making these kinds of bows, but it still kind of depends on how thick your ribbon is).
Take your next ribbon and repeat the exact same process, with 6 inch tails and 9 inch loops.
If you’re still holding your first piece, lay the second one on top, alternating which direction the tails are pointing. Or, open the chenille stem and carefully lay the second one on top, then lightly twist again to hold both pieces.
Make your final ribbon, again with 6 inch tails and 9 inch loops.
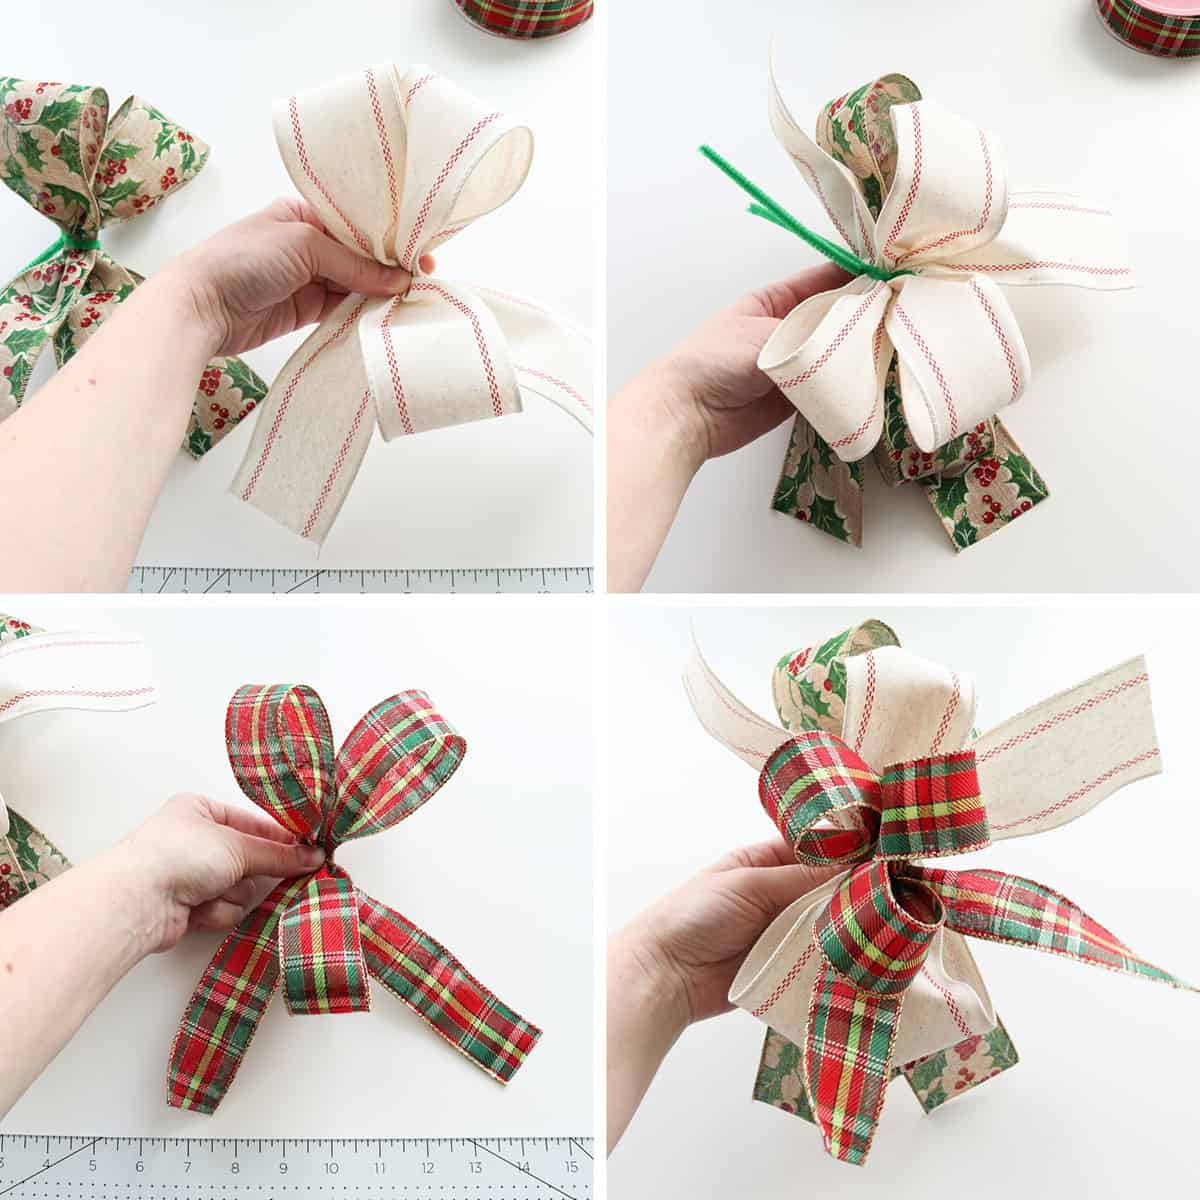
Hold all of that together in the middle, carefully unwrap your other pieces from the chenille stem, and lay this one on top. Then wrap the chenille stem around all of them again and twist a couple times.
Before twisting too tight, go around the bow and pull all the tails to the bottom and spread the loops out on top. Do your best to tuck the tails behind the loops as much as you can and rearrange the loops so the different patterns of ribbon are spread out. (I like keeping the 1.5 inch ribbon at the center, because I like the way that looks, which is why I also tend to make that one last.)
Once you’re happy with everything, finish twisting the chenille stem a couple more times to tighten the bow. Then you can dovetail all six ribbon tails. Isn’t this the most beautiful bow?!
To secure the bow to my Christmas present, I simply twisted my bow’s chenille stem around a ribbon that I already had wrapped around the box. Just twist a few times, trim the ends if you want to, and you’re good to go.
Note: You can easily adjust the size of this bow for different uses by changing the size of the tails and loops. The size I made here is great for a standard clothing gift box. When I make this bow for my deco mesh wreaths, I usually make my tails 7 inches and loops 12 inches. If you want your tails to trail over a gift or wreath, you can make them even longer.
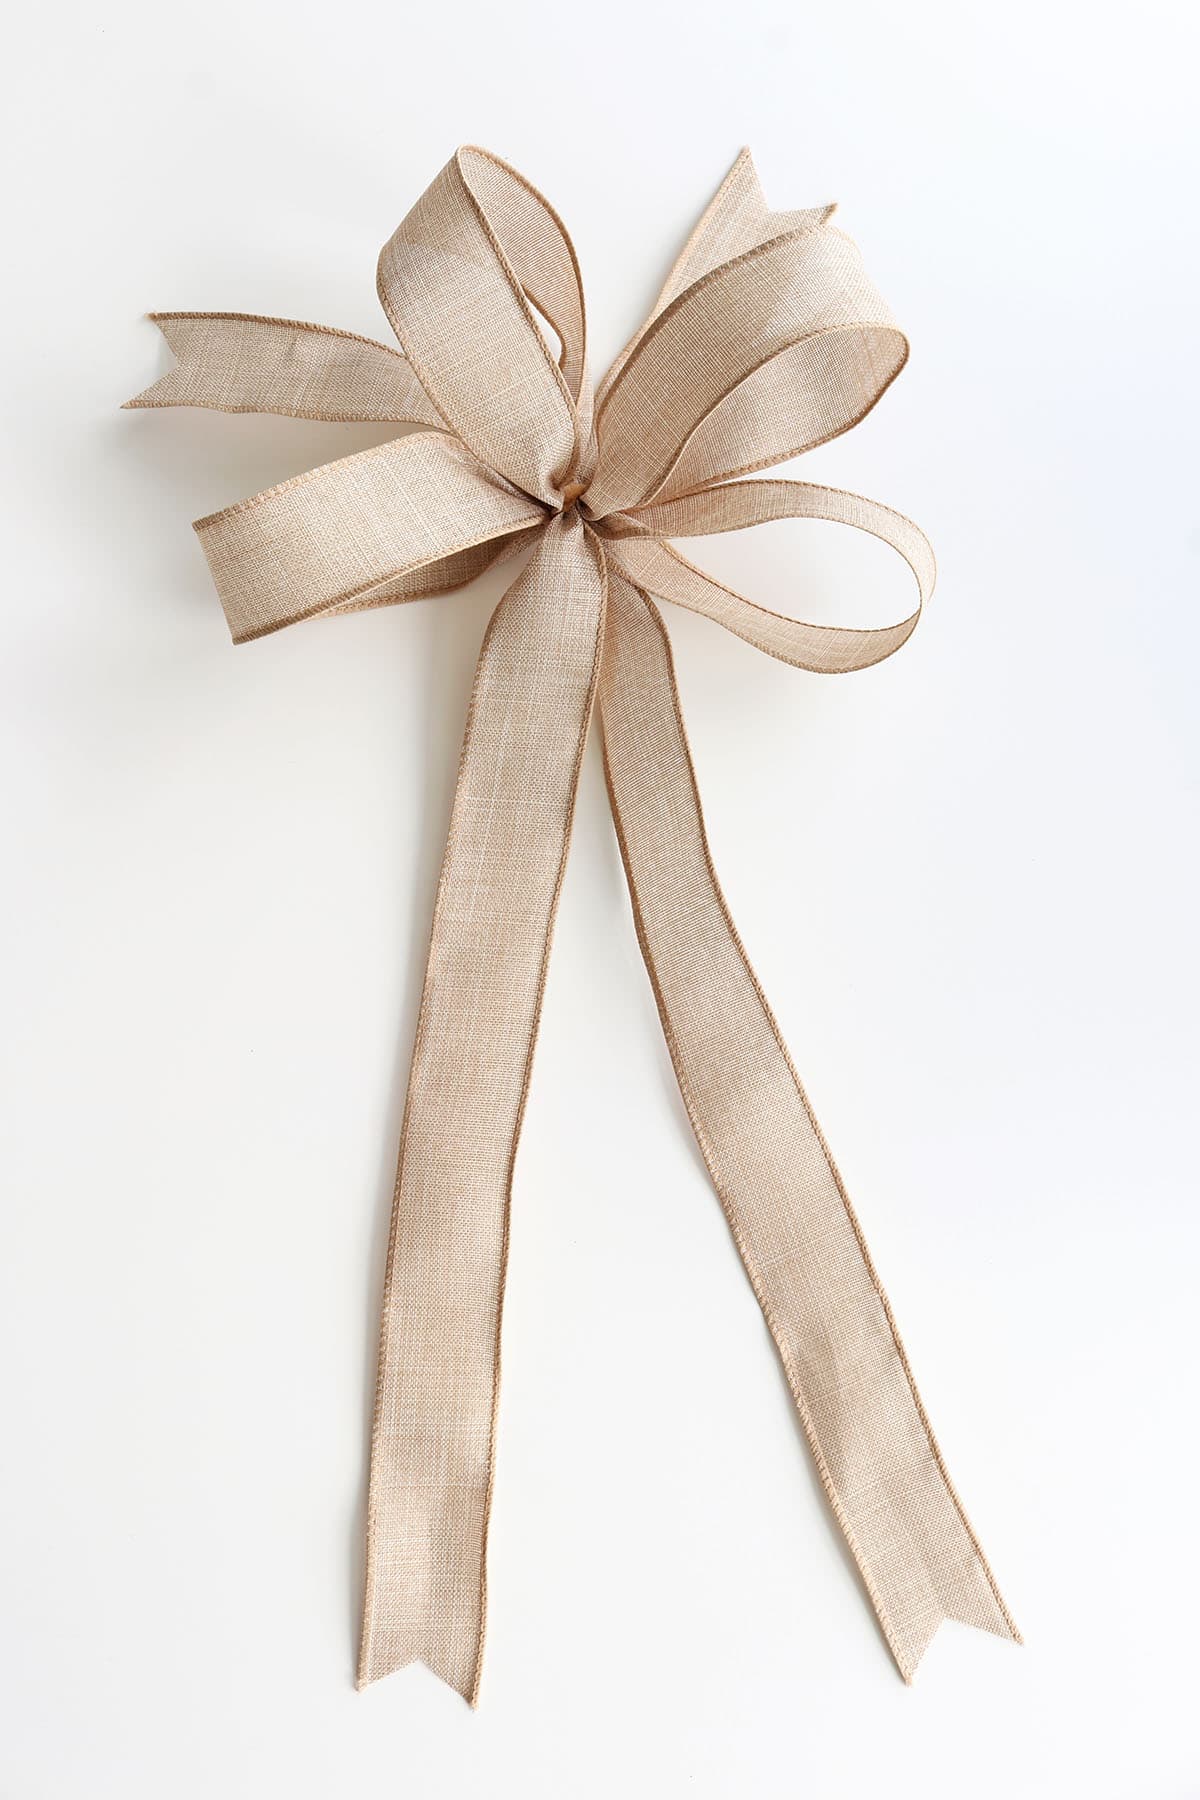
5. Long-Tailed Wired Bow
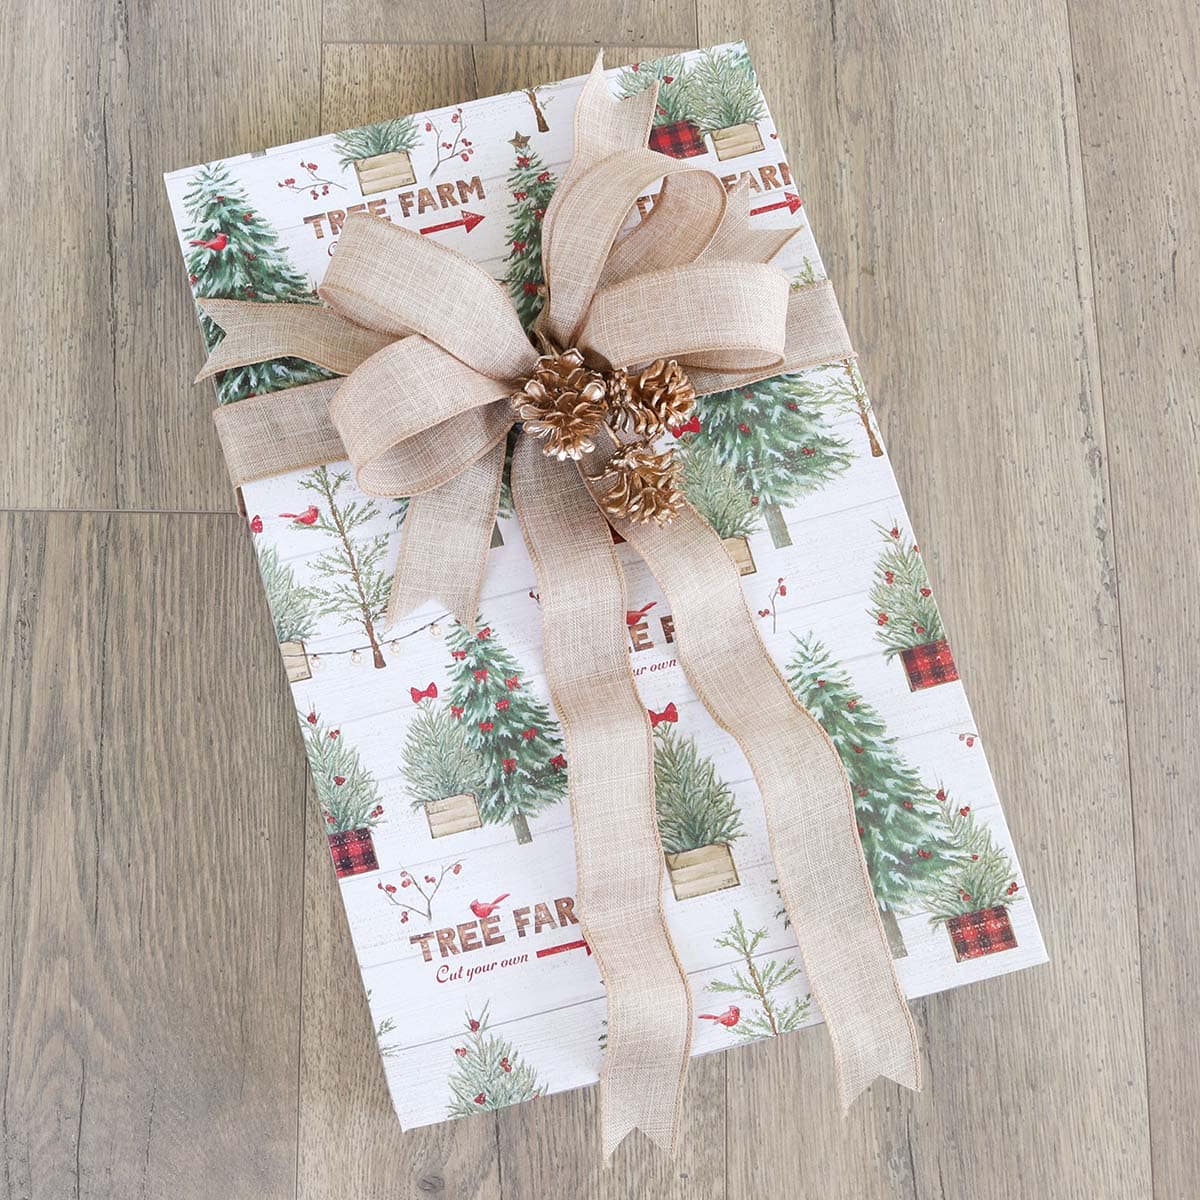
I used 1.5 inch wired ribbon for this bow, and the process is similar to my Favorite Wired Bow.
Start with a 6 inch tail and pinch the ribbon. This time we’re going to do 10 inch loops, so pinch again at 10 inches, then combine to make a loop. Twist the ribbon towards you. Make another 10 inch loop, which will be at the bottom now, combine, then twist the ribbon away from you.
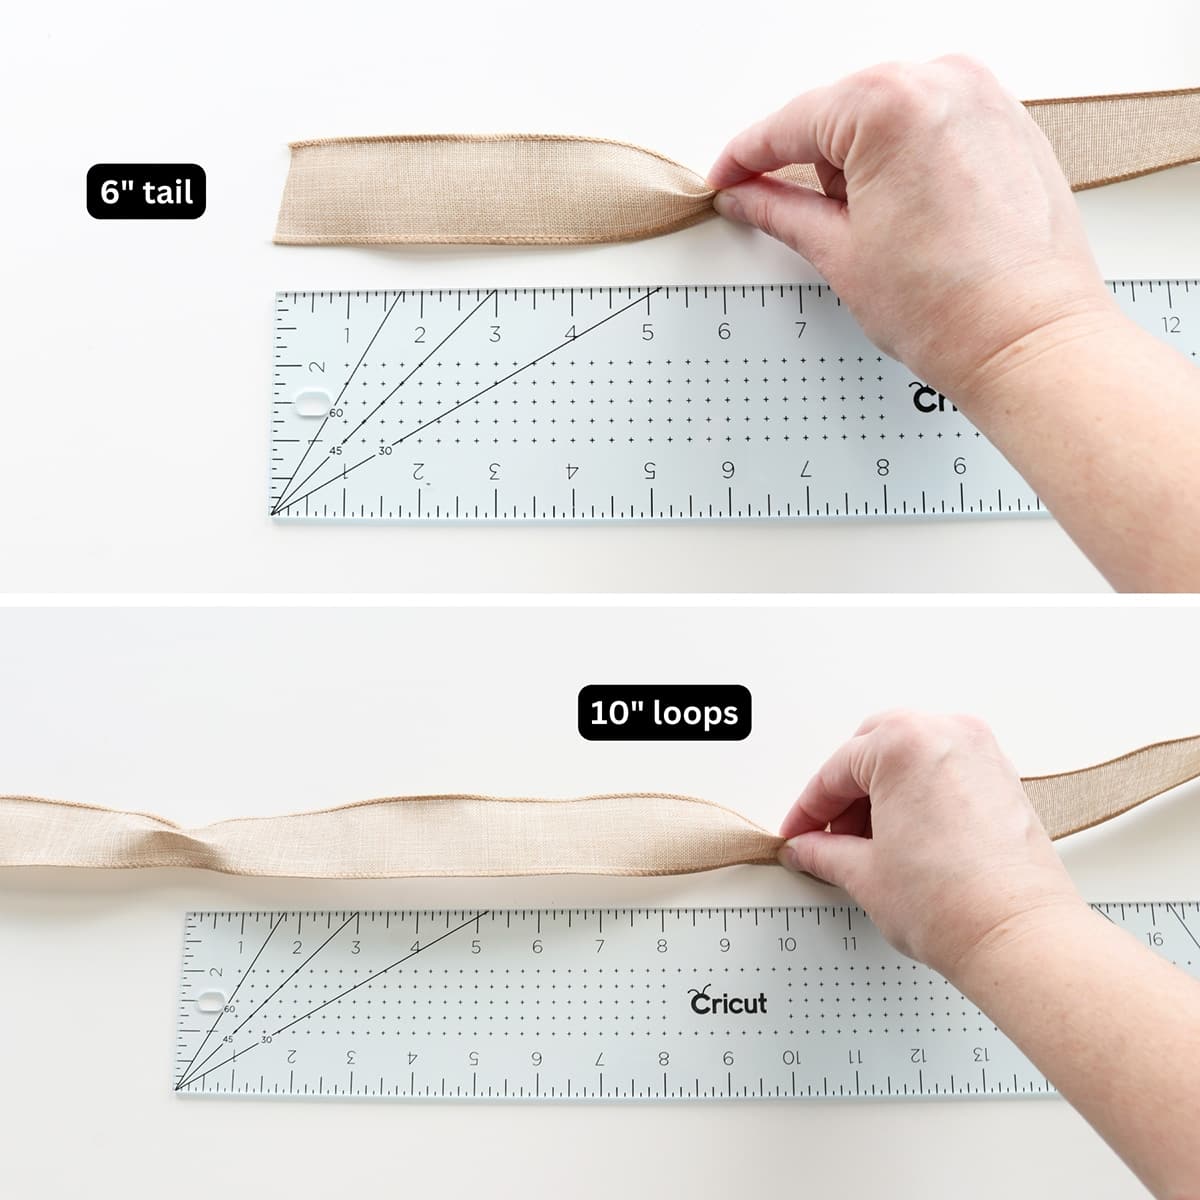
Measure a 14 inch tail and cut. Wrap a chenille stem around this piece to hold it and repeat the process to make one more piece like it (6 inch tail, 10 inch loop, 10 inch loop, and 14 inch tail).
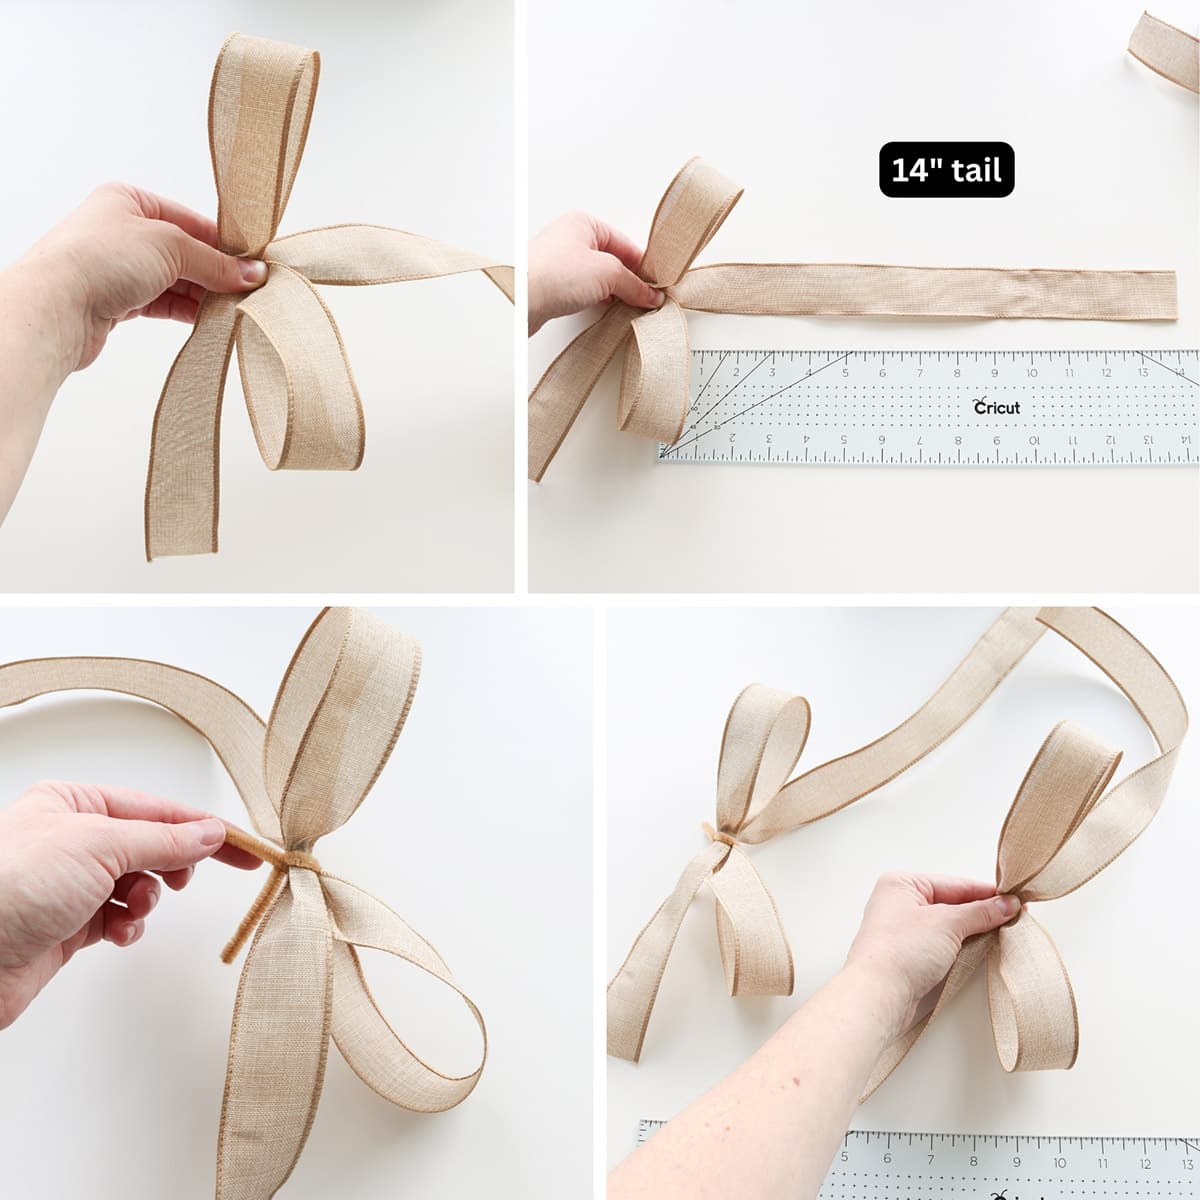
Take your first piece and halfway remove the chenille stem, add in the second piece so the short tails are on the same side of the bow and the longer tails on the other side. Twist the chenille stem to secure them. Then pull the long tails to the bottom of the bow, with the short tails behind and the loops in the middle.
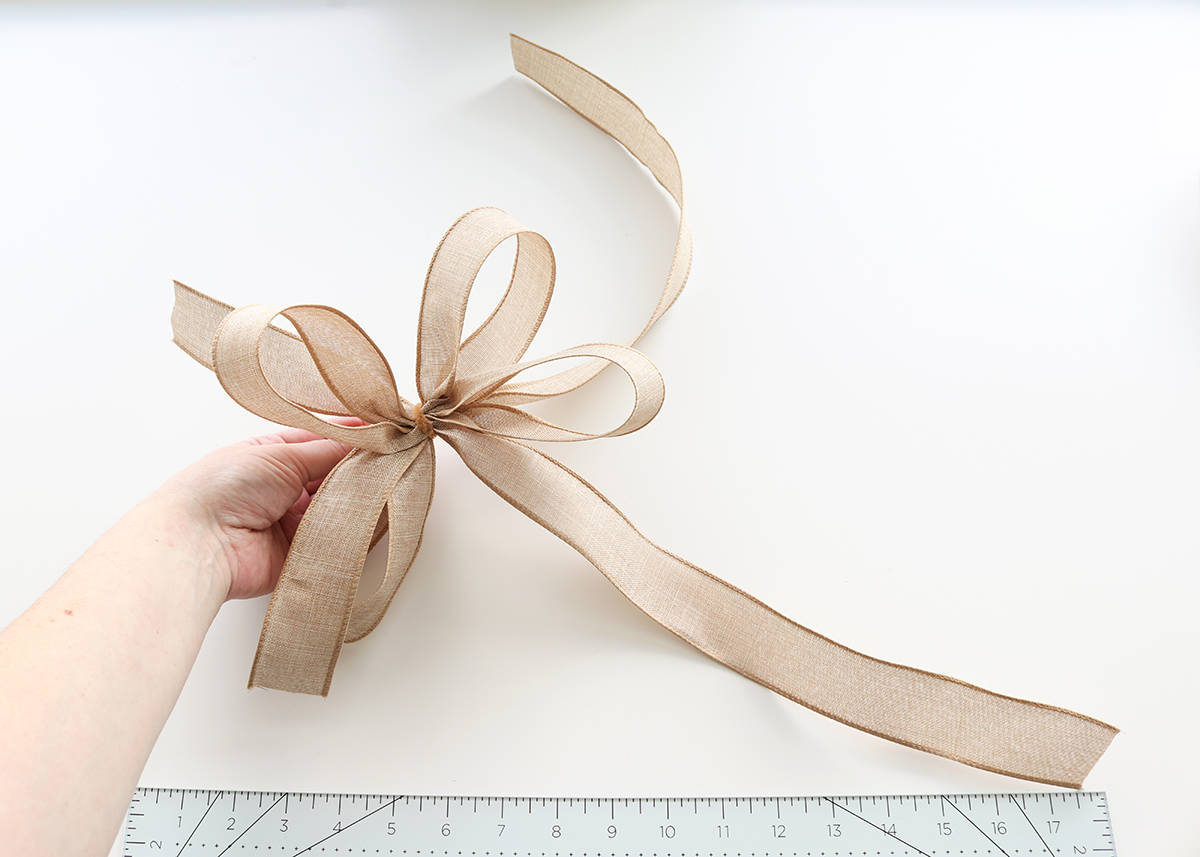
Dovetail all four tails and you’re done! I love this bow. I think it would look fantastic on a wreath or on garlands that you’d hang on your banister.
For my gift, I wrapped the same 1.5 inch ribbon around the box, tied a knot, and dovetailed the ends (and this is why in the pictures you might have noticed four short tails instead of just the two from the bow). I twisted the bow’s chenille stem around this ribbon and then trimmed the ends. You can fluff the bow and add some bends in your ribbon to add some dimension. And then just for fun, to cover the center, I added a pine cone Christmas pick (I trimmed it smaller with wire cutters, then I just bent the wire around the bow to secure it).
6. Double Bow With Middle Loop
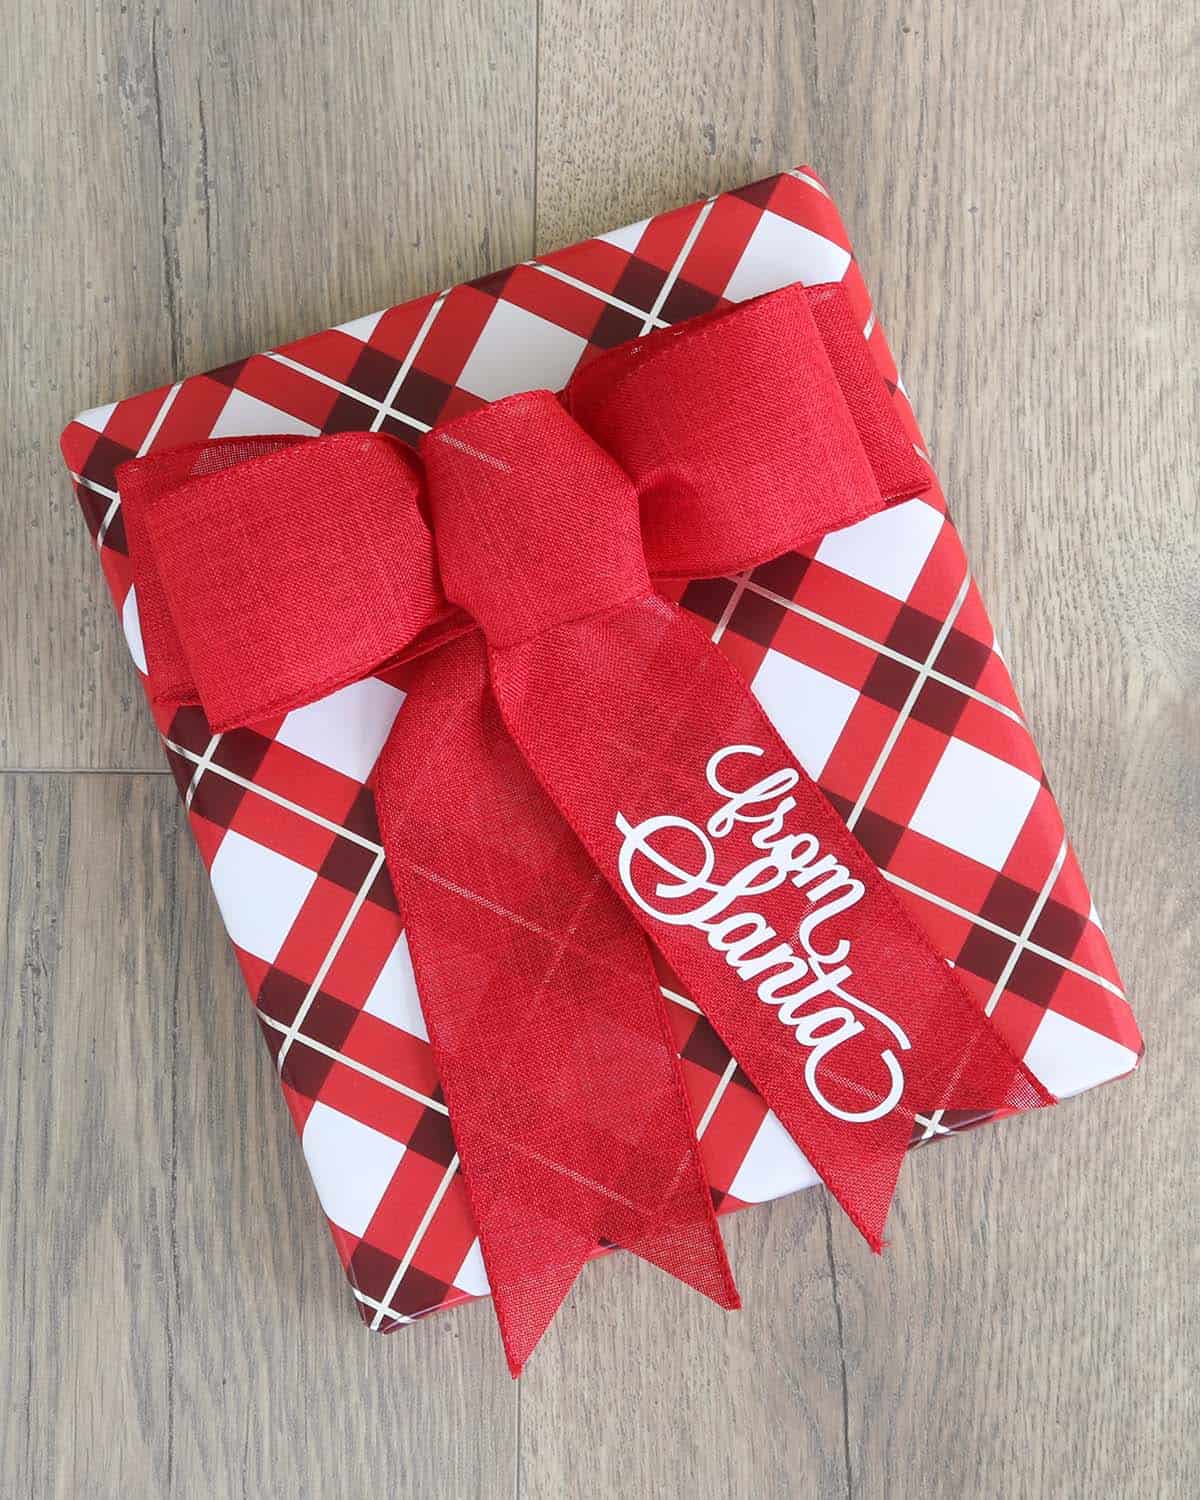
This bow uses 2.5 inch wired ribbon. Start by curling the end of the ribbon on itself to make a small loop for the middle and pinch at the back. Twist the ribbon away from you so the right side of the ribbon is now facing you. Make a loop to the right side. Pinch all the pieces together at the back.
Switch hands and twist the ribbon again. Make an opposite loop on the left side. Gather and pinch that at the back as well. Twist again and make another loop on the right side, slightly larger than the first one you made. Gather and pinch, then twist the ribbon, and make another loop on the left side, to mirror the one you just made. Gather and pinch at the back.
Now make a large loop which will form the two tails. Trim the ribbon where you want. Gather the end of the ribbon at the back with everything else you’re holding. Stick your chenille stem through* the middle loop and all the way around the bow, making sure you’re catching all the pieces. Twist to secure.
Cut the tail piece in two.
Now you can fluff your loops out and make any adjustments that you need to. Just be careful not to pull too hard because you don’t want the middle loop or any other pieces to come out of the chenille stem.
Dovetail the ends and you’re done!
*Note: I realized after making this bow a couple times that the first right loop didn’t get caught in the chenille stem when putting it through the middle loop (I think it probably depends on how you’re holding the bow, because I didn’t have this problem when I made this bow for my Dollar Tree fall wreath). If this happens to you, carefully remove the chenille stem and reposition it to the right of the center loop and that should solve the issue.

If you want to see how I personalized this bow to say “from Santa,” check out my tutorial on how to easily customize ribbon.
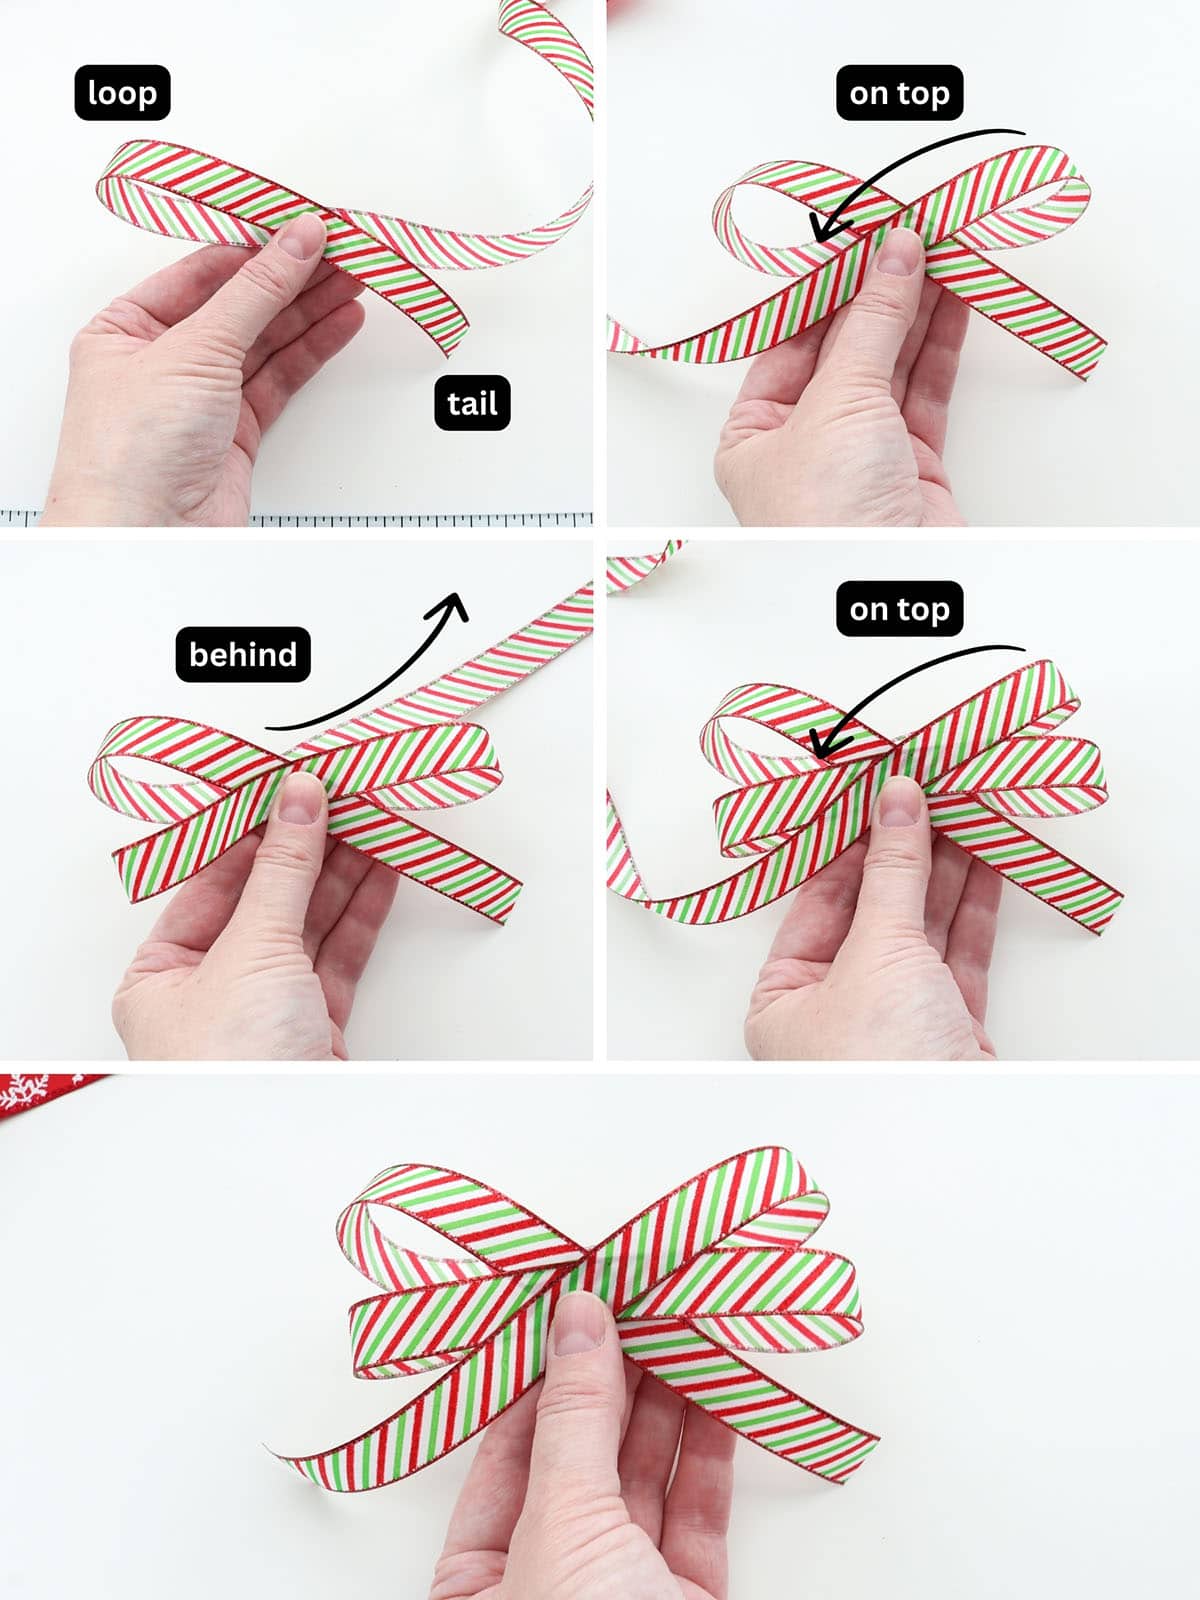
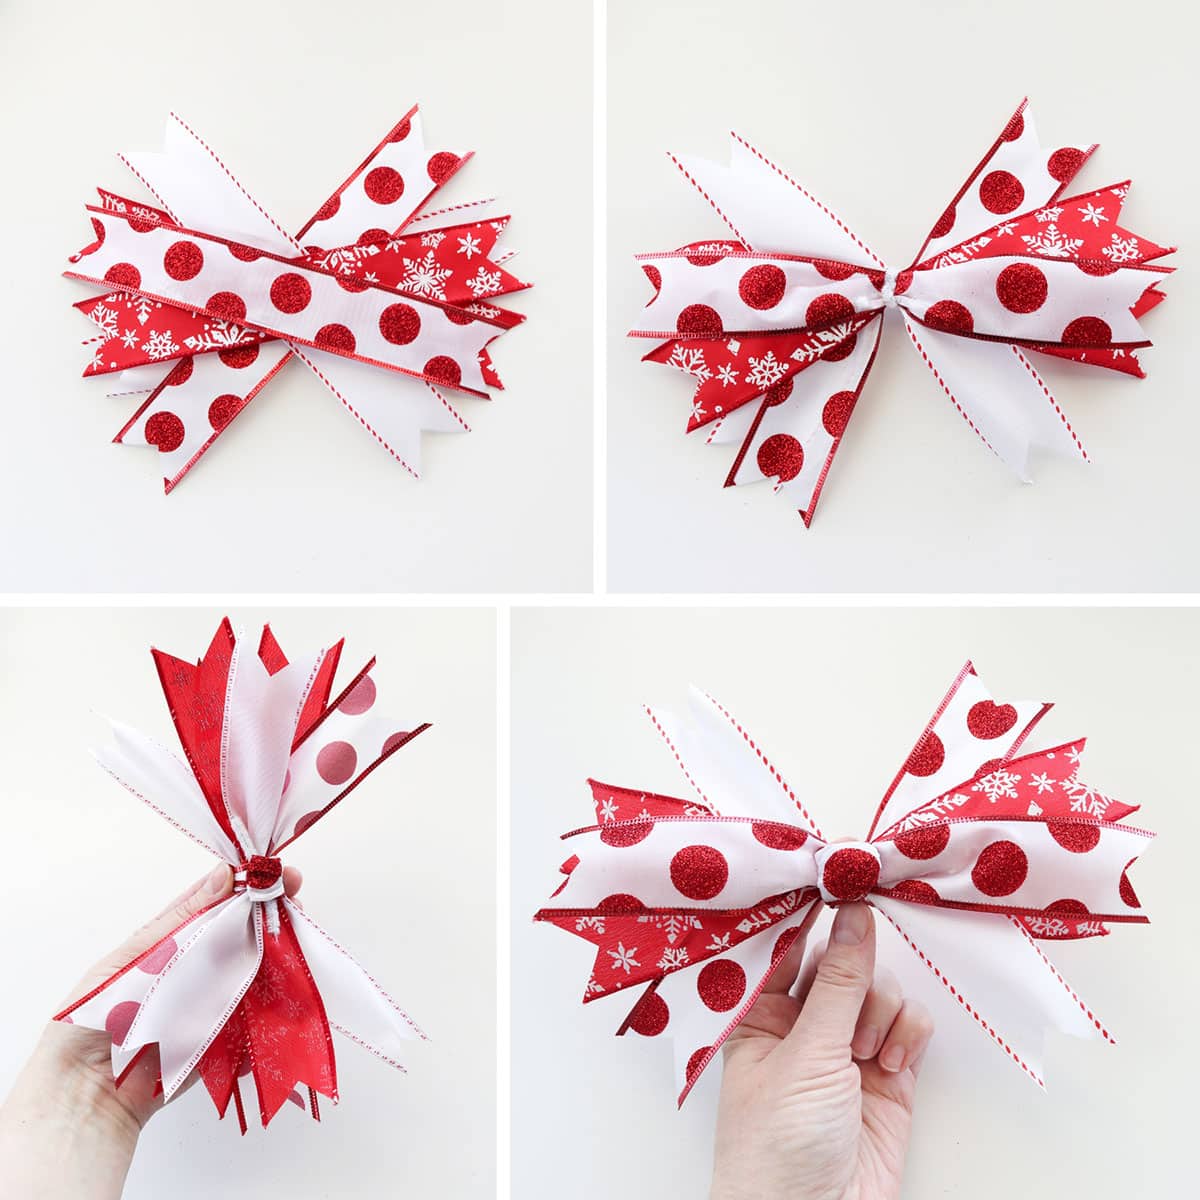
7. Simple “X” Bow
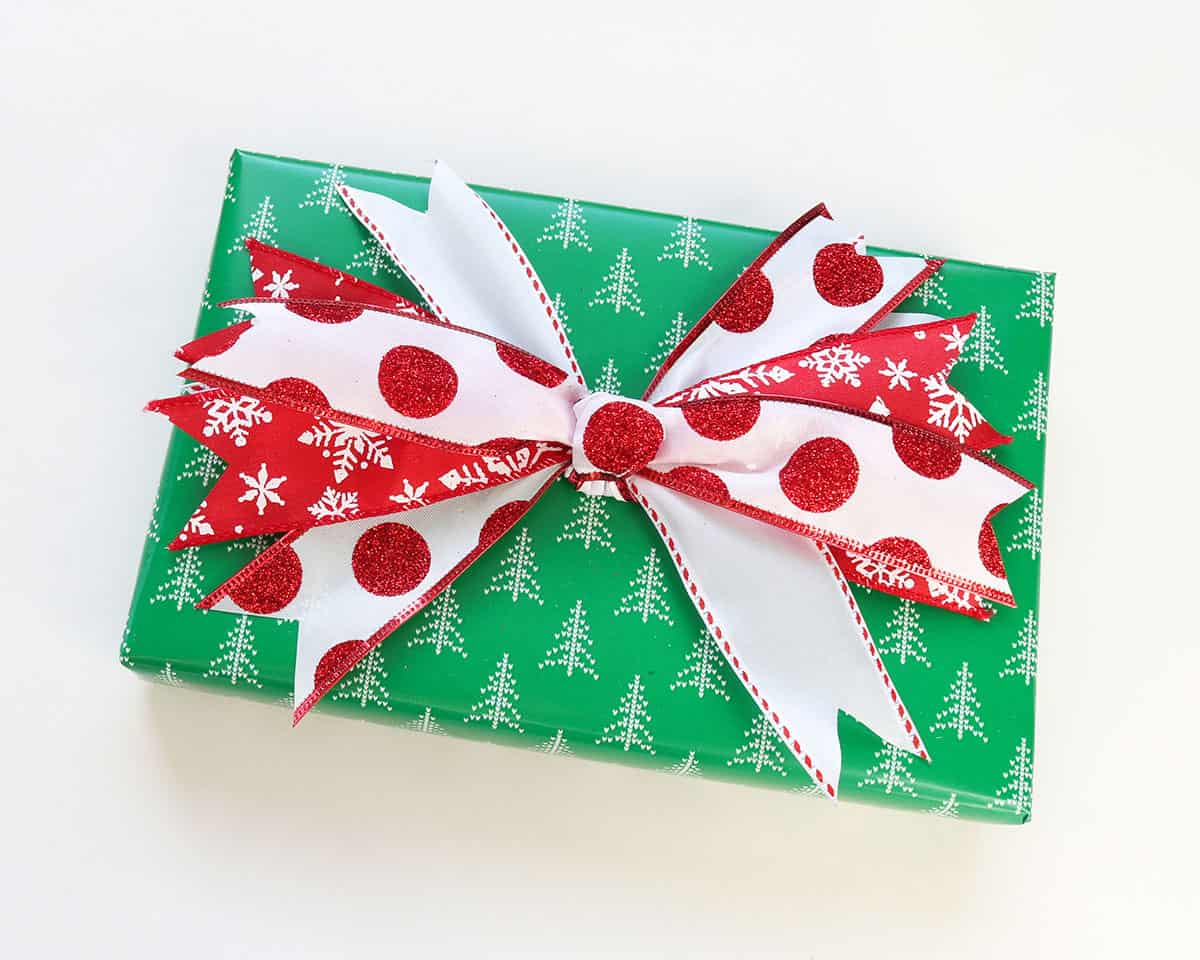
To make this bow, you will need six pieces of 1.5 inch wired ribbon in three different kinds. Cut each to 9 inches long and dovetail all the ends.
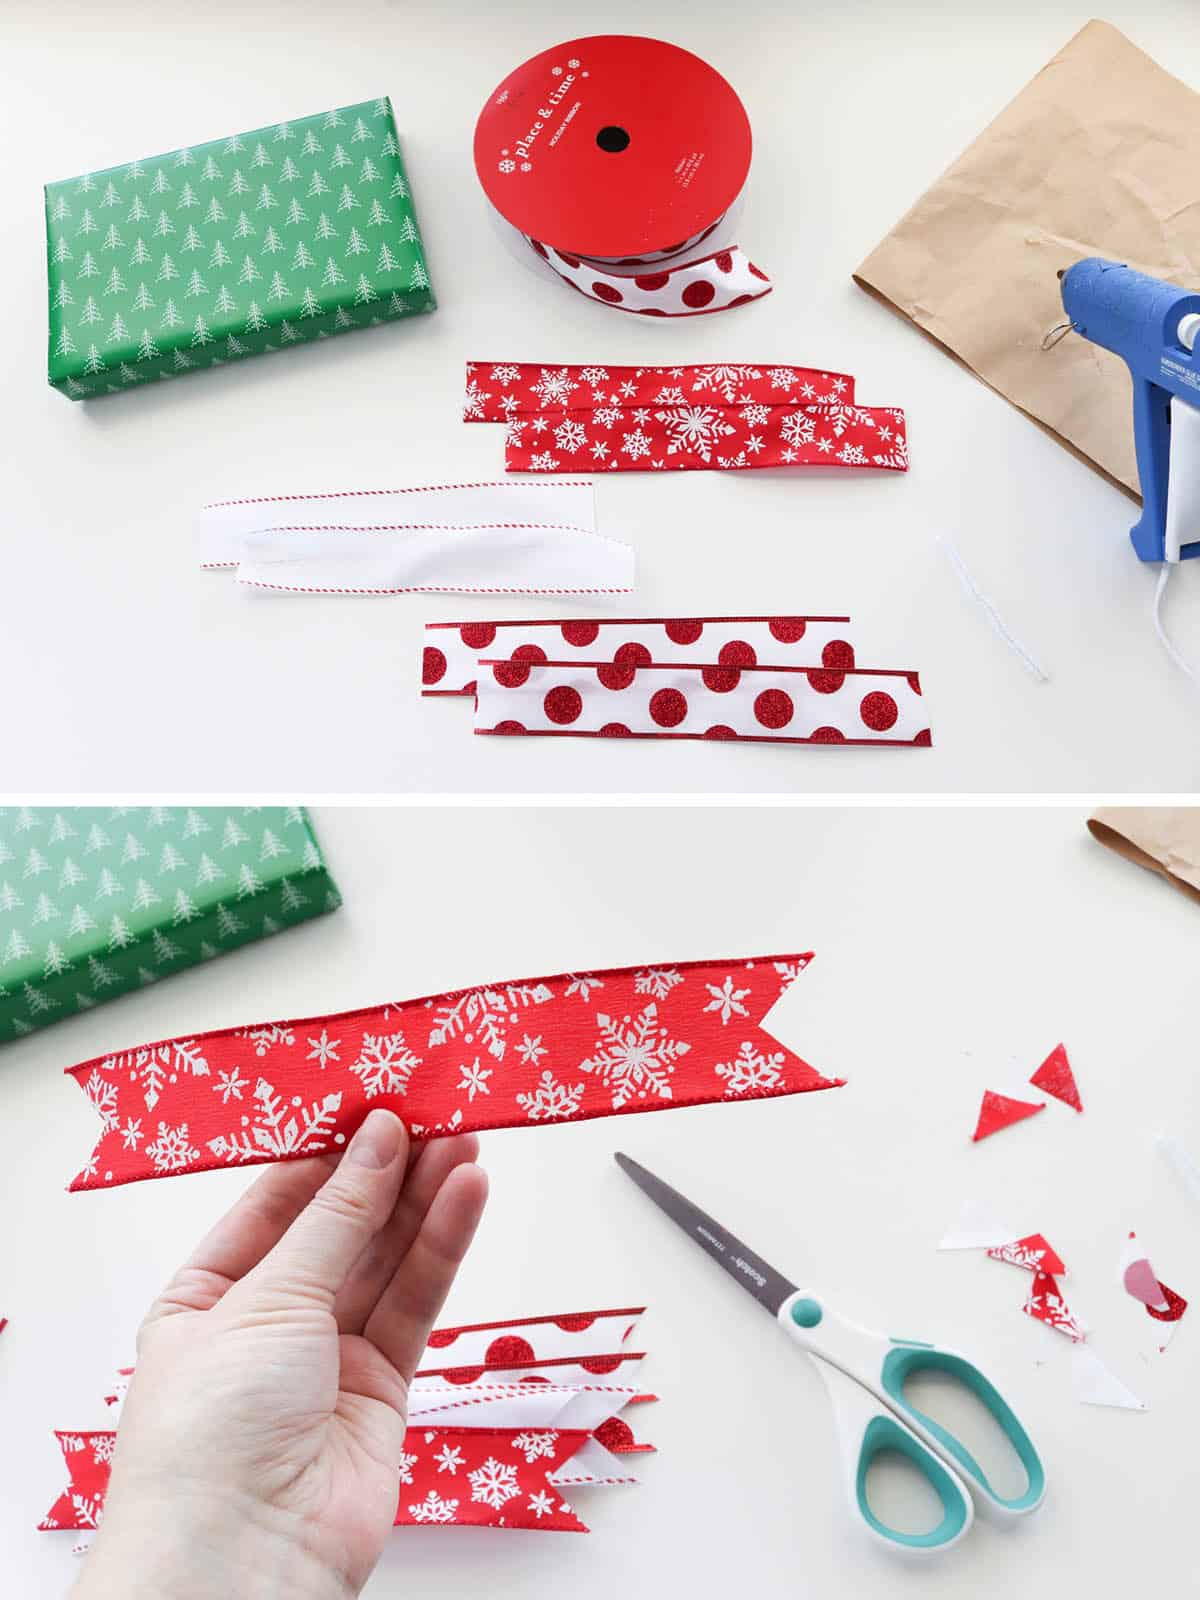
Now you can start stacking them in a criss-cross “X” pattern. Alternate the ribbons so it looks balanced. Gather and pinch all of the pieces in the middle and wrap a chenille stem around it.
Use a small piece of ribbon to wrap around the middle, like we’ve done in some of the other bows. For a little variation, you can make a knot in the ribbon first (and the knot will become the center of the bow). Trim the ends so you’re left with about 3 inches. Wrap that around the middle of the bow, tuck one end under, and hot glue it down. Such a simple bow!
8. Faux “Perfect” Double Bow
If you struggle making a perfect bow when tying ribbon, this one’s for you!
For this bow, I used 1 inch velvet ribbon. Cut three pieces, one that is 10 inches long, 12 inches long, and 14 inches long. The 14 inch inch piece will be the tails of the bow, so you can actually make this as long or short as you want.
Take your smallest piece and fold over one end, add a bead of hot glue to it, fold the other end of the ribbon over and glue it down, forming a loop. Repeat with the 10 inch piece of ribbon.
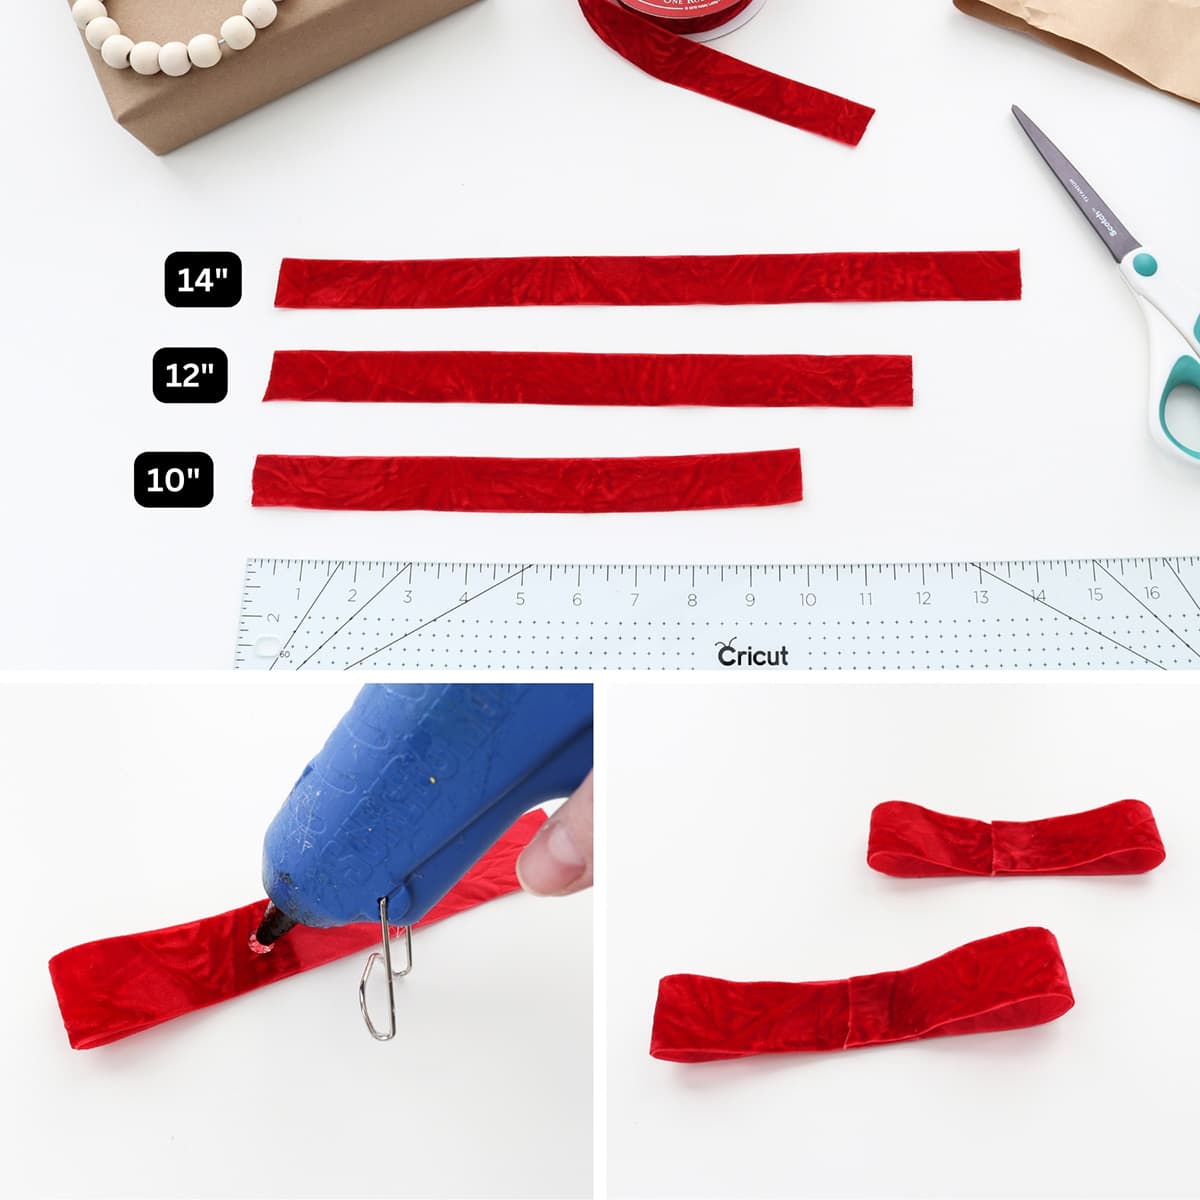
Turn the loops over and stack them with the smaller one on top. Take your 14 inch piece of ribbon and find the center and place it behind the loops. Then take a chenille stem and wrap it around all three pieces and twist at the back.
Adjust the pieces to make sure the loops are centered and everything’s positioned well.
Next, cut about a 3 inch piece of ribbon. Wrap it around the middle of the bow, fold one end under, and hot glue it down.
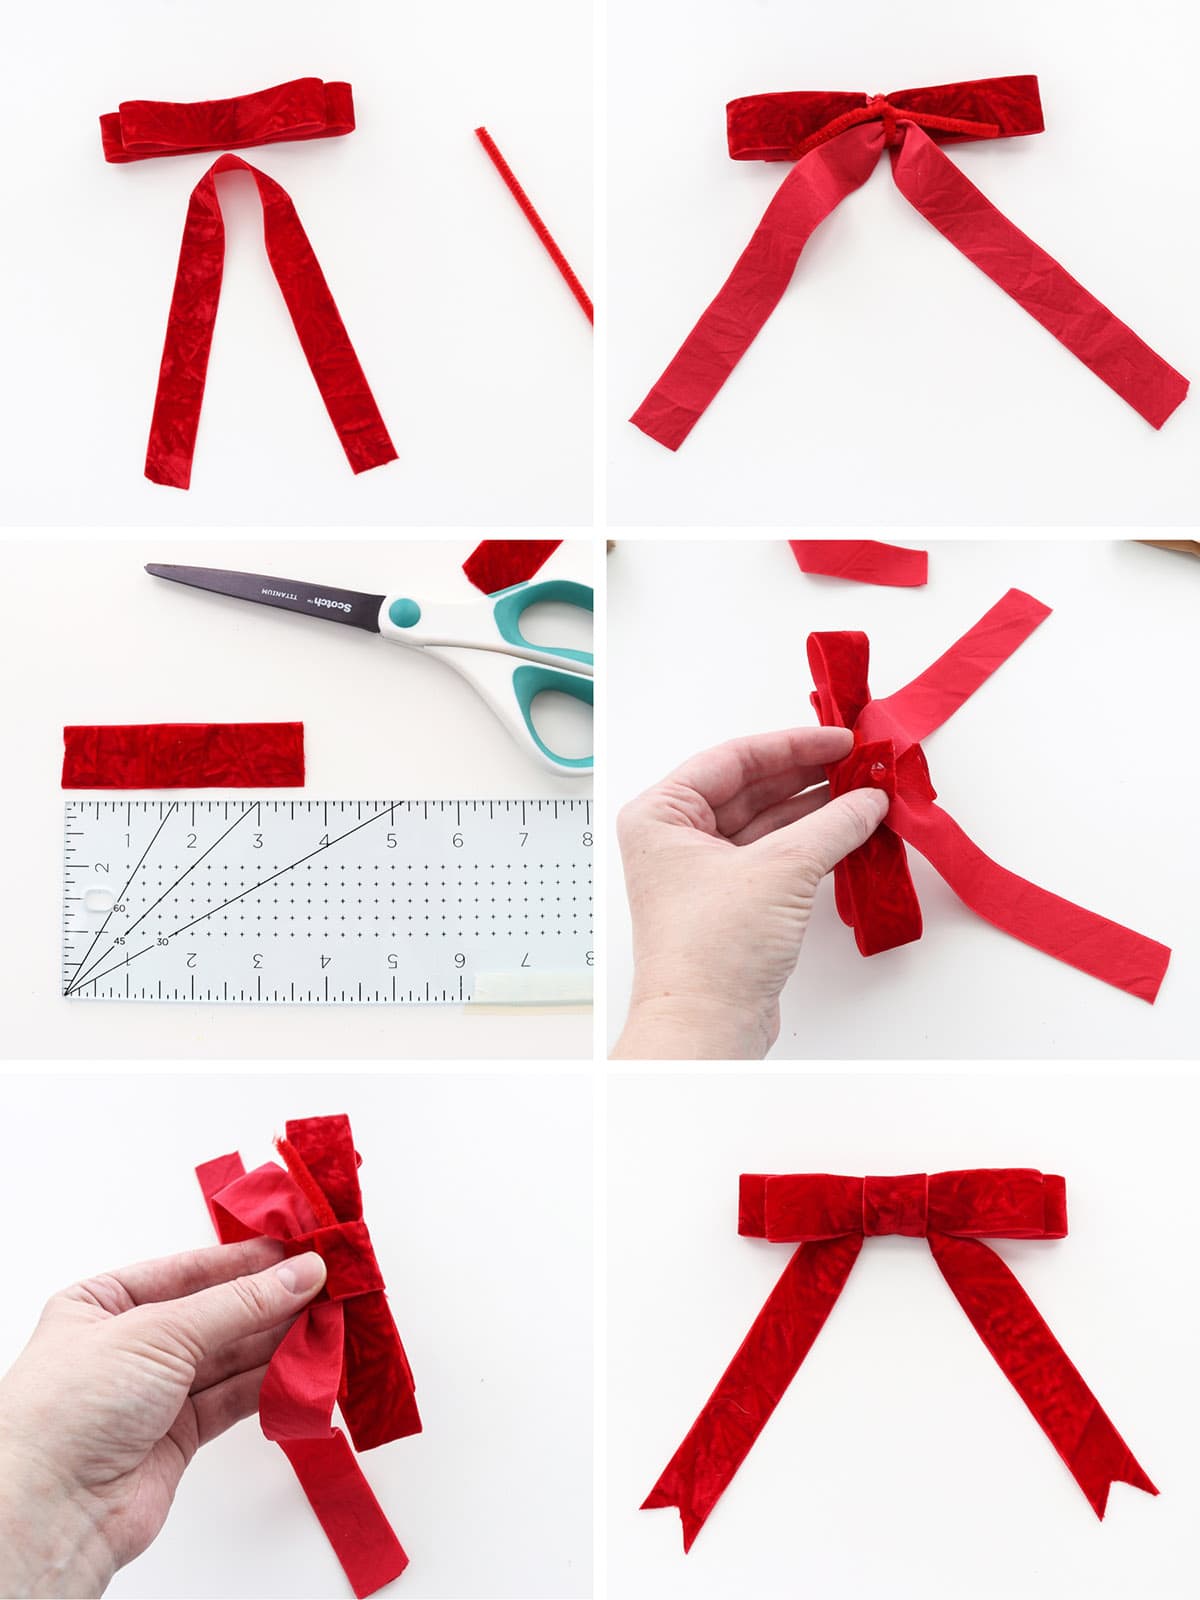
Finish the ends of the ribbon, either by dovetailing them or cutting at an angle. I decided later on that the angle looked better, so that’s why you see both in my pictures.
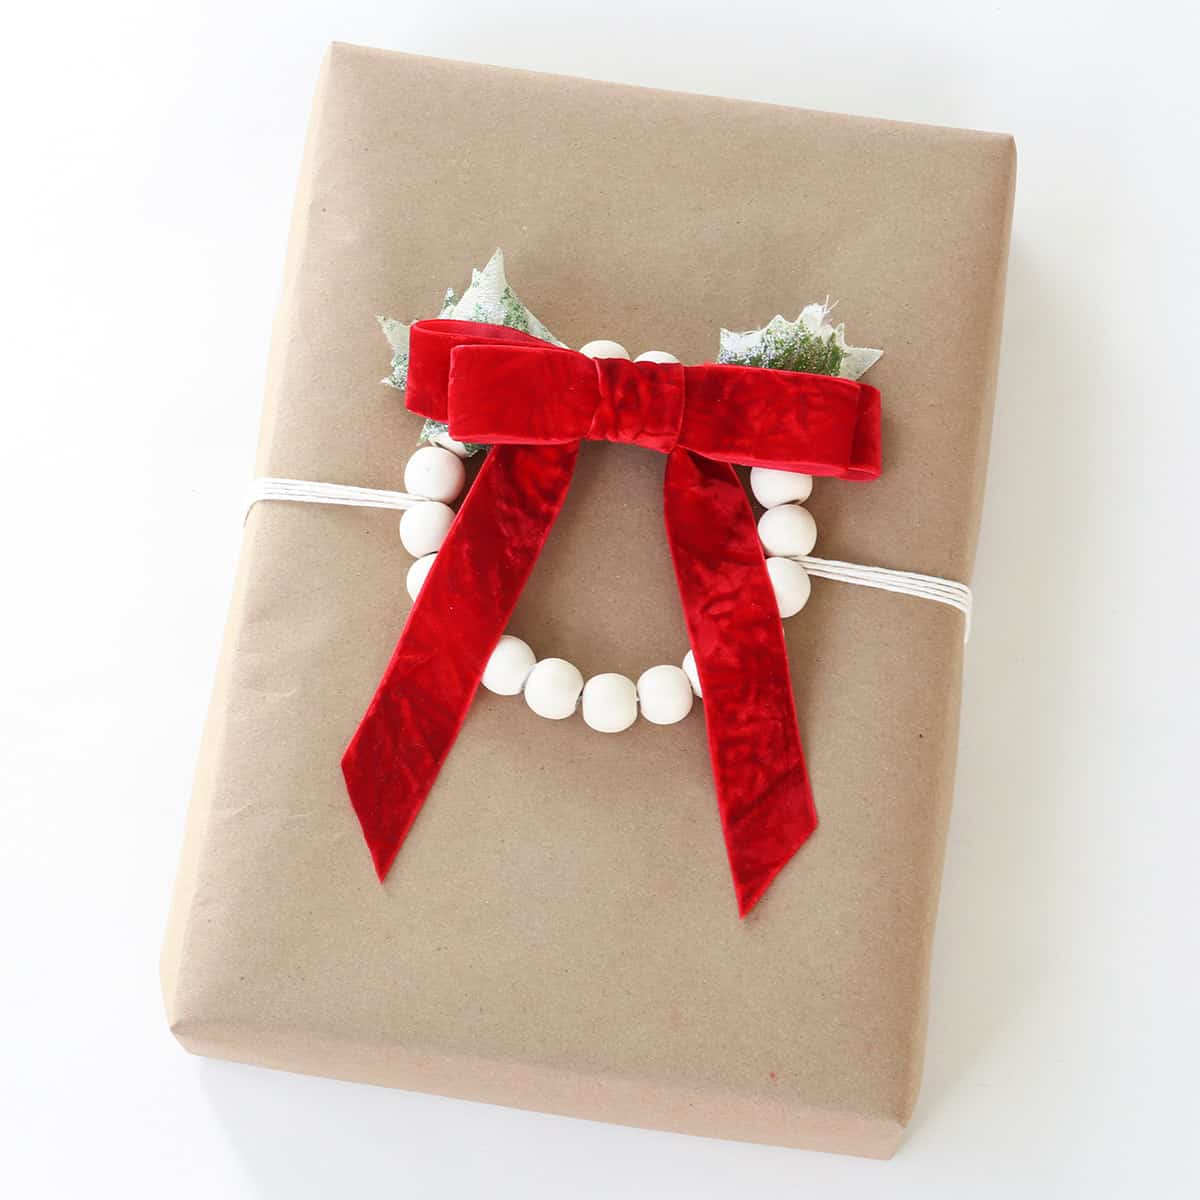
I found some little wood bead wreaths in the craft section at Hobby Lobby and tied them on my gift with some doubled-up string. The length of the string will depend on the size of your box. Loop one doubled-up piece through each side of the wreath and then flip your gift over and tie a knot.
I also had some leftover holly leaves from a floral pick and thought some greenery would look cute, so I cut two of the leaves off and hot glued them in the back of the bow. And then I glued the bow to the top of the wreath.
9. Stacked Loops Triple Bow
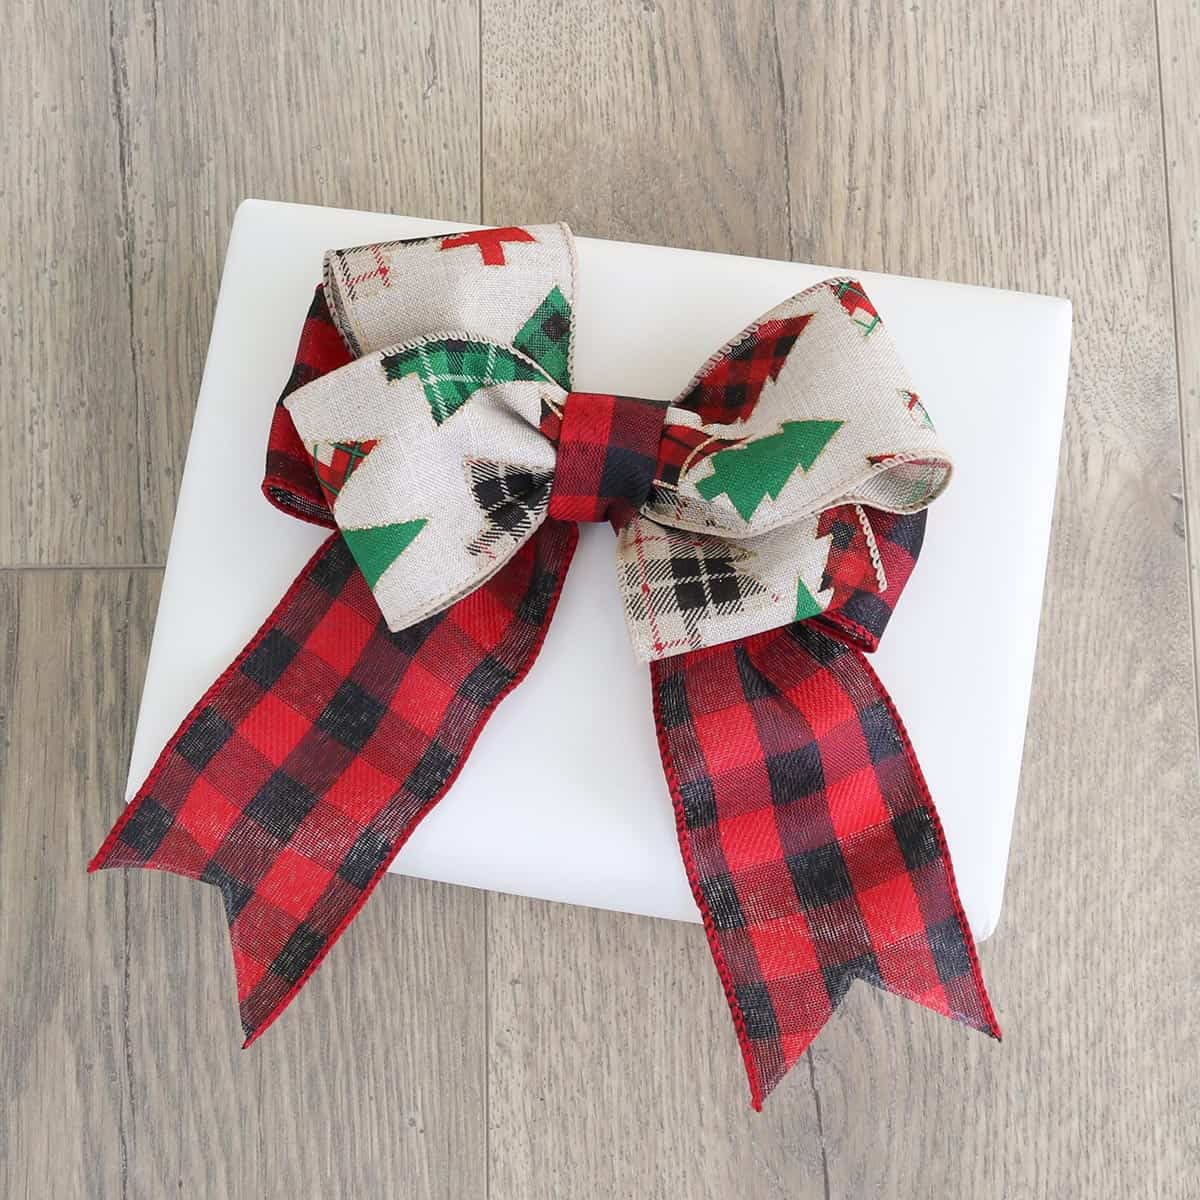
To make this bow, you’ll need two different kinds of 2.5 inch wired ribbon. Cut two 14.5 inch strips from each. Then you’ll also need a small piece of ribbon: I initially cut mine too short, but you actually want it to be 4.5 inch long.
Take your main ribbon, whichever one you want to be on top, and make a loop out of each piece, hot gluing the ends together. Make a loop from one of the bottom ribbon pieces.
Stack your ribbon loops, with the bottom loop horizontal and the two top loops in an “X” on top. Take your last 14.5 inch piece and find the middle. Tuck it behind the stack of ribbon loops. Gather all the pieces in the middle, wrap a chenille stem around them, and twist at the back. Adjust the pieces as needed.
Take your 4.5 inch long piece of ribbon and fold it in thirds lengthwise, then hot glue it together. Wrap it around the middle of the bow, tuck one end under, and hot glue it down.
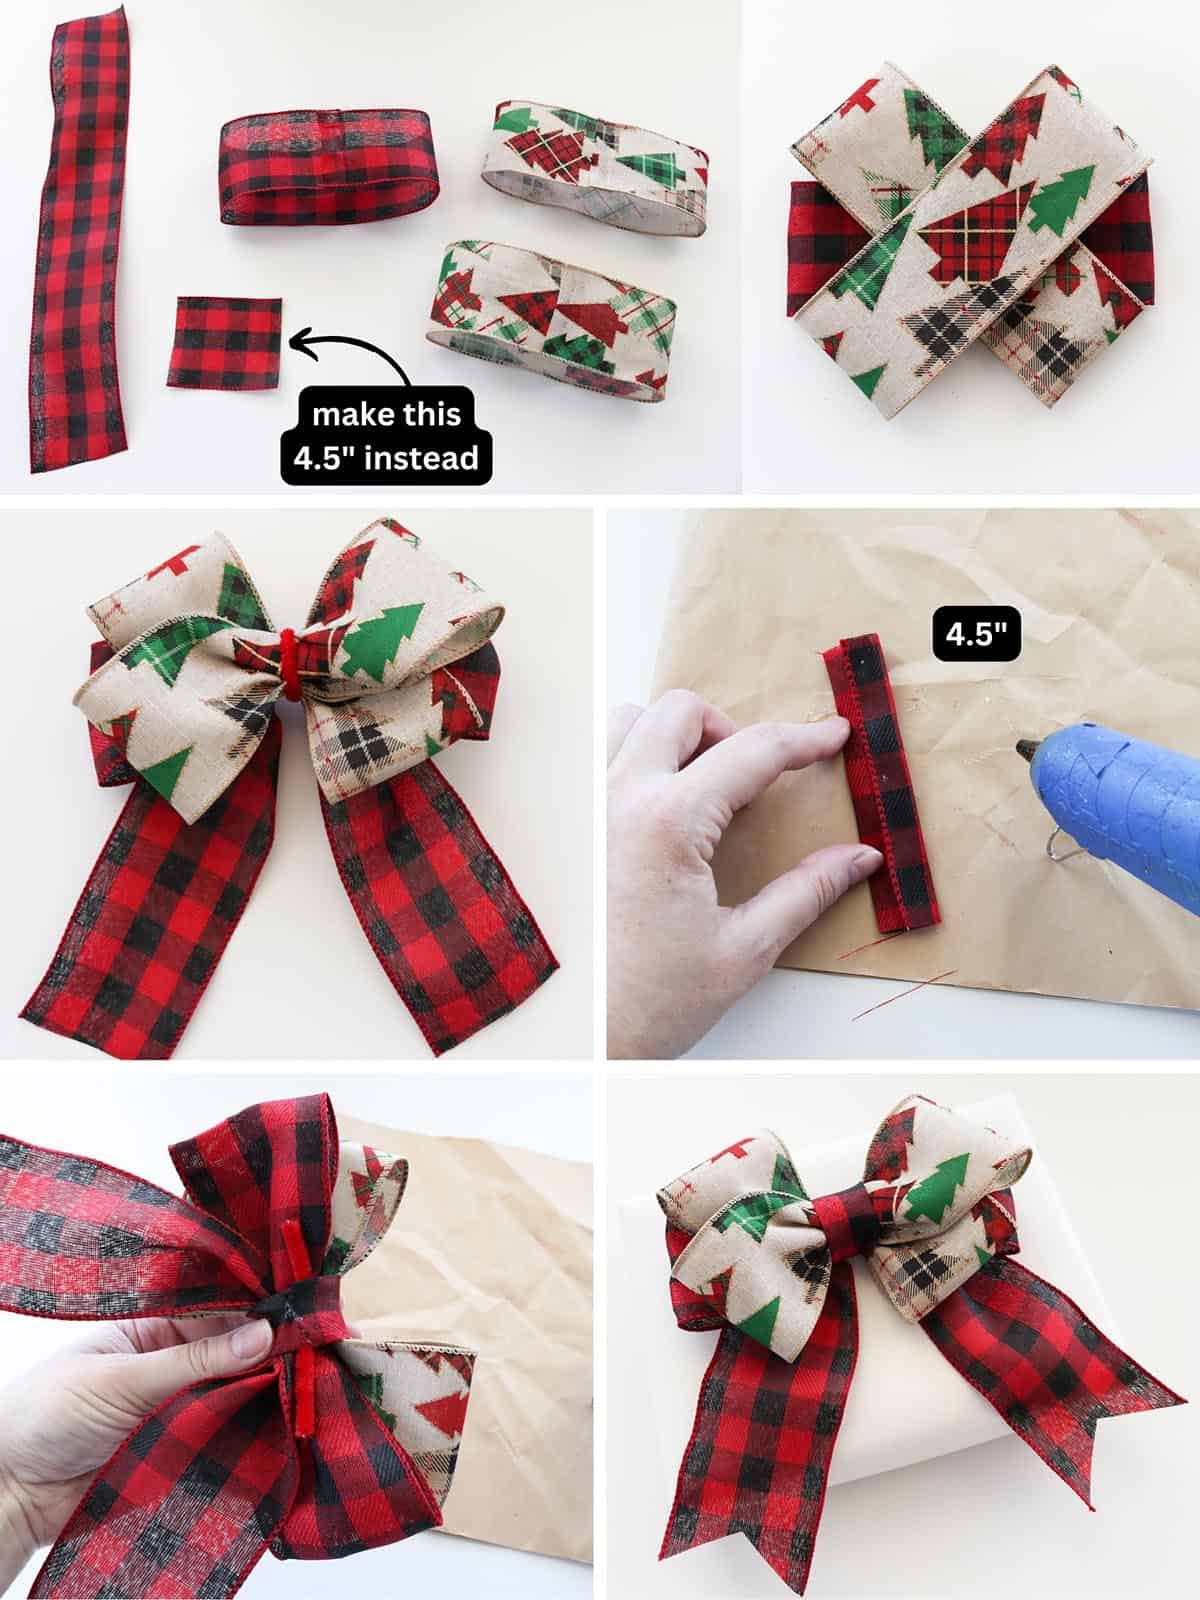
Dovetail the ends of the ribbon. And it’s so cute! This is one of my favorite bows.
10. Classic Gift Bow
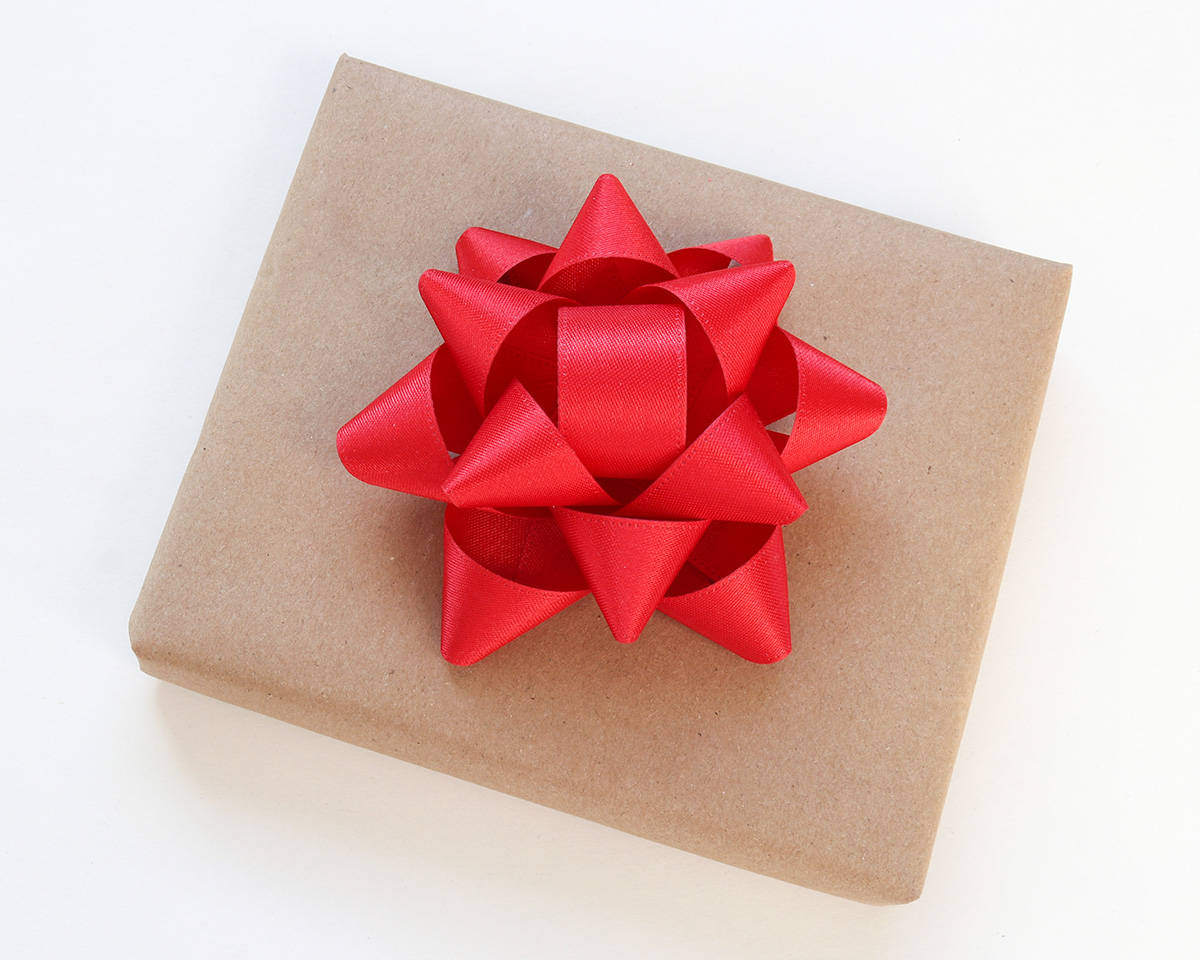
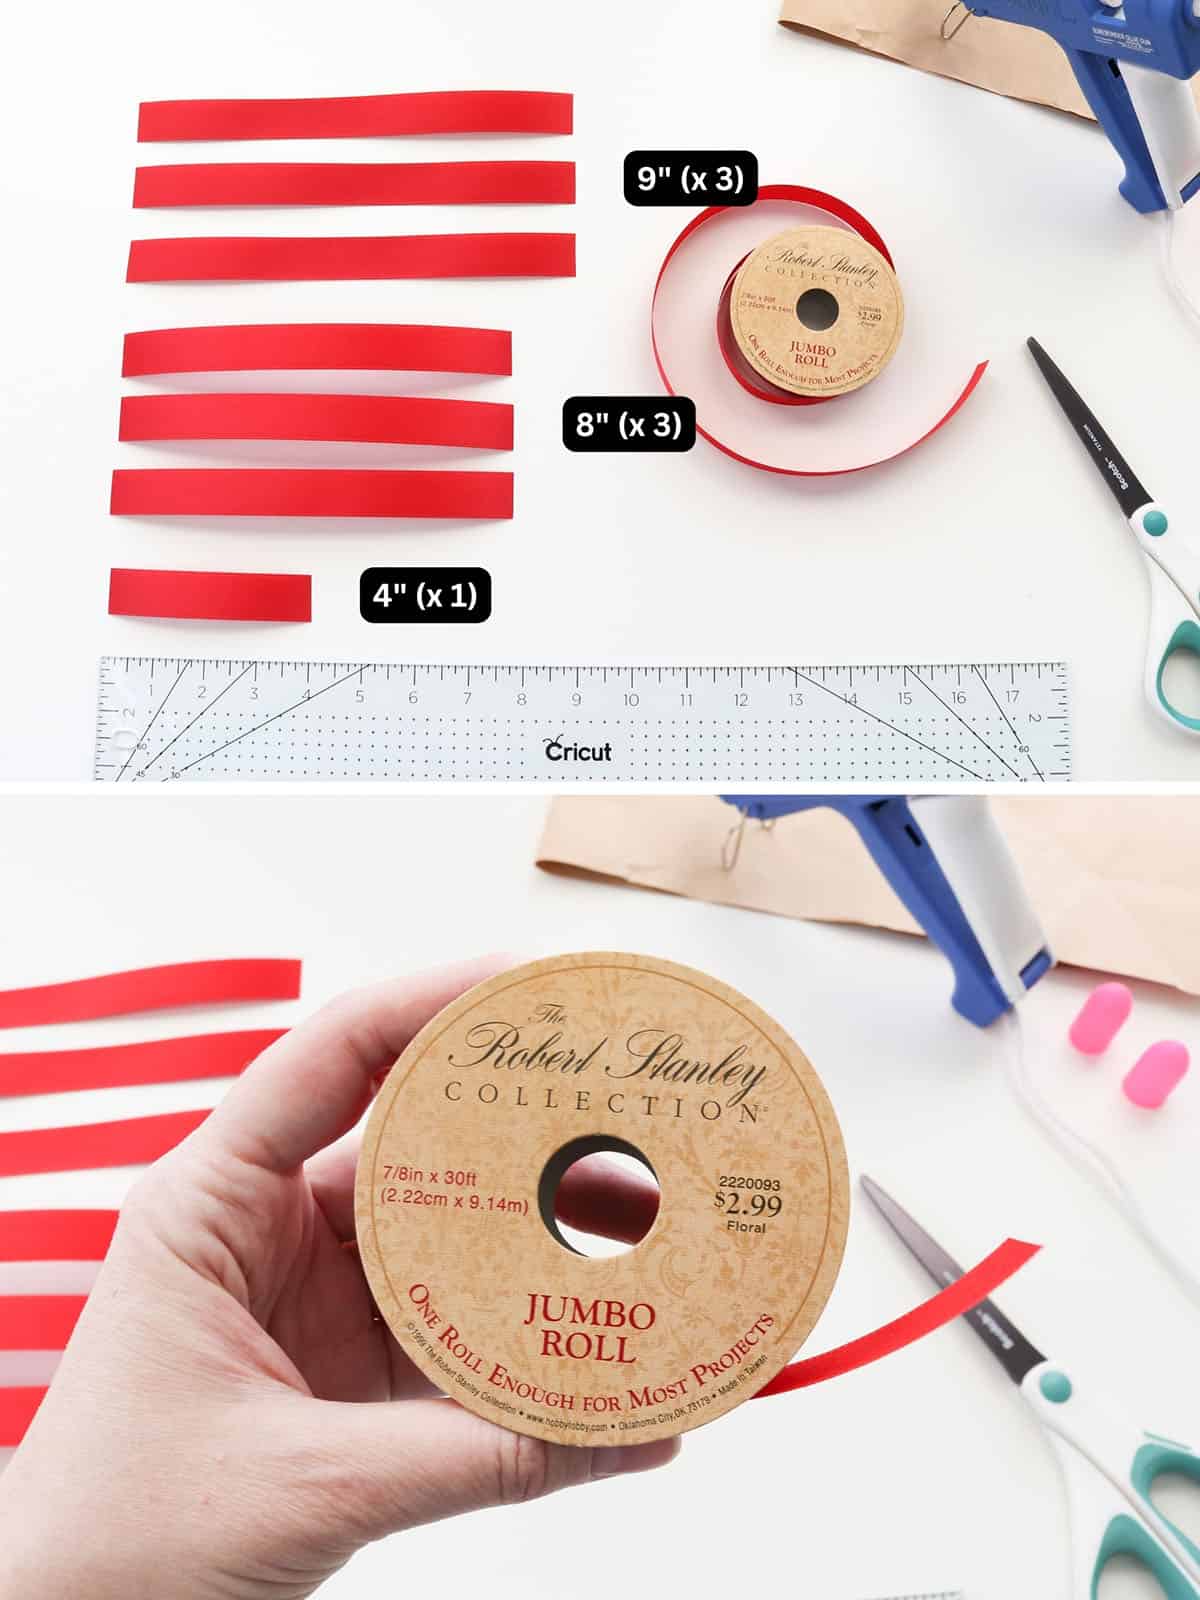
For a classic gift bow, you’re going to want a narrow ribbon, and I highly recommend this 7/8 inch ribbon from the floral section in Hobby Lobby (or any other 7/8 inch ribbon, but I like this one especially because it’s a little stiff–it kind of looks like satin but it’s not, it almost has a plastic-y kind of texture, which worked out perfect for this bow).
Cut three 9 inch pieces, three 8 inch pieces, and one 4 inch piece.
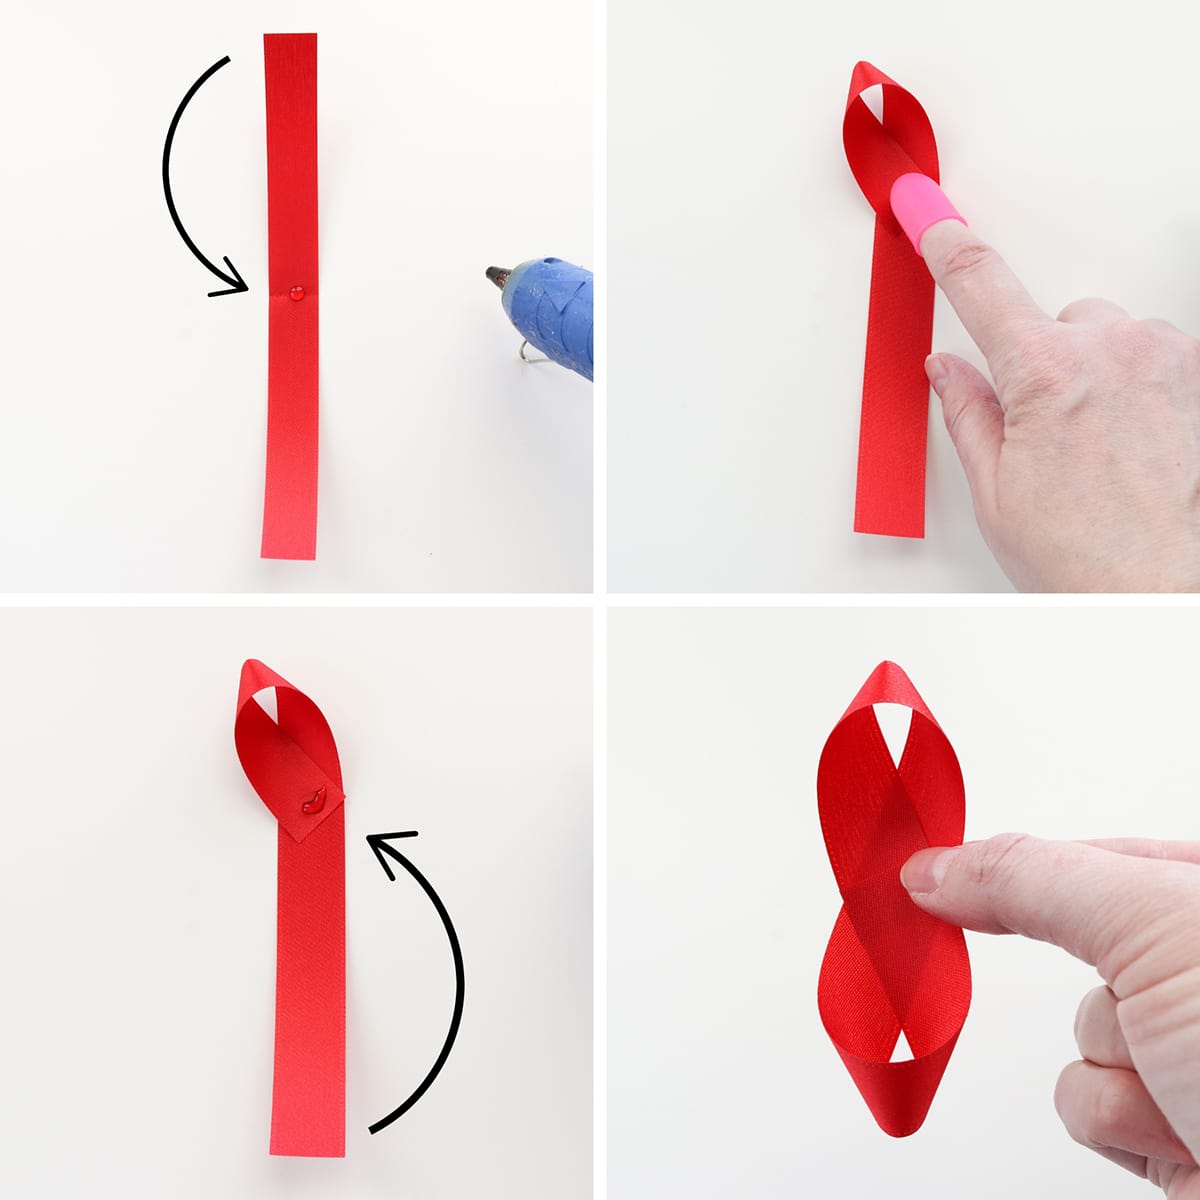
Starting with a 9 inch piece, fold it in half to find the middle. Put a bead of hot glue in the middle, then loop the top down on itself as shown, pressing it into the hot glue (definitely use your finger protectors). Then add another bead of glue and flip the bottom end up in the same way, so you end up with what looks like a figure 8. Repeat this with all the 9 inch and 8 inch pieces of ribbon.
Once those are done, stack the bow, starting with the larger pieces (you can position them first to get an idea of where to glue them). Glue them down.
Next, glue the smaller pieces down. You’ll see which way you need to position each piece because there will kind of be a gap in the loops where you would want your next points to be.
For the final ribbon piece, roll it into a loop and you’ll want to see how big to make it by placing it in the middle of the bow first. I folded mine over about 5/8 inch. Glue the loop together. Then add some hot glue to the bottom of the loop and glue it inside the middle of the bow.
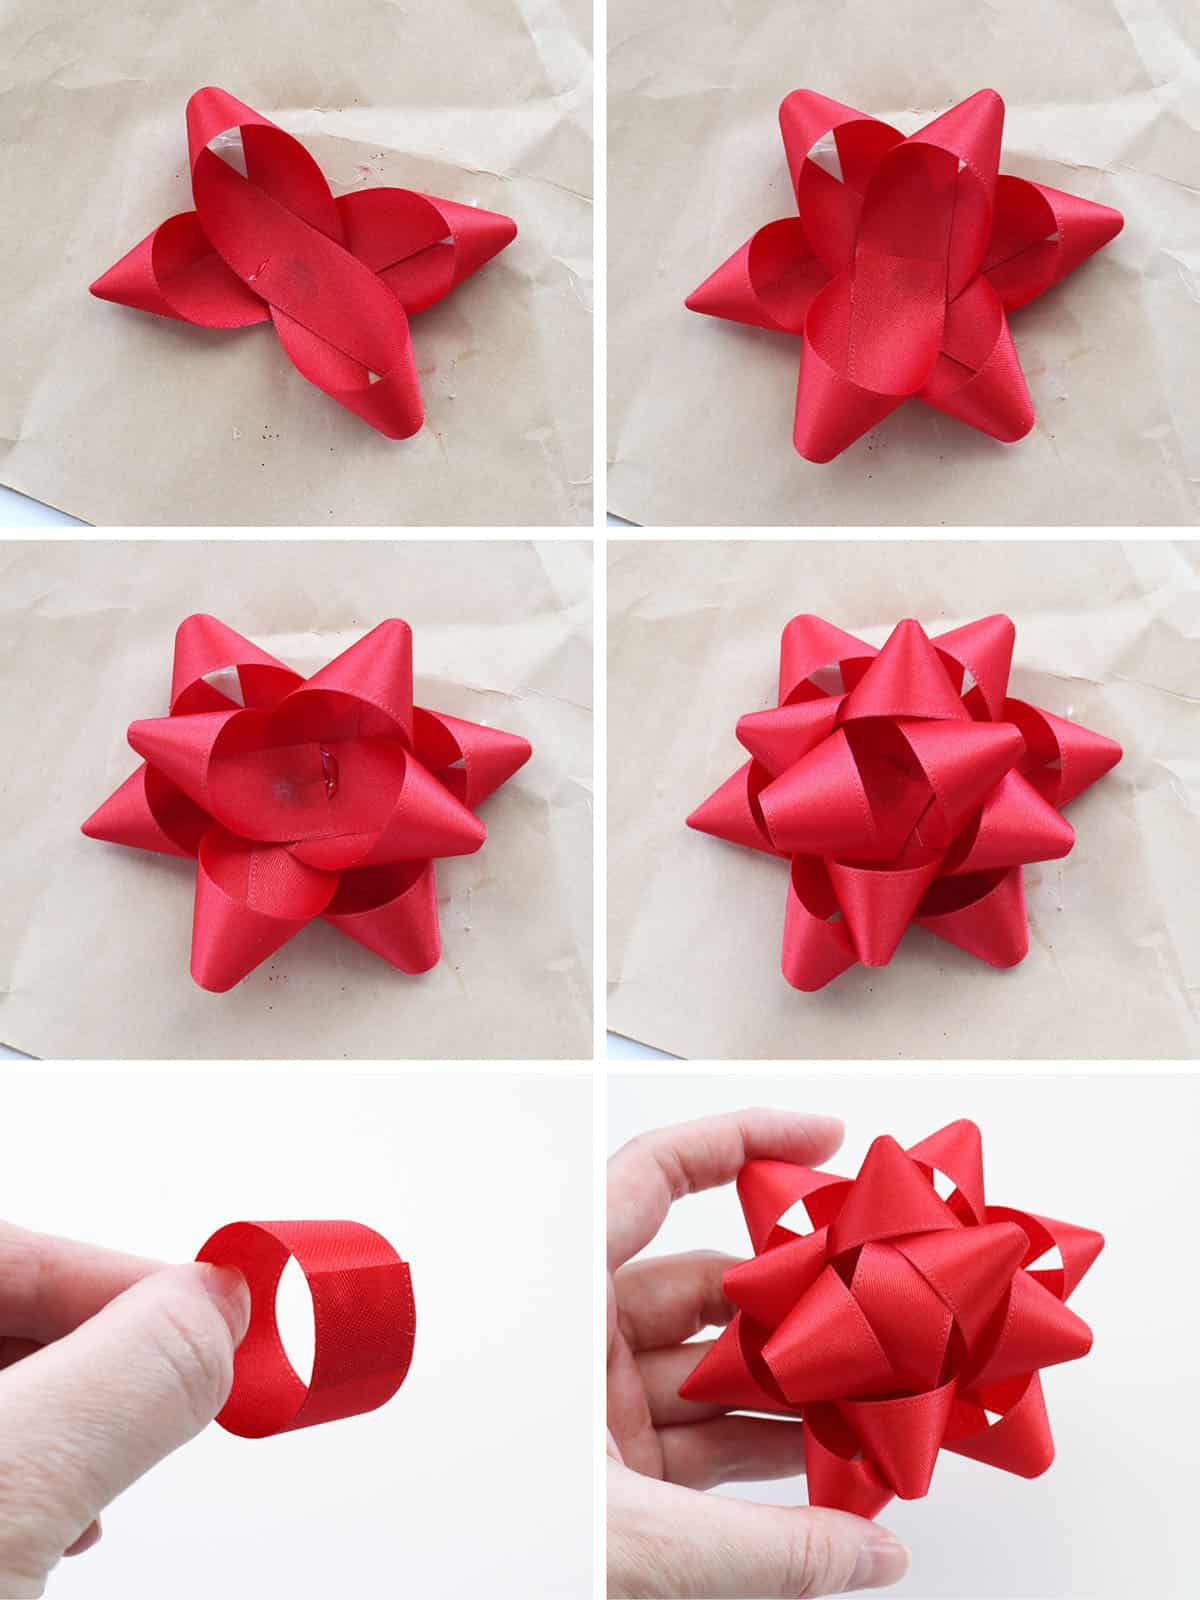
And how satisfying is that!
When gluing these bows and making those figure 8s, do your best to keep the amount of overlap consistent, but you’re bound to have a little bit of variation–some bows will look a little more spaced out and that’s fine too. Either way, they’re so much prettier than store-bought!
11. Bow Tie
This is the easiest bow of all of them, but I still wanted to include it because sometimes you just want something really simple (and this is bow #11…I’m tired, haha).
I used 2.5 inch wired ribbon for this. Lay the ribbon under your gift. The length of ribbon will totally depend on the size of your gift–you want each ribbon end to be about 1.5 times the width of the gift.
Make sure the ribbon is centered, then tie a regular knot, keeping the right side of the ribbon face up. Turn the ends so they’re going horizontal across your gift and then you can dovetail them.
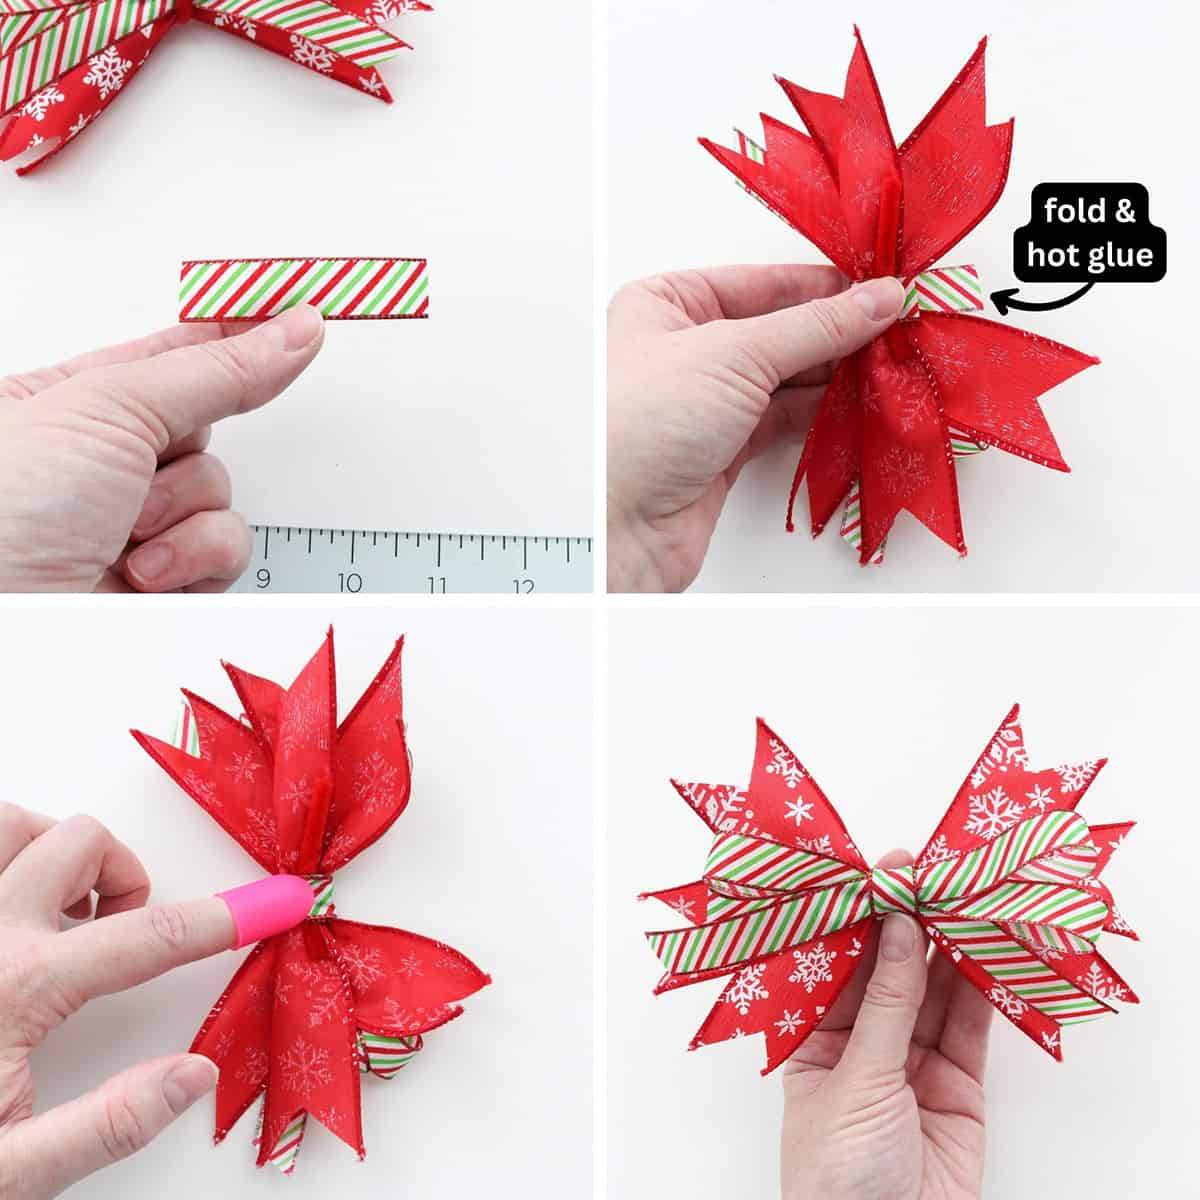
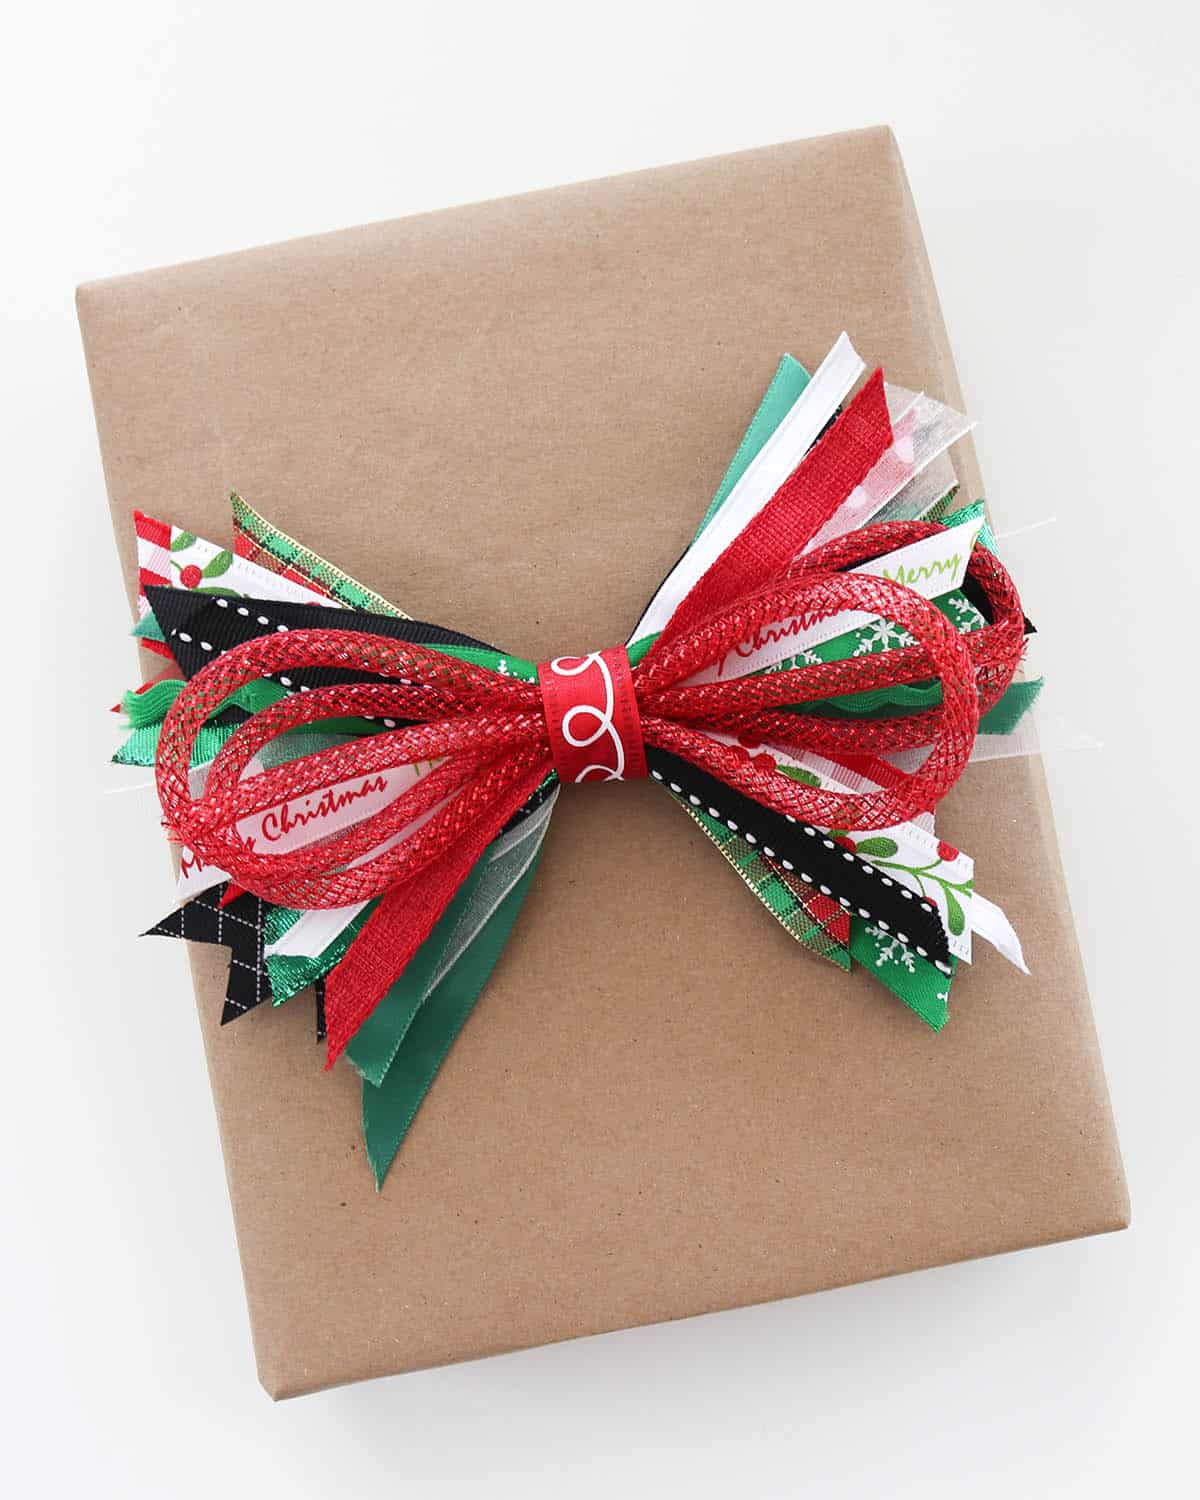
12. Scrap Ribbon Bow

The final bow is a scrap ribbon bow, which is such a great way to use up all your small ribbon scraps. I have a cookie jar in my craft room that I keep regular ribbon scraps in, so for this bow I just collected all my green, red, white, and black scraps.
And, I’m a hoarder and keep everything, so some of these ribbons have been used before or came on gifts from other people, so I used my handy Cricut EasyPress Mini to iron out any wrinkles. The lowest heat setting should be plenty hot and you only want to press for a second or two, just long enough to straighten the ribbon. Probably don’t iron anything with metallic threads or glitter—stop immediately if you feel your EasyPress start to stick, like the ribbon might be melting.
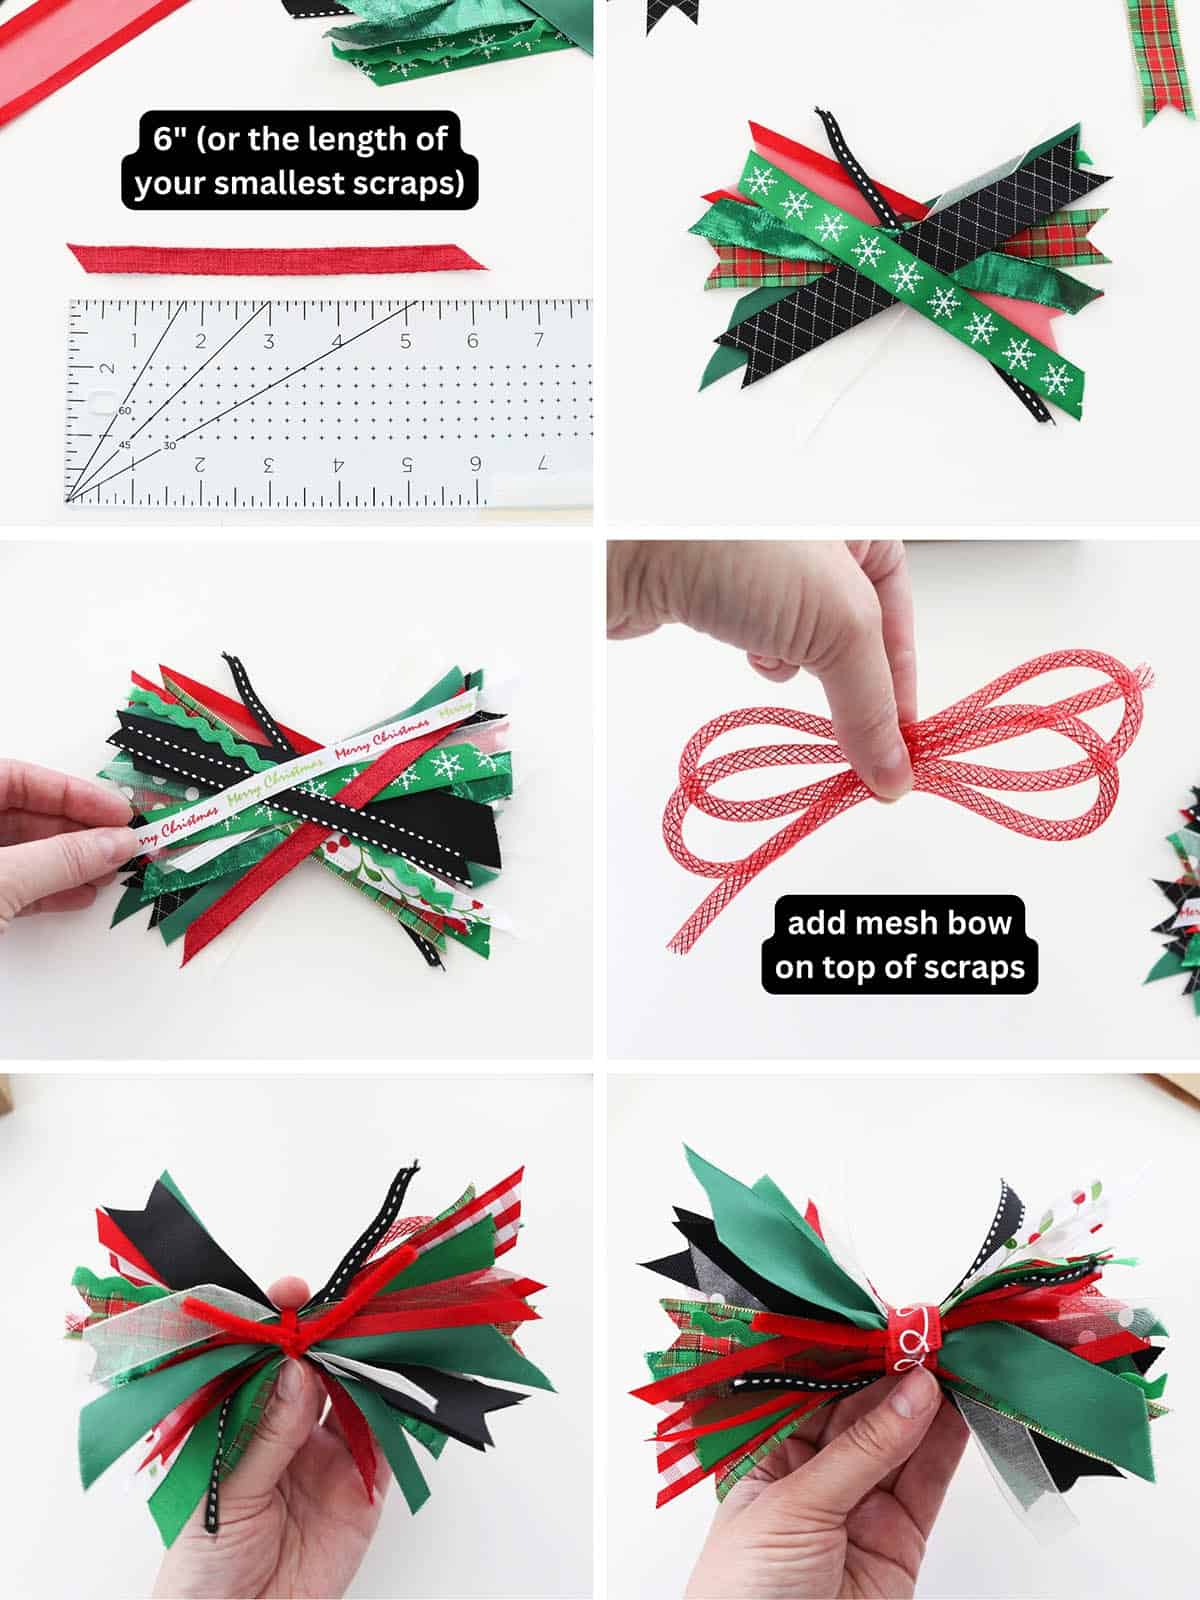
My smallest pieces were about 6 inches long, so I cut all the ribbons down to that size. I think it’s the perfect size for this bow.
After cutting, sort your scraps into piles by color. Then you can assemble your bow. Criss-cross the ribbons in an “X” shape, alternating the colors as you go.
You could leave the bow as is here and skip to the last step, but if you want to add a little extra texture and sparkle, you can make a double loop bow with some mesh tubing, which you can find at Dollar Tree. This bow is super easy to make: just loop it around to create the shape of a bow, pinching in the middle, then loop around again to create the double loops and trim the end.
Keep pinching the mesh tubing and lay it on top of your ribbons, keeping them in the “X” shape. Wrap a chenille stem around all of it and twist at the back. Straighten any ribbons as needed.
Grab another small scrap of ribbon that’s a couple inches long and hot glue it around the middle of the bow.
And ta-da! You have the cutest scrappy bow.
How to Make Ribbon Bows For Christmas
I hope you found these 12 bow making tutorials helpful! These bows are the perfect finishing touch for all your gifts and decor–during the Christmas season, of course, but also year-round.
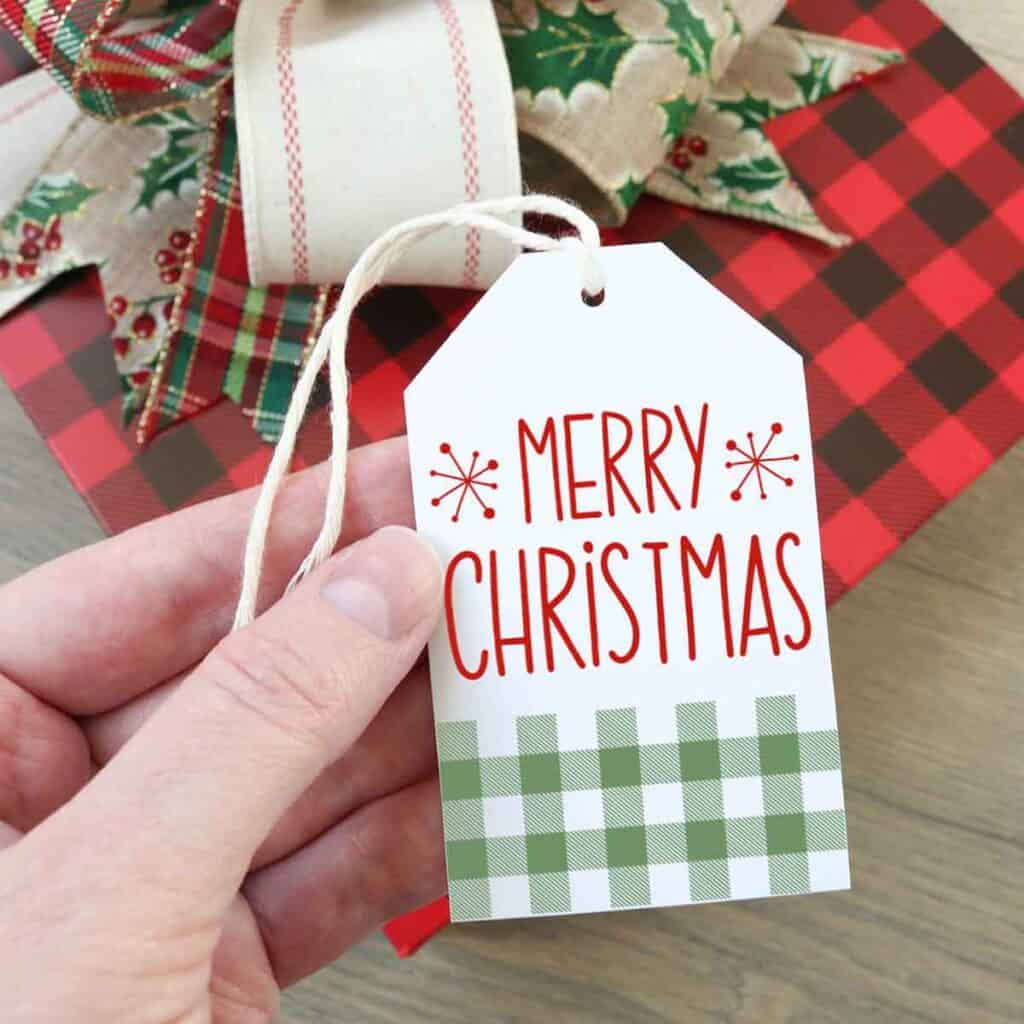
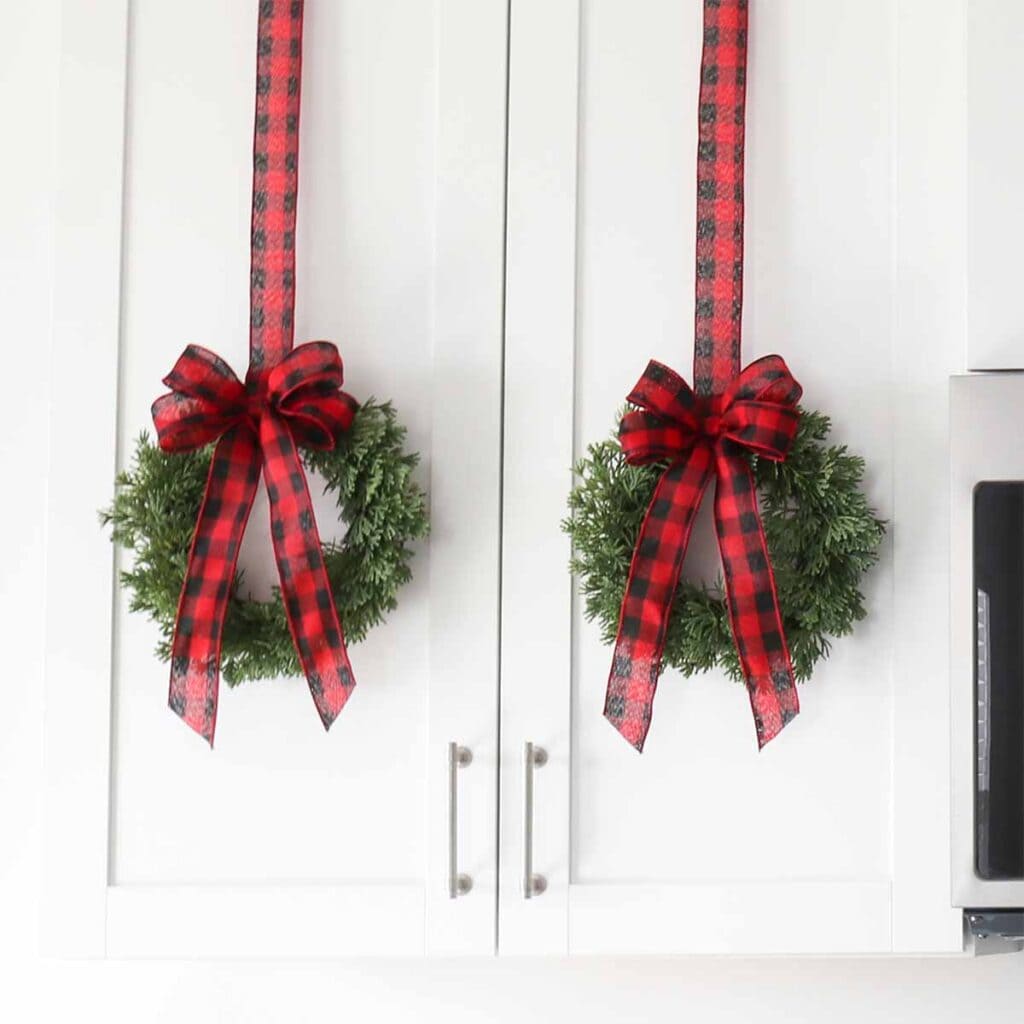
Don’t forget to check out my kitchen cabinet wreaths to see how I used these bows! And grab your free printable Christmas gift tags here!
Merry Christmas!

Don’t forget to pin and save for later!