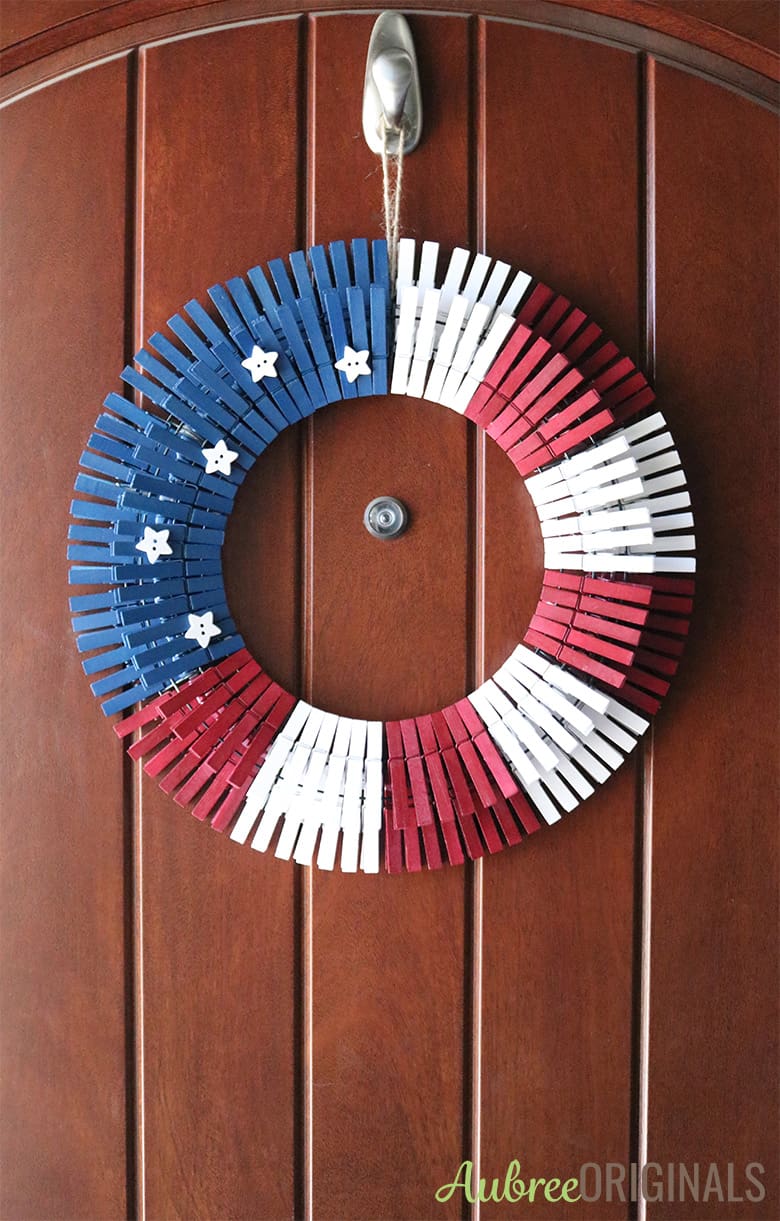
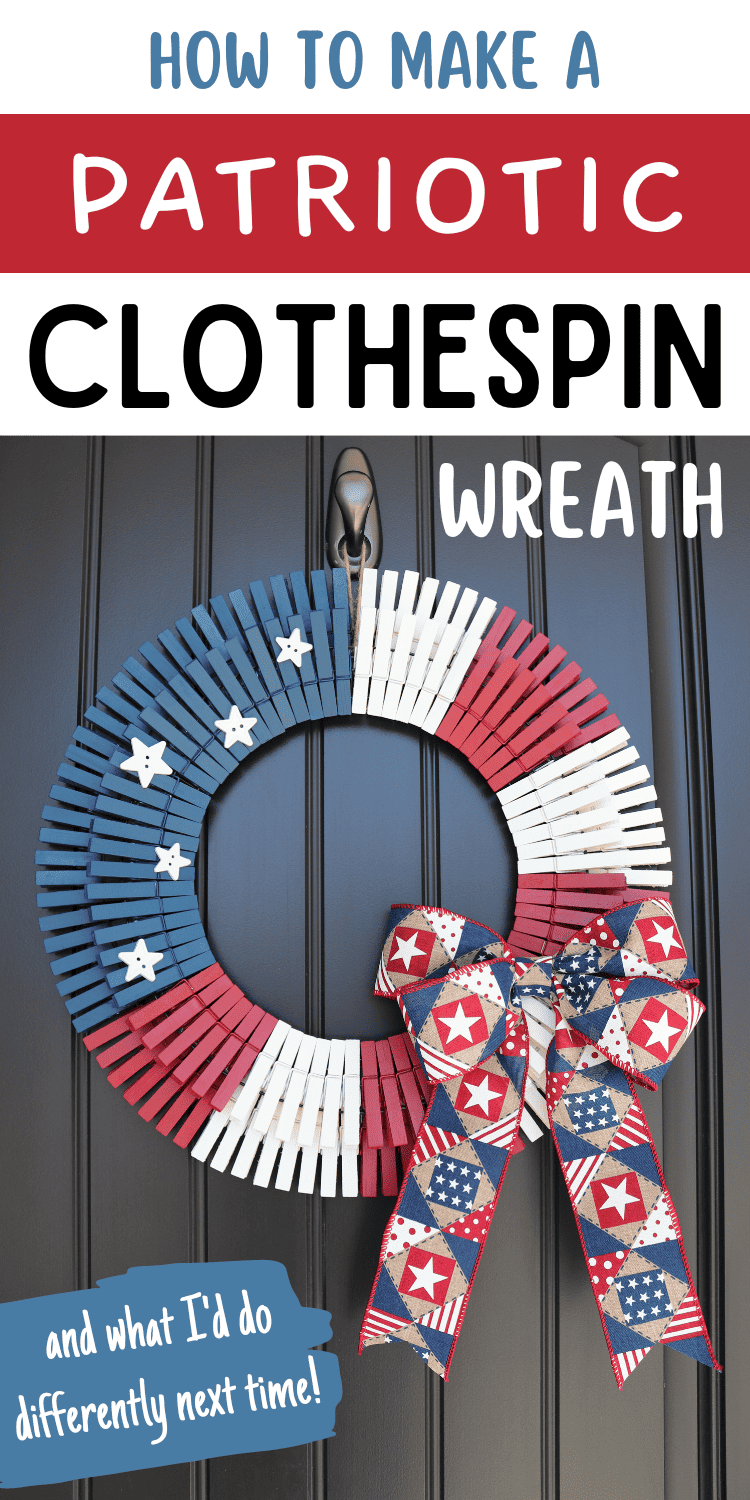
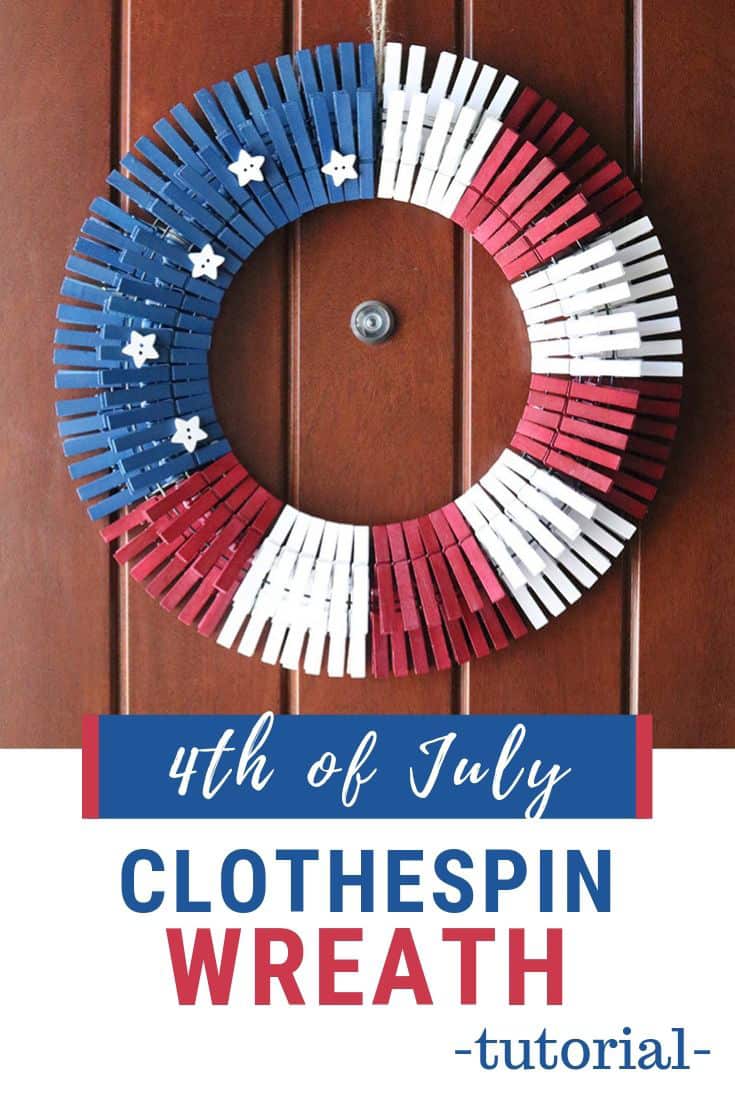
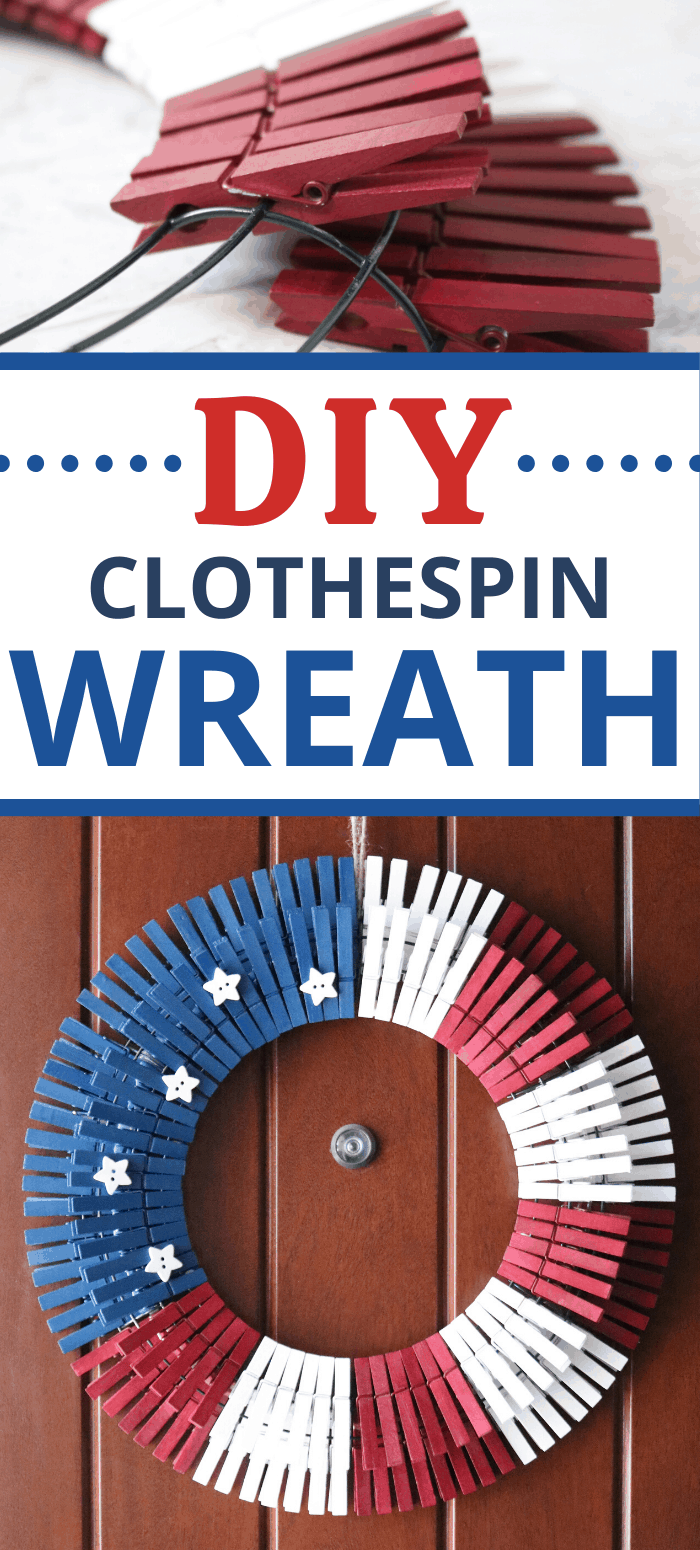
DIY 4th of July Clothespin Wreath: Easy Dollar Store Craft Project
This DIY Dollar Tree clothespin wreath tutorial will show you how to make a double layer clothespin wreath that you can copy for any holiday! Be sure to check out all my tips for painting clothespins, as well as reinforcing your wreath to make it stronger!
Dollar store crafts are the best! Because I’m all about cheap and easy. Crafts, that is.
This wreath is a little time-consuming (it’s a lot of clothespins to paint), but then it comes together super easily and will be so worth all your hard work! I promise, these wreaths are fail-proof and turn out gorgeous every time.
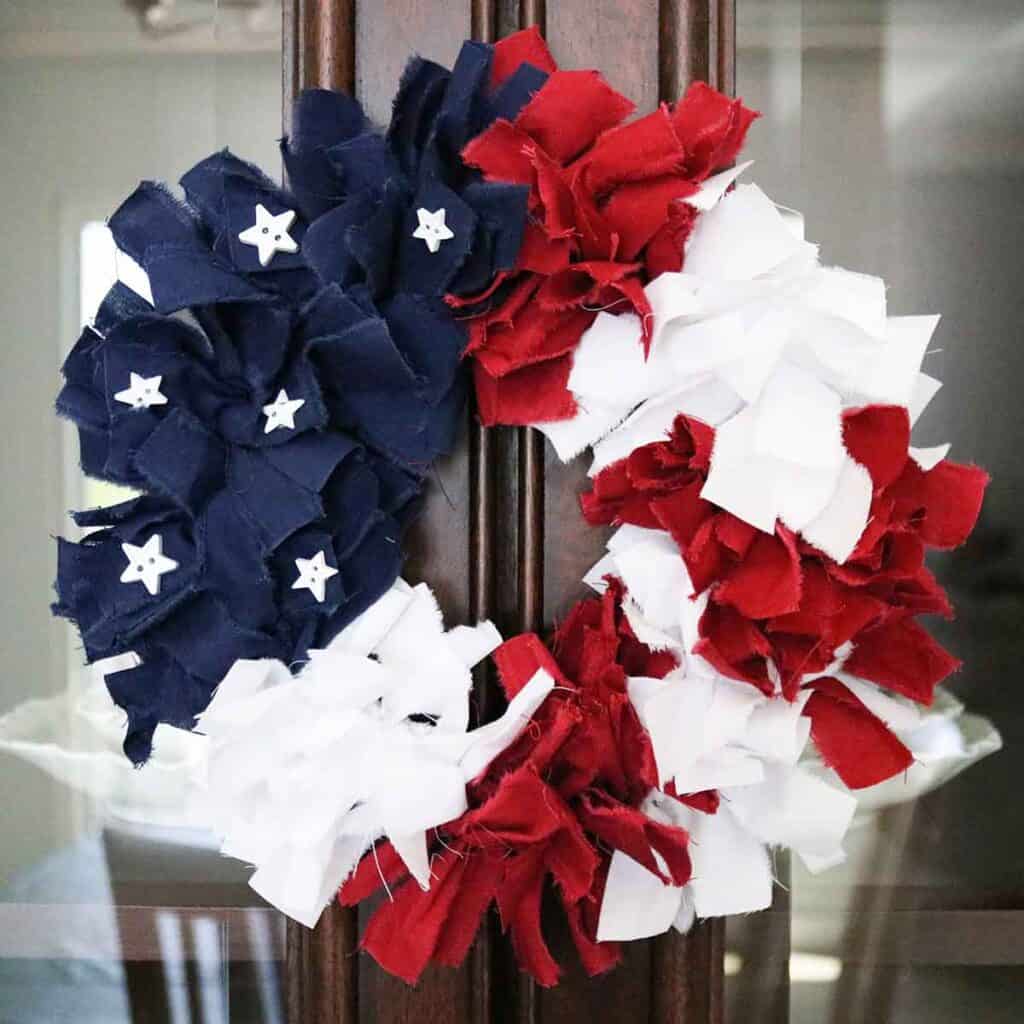
I love this patriotic flag clothespin wreath for the 4th of July, but feel free to change up the paint colors and decorations for any other holiday or season!
This post contains affiliate links. For more information, see my disclosures here.
More posts you’ll like:

What do you need to make a clothespin wreath?
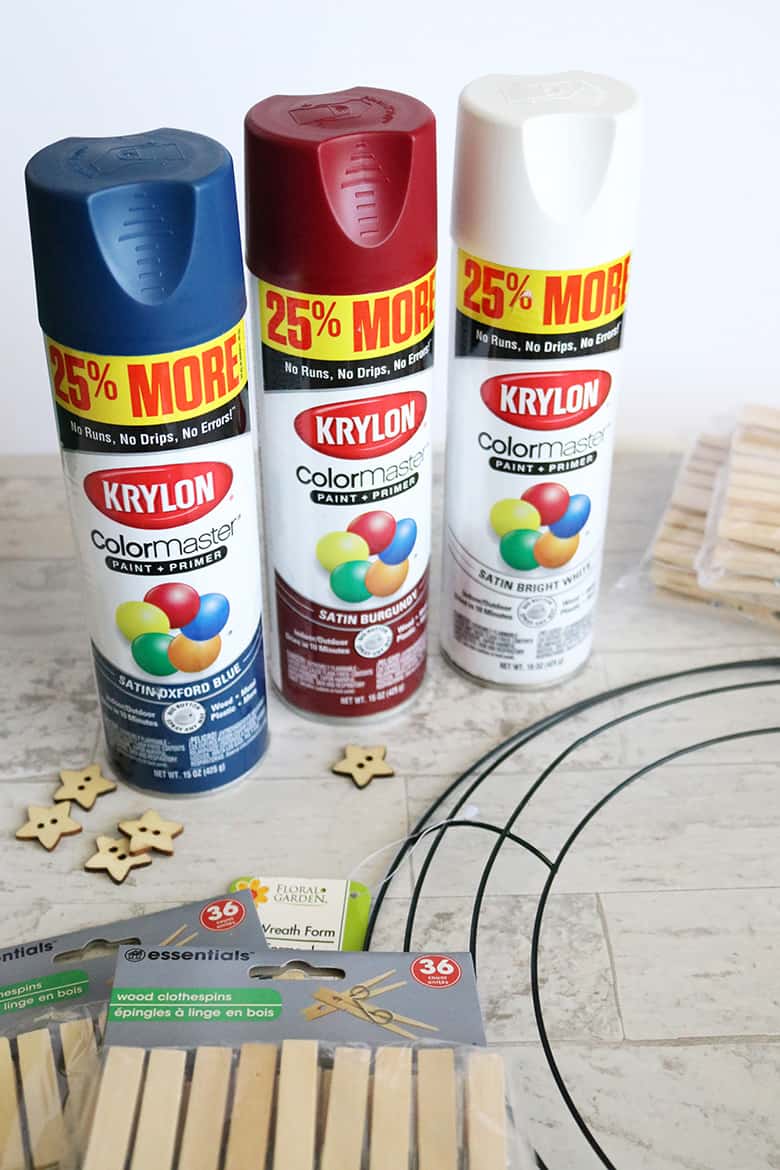
- clothespins: Buy these at Dollar Tree! They come in a pack of 36 for $1 (now $1.25…boo price increases!), which is the cheapest I found anywhere. Plus, they’re actually really great quality. Get 5 packs (you’ll have some leftover).
- a wire wreath form: I used a 14″ wreath form (also from Dollar Tree). You can use a different size, just make sure that the wreath form has at least 3 rings, preferably 4.
- paint: You can use craft paint or spray paint, but I definitely prefer spray paint–it’s gives you better coverage faster, and it also leaves you with a more professional looking finish (I try to find satin or matte spray paint). This is the spray paint I’ve come to really love for painting clothespins–it sprays really smooth and doesn’t seem to take as many coats as other brands!
- wooden stars, buttons, or other decorations you want to use (I used wired ribbon from this store to add a bow the second time I made this wreath)
- hot glue
- twine or ribbon for hanging
How many clothespins does it take to make a wreath?
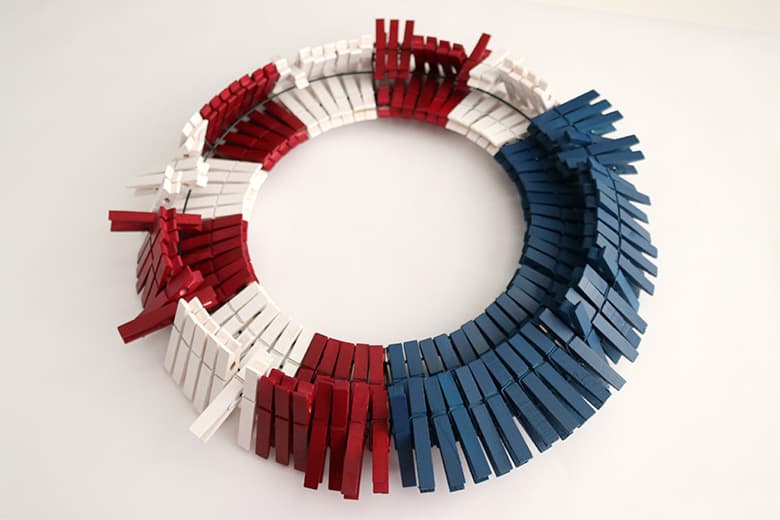
The number of clothespins you need for a clothespin wreath depends on how big your wreath form is and how many layers of clothespins you want to do. For this double clothespin wreath, I used a 14″ Dollar Tree wreath form and did a bottom and a top layer of clothespins. The first time I made this wreath, I used a total of 154 clothespins (52 blue, 50 white, and 52 red).
I have since made this wreath a second time (video below!) and used 162 (54 of each color–I must have pushed the clothespins a little tighter together in some sections so I ended up needing more).
If you’re buying your clothespins in the 36 packs from Dollar Tree, I recommend buying 5 packs.
New Video Tutorial!

Update: I’ve finally made a video tutorial for this clothespin wreath, so be sure to watch that for more tips! Plus, you can see how I made the adorable bow for my updated version of this wreath! This is my favorite place to buy ribbon for wreaths!
How to make a DIY clothespin wreath
Keep in mind while going through these clothespin wreath instructions that they can be applied to any holiday or themed clothespin wreath–you have tons of possibilities!
Paint the clothespins (and stars, if you choose)
The first step is to paint all your clothespins (and paint extra in case you get a dud or need more than you predicted). You’ll also want to paint any other optional decor you’ll be using, like the wood stars I used in my first wreath.
How do you spray paint clothespins?
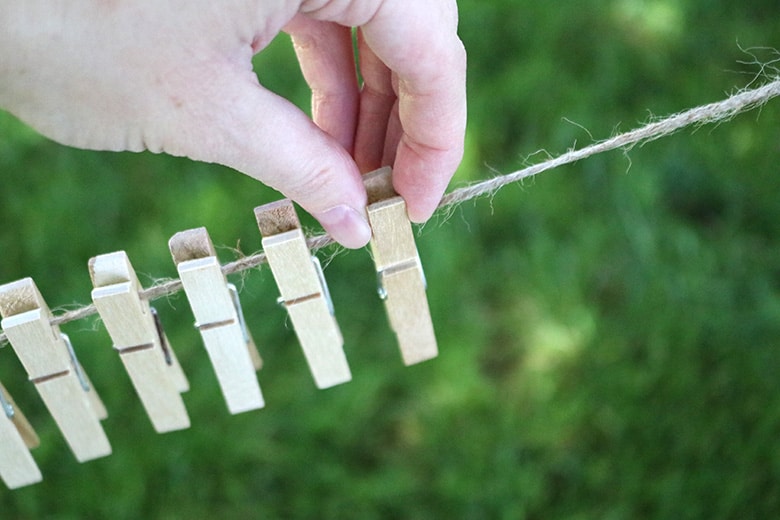
There are several different ways you can spray paint clothespins–and you may have to try a couple to get in all the nooks and crannies of your clothespins (let’s be honest…clothespins aren’t the most fun things to paint).
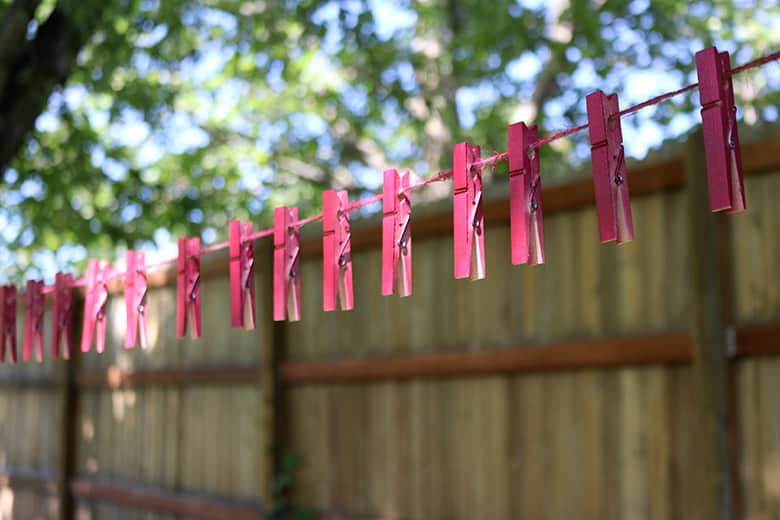
First, I clipped all the clothespins on a string and suspended the string between two trees in my yard–if you do this, just be careful not to accidentally spray paint anything else…ahem, like your fence).
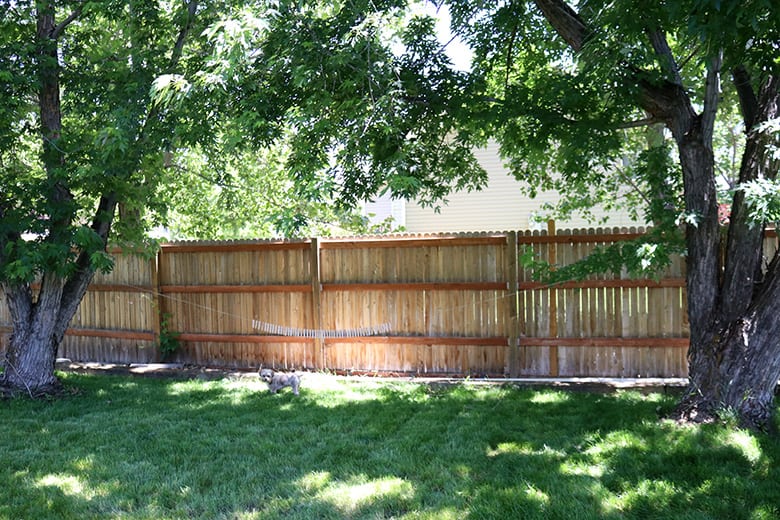
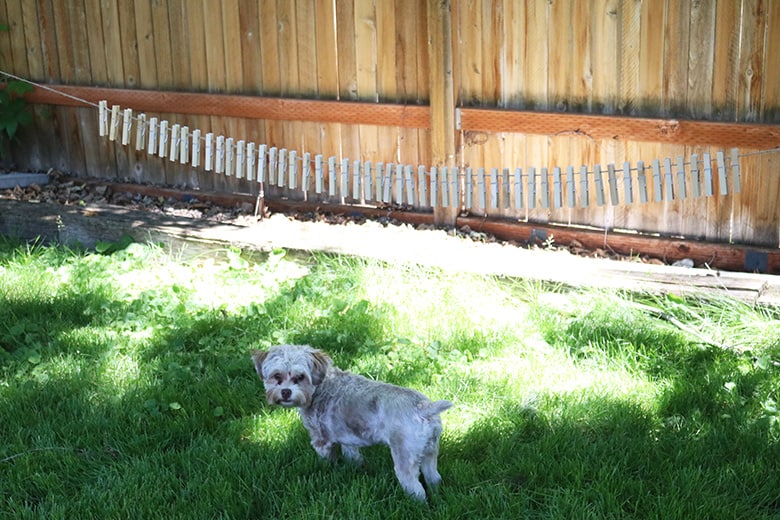
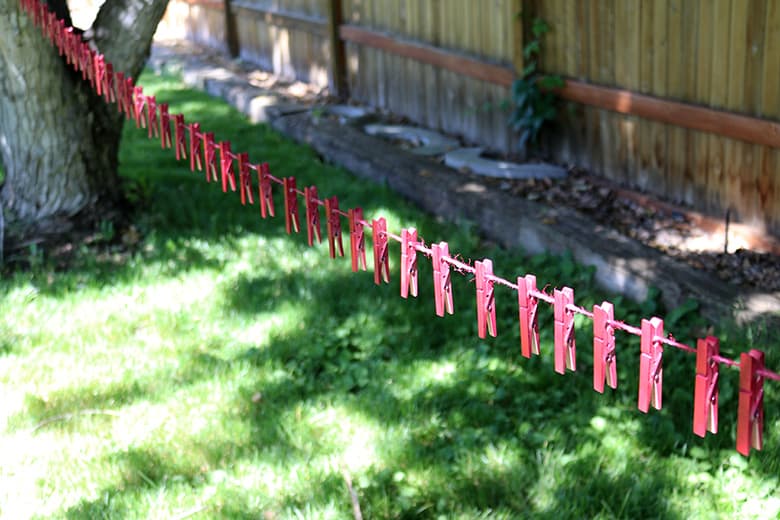
This method works great for getting the first coats on your clothespins. However, it gets a little tricky to get the underside fully covered.
So, after painting a couple quick coats on the clothesline (if you use light coats, you only have to wait a minute in between), I took it down and laid the clothespins on a piece of cardboard. I found laying the clothespins on their sides was the best way to get in between all the places I’d missed.
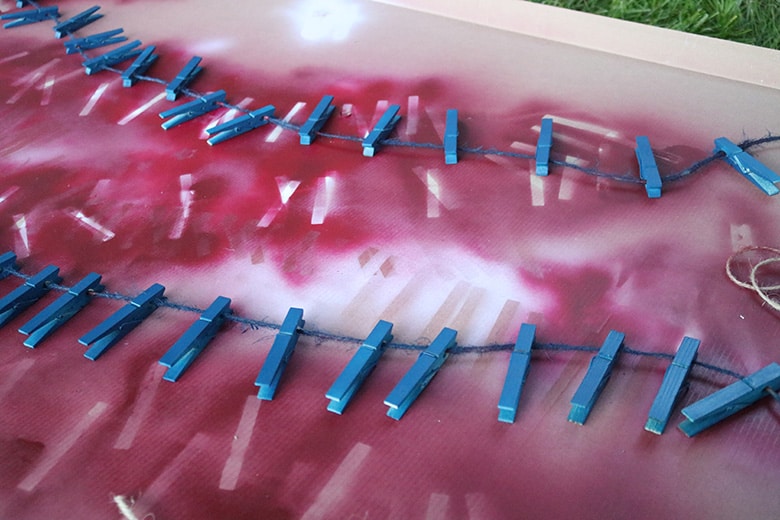
The second time I made this wreath, I used cardboard boxes, clipping the clothespins to the flaps. I painted them this way for awhile and I got most of the exterior parts, but the cardboard is kinda thick which keeps you from being able to access the insides of the clothespins.
So then I halfway pulled the clothespins apart (you could pull them all the way apart but then they’re kind of tricky to put back together), laid them on some cardboard, and painted each side that way.
My most favorite way to spray paint clothespins (I realized much later) was using an extra wire wreath form I had on hand, clipping about 25 at a time to that (with plenty of space in between each clothespin), and rotating it in my hand while I sprayed. This is actually a pretty smart way to spray paint clothespins because you can see exactly what they’re going to look like when clipped to your actual wire wreath form (and you can better see if you missed any parts). If you go with this method, just wear a glove to protect the hand holding the wreath form and don’t get too close with the spray paint (to avoid heavy coats and drips).
It’ll probably take you the course of a day to get all your clothespins painted. But maybe less if you’re more patient than me and use lighter coats like you’re supposed to. Seriously, keep the recommended distance and don’t get heavy-handed and you’ll be able to do another coat sooner (this is what I always tell myself…after I’m forced to wait hours for sticky spray paint coats to dry 😆).
How to make a patriotic flag clothespin wreath
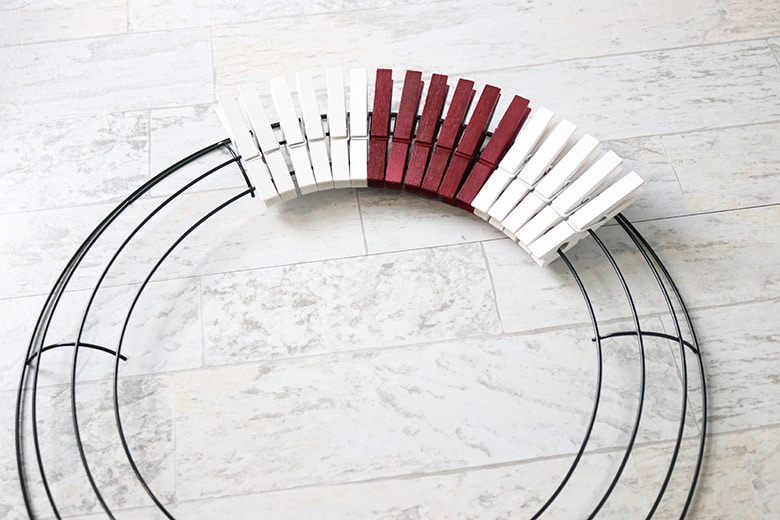
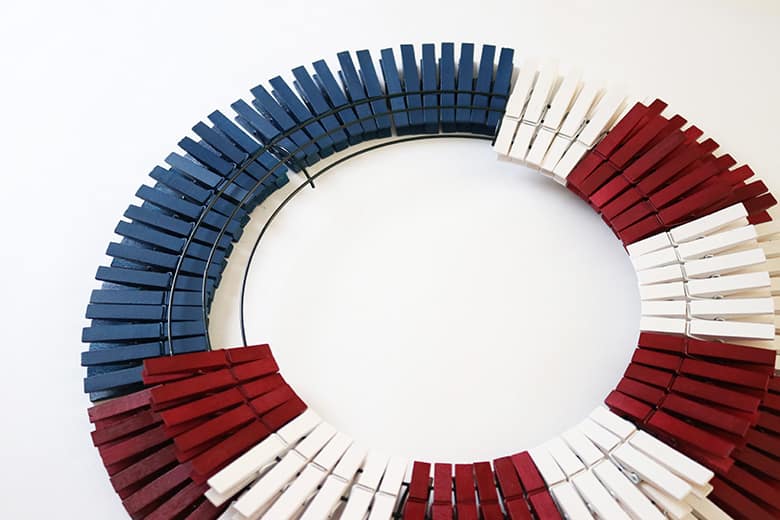
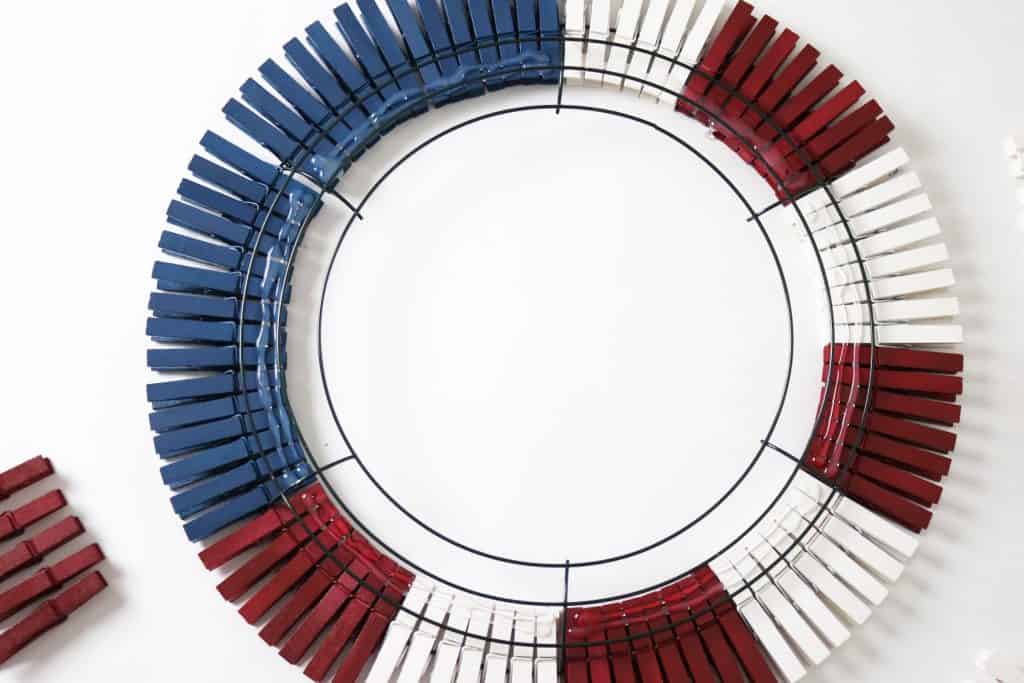
My wreath form was divided into six sections. I decided I wanted two of the sections to make up the blue part of my “flag” pattern. For the stripes, it wasn’t coming out exactly even the way I wanted, so I just played with it until I found what looked good to me (either 5 or 6 clothespins within a “stripe”).

As you can see, the first layer of clothespins gets clipped onto 2 wires. Push the clothespin down almost as far as it will go until you find a “sweet spot” that feels secure.
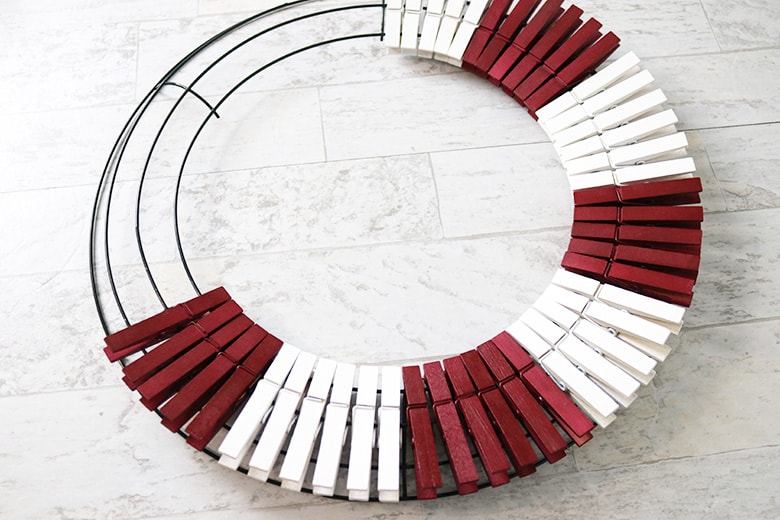
Once you’ve figured out the top layer of your stripes pattern, you can start on the bottom layer:
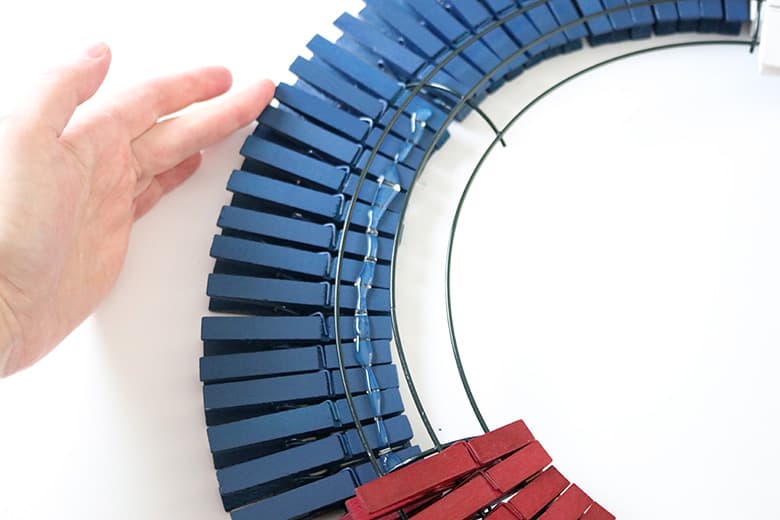
The bottom layer of clothespins gets clipped onto the outermost wire (again, finding that “sweet spot”). Since it’s only one wire, it won’t be as secure, which you’ll see in a second. But, fear not, there’s a solution.
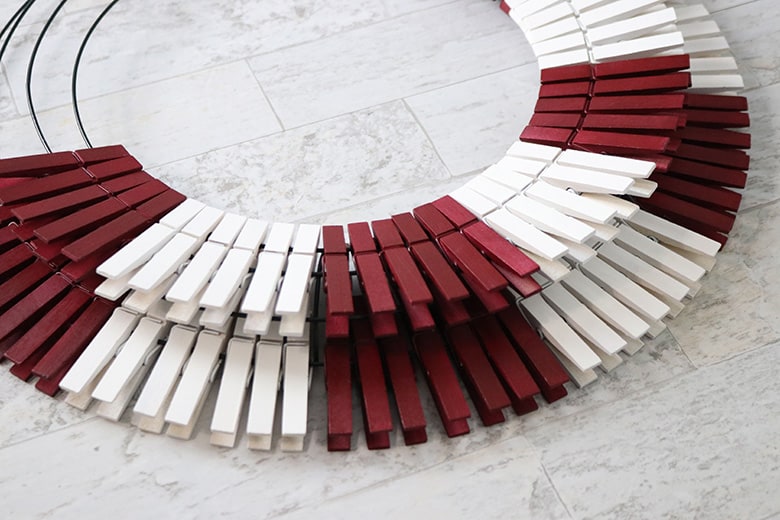
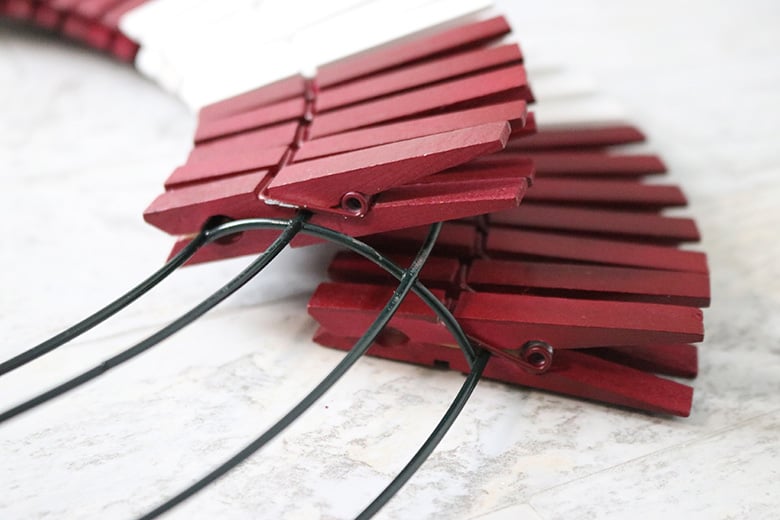
Once you’ve got all your clothespins on the wreath form, it looks pretty awesome, right?
I agree. But…then you flip it over and might be terribly bugged by how insecure and “flippy” the bottom clothespins are:
Me too. Which brings us to the next step…
Secure the clothespins on the wreath form with hot glue
I was having the hardest time figuring out a solution to the flippy clothespin problem (pregnancy brain) and I was super worried my wreath wouldn’t turn out. But then Jared came in and said, “just hot glue it.” Oh. Yeah. I could do that.
First, take off the top layer of clothespins. I know, I know, all that hard work down the drain…for a second.
I was very picky in how I originally arranged the clothespins, so I carefully laid them out in the exact order so I could later return them exactly how they were (I’m way too OCD).
Run a bead of hot glue over the bottom layer of clothespins–where it will be hidden by the top layer. Your wreath form may be different, so do what you can to find a spot that won’t be seen.
(This is where you’re going to want that extra paper or cardboard to protect your work surface from any hot glue spills.)
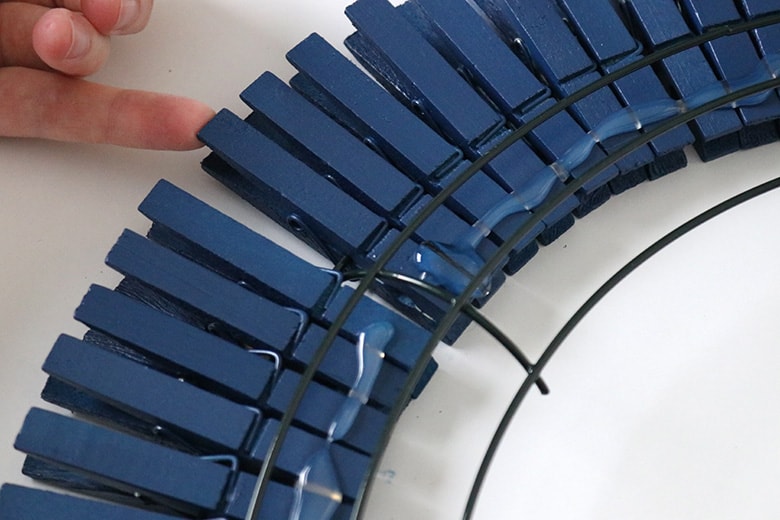
Continue removing the top clothespins and gluing around the bottom layer of clothespins. I ended up going all the way around a second time for good measure.
If you feel like your wreath is secure, great! You can stop here. However, I felt I needed to glue in between the sections, too. Just carefully angle your hot glue gun underneath the wire and add a larger-than-normal bead of glue.
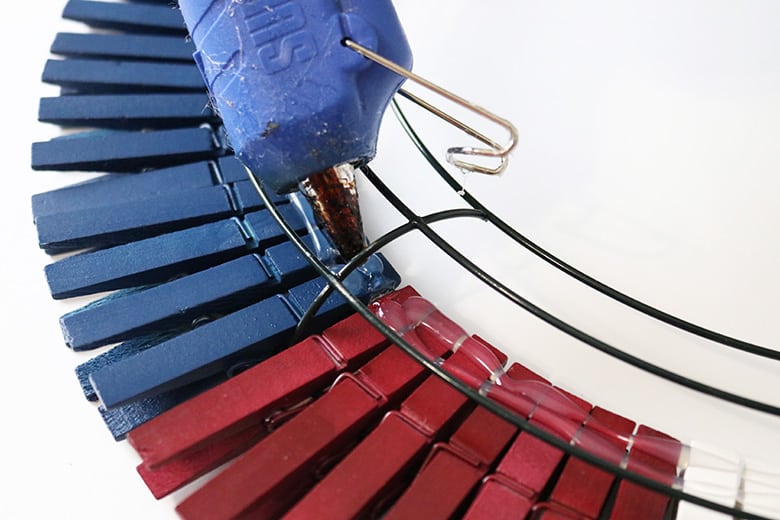
The hot glue may fall down in between the clothespins and land in a puddle on your work surface. That’s okay. That’s why you have the paper underneath.
I totally glued my wreath to the table in a few spots. But I just tore it off the paper once it was dry and no harm done (no one cares what the underside of the wreath looks like). And, even if the hot glue does puddle this way, it will still secure those sections of clothespins together. If you have any giant hot glue blobs that you want to make smaller, though, just wait ’til it dries and trim with scissors.
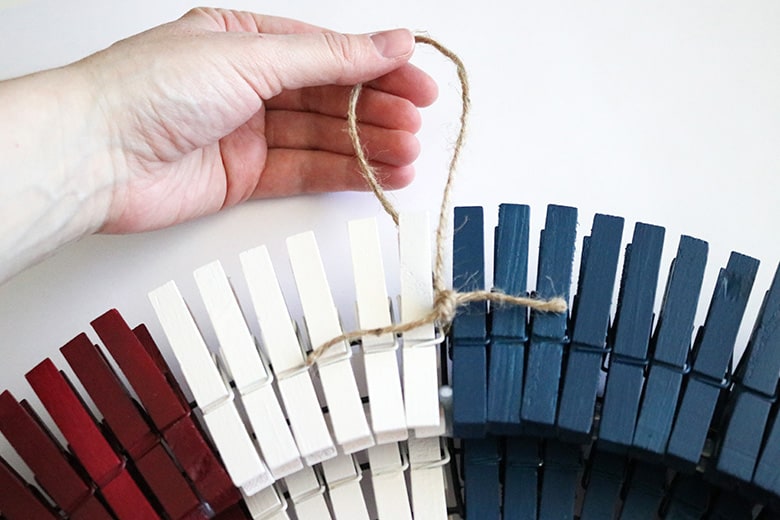
How to hang a clothespin wreath
Once you’ve secured your bottom layer with hot glue and it’s dry, return the top layer of clothespins to their spot. (If you feel like the top layer is wobbly, you could do something similar, carefully gluing the underside so the glue isn’t visible. I decided my top layer was secure enough as it was.)
Now you can hot glue your painted stars to the clothespins and add any other decorations you want.
To make a simple door hanger, tie a loop of twine or ribbon around one of the wires of the wreath form and knot it at the bottom.
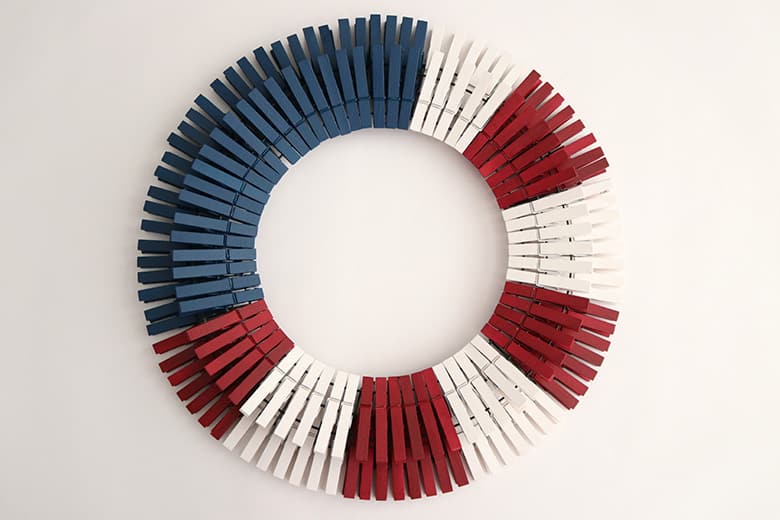
And you’re finished!

I love how it turned out! And it was such a satisfying craft project–definitely a wreath even the most timid of us wreath-makers can easily do! I hope you make one!
Want another easy 4th of July craft (but one that’s a lot less time-consuming)? Try this easy felt star garland!

Don’t forget to pin and save for later!
Could you please advise the size of the clothespins? I bought some from Walmart but they are only 3” tall. I’m not sure they will work. Thank you!
Hi Pam! My clothespins are just slightly less than 3 inches tall so you should be good to go! 🙂