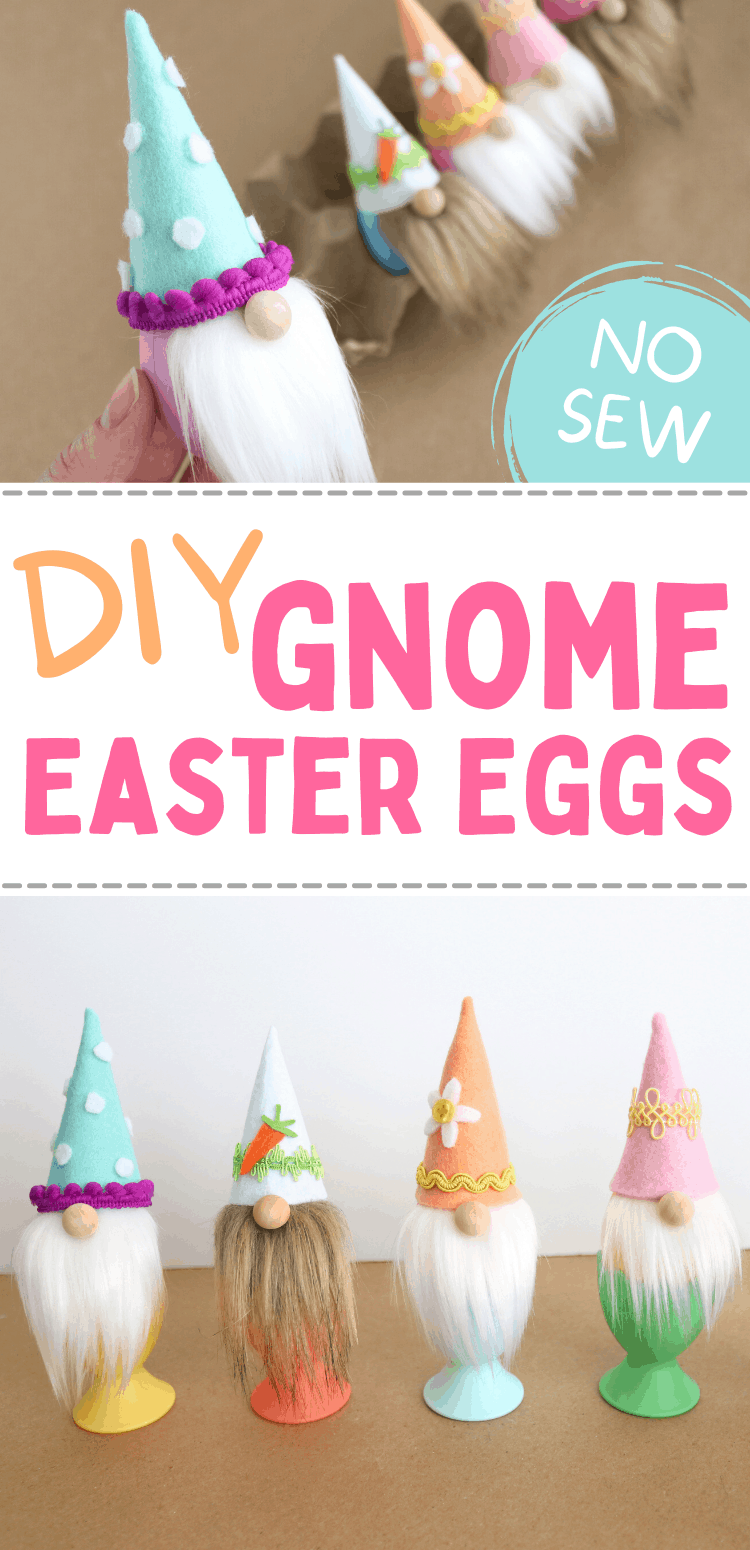
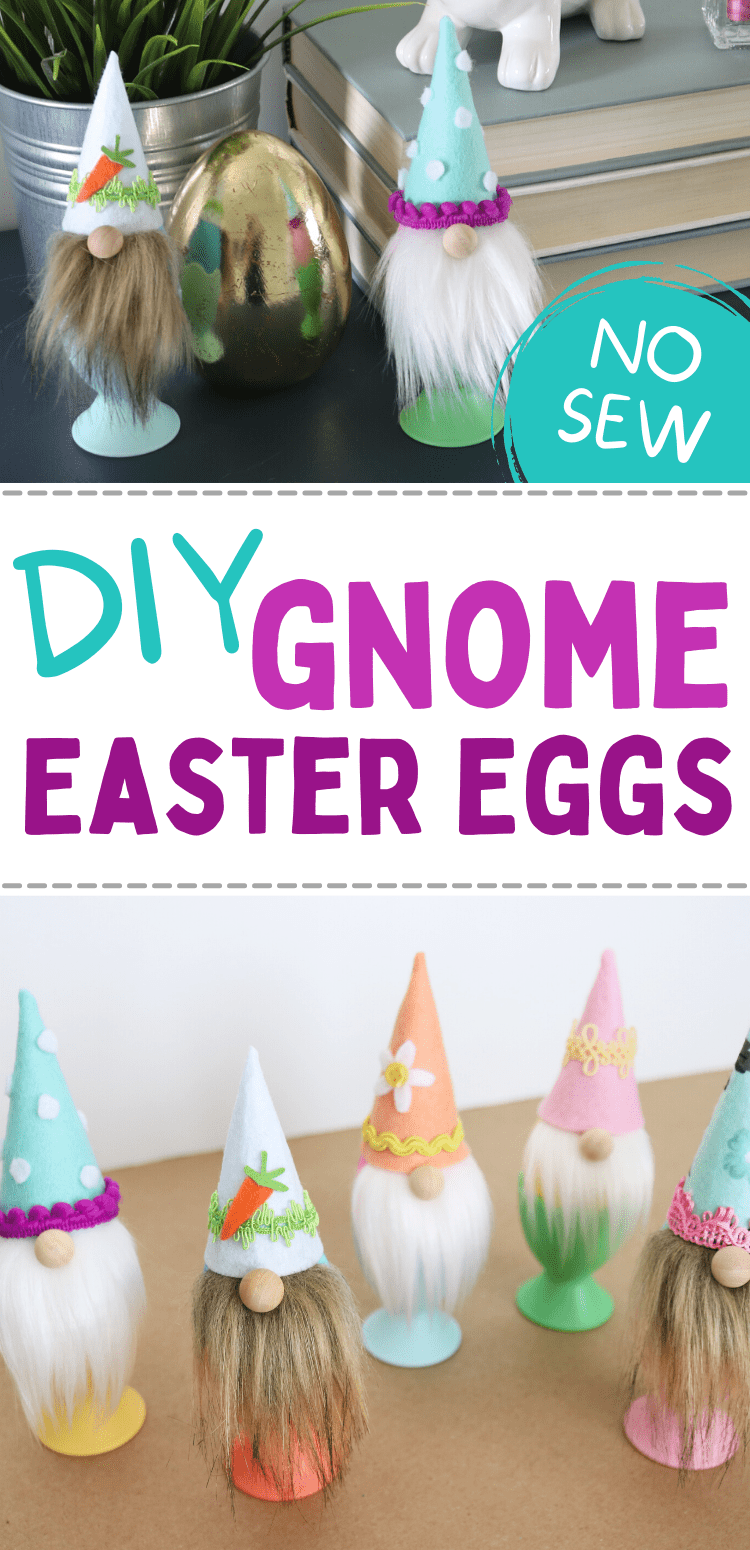
Easy DIY Gnome Easter Eggs Craft
If you’re looking for a unique way to decorate Easter eggs, these gnome Easter eggs are so fun! Learn how in this step-by-step video tutorial!
Gnomes are my favorite. I love that you can use them in your decor for any holiday (they’re just festive little guys, really), but I think they’re especially great in spring crafts.
I’ve actually had all the supplies to make gnomes for awhile now, but then I just barely had the idea to turn craft Easter eggs into little miniature gnomes.
And. They’re. Adorable.
I hope you love them. You’re about to see just how easy they are to make! You’ll have an entire gnome family in no time!
This post contains affiliate links. For more information, see my disclosures here.
What You Need to Make Gnome Easter Eggs
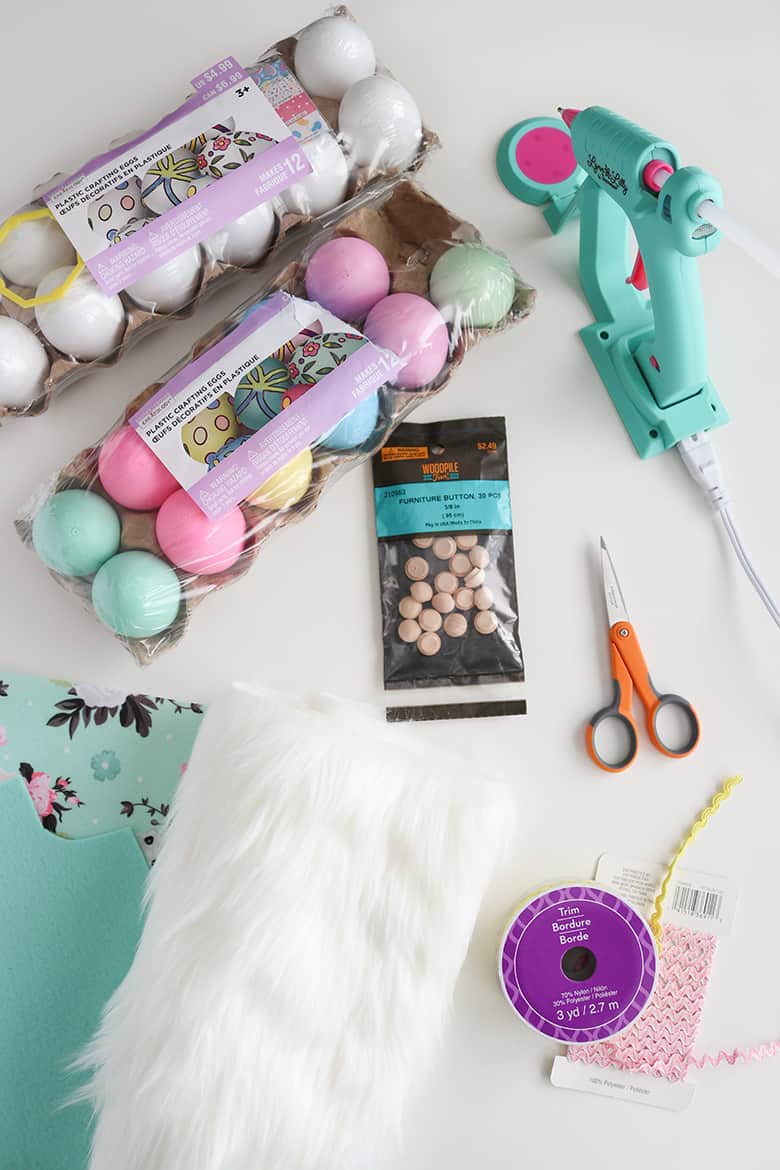
- plastic craft Easter eggs: I found mine on sale at Michael’s, white or colored both work
- felt for the hat: I prefer thicker or stiff felt, but if you use the regular/floppy felt then you may also want a small amount of polyfill stuffing (more on this later)
- fur for the beard: you can find pre-cut fur at the craft store near the felt or chenille stems, but buying it by the yard is usually a lot cheaper–I bought 1/4 yard of white fur (and some of brown) from Hobby Lobby
- various trim and other decorations you want to use for the hat
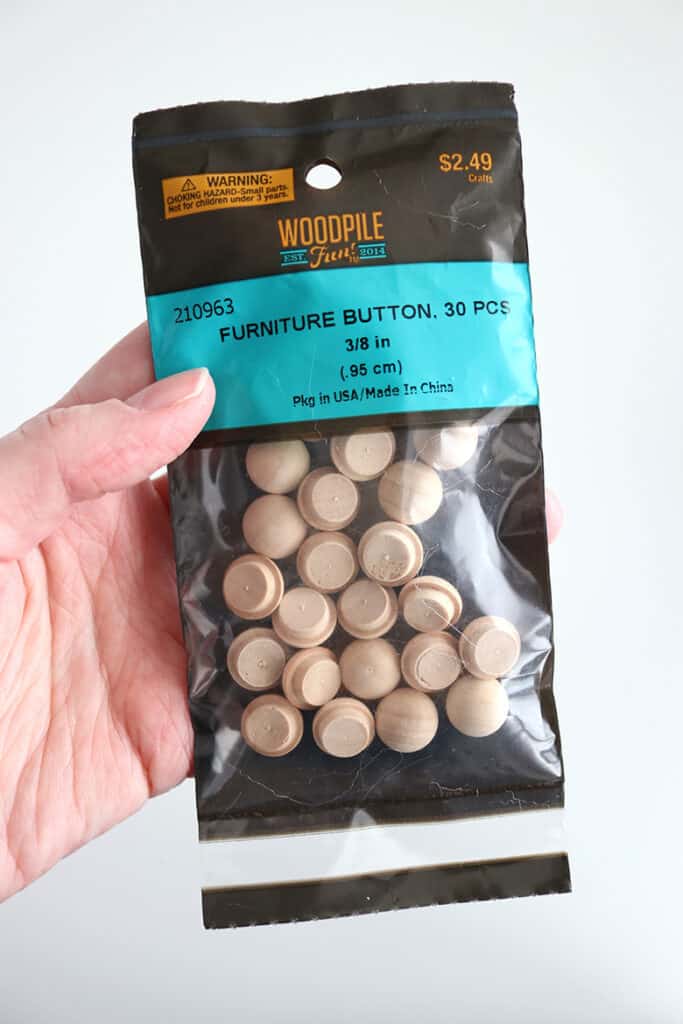
- something for a nose: I found 3/8″ furniture buttons at Hobby lobby in the wood section and they worked perfectly!
- scissors
- a hot glue gun: you’ll want a glue gun with a fine detail tip and good control, I’ve been loving my Surebonder glue gun (I bought the Lynn Lilly version of this glue gun direct from Surebonder because the colors are adorable!)
- gnome hat template: either download and print the template below, or use my template in Cricut Design Space if you want to use your Cricut
How to Make Gnome Easter Eggs
I put together a video tutorial because sometimes it’s just so much easier to explain in a video (but you can also keep scrolling for the written version).
If you make it all the way to the ends of my videos, I usually reward you with some dorky commentary 😂: it’s the hazards of video editing late at night. And having a mom brain, that also doesn’t help.
If you want to see more videos like this, you can subscribe to my YouTube channel here! (Video editing takes a lot of work, so I super appreciate the positive feedback!)
How to Make the Gnome’s Hat
If you’re cutting by hand:
Print the template at 100% scale. The template has a 1 inch test square you can measure after printing to make sure you printed it correctly.
There are 3 different hat sizes: short, medium, and tall (I used medium and tall–I thought the small ended up looking more like a party hat than a gnome hat…but I left it just in case). Cut out the hat(s) you want to use, trace them with a disappearing fabric marker onto your felt, and cut them out.
(The template also includes an optional flower decoration that I used on one of the hats, feel free to cut that out from felt as well.)
If you’re using your Cricut:
Head to my template/project in Cricut Design Space. Again, there are 3 different hat sizes and an optional flower decoration.
Load your rotary blade into your *Cricut Maker. Mount your felt onto a FabricGrip mat. (If you want to know the most amazing Cricut hack to protect your mat from felt, line it with a sheet of transfer paper, sticky side up, before mounting your felt! When the transfer paper has lost its stickiness or is too cut up to use anymore, replace it with another sheet—way better than ruining your mat with all the felt fibers!)
Set your base material in Design Space to the type of felt you’re cutting, and then press Go. (If you set the material to stiff felt, it’ll have you use the fine point blade. I personally prefer the rotary cutter, though, so I set it to acrylic felt each time. Just personal preference.)
*If you don’t have a Cricut Maker, I think there are still ways you can cut felt with the Cricut Explore…but you could also just have your Explore cut out the template on cardstock and use either the pieces or the cutout as a template to then trace onto felt.
I LOVE love my applicator and remover set anytime I’m working with fabric or felt with my Cricut! The brayer is great for rolling anything onto a mat, and the remover/tweezer tool is great for carefully removing pieces without damaging your mat with the oils from your hands.
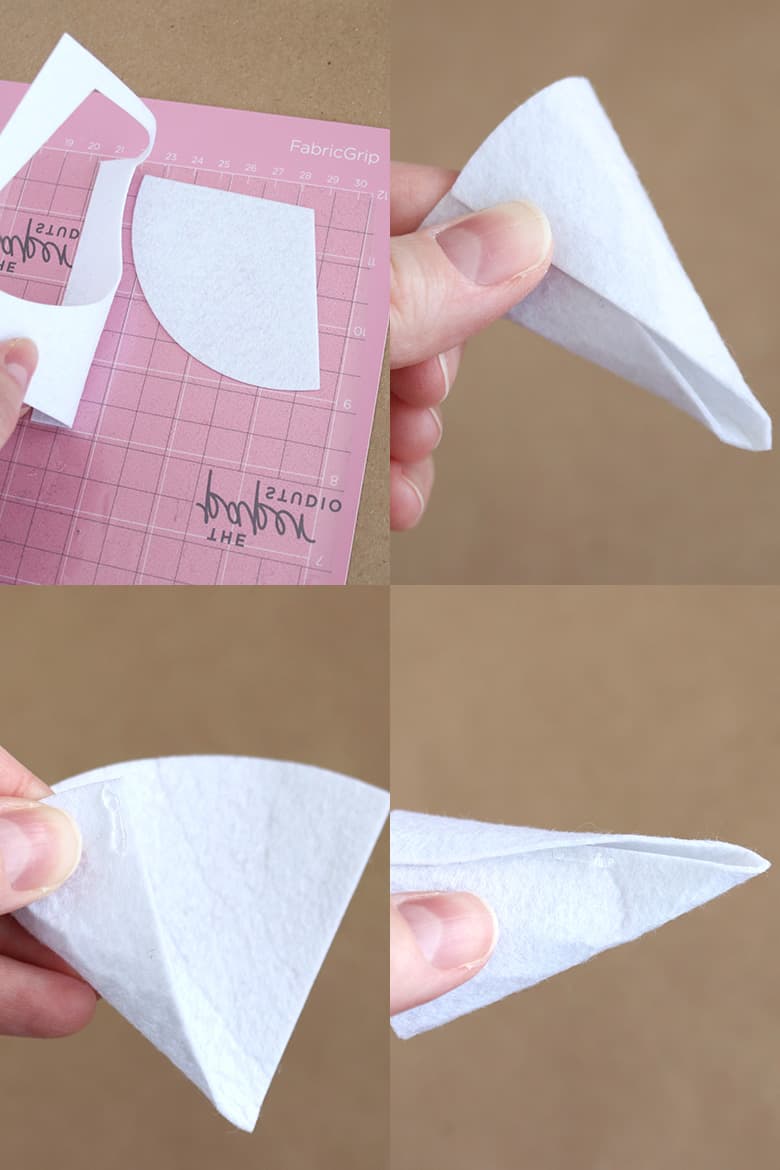
Once your hat is cut out, fold it to form a cone shape and carefully hot glue it a little bit at a time. My glue gun is a high temperature glue gun, but the glue seems to dry and cool fairly quickly, which is nice. If yours doesn’t, be very careful not to burn yourself!
As you’re gluing, try to keep the base of the hat lined up straight. Press the felt together until it stays, but make sure you’re not accidentally gluing the back of the hat to the front of the hat because hot glue tends to seep out sometimes. If it does, just separate it before the glue dries completely.
When you get to the tip of the hat, I’ve found it slightly easier if you apply the glue to the outer flap. But either way, it’s still kind of tricky so you may just have to play with it a bit. If you mess up, let the hot glue dry, and use scissors to carefully cut it off the felt and then try gluing it again.
When you’re done, if you have any hot glue spillage (I think that’s a word), again, let it dry, and cut it off with scissors.
How to Make the Gnome’s Beard
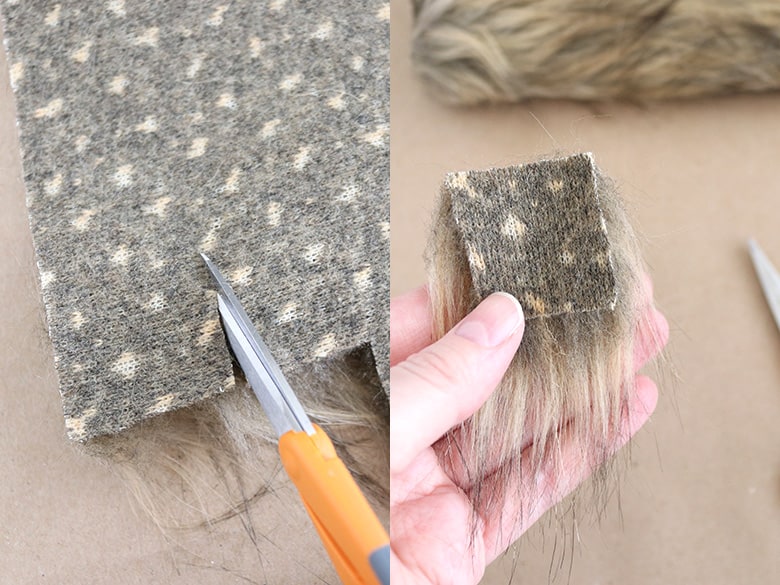
If you’ve never cut fur before, you’re actually going to cut it from the back, only cutting the rough backing part, not the actual fur hairs. This keeps your fur in tact and reduces mess (though, you’ll probably still end up with fur on your craft table and clothes—just one more reason why I keep a lint roller in my craft room).
Roughly measure the width of your egg to see how wide to cut the beard—I cut mine about 1.5“ wide.
You can cut your beard as short or as long as you want, I’ve found that between 1 and 1.5” high is good. Clean up the edges by pulling away any stray hairs. And feel free to trim the bottom of your beard if needed.
How to Assemble Your Gnome Easter Egg
Before gluing anything to your egg, check to see if your egg has seams (if you’re using a plastic craft egg). This may or may not matter to you (especially since most of the egg is going to be covered anyway), but I just like to keep the seams on either side of the gnome’s face.
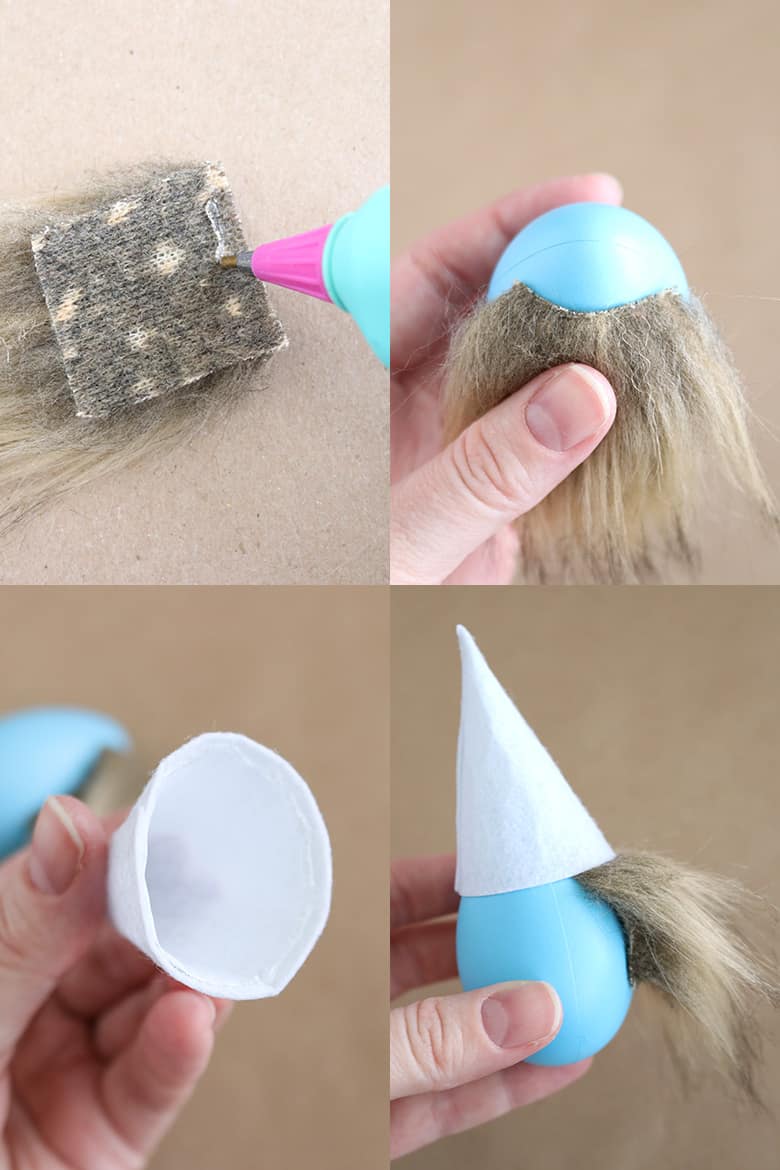
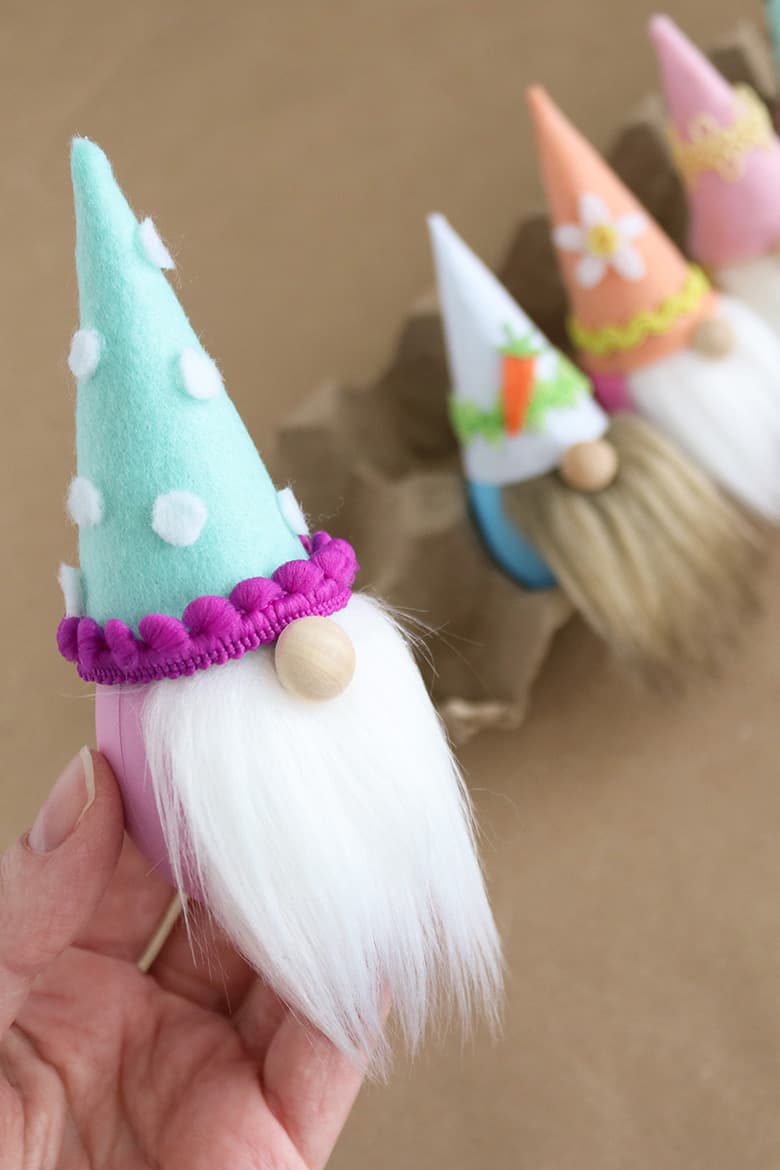
Apply a strip of hot glue to the top of the beard and press it to the front of the egg. Make sure you’re placing the beard high enough that the hat will be able to overlap it slightly.
Add a second strip of glue to the bottom of the beard and press it to the egg.
If you used non-stiff felt for your hat, stuff it with some polyfill stuffing (a wooden chopstick helps to push it to the tip–this is another of my random useful things I keep in my craft room). This will help the hat to stand up so it doesn’t collapse. Remember that you need to leave room at the opening for the egg–don’t overfill the hat. If you used thicker or stiff felt, you shouldn’t need to use polyfill but you’re welcome to if you think your hat needs it.
Apply glue to the inside of the hat and place it on the egg, overlapping the beard. While doing this, check that the hat is straight up and down on the egg (look at it from the sides and also the front–it’s easy to get crooked).
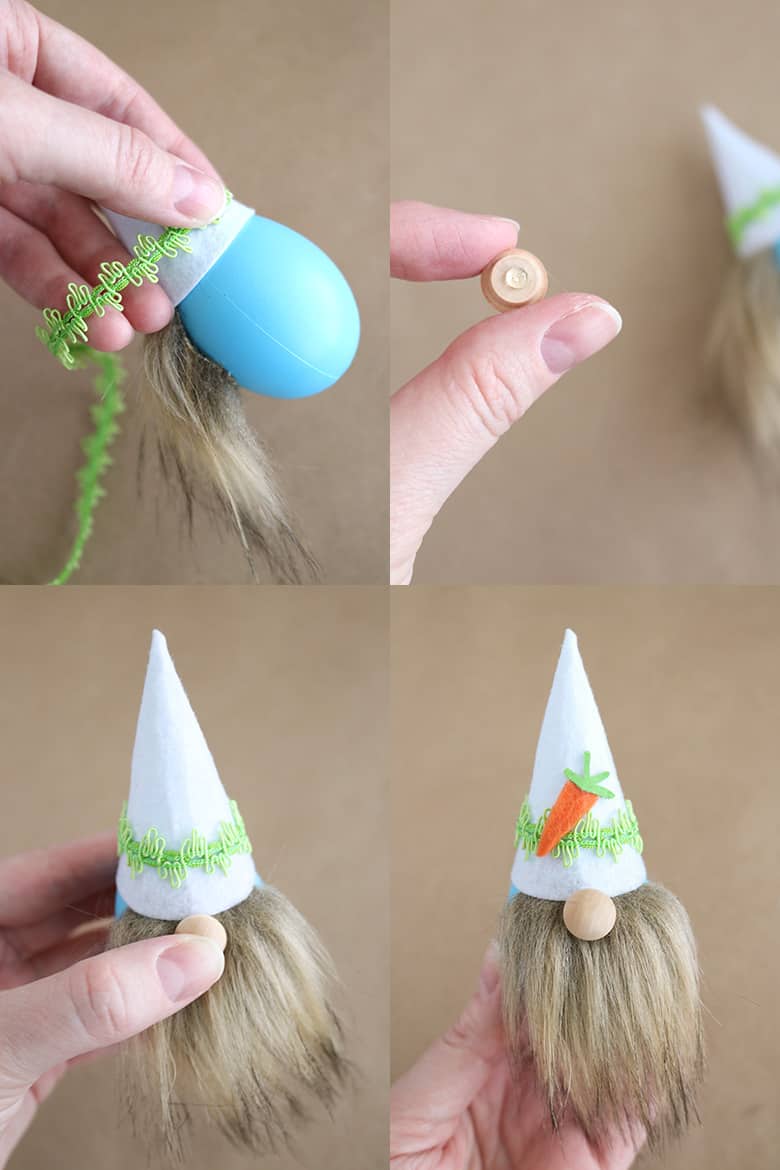
Next, glue on any trim or decorations you want to add to the hat. If you’re using trim, start from the back of the hat so your ends meet at the back.
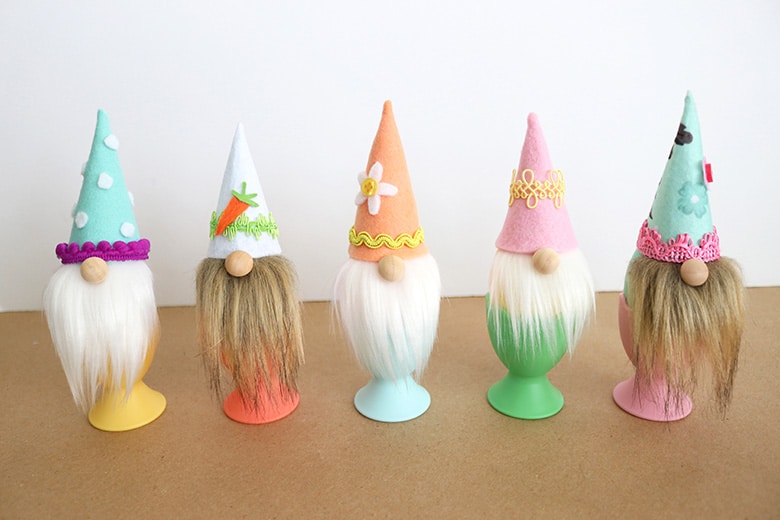
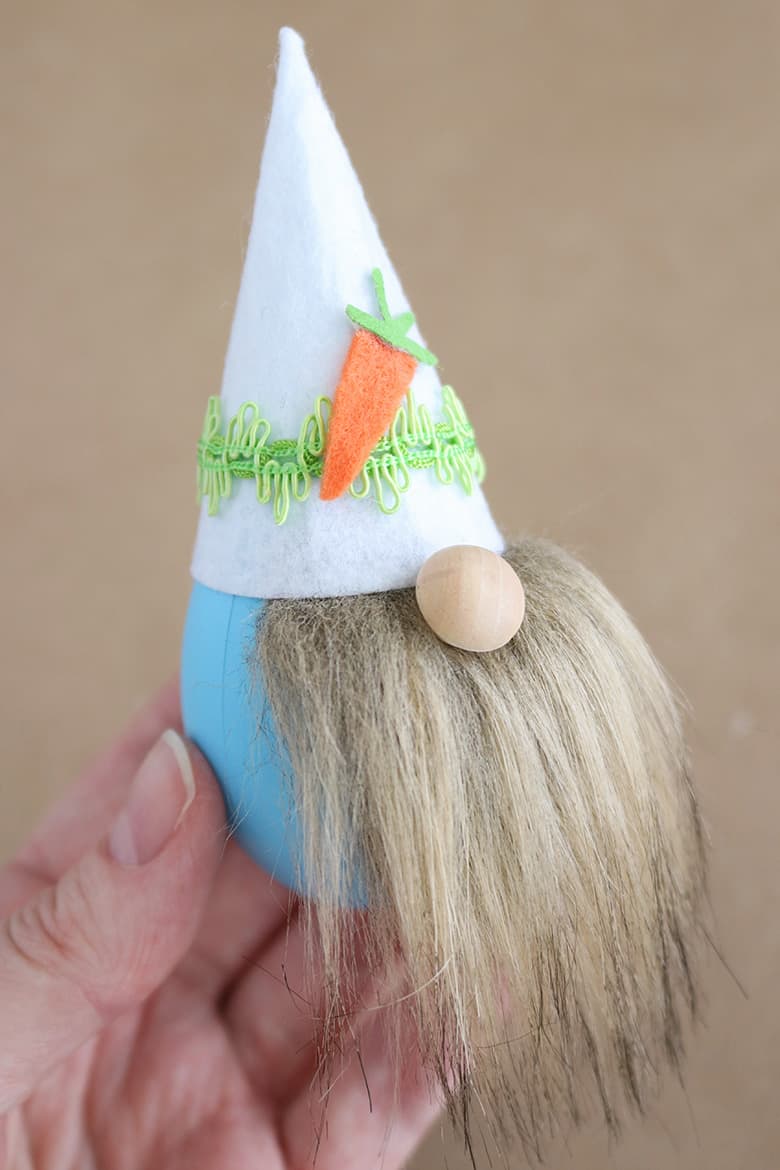
You can add felt decorations, flowers, buttons, sequins, or anything else you want. I hand-cut a small carrot from orange and green felt for this gnome’s hat.
Finally, glue on the nose just under the hat and center it in the middle of the beard. (I left my wooden buttons as they are, but feel free to paint them if you want.)
DIY Gnome Easter Eggs
And there you go! The cutest gnome Easter eggs ever! This is a great, no-dye option for decorating Easter eggs.
My toddler got very excited when he noticed my gnomes on my craft table the morning after I finished them. But…playing with them will have to wait until next year, because he’s very much still in an “exploring with my mouth and teeth” phase and there will be absolutely no sacrificial gnomes this Easter. 😜
If you make these, I’d love to see them! Tag me @aubreeoriginals on Instagram or leave a comment below. I can’t wait to see what you come up with!

Don’t forget to pin and save for later!
Hi. I am considering buying a Cricut, but I don’t know which one to buy. I want to be able to use it to cut from dies and/other templates and it should be able to cut thru felt. Do you know which one would be best?
Thanks!
Mandee
PS. Your Easter gnomes are adorable! I totally want to go out and buy Easter eggs so i can make a bunch!
Hi Mandee. I’m so glad you asked! I’ve been meaning to write an in-depth post on which Cricut machine is best.
For now, though, I recommend the Cricut Maker for you, either the original Maker or the Cricut Maker 3—the difference is primarily price. The Maker 3 is the newest machine. It can cut Cricut Smart materials without a mat, which is great for making really long projects like vinyl wall murals (the original Maker is limited to a 24″ length mat so longer projects would just need to be pieced during assembly). The Maker 3 also cuts Smart materials a little bit faster, which is kind of nice. However, I would say that majority of the materials I use are NOT Smart materials (mostly due to the higher cost of those) and I still love my original Maker! Either Maker machine can cut all the materials it sounds like you’d be using: paper/cardstock, vinyl, fabric, felt, etc. (And if you still want to use Smart materials with the original Maker or any older machine, you can, you just have to put them on a regular mat.) To cut felt you will also want to purchase a FabricGrip mat and a rotary blade. (Some types of felt can actually be cut with the fine-point blade but I prefer using the rotary blade, especially for acrylic felt fabric sheets.) I also really love the brayer tool for pressing felt to the mat after it starts to lose some of its stickiness from the fuzzies (and just in general to press materials to the mat).
You can cut felt with the Explore machines but it’s not as straight-forward. You have to bond the felt with freezer paper and you’d cut it on a StrongGrip mat with the bonded fabric blade.* The price difference isn’t huge between the Explore and the Maker so I think it’s worth the upgrade, especially if you plan to cut felt often. And then if you ever want to expand your crafts to include the knife blade (for thicker materials) or engraving tip (a couple examples), the Maker machine will have those capabilities.
*I actually believe the bonded fabric blade is identical to the fine-point blade, just a different color, but you’d still want to purchase this if cutting fabric or felt so you can differentiate between the two (like how you’d keep your sewing scissors nice and sharp by only cutting fabric with them, you’d only want to cut fabric/felt with the bonded fabric blade).
I’m not quite sure what you mean by cutting from dies and templates…You can upload digital designs into Cricut Design Space (the free Cricut software needed to run your machine) and cut your own templates that way. (The compatible file types are jpg, gif, png, bmp, svg, and dxf.) If you mean a physical steel die like you’d use with a Sizzix die-cutting machine, then that’s something different–Cricut machines are entirely digital.
If you have plans to purchase directly from Cricut (which I usually recommend, but it’s personal preference), check out my post on Cricut Access. I highly recommend an Access subscription (mostly for access to the Design Space library which is so fun!), but you’ll also get 10% off your machine purchase and 20% off materials—you might have to be subscribed first, so I’d probably purchase the subscription separately. I’d also wait and purchase your machine and additional materials when Cricut’s having a sale–they come up pretty regularly so just keep an eye out (I want to say the machine prices are pretty consistent so this would mostly be for better deals on materials).
I hope that helps a little! Feel free to send me an e-mail if you have more questions!
I just found you on Pinterest and I am in love with these Gnomes. I love using gnomes in my holiday decorating. I am so excited to make these. I did sign up to see what other wonderful projects you may have.
Hi Judi! I’m so glad you’re here! I love gnomes too. I’ll definitely let you know if I do any other gnome crafts (I have some on my to-do list, but they’re a ways down…so many fun things to make, not enough time, haha).
Hi Aubree!
Love your Easter egg gnomes!
Was just wondering about the stands they are on-assuming they are egg cups? Where did you purchase, and did you paint them?
Thanks.
Hi Donna, thank you! I believe the egg cup/stands were from Target…or maybe Michaels, I can’t remember now. It was just in their seasonal decor so I’m not sure if they’re still available. They’re just plastic and they came in a set of those colors.