How to Make Handmade Cards: Easy Design Templates For Any Card
Learn how to make handmade cards with simple templates you can adapt for any card design! These are my go-to card-making designs, perfect for beginners!
Making handmade cards was one of my very first hobbies. I quickly became pro with construction paper, safety scissors, Elmer’s glue, and crayons (*wistful sigh* I had one of those white plastic Barbie crayon boxes with the built-in sharpener on the back…I miss it).
If I liked you well-enough, you might even get a pop-up picture in the middle of your birthday card (yeah, I know…things just got real).
I was about 10 years old when my dad suggested that I create a logo to put on the back of the cards. We brainstormed for awhile and came up with this circular logo with a simple pine tree. And, so, Aubree Originals was born.
Since then, my card-making skills have vastly improved (and my logo shrunk, thankfully). I’ve even developed some strategies that make my creative process more efficient. I’ve adapted these ideas for you to learn from and reproduce in your own card-making!
Why make handmade cards when I can buy a greeting card for $1 at the store?
- Most store-bought cards have super cheesy messages in them. Making your own cards allows you to completely customize the exterior and interior.
- It’s fun. This may be a stretch for some people who are less papercrafty-inclined. But you’ll be proud of yourself for creating something that’s entirely your own!
- Why spend $1 when you can spend hundreds collecting papercrafting supplies? It’s true, you may be out a little more for some basic materials if you’ve never done any kind of papercrafts before. But, if you have any kind of scrapbook materials on hand, you’ll save hundreds by never having to buy greeting cards. (And, the good store-bought cards are never just $1.)
- Great Uncle Greg and all your relatives will appreciate the handmade touch. True story.
What You Need to Make Cards
Cardstock
I generally like to start with a solid piece of cardstock with a decent weight to it for stability. (You could also use patterned scrapbook paper if it’s not too thin. If the pattern is loud, I pair it with more-neutral embellishments for contrast.) One 8 ½” x 11” piece of cardstock will yield two cards when cut in half (each measuring 8 ½” x 5 ½”). Fold in half (match up corners carefully when folding—sometimes heavier-weight cardstock has a mind of its own).
Message Insert
If the cardstock is dark in color (making it difficult to write a message on the inside), I cut a piece of white printer paper measuring 4” x 5 ¼” and mount it inside (or any size just slightly smaller than the card). Printer paper (as opposed to white cardstock) keeps the card thinner, which is better for postage, and it’s cheaper (win, win).
Patterned Paper
If I started with a solid piece of cardstock, I generally add a larger piece of patterned paper (to take up 1/3 or more of the card), according to the design layout I have in mind. If I have an idea that this piece of paper will work (regardless of any other embellishments I may add), I’ll glue it down. I find committing to the design as I go along helps me to move faster.
Embellishments
Play with other pieces of paper, stickers, stamps, sentiments, and embellishments to get the look you’re going after. This hands-on arranging is why I never converted to digital scrapbooking—I find it so much easier to physically manipulate all the elements this way! If you made an element that doesn’t quite work, just save it for your next card—I keep a small container of these pieces and will eventually find a use for them.
A Logo
Totally optional! This is just kind of a laugh at my childhood logo. It’s just something I’ve always done on my cards. And probably always will. 😊
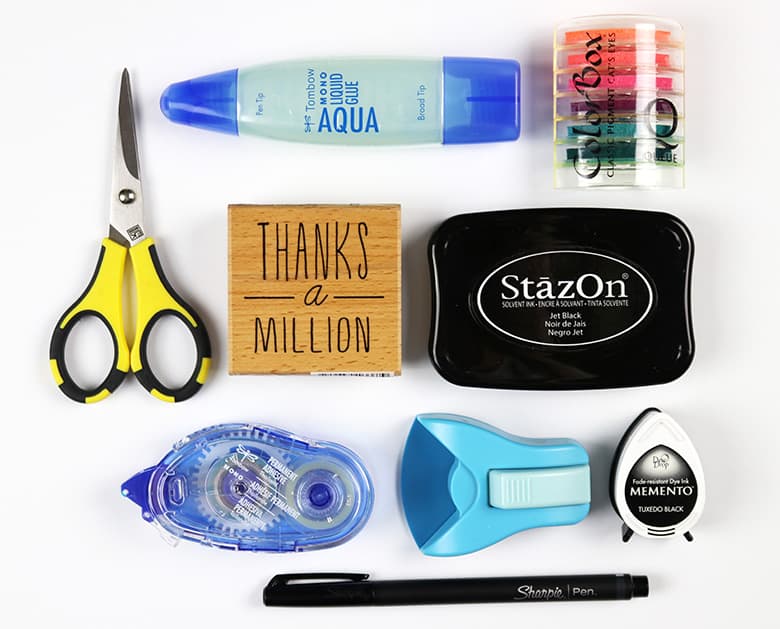
My Go-To Card Making Materials
Cardstock
Comes in all kinds, colors, and weights. I’ve used textured, double-sided, white-core, and the bulk kind you can find at Costco (white).
Patterned paper
Ahh…it’s an addiction. How many times have I heard “Aubree, you don’t need more paper.” And yet I do. I really do, guys.
Adhesive
Duh, kind of a given. I use tape rollers (permanent, removable, and for vellum), liquid glue (for small embellishments or when I need something stronger than the rollers), glue dots (for embellishments), and glue sticks (sparingly).
Paper trimmer and scissors
Both are a must! For years, I used a Fiskars trimmer that required blade replacements every other week (and I would extend their lives as long as possible by suffering with fuzzy-cut edges and having to trim them afterwards with scissors). And then I upgraded to an inexpensive guillotine-style trimmer. Best decision ever.
Stamps and stickers
I love the professional look of stamps and stickers (as opposed to my own drawings or handwriting). There are some really cute designs out there, too–are llamas and cacti still all the rage? (Do we still say “all the rage”?)
Pens and markers
Despite what I just said, I still do hand-write a lot of sentiments–it’s quick and easy (if you have acceptable handwriting).
Punches
I definitely recommend a corner-rounding punch, and maybe a miniature hole punch (for small tags, etc.). I also use my circle punch fairly regularly (it’s just slightly bigger than 2″ in diameter).
Embellishments
Finally, the icing. I love my Prima flowers, pearl and gem stickers, ribbon, and washi tape.
Other posts you might like:
FREE Printable Father’s Day Cards
How to Organize Scrapbook Paper
Card Design Layouts and ideas to customize them
I conducted an experiment when writing this post: I wanted to make 50 cards (as a birthday gift for my mom), using only my ideas with no outside influence, and then I wanted to analyze my designs to determine how I naturally arrive at my layouts. Well, I made 50 cards (and I’m a month late in giving them to my mom, not a huge surprise), and found three signature design layouts that I only slightly altered between cards. As you’ll see below, I use the same formula for a lot of my cards, and they’re super simple. (The black circles symbolize any kind of stamp, image, or embellishment.)
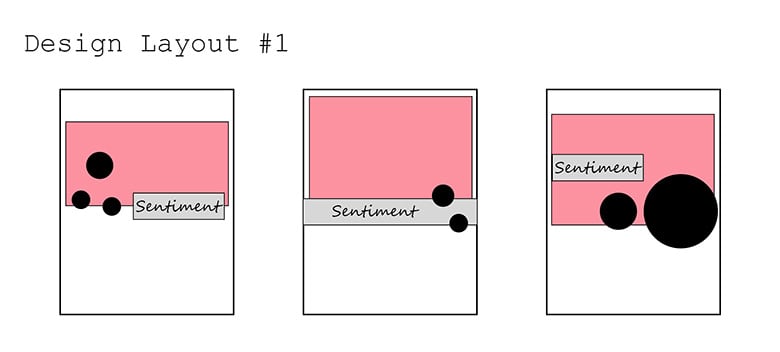
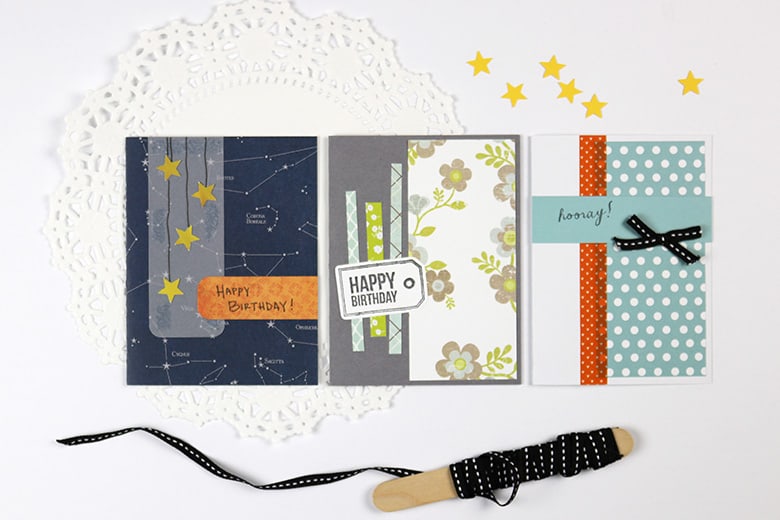
This layout is probably my favorite. I seem to just naturally gravitate to it. Here are three of the cards I made that demonstrate how you could interpret these designs:

I love that the embellishments could be “hanging” stars or hearts, or strips of paper or a half circle peeking out underneath the patterned paper element, or a bow or button or sticker. You have so many possibilities!
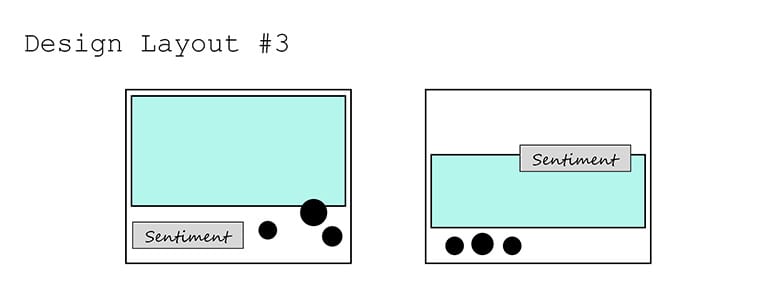
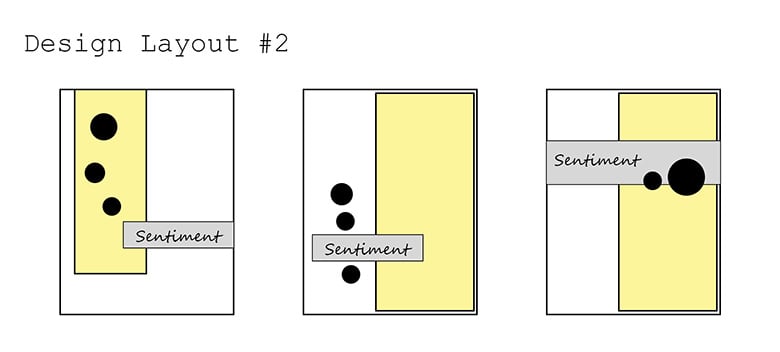
My horizontal layouts all seem to be quite different, but roughly follow these designs: either with the sentiment at the bottom or about 1/3 of the card down.

10 Extra Card Making Ideas and Tips
- If you have trouble coordinating products, purchase card kits and paper packs to do the color- and design-matching for you.
- You can use washi tape in the place of patterned paper: gather several different coordinating tapes and adhere in rows (they can be straight or crooked rows) in the place of a large rectangle of paper.
- If you don’t have stamps or stickers, cut out florals and other images from patterned paper using small, sharp scissors.
- Want to recycle a cute store-bought card? I often cut (or punch) out pieces from old cards to make a new card. (Umm…don’t tell all my relatives…)
- Use the design Rule of Three. You can Google this for days—for web applications, home design, photography. I often apply this rule by using three of the same elements and spacing them in a triangle. (This could be three flowers, or two flowers and the sentiment, for example.) The triangle is visually appealing and helps guide the eye across the page.
- Little touches can make a huge impact: use an ink pad to go around the edges of paper elements, stick a pearl or gem in the middle of a flower, round corners of paper elements using a punch, draw a squiggly border around the entire card, or make your sentiment out of letter stickers.
- If you plan on mailing your card, dimensional embellishments (ribbons, buttons, etc.) will increase the thickness of your card and unfortunately increase your postage costs—so you won’t be able to just use a standard stamp. (This is not my favorite.)
- Use Pinterest for fresh ideas and design layouts! I do all the time.
- If you find a design layout that you love, replicate it! This is great, especially when you need to make multiple cards that will be going to different people (Christmas cards!). Or, keep the design but change up your color scheme and sentiment.
- Don’t get hung up if your card turns out, um, ugly. I made several less-than-amazing cards, even when making this post. Your skills will definitely improve over time (goodbye, crayon-colored pop-up cards), but you won’t always get a perfect design every time. And that’s okay! Your mom will still love it.
How to Make Handmade Cards
I hope these card making ideas and templates show you that making cards doesn’t have to be super complicated or time-consuming! These templates are foolproof and yield attractive results every time. I hope you try them and start saving money by making your own cards!
