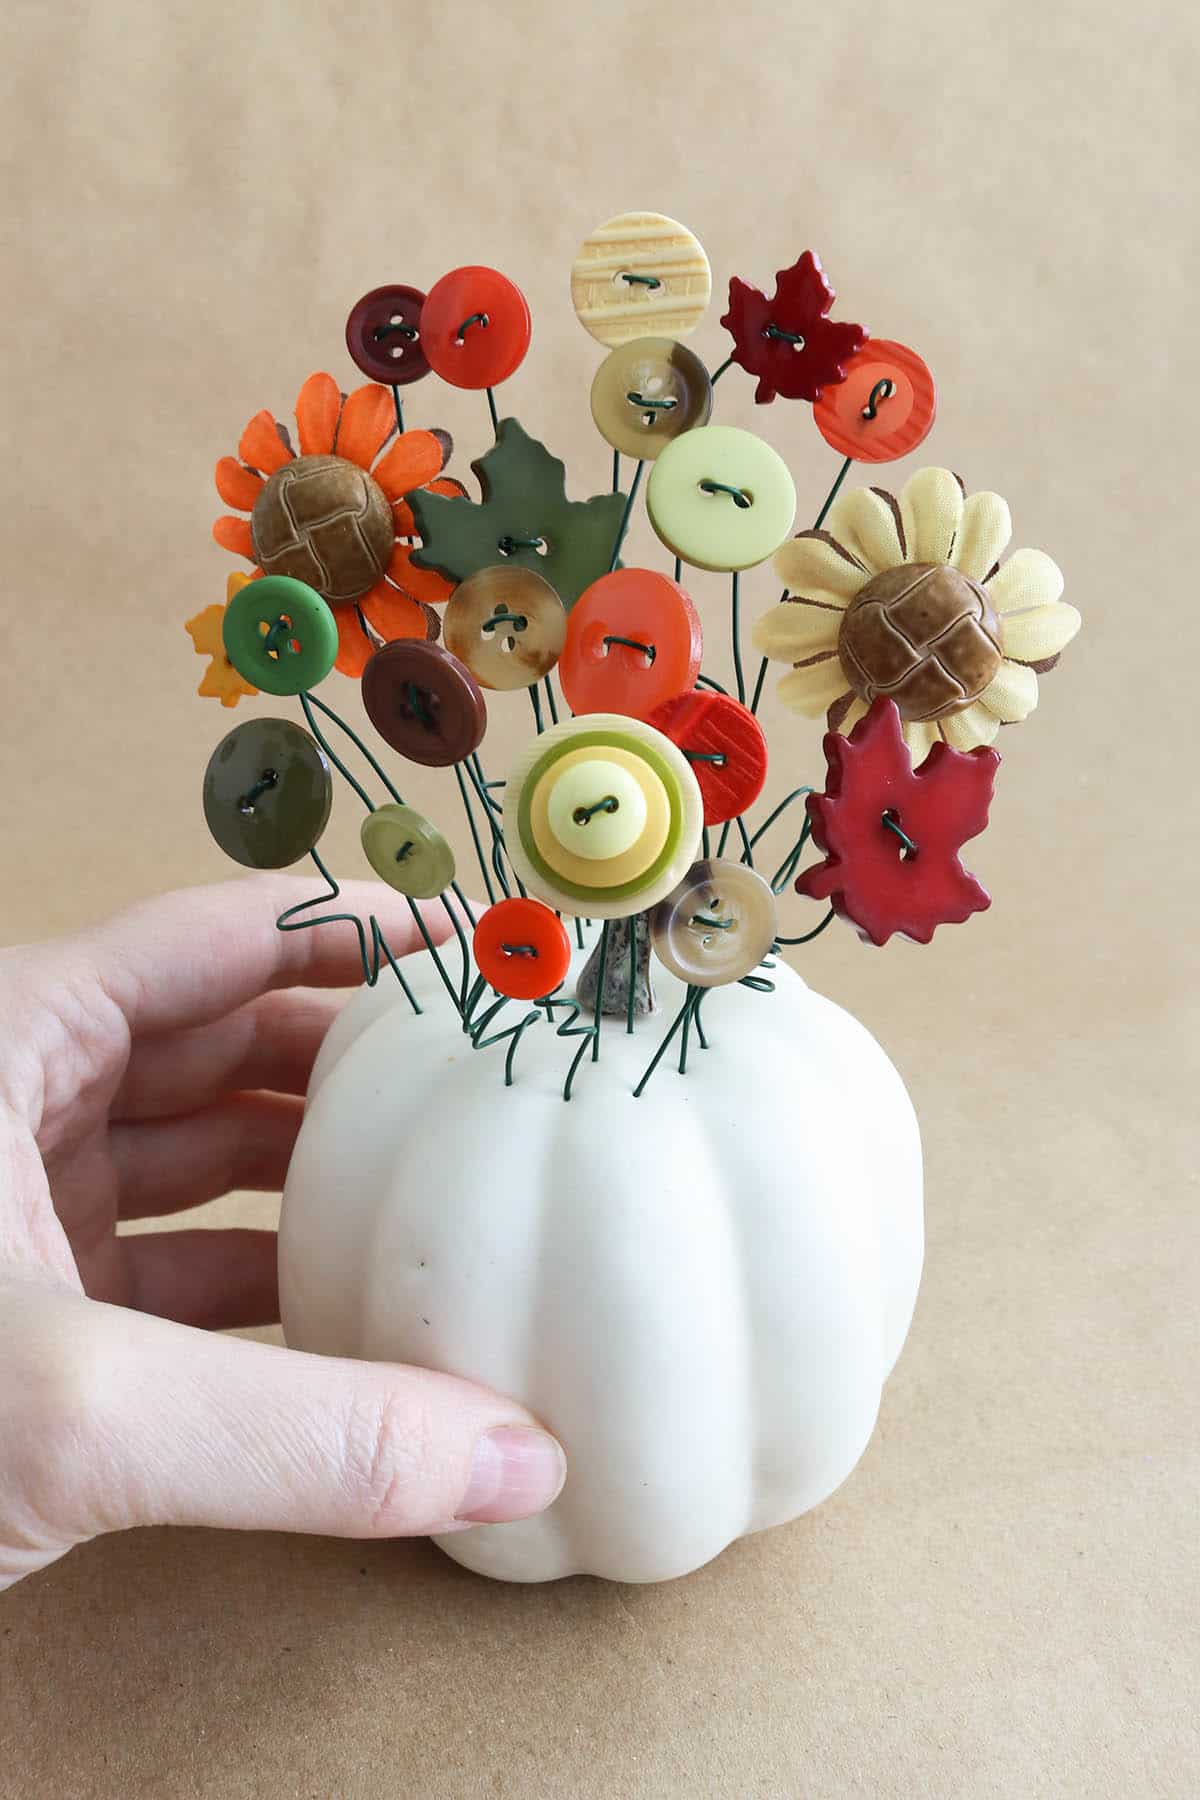
DIY Fall Button Bouquet in a Foam Pumpkin
Learn how to make a fall button bouquet in a foam pumpkin! This is the perfect pop of autumn colors for your decor and a great way to use up old buttons!
I get asked all the time what kind of crafts I make on my blog. And I always have such a hard time answering because, the truth is, majority of it is a whole bunch of random things and little seasonal decorations. Like my button bouquets.
If you haven’t seen my super popular spring button bouquet yet, definitely go check it out. This fall bouquet is another version of that one, with just a couple fun differences. I’ll show you exactly how to make this fall button bouquet in a foam pumpkin below!

This post contains affiliate links. For more information, see my disclosures here.
More posts you’ll like:
What you need to make a fall button bouquet

- buttons: I used a bunch of random ones from my stash, as well as some leaf-shaped buttons. Go for fall colors: dark reds, orange, yellow, olive green, and browns.
- floral wire: 22 gauge is perfect for button bouquets
- wire cutters, round nose jewelry pliers, and possibly also needle nose pliers (these are some of the 13 random but super useful things I keep in my craft room)
- various round objects for coiling stems: paint brush, pencil, marker, etc. (I just used the handle of my jewelry pliers this time)
- a foam pumpkin: mine came in a 10-pack from Hobby Lobby, but Dollar Tree also has them (feel free to paint or decorate your pumpkin however you want, though I just left mine plain)
- small paper craft flowers, optional (you could also cut your own from felt, like I did in my original button bouquet)
- faux fall florals, optional (I considered adding some of the pieces pictured here, but ultimately left my bouquet as is)
- felt and hot glue (to cover the button backs, optional)
How to make a fall button bouquet in a pumpkin
The steps below are a simplified version of my original button bouquet tutorial. Be sure to watch the video for more details!
Make wire stems for the buttons
Attach floral wire to each button to form a stem, following the instructions in the original post/video.
Since this bouquet is being made in a small pumpkin, you don’t need as much length for the wire: I cut my pieces into about 6″ lengths.
I was having the worst luck this time with the four-hole buttons snapping when I went to pull the wire through the second time, so I decided to simplify for this bouquet and only went through once. I guess I just don’t know my own strength, haha.
For shaped buttons, attach the wire based on how many holes the button has (the shape of the button doesn’t matter).
Make as many button flowers as you want. For my 3.5″ wide pumpkin, I used 15 circle buttons, 4 leaf-shaped buttons, 2 paper flower buttons, and 1 stacked button (22 total button flowers).

How to make paper flower buttons
I used a shank-style button for the paper flowers (a button with a loop on the back instead of holes). I simply pulled the shank through the holes of the flowers and then added the wire to the button like normal (I stacked two flowers for each of them). They felt plenty snug like that, but feel free to glue the flowers to the button first if your flowers are slipping down.

These flower buttons are top-heavy so you may need to play with them a bit when putting them in the pumpkin so they’re facing the direction you want (try twisting the wire a different direction, etc.).
How to make stacked button flowers
Stacked button flowers are super easy to do! You could do this for your entire bouquet if you wanted, but I just did one to demonstrate. Choose about 4 buttons of varying sizes that you want to stack. They need to all have the same number of holes (or you at least need to be able to match up the holes).
Stack the buttons and stick a piece of wire through all of the first holes, coming through the back of the buttons. Bend the wire and push it down through all of the second holes, coming from the top. Twist at the back and trim the wire like normal. (You’ll notice that this process is exactly the same as with a single button—you’re basically treating the stack of buttons like a single button.)

Cover button backs with felt
If you want a cleaner look on the back of your bouquet, you can cut small circles of felt to hot glue to the back of each button flower. I did this with my original bouquet but skipped it this time to save a little time (this is totally optional and doesn’t really affect the finished look, to be honest).
Assemble the pumpkin bouquet
Choose the “best” side of your foam pumpkin to be the front, then begin assembling the button bouquet in it. The foam makes this step so easy and satisfying! Just stick your button flowers through the top of the pumpkin wherever you want. Try to space out the different sizes and colors so it looks balanced.

Trim and/or coil the wire stems
While you’re assembling the bouquet, you can trim any long wires as needed (you only need an inch or so to go into the pumpkin to hold it).
Coil a few of the wires for added interest and dimension by twisting the middle of the stem around a round object a few times. This will naturally shorten the wire, but you can still trim the end as well if needed.

Easy Fall Button Flowers in a Pumpkin
I hope you love this fall button bouquet as much as I do! I think this is the perfect little addition to a fall entry table or pumpkin display. This also makes a fun fall gift. I know lots of people have made button bouquets as gifts for coworkers, nursing home residents, and grandparents, and this fall pumpkin version will not disappoint!
Happy crafting!

Don’t forget to pin and save for later!
