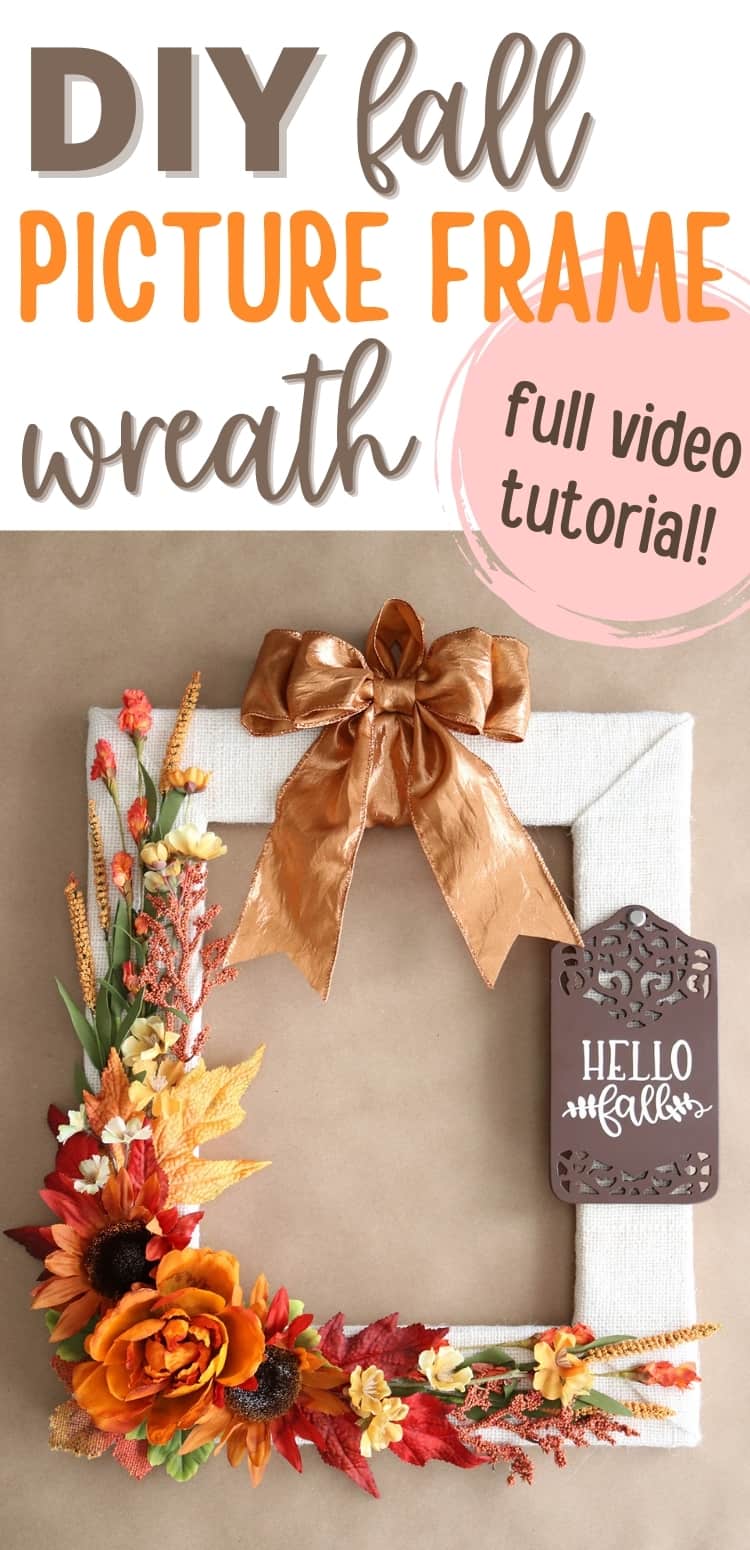
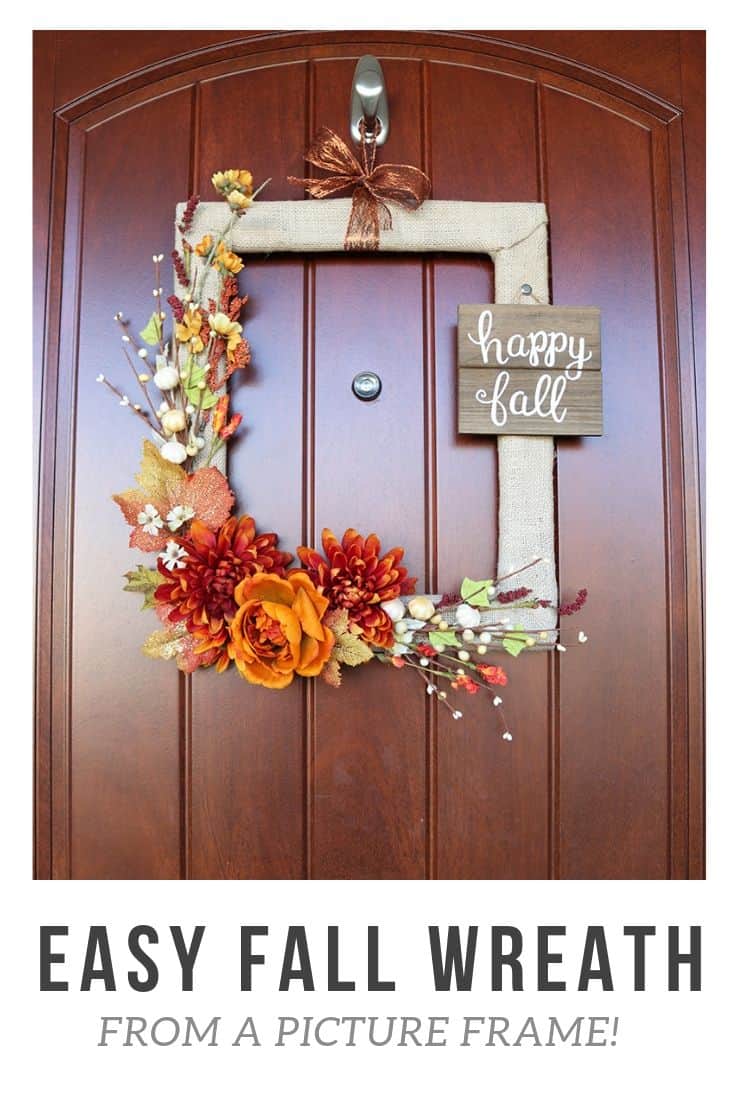
How to Make a DIY Fall Wreath From a Picture Frame
Learn how to make a simple and cheap fall wreath with this step-by-step video tutorial! Cover a picture frame with fabric or burlap, fall florals, and a fall sign—the perfect update for an old picture frame!
Wreath-making used to super intimidate me. Actually, it wasn’t until I was forced to make a wreath for a work fundraiser several years back that I attempted my very first wreath. Since then, I just keep learning and growing my wreath-making skills (and even sell wreaths in my Etsy shop now!).
But, still, you have to start somewhere. And the good news: this fall picture frame wreath is SO easy and perfect for beginners! You will love how easy this comes together (and how inexpensive it is to make!).
And if you’re still unsure, I have a detailed video tutorial walking you through every step, so keep scrolling.
This post was originally published in September 2018 (when this blog was just a baby!). It was updated August 2021 with a much better video tutorial (thank goodness!) and additional photos.
This post contains affiliate links. For more information, see my disclosures here.
More posts you’ll like:

What You Need to Make an Easy Fall Picture Frame Wreath

- a picture frame (*see notes below)
- burlap fabric or wide burlap ribbon
- fall floral picks: I found mine at Hobby Lobby after Thanksgiving on clearance for 90% off!—post-holiday shopping is my favorite way to save money on craft supplies!
- wired ribbon: I used 1.5″ wide ribbon on the original wreath and 2.5″ wide ribbon on the updated wreath (this is my favorite place to buy ribbon for wreaths!)
- chenille stems
- wood sign or other decoration (chalkboard sign, monogram, wooden word, etc.)
- brad (or nail or clothespin) to hang sign
- scissors, wire cutters, hot glue, E6000 glue
- I also recommend something to protect your hands from hot glue burns (I use a regular plastic Sharpie, but they do make actual hot glue finger protectors…)
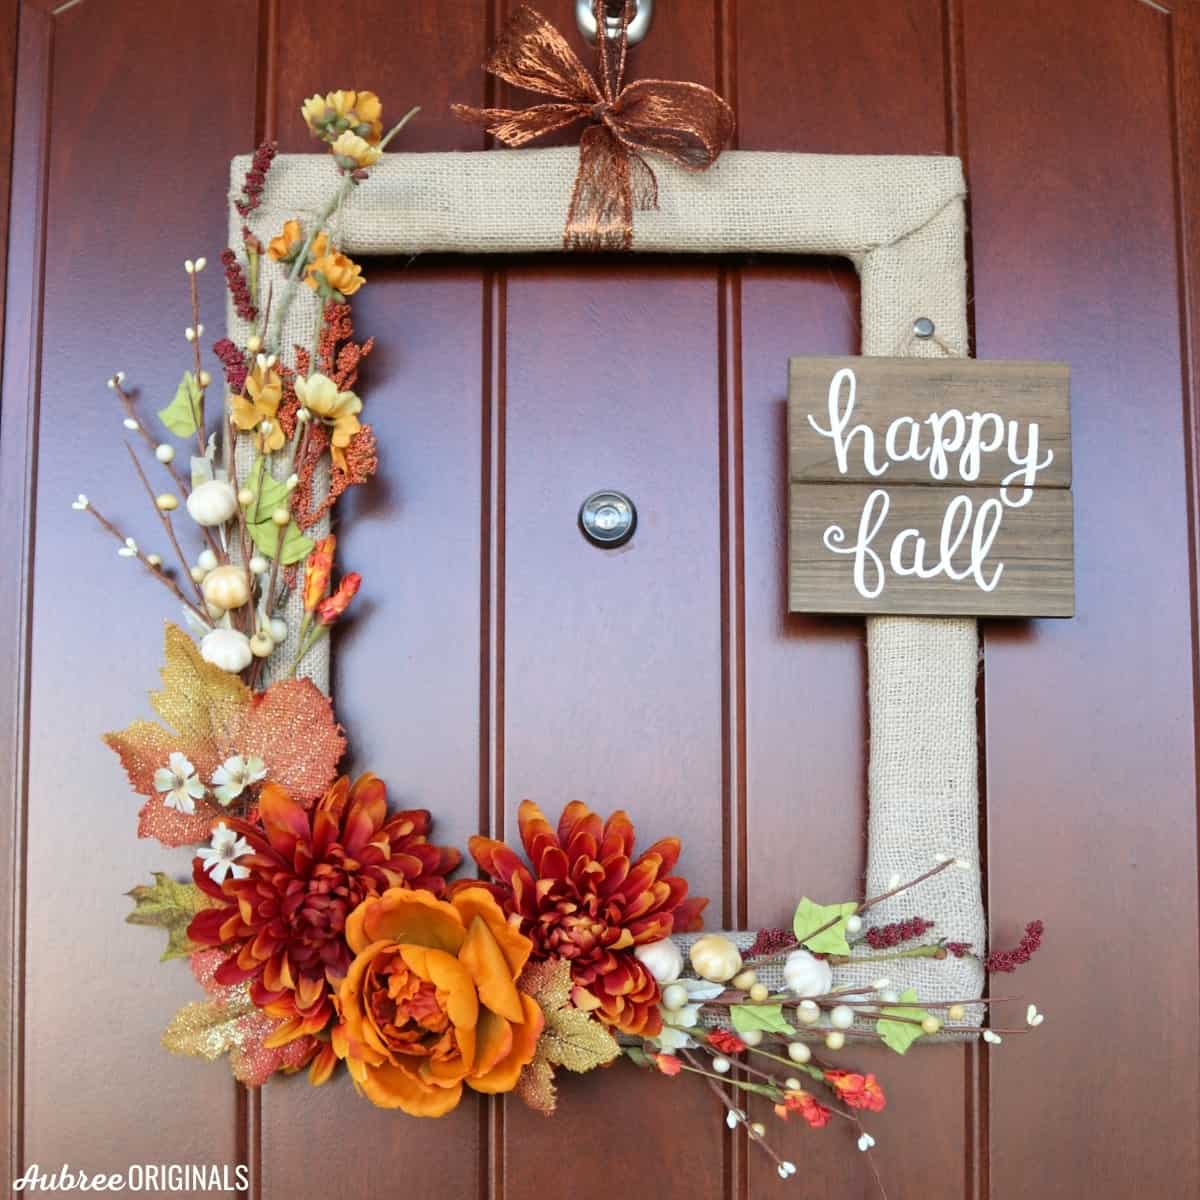
*I thrifted the original picture frame from the DI for $1. It measures 14″ x 17″ and each edge is 2″ wide. The wider the picture frame edges, the better: you want as much surface area as possible to glue florals onto (and it also looks better in the end).
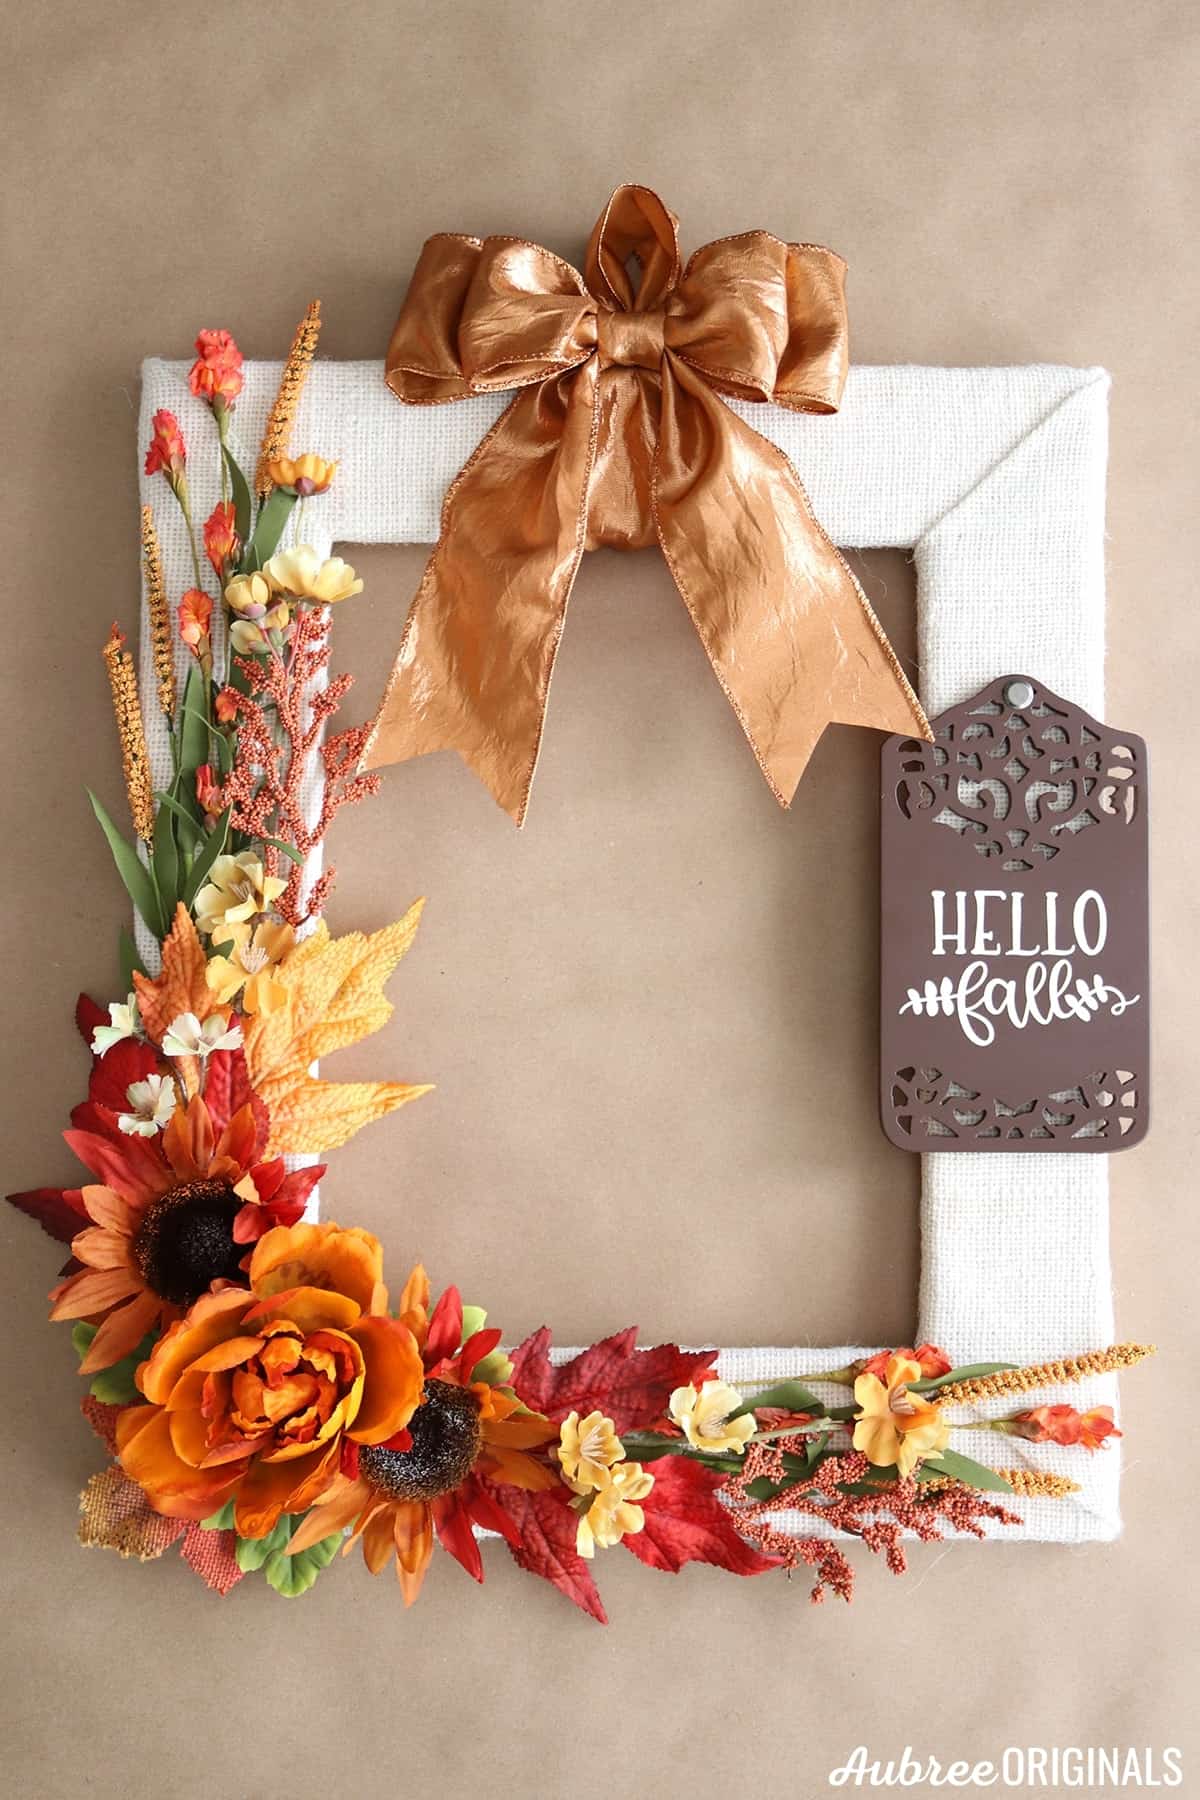
For my updated wreath, I had a hard time finding a frame with the perfect dimensions so I had my wood-working brother build me a frame instead. It still measures 14″ x 17″ (outside dimensions) but each edge is 2.5″ wide. If you’re interested in learning how to make a frame like this, please leave me a comment at the end of this post…and I’ll see if I can get my brother to teach me, haha!
How to Make a Picture Frame Wreath For Fall
For more video tutorials like this, please subscribe to my YouTube channel! I seriously appreciate every single like and subscribe—it makes my day and keeps me motivated to continue putting out awesome tutorials for you!
I’ve included detailed written instructions below (including exact dimensions and some other info not included in the video), but they’ll make so much more sense if you watch the video first.
Step 1: Cover the Picture Frame with Burlap
Cut four strips of burlap wide enough to fold around each side of your frame and meet in the back. For my 2.5″ wide frame, I needed 6″ wide strips. Make sure the strips of burlap are long enough, at least a few inches longer than each side of the frame (so, for my 14″ x 17″ frame, 2 strips that are about 19″ long and 2 that are about 22″ long. Start with plenty and you can always trim them down later if you have extra.
(If your picture frame is uneven, you may want to put a thin layer of foam or batting underneath your burlap. However, doing so could make the hot gluing process difficult, so I’d recommend using a staple gun instead. You will also probably need larger pieces of burlap if you want to do this. My original picture frame was uneven, though, and I didn’t have any issues—I think it’s more important for your frame to have wide-enough edges.)
Center your first piece of burlap on one side of the frame and hot glue it down, being careful not to burn yourself. (Sharpie to the rescue! haha) Next, make two perpendicular cuts in the burlap, going along the inside of the frame and right up to each corner. Flip the frame over, check to see how far the flap will go down (so you know where to put the hot glue), and hot glue it to the back of the frame.
Flip the frame back to the front and trim the burlap sides. Measure how much you need by folding the burlap around the frame’s edge and marking what would be the middle of the back of the frame (you want the folded edge to roughly hit the middle of the frame’s edge when folded to the back).
Once the sides are trimmed, continue hot gluing the burlap to the frame so it’s secure. Flip the frame over and glue the bottom flap.
Next, fold in the sides of the burlap to hide the cut edges, folding the bottom up on a slight angle so you don’t see any folds from the front of the frame. Keep the burlap as flat and smooth as possible.
Repeat this exact same process on the opposite side of the picture frame.
For the last two sides of the frame, it gets slightly trickier because we want to miter the corners (I totally could have mispronounced miter in the video…and, yep, google is telling me I definitely pronounced it wrong. Oh well, I can only be perfect 99% of the time, you know? 😉). You’re going to fold both ends of the burlap strip at 45° angles, making sure that the strip of burlap meets the corners perfectly.
Once you’ve measure where to fold, press the folds with an iron—I promise it looks way professional if you do this.
At this point, you can double check to make sure you’ve folded the strip and measured it correctly to the frame. Trim the excess burlap, leaving about an inch to have folded under each 45° fold.
To save time on the last strip of burlap, copy the folds you just made before gluing that strip down. Press the folds with your iron. Trim the excess burlap.
Apply hot glue to the frame, but don’t forget that we’re doing mitered corners—you don’t accidentally want to put hot glue on the entire picture frame’s side when only half the corner will get covered. Lay the burlap down, pressing the corners down first because the burlap will have a little stretch so you can perfectly line up the 45° angle with the corners.
Flip the frame over and cut the flap on the inside of the frame so you can lay it flat against the back of the frame. Glue it down. Trim a triangle out of each corner on the bottom flap to minimize bulk. And then trim even more off, leaving just a small flap to be able to fold in. Finish gluing it down.
Now repeat that exact same gluing process for your final flap.
Optional Step: Add Felt Strips to the Back of the Frame
I didn’t video this part, but I ended up cutting some strips of felt to cover the burlap “seams” on the back of the frame. Just measure your frame and make the strips slightly smaller so you don’t see any felt from the front. For perfectly straight strips, I recommend using my favorite quilting tools.
Adding felt to the back of the frame isn’t necessary, but it covers up any imperfections and gives the back of the frame a cleaner finish. But, what I should have done, is save the top piece of felt and glued it on after gluing the ribbon door hanger on. Instead, I have an ugly ribbon knot on the back of the frame: I’m not sure if it would’ve been too bulky to cover up with a felt strip, but I’d definitely at least try it next time.
Step 2: Add Fall Florals to the Frame
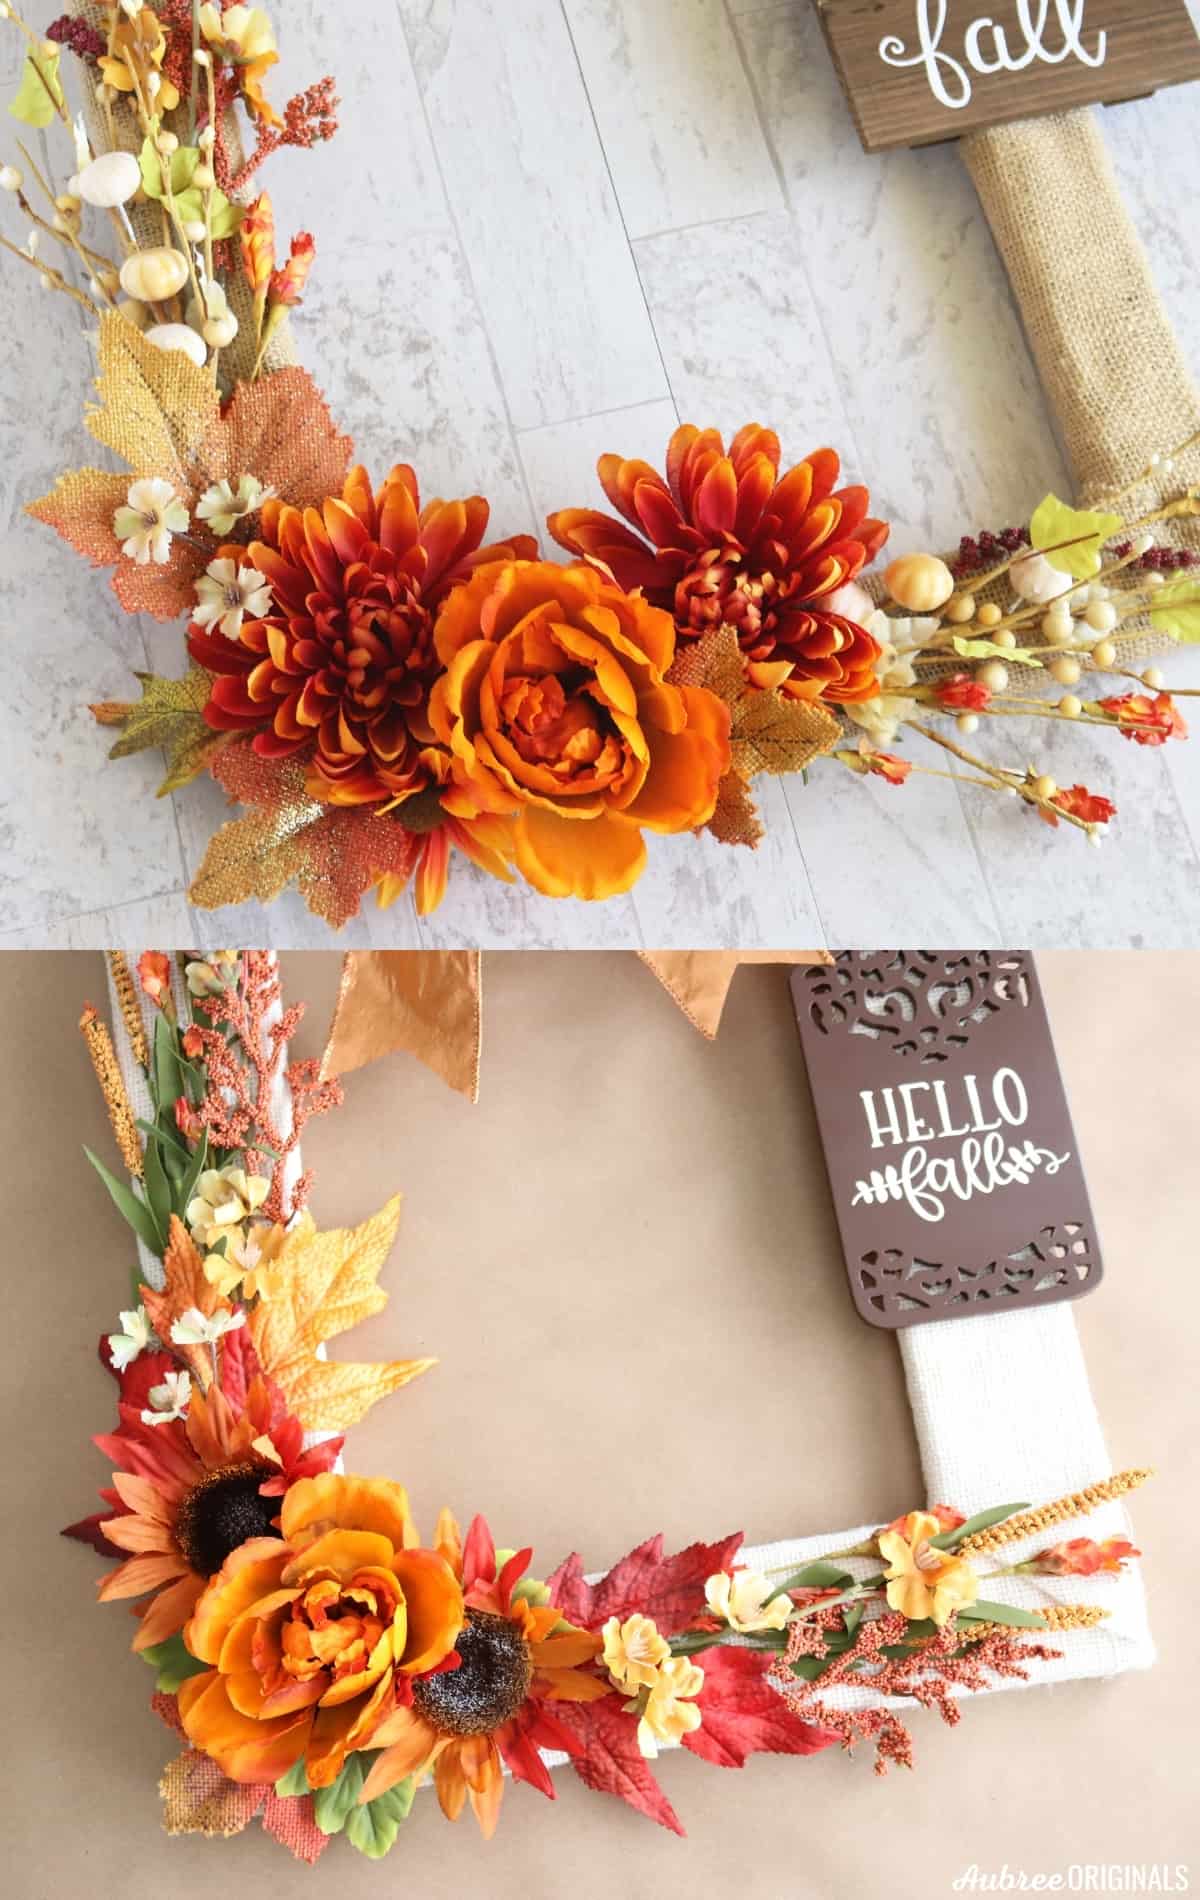
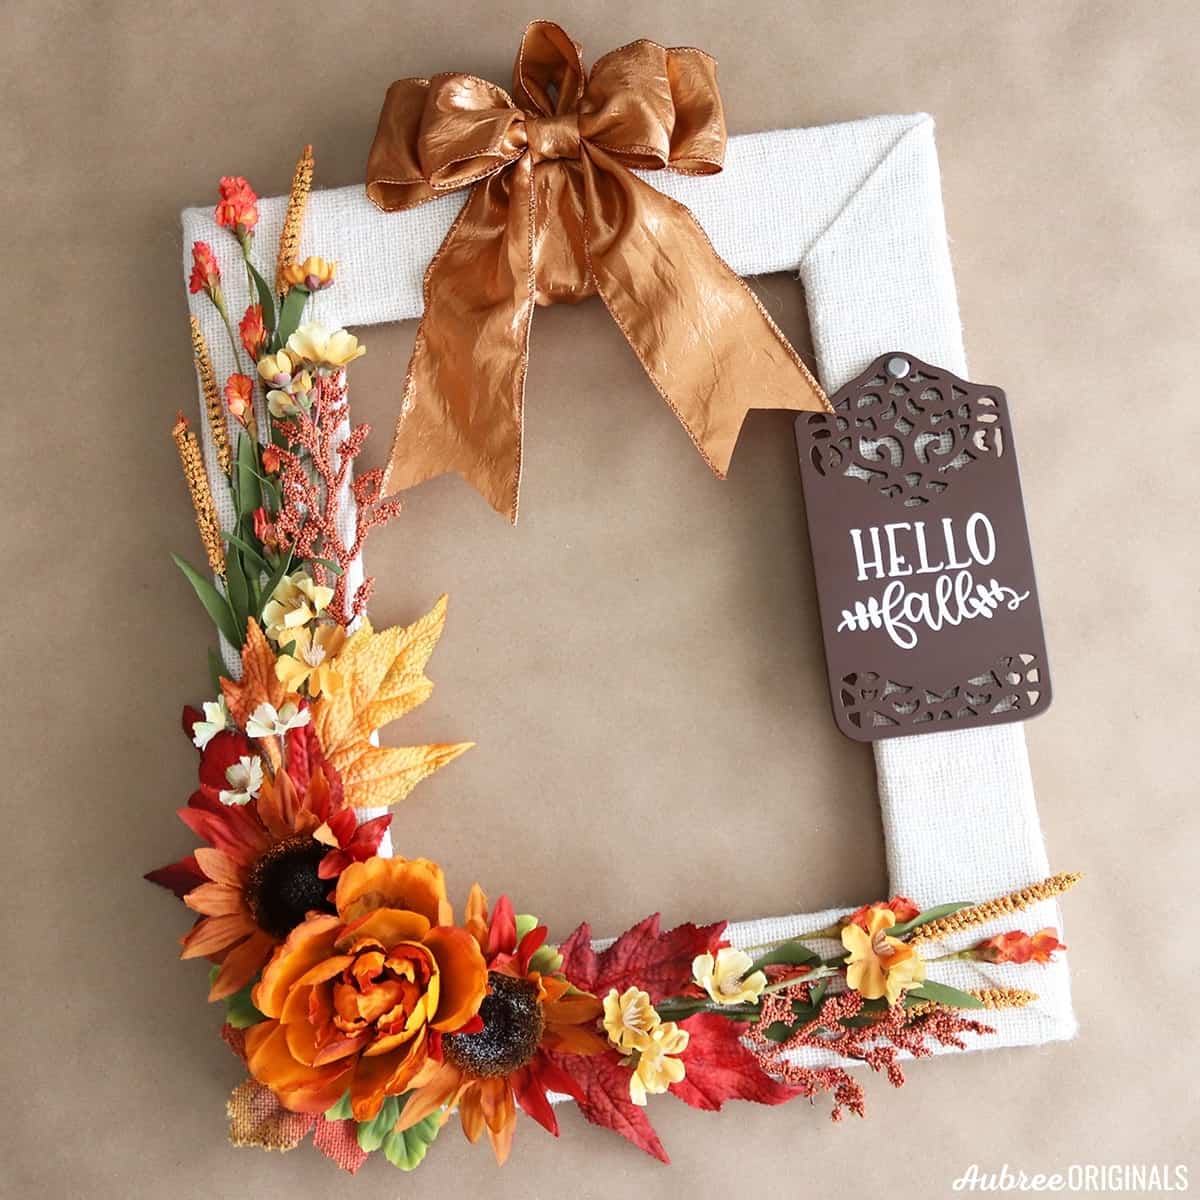
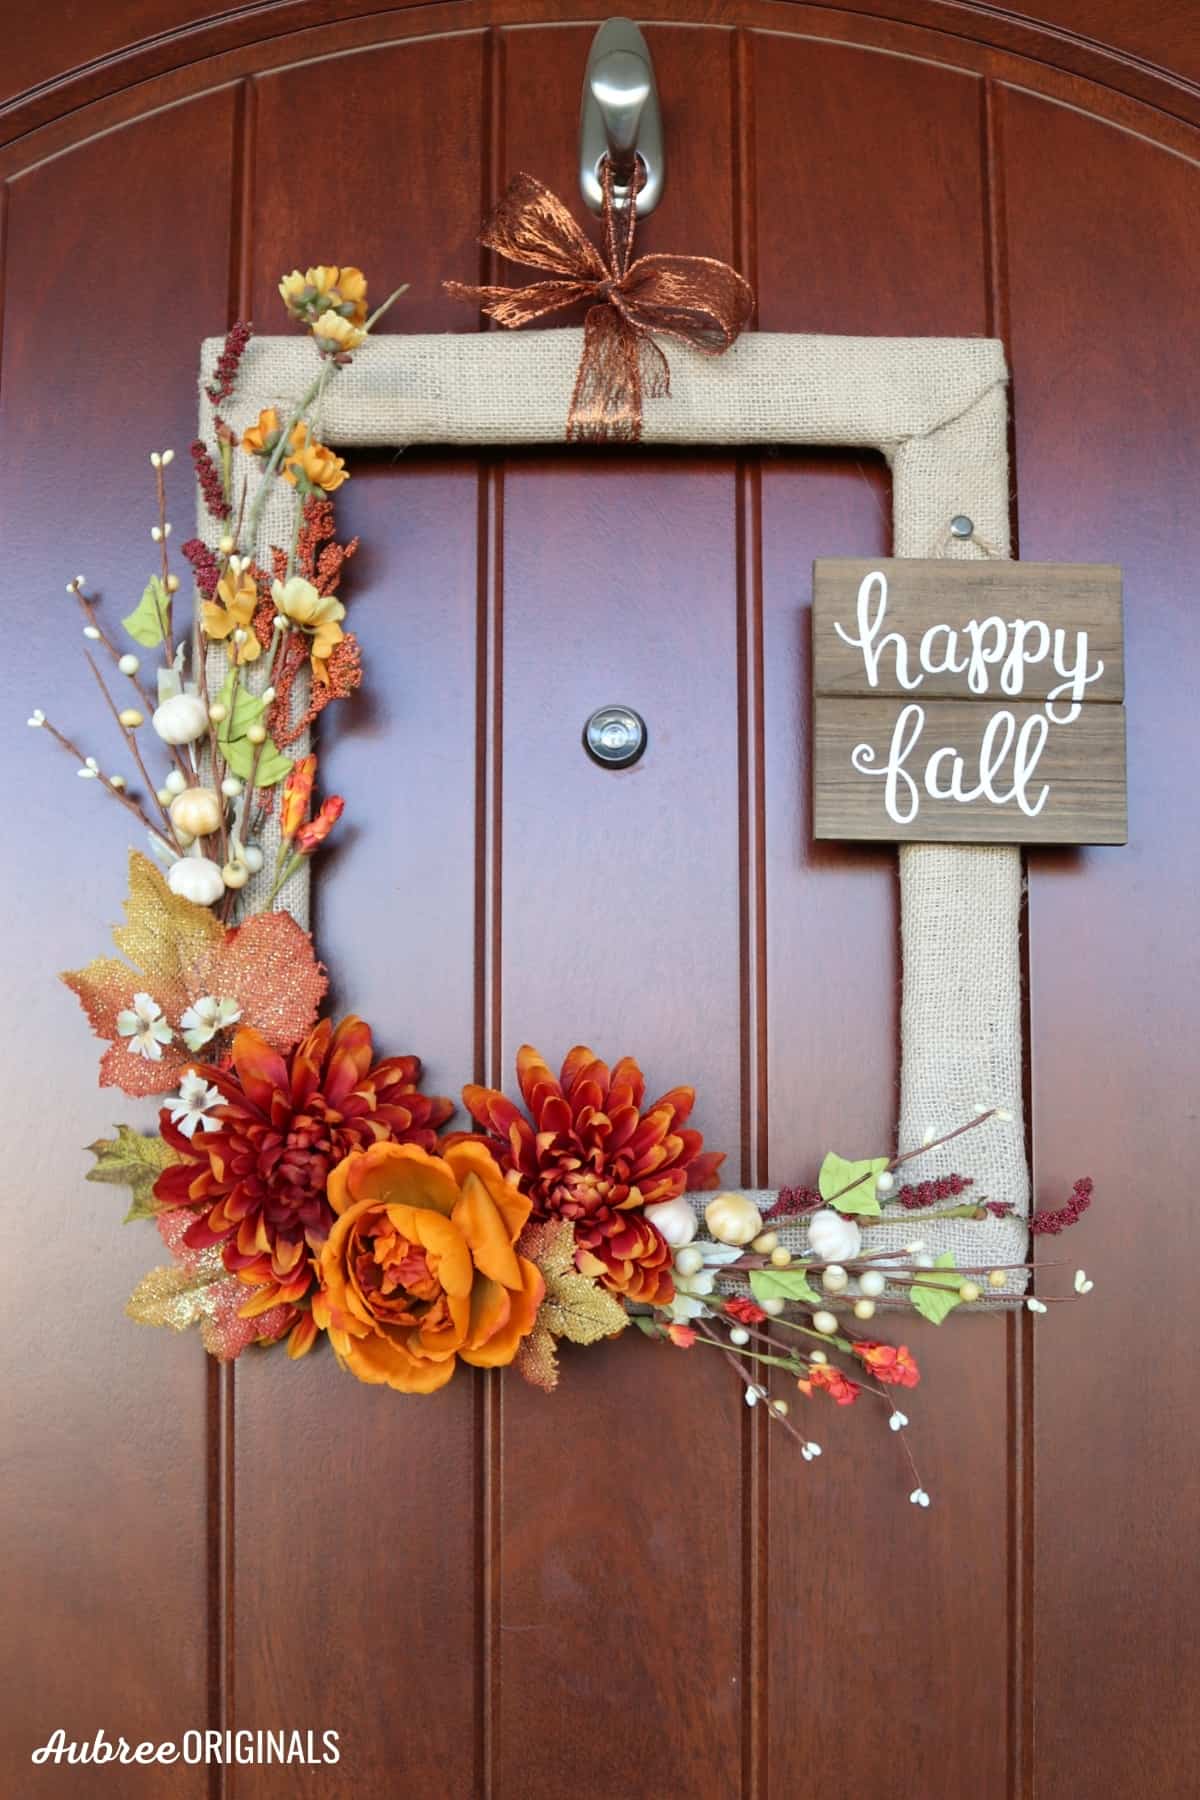
Lay out your floral picks to see where you want everything placed. Because I knew I wanted a bow at the top of the frame and a sign on the right hand side of the frame, I put all the florals on the other two sides of the frame.
Use a variety of sizes and textures (most of my picks came on larger bushes, but I just trimmed the pieces I wanted with wire cutters). Start with some longer wispy pieces that point away from the bottom corner. I like to make the sides almost symmetrical so the wreath feels balanced. Next, add some large flowers to the corner as a focal point. I love using large leaves behind these flowers—it adds a ton of color and helps to draw your eye to that focal point.
Continue placing additional pieces to fill in any gaps.
At this point, once you’ve decided on your design, I recommend taking a picture—that way you can just glance at your phone to remember where you wanted everything while you’re gluing.
Carefully remove everything except the first pieces you’ll be gluing down. Trim any unnecessary length or wires and start gluing. You want enough hot glue in places so the floral picks don’t move, but you don’t want too much that they look flat or squished or unnatural—so, not every leaf or petal has to be glued down. Again, I used my trusty Sharpie to avoid hot glue burns.
Alternate gluing between the two sides so you make sure you keep your layers of floral picks in the right order. And just keep gluing and layering.
When you get to the big flowers, you may want to trim the backs down a little more with wire cutters so they’re not sticking way too far out from your frame. This will also make them easier to glue.
Step 3: Make a Ribbon Bow Hanger
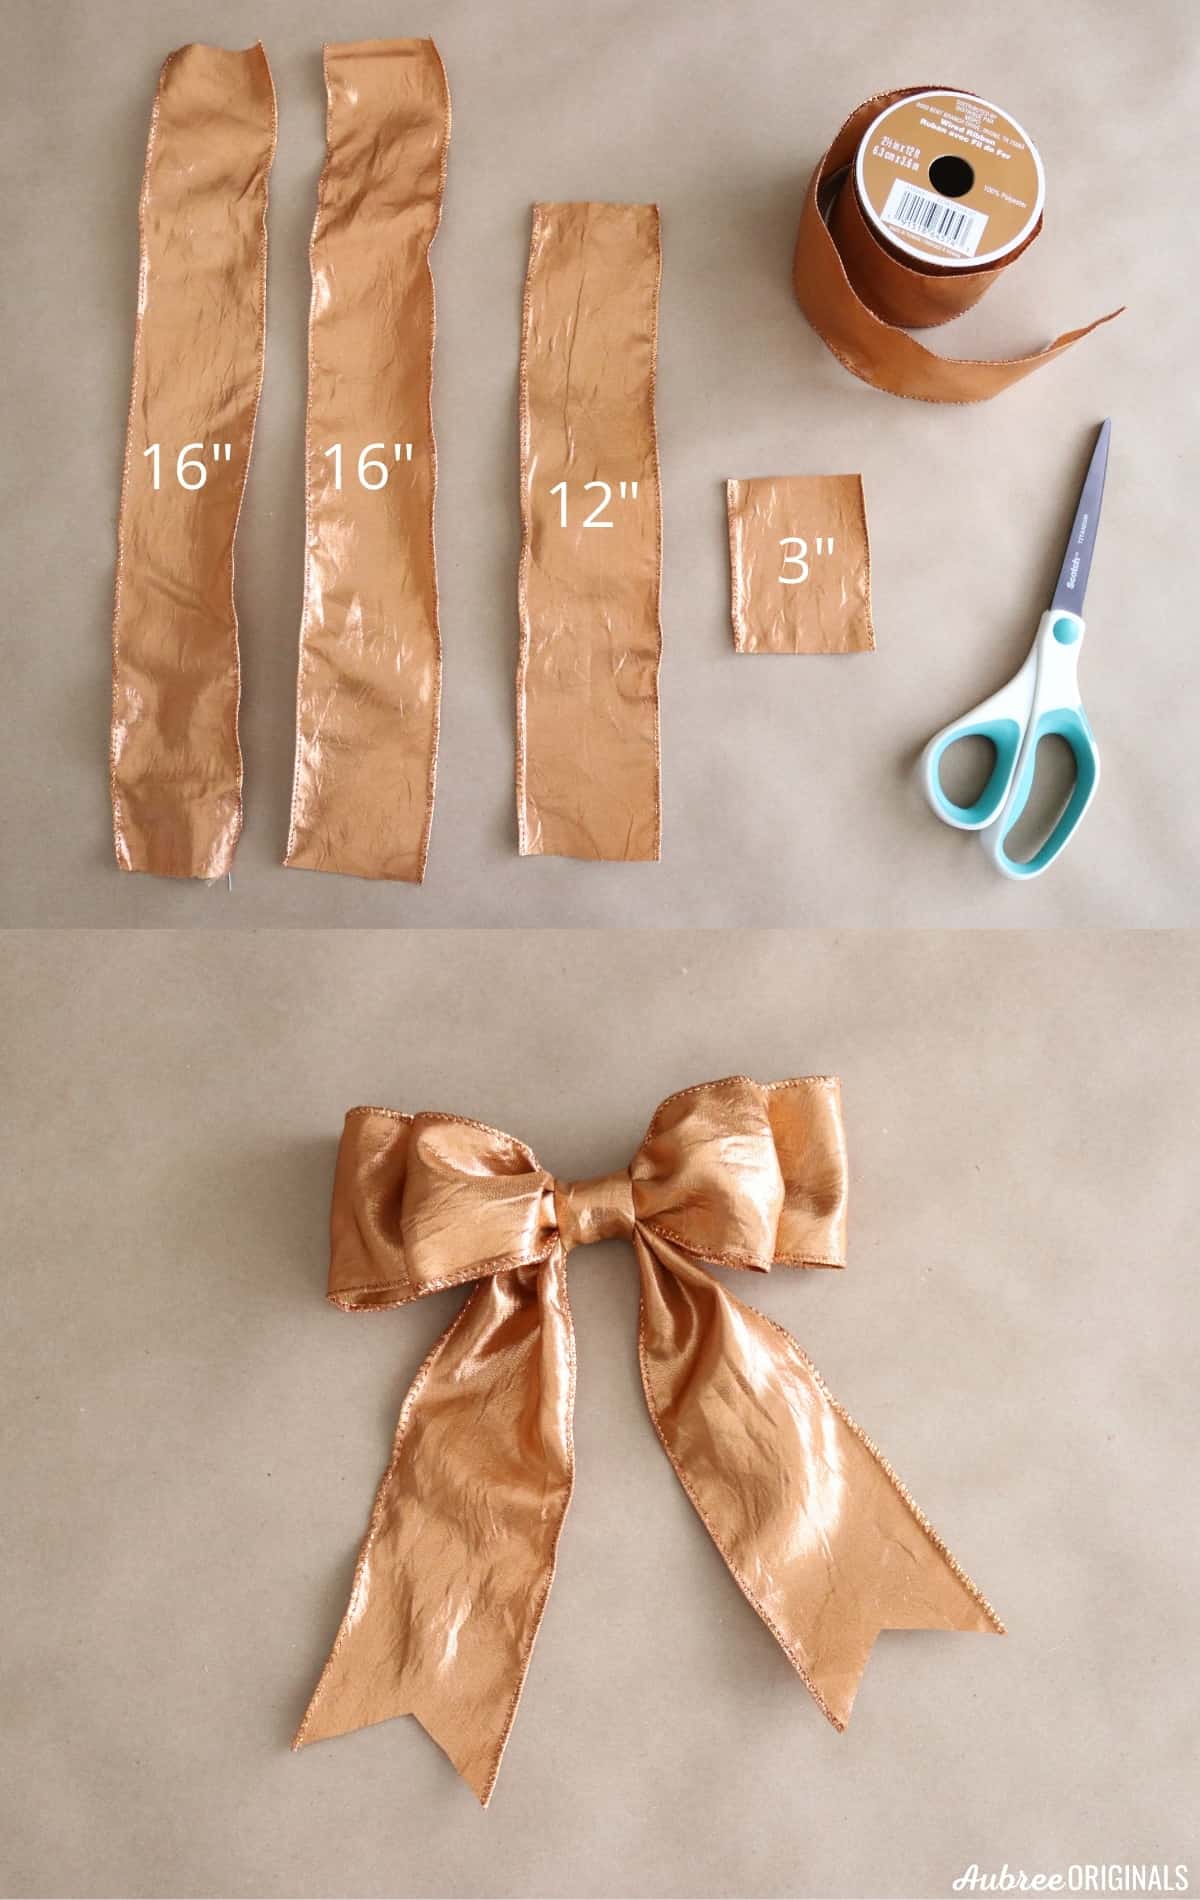
To make a ribbon bow, you’ll need 4 pieces of ribbon: 2 that are 16” long, 1 that is 12” long, and 1 that is 3” long.
Take a 16” piece, fold it over on itself, and glue the ends together to make a loop. Do the same thing with the 12” piece. Next, grab the other 16” piece and a chenille stem. Lay the small loop on top of the big loop, fold the 16” piece of ribbon in half and pinch the sides together at the middle. Gather the middle of the loops, and join all 3 pieces together with the chenille stem, twisting it at the back. I trimmed my chenille stem here, but, if you want to save a step later, don’t trim it, just leave the ends sticking out.
Next, take your 3” piece and glue it in thirds to make it narrower. Glue the 3” piece around the middle of the bow (if you didn’t trim the chenille stem, the ends would be sticking out of either side of the 3″ ribbon piece). Trim the 3″ ribbon piece if it’s too long. Dovetail the ends of the ribbon.
For the hanger, wrap a long piece of ribbon around the frame. Tie a knot wherever you want depending how long you want the hanger to be. Slide the knot around to the back of the frame and glue it in place (again, I recommend gluing the knot before gluing a felt strip to the back of the frame for a cleaner look).
To help the ribbon loop stay flat when hanging the wreath, twist a chenille stem around it, trim the ends and tuck them in. Or, if you didn’t trim the chenille stem on the bow earlier, you can just use that and twist the bow onto the loop hanger. But, since I trimmed it, I just hot glued the middle of the bow to the hanger at the top of the frame.
Step 4: Add a Sign (optional)
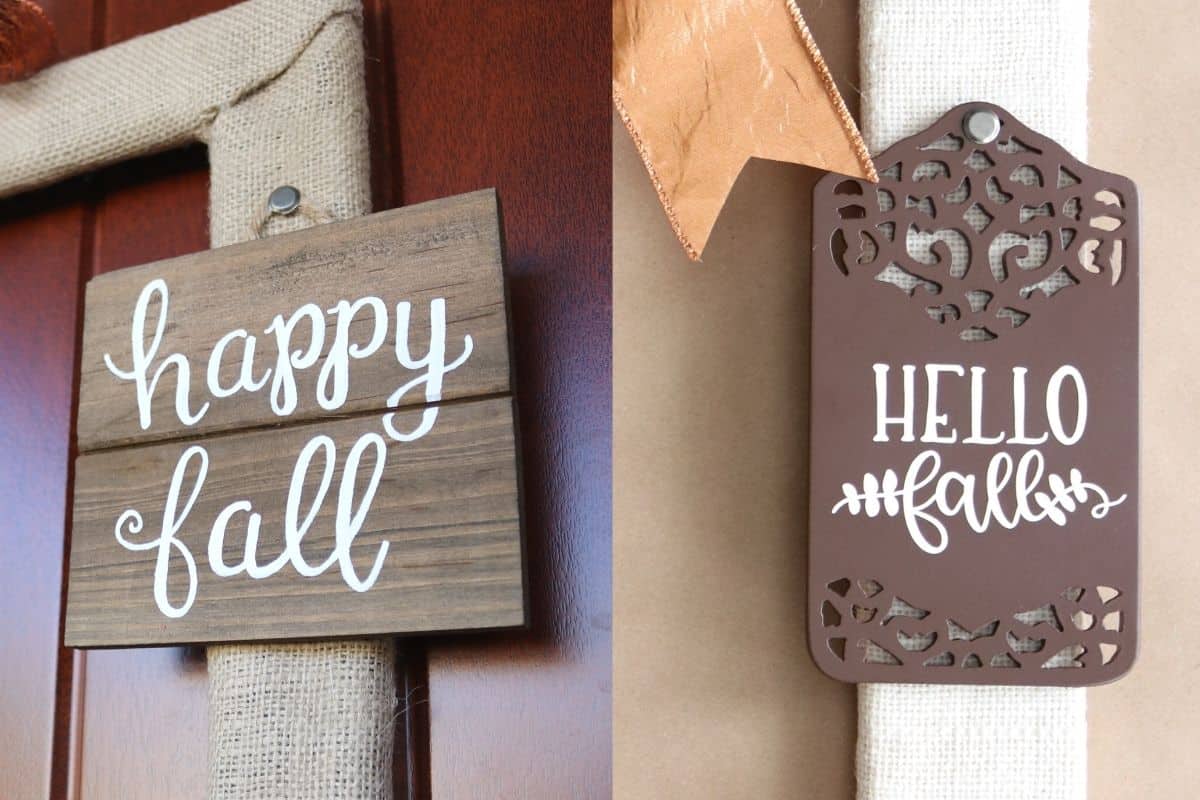
I think your wreath would look fabulous at this point, even without a sign. But for that extra bit of interest, add a sign, a monogram, a wooden word, or even a scarecrow pick!
I hand-painted “happy fall” onto a wood plaque for my original wreath with white acrylic craft paint. In the updated wreath, I repurposed a small sign that I spray-painted brown. I then added a vinyl “hello fall” that I cut with my Cricut. For both signs, I “hung” them with a scrapbooking brad to make them look like they weren’t just floating there (you can push the ends of the brad through the burlap and flatten them, and then add a dot of glue to hold the brad in place).
In my original tutorial, I glued the sign to the picture frame with a TON of hot glue (the back of that frame was not pretty). But after a little more wreath-making experience, I now recommend E6000 glue when attaching signs to wreaths (or when attaching chenille stems to the backs of signs to then attach to wreaths). E6000 glue will be much more durable, especially if you’re displaying your wreath outside.
Thanks for this updated tutorial, Aubree, but I actually just want to see the old one…
In case you previously saw this post and really just want to see how I made the original wreath (though I’m not sure why, because those videos are rather awful…), you can find them in order HERE, HERE, and HERE. But, please, just watch the new video above and save me the embarrassment. 🙂 If you still have questions, leave a comment at the end of this post—I read and answer all of them!
How to Make an Easy Fall Wreath From a Picture Frame
And there you go! This is such a fun and easy wreath to make. Thrifting the picture frame or using an old one also makes this a very cheap wreath to make. You could totally customize this wreath for other holidays and seasons, too! So many fun possibilities!
I hope this tutorial was helpful! I would love to see your creations, so please share them and tag aubreeoriginals!
Happy wreath-making!

Don’t forget to pin and save for later!
These turned out so cute!! I’m looking for a good fall project to do with friends next week and I think this may just fit the bill. I just had my floors resurfaced so my decor budget is a bit slim right now, but the materials seem cheap enough to get! Wish us luck haha
Thank you! I think you can definitely make these wreaths inexpensively. Good luck! 🙂
Looks wonderful, love it.
Thanks Carol! If you end up making one, check back in a week or two for an updated video tutorial! I’m still working on editing it but it should explain the process a lot better. 🙂
Love what you did with the old picture frame! We shared it with our readers in an article: https://www.craftcuts.com/community/home-decor/fall-wreaths-home/
Thanks for the fun inspiration!
I’m so glad you liked it! Thanks for sharing, Mariyah.