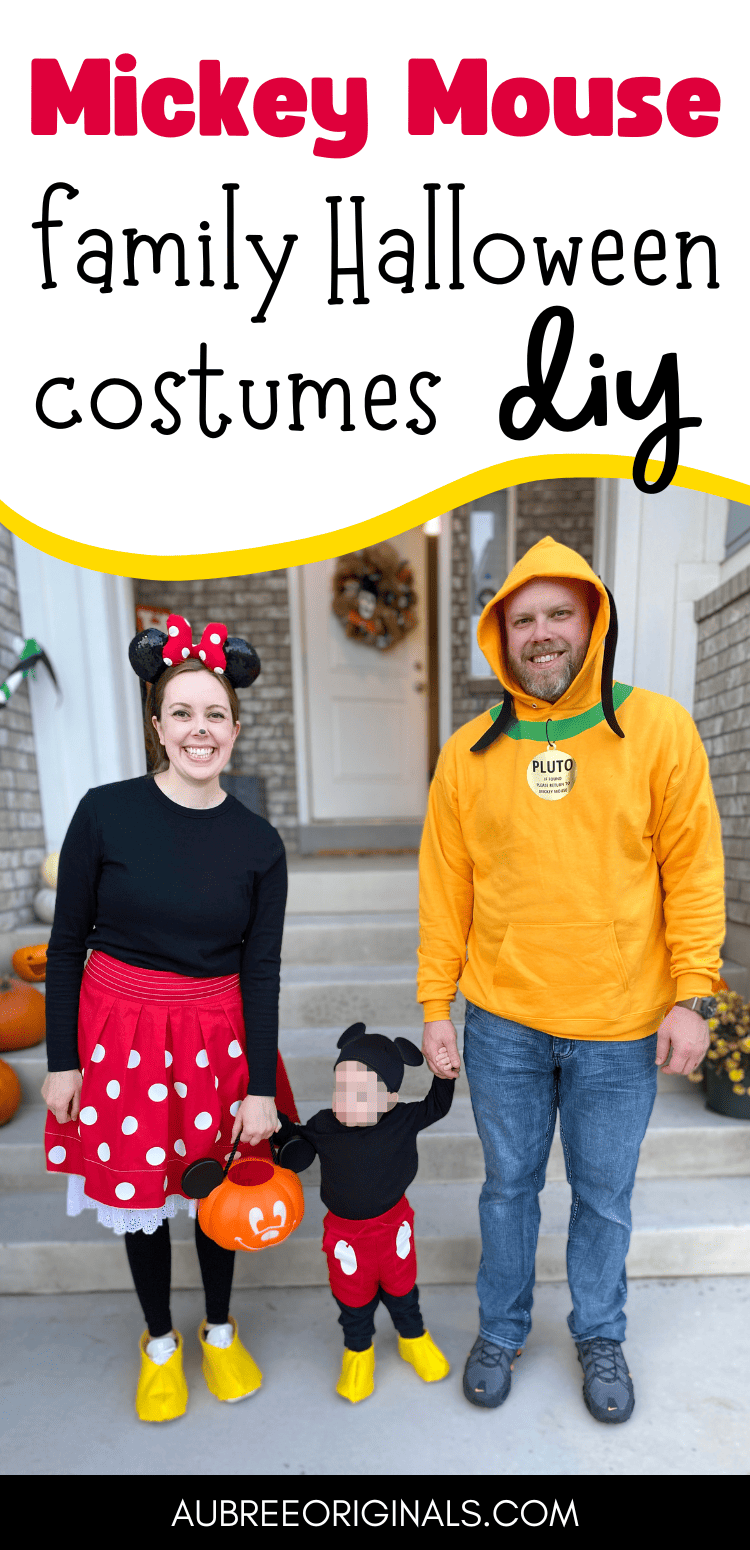
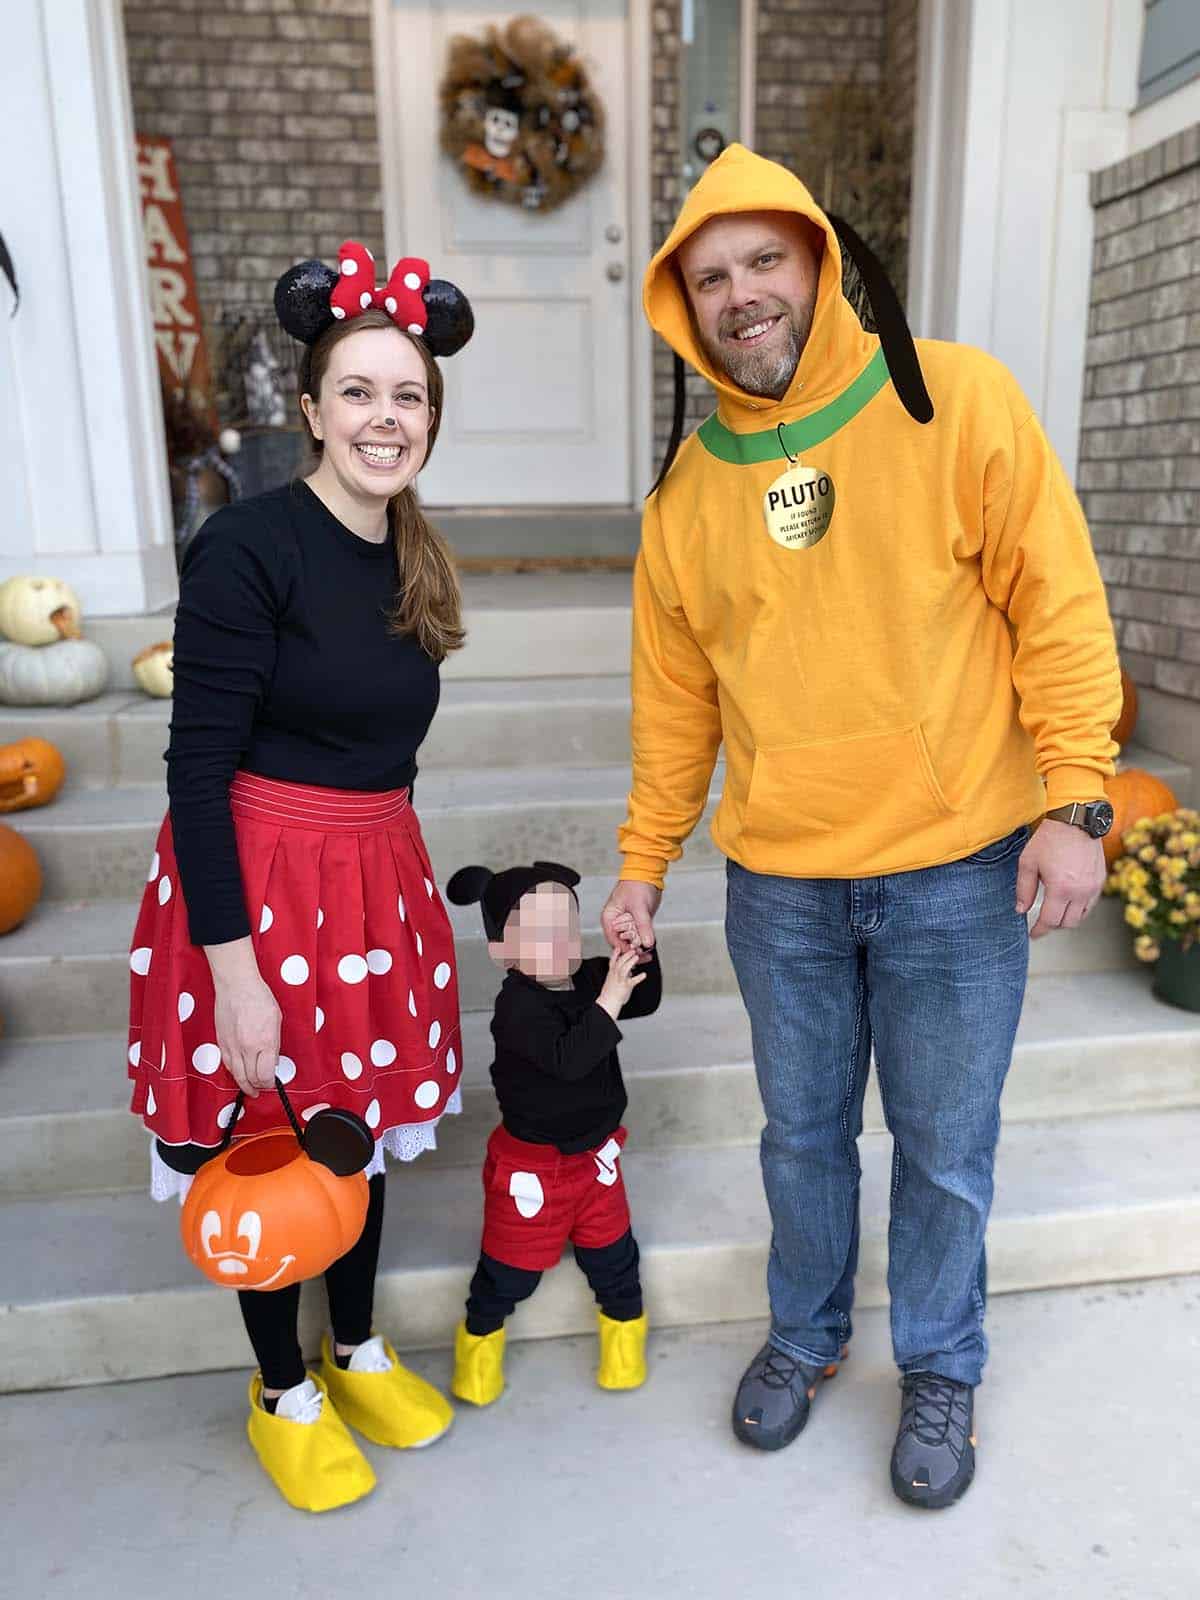
DIY Mickey Mouse, Minnie, and Pluto Family Halloween Costumes
These DIY Disney character Halloween costumes were so fun to make! Save money with these diy costume ideas. We loved our cute little Mickey Mouse toddler!
Ahh, Halloween…it’s the best! And so much better with kids!
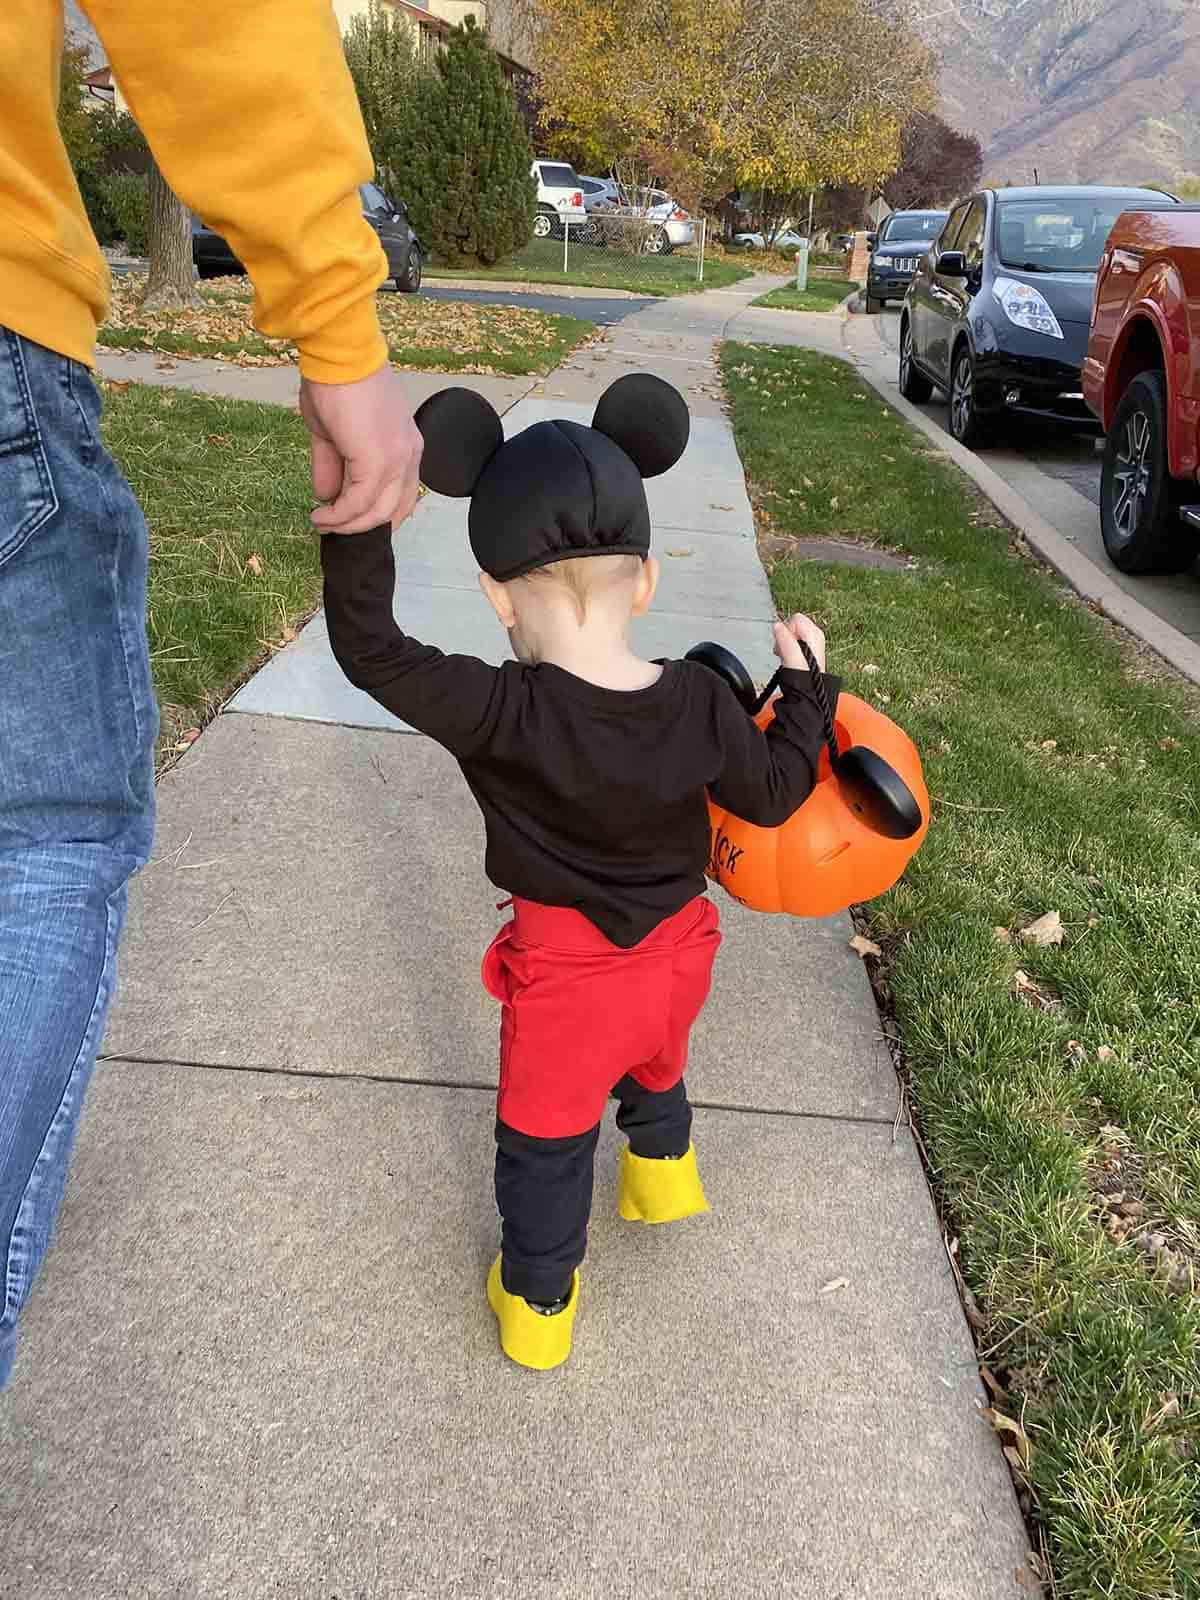
I loved our Mickey Mouse, Minnie Mouse, and Pluto DIY family costumes we made this year! My son fell in love with Mickey Mouse as a toddler so this theme was a no-brainer.
These Disney themed family costumes were cheap and simple, great for last-minute DIY-ing. (Which we especially needed this year since we were in the middle of a move.)
I hope you find this costume tutorial inspiring! There’s lots of ways you could recreate these Mickey costumes, even going as simple as a t-shirt. Just don’t forget the Mickey ears!
This post contains affiliate links. For more information, see my disclosures here.
More posts you’ll like:
How to Make a Mickey Mouse Costume
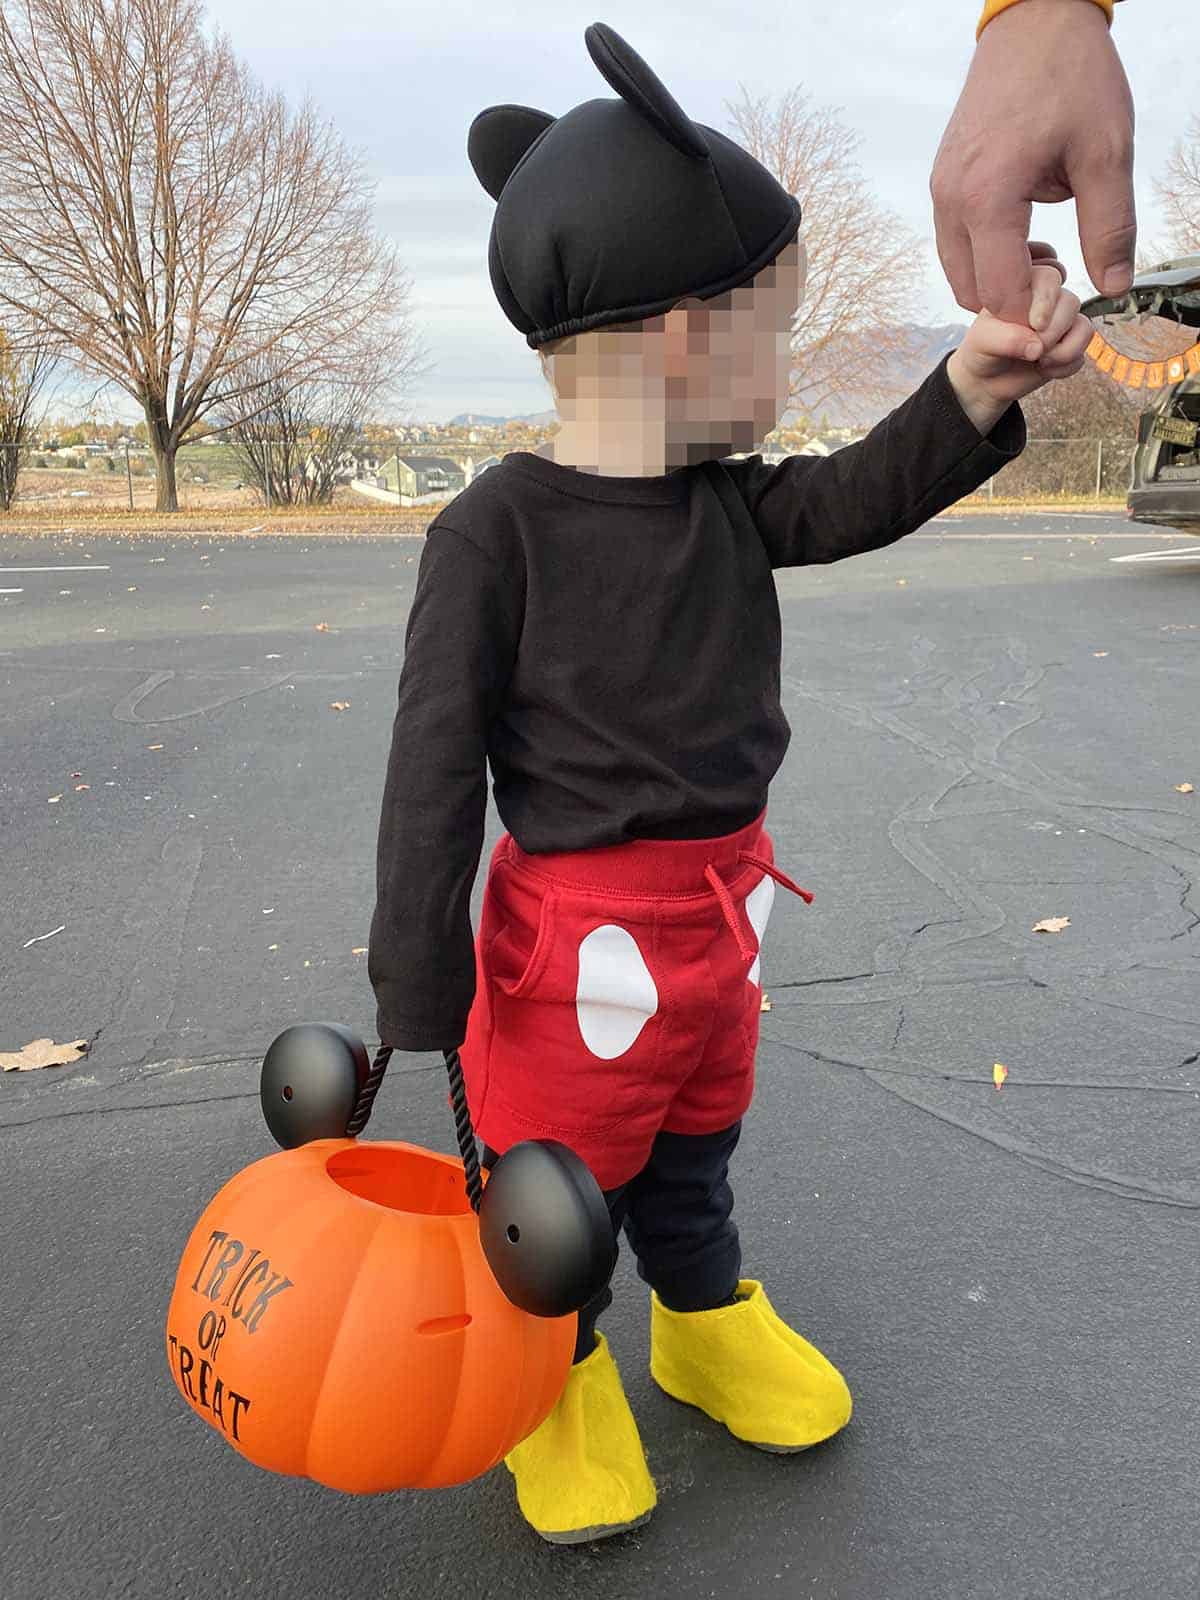
To make a DIY Mickey Mouse costume, you need:
- a black long-sleeved shirt
- long black pants
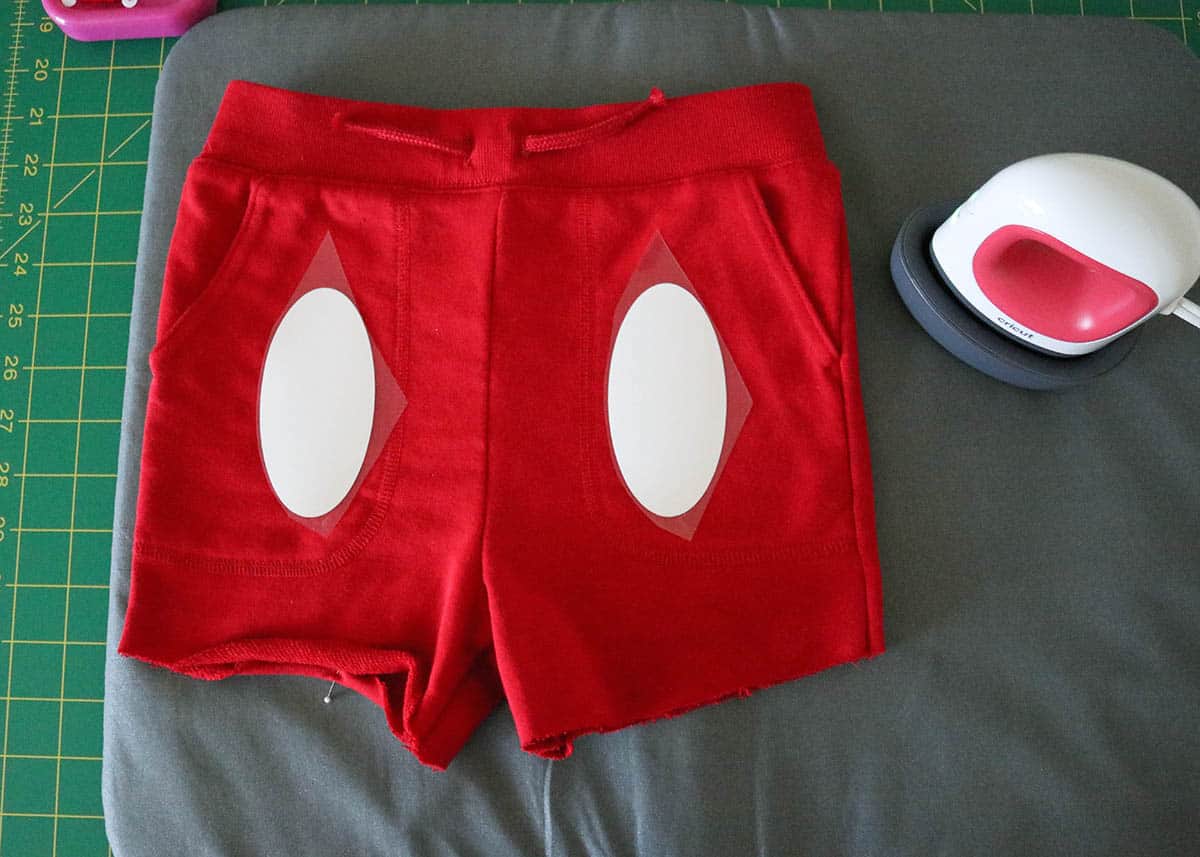
- red shorts with two white dots or buttons
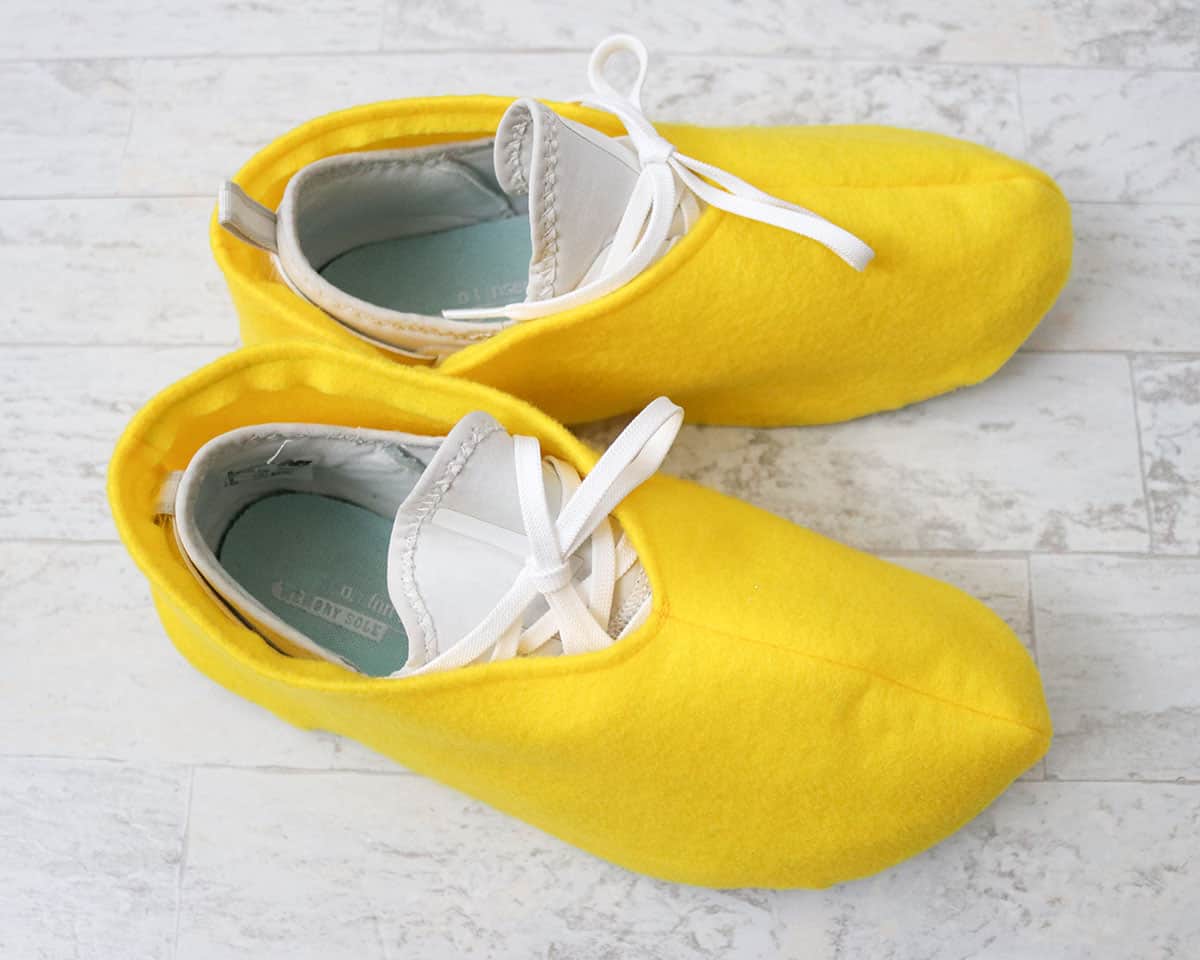
- yellow shoes (tutorial for shoe covers below)
- white gloves (optional–I couldn’t find any cheap white ones last minute so we skipped this)
- Mickey ears
- Mickey pumpkin trick-or-treat bucket (optional but so fun for kids! Disney usually has a new one each season available from shopDisney.com)
I could not find toddler-sized red shorts in October for anything! I ended up finding a pair of red pants on clearance (much too big) and cut them off, hemmed them, and pinned the waistband in the back so they fit (actually…I might have sewn the waistband, I can’t remember). Then I cut two ovals from white iron-on vinyl with my Cricut and pressed them on with my EasyPress Mini.
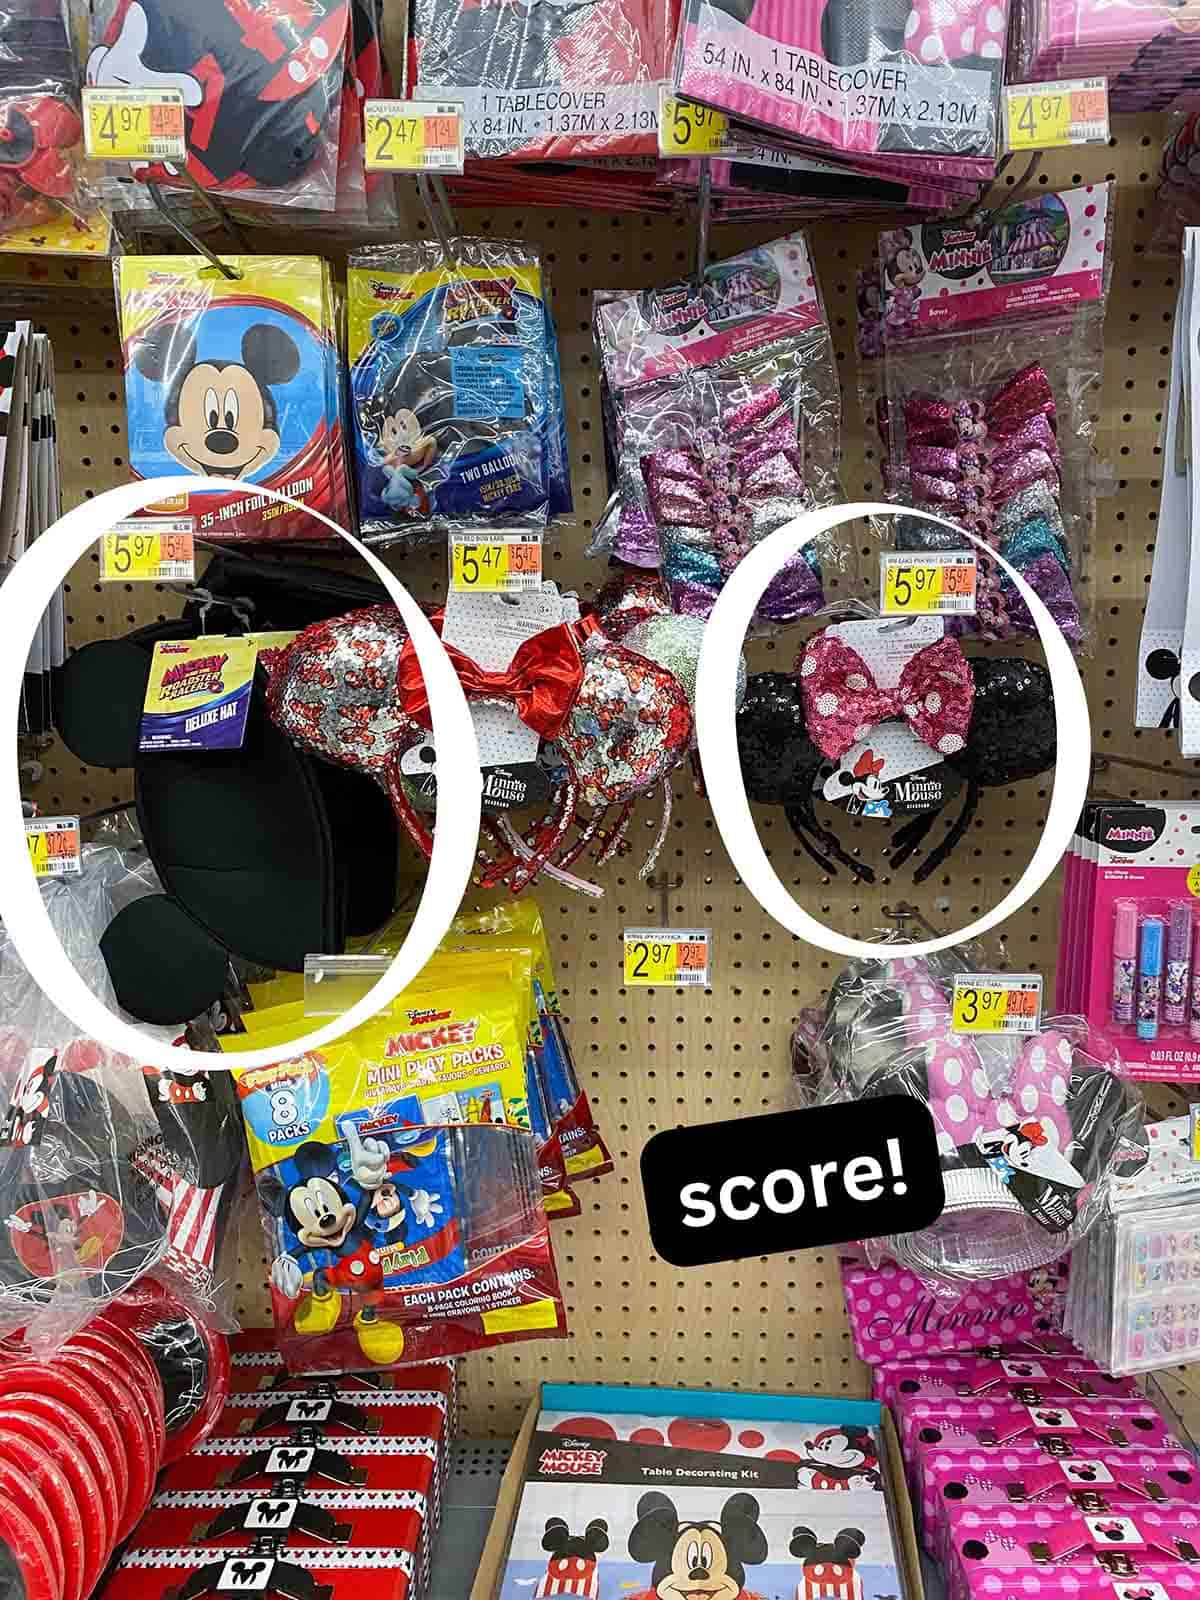
The Mickey ears hat came from the party section of Walmart for $6 (score!).
If you want, you can add a little black nose with some black face paint or eyeliner. (It was totally adorable on my little Mickey Mouse.)
How to Make a Minnie Mouse Costume
To make a DIY Minnie Mouse costume, you need:
- a black long-sleeved shirt
- black leggings or tights
- a red dress or skirt with white polka dots (if you don’t want to diy this, this skirt would be perfect!)
- a white lace underskirt or bloomers (optional)
- yellow shoes (tutorial for shoe covers below)
- white gloves (optional)
- Minnie Mouse ears headband with red bow
For my skirt, I actually used two old skirts I already had (yay for being thrifty!). For the red one, I cut a whole bunch of circles out of white iron-on vinyl with my Cricut and pressed them on with my EasyPress Mini—super simple. Then I had a white skirt that had a lacy bottom that worked perfect for the “bloomers” (I just had to wear it super low on my hips so it would show underneath the red one, haha).

For my Minnie Mouse ears, I found a cheap headband in the party section at Walmart (right next to where I found the Mickey Mouse one for my son). It came with a pink bow so I removed that and made my own bow from some red and white polka dot fabric I had (eventually I’ll share a tutorial for that bow but I’m still fine-tuning the process).
Again, you can add a black nose with face paint or eyeliner.
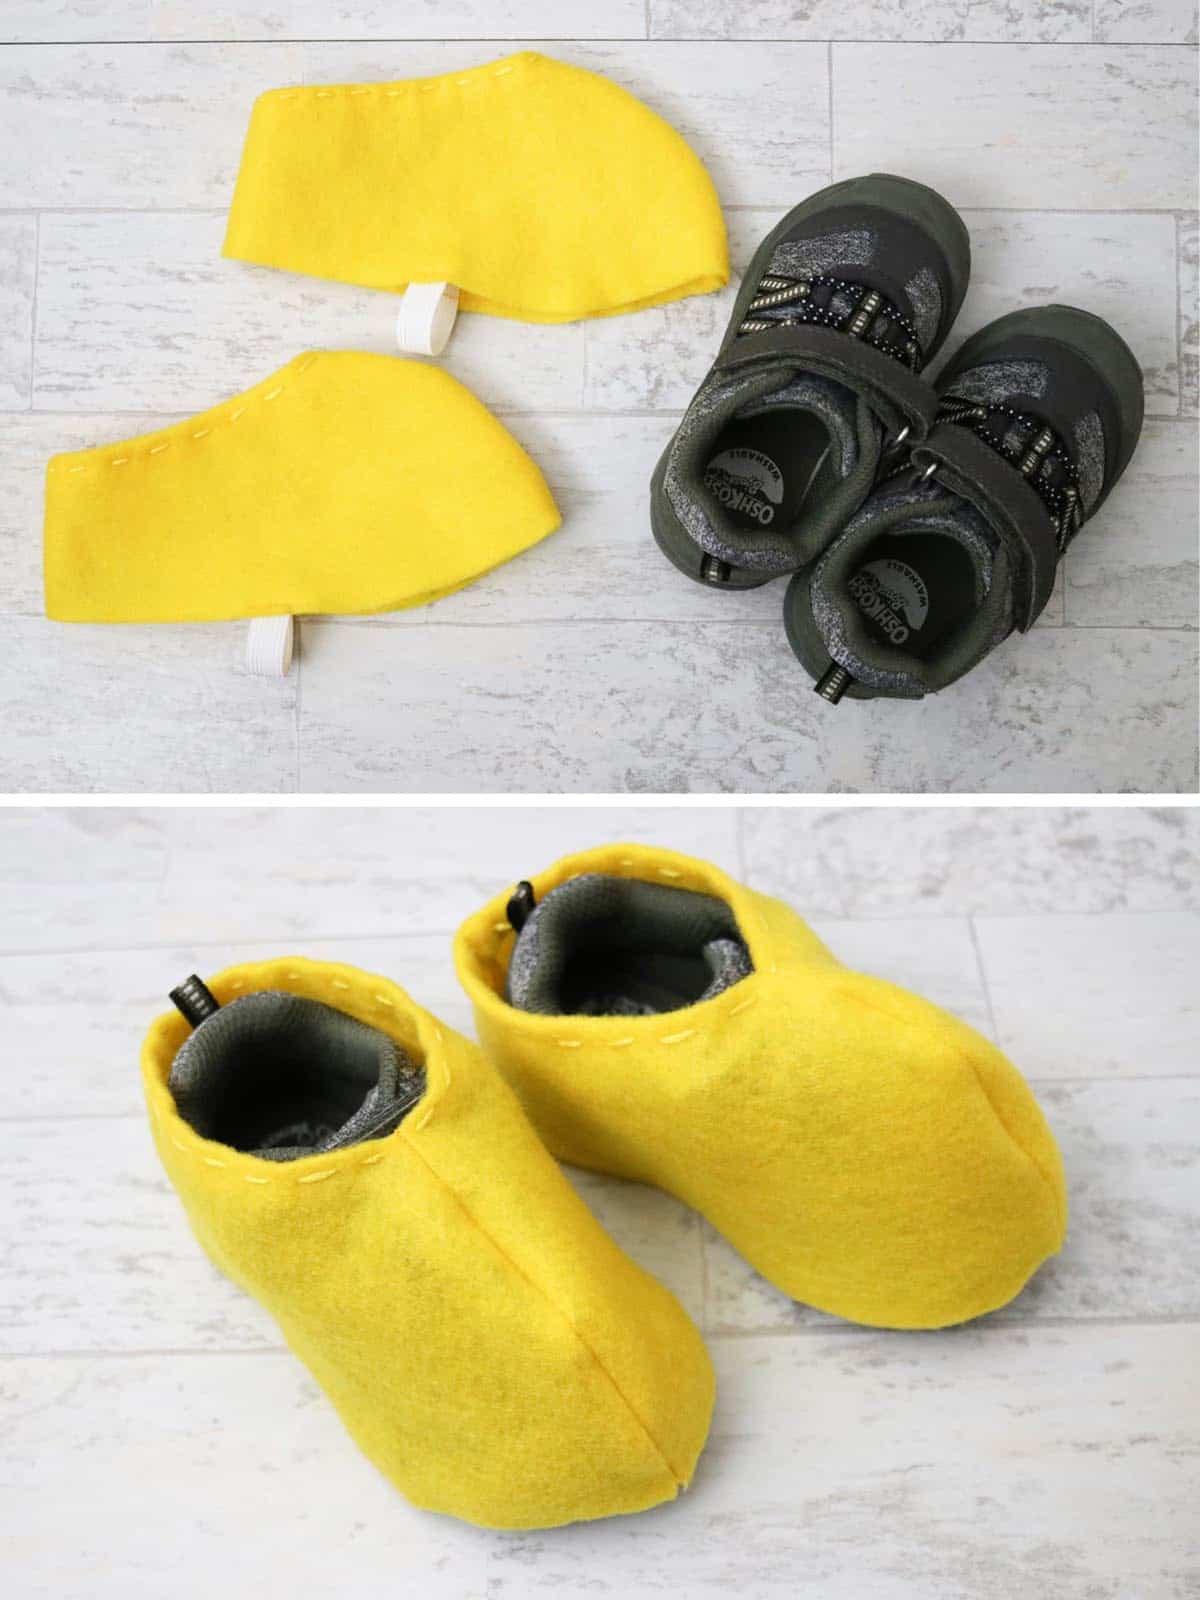
How to Make Felt Shoe Covers for a Costume
I made simple yellow shoe covers from felt for both the Mickey and Minnie shoes. Fair warning, these will probably get totally destroyed, but they’re great for a one-time or one-season use! (And so much cheaper than buying actual yellow shoes that’ll never be worn again.)
For an adult shoe, one sheet of 9×12″ craft felt will just barely cover it (if your shoe is larger than a women’s size 7, you may need to sew two sheets together to be large enough).
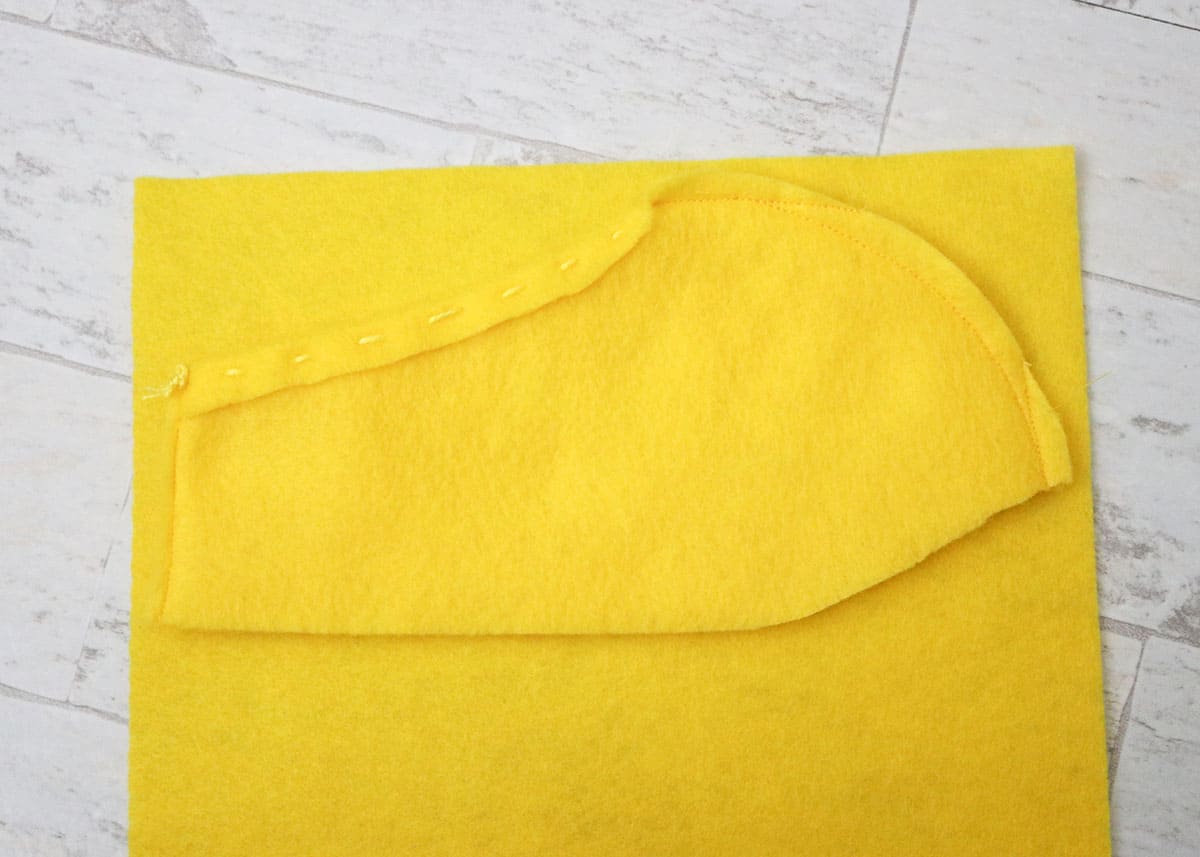
I didn’t show this very well in the pictures, but you can actually cut your sheet of felt in half lengthwise so you have two pieces, each roughly 4.5 x 12″. Next, you’ll trace a rounded outline of the top of the shoe, leaving extra room for a seam allowance. (Start bigger and you can always adjust and sew it closer to the shoe later.)
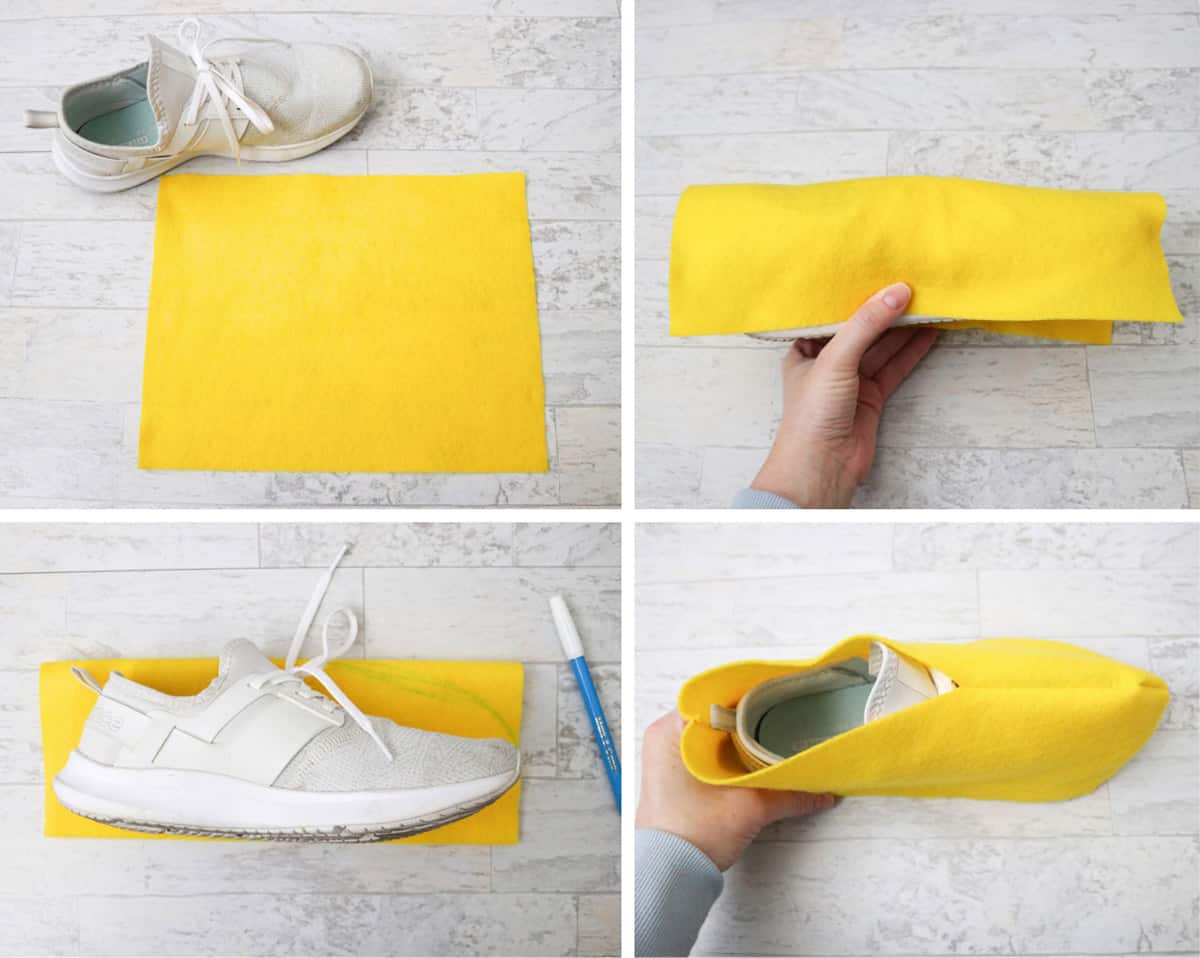
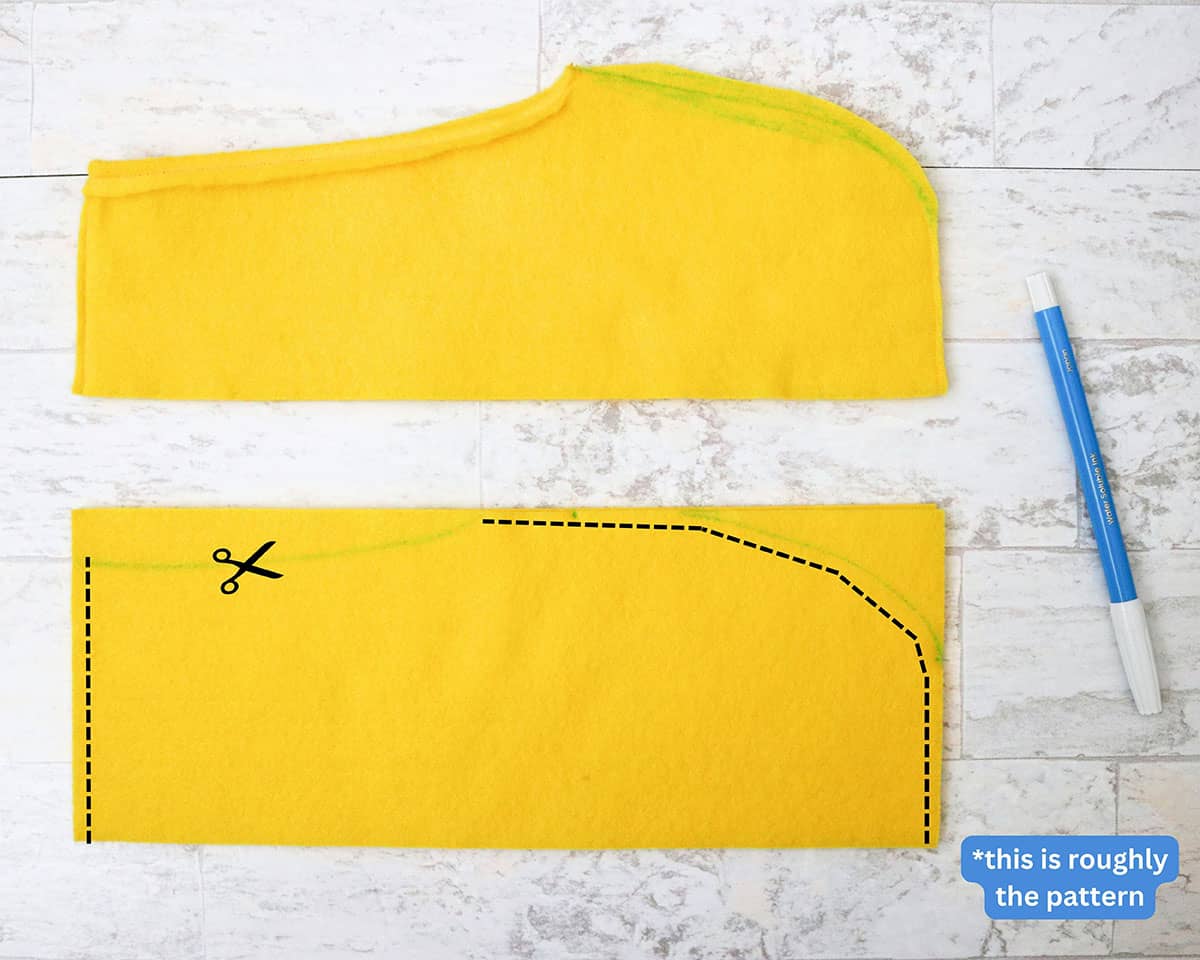
In the bottom half of the image below, you can see a rough pattern shape (ignore the top shoe for a second). Before cutting anything, sew the two pieces of felt together, making a seam down the left side (which will be the back of the shoe) and a seam from the top of the shoe (where the laces would be) and curving all the way down the front (the black dotted lines show where to sew).
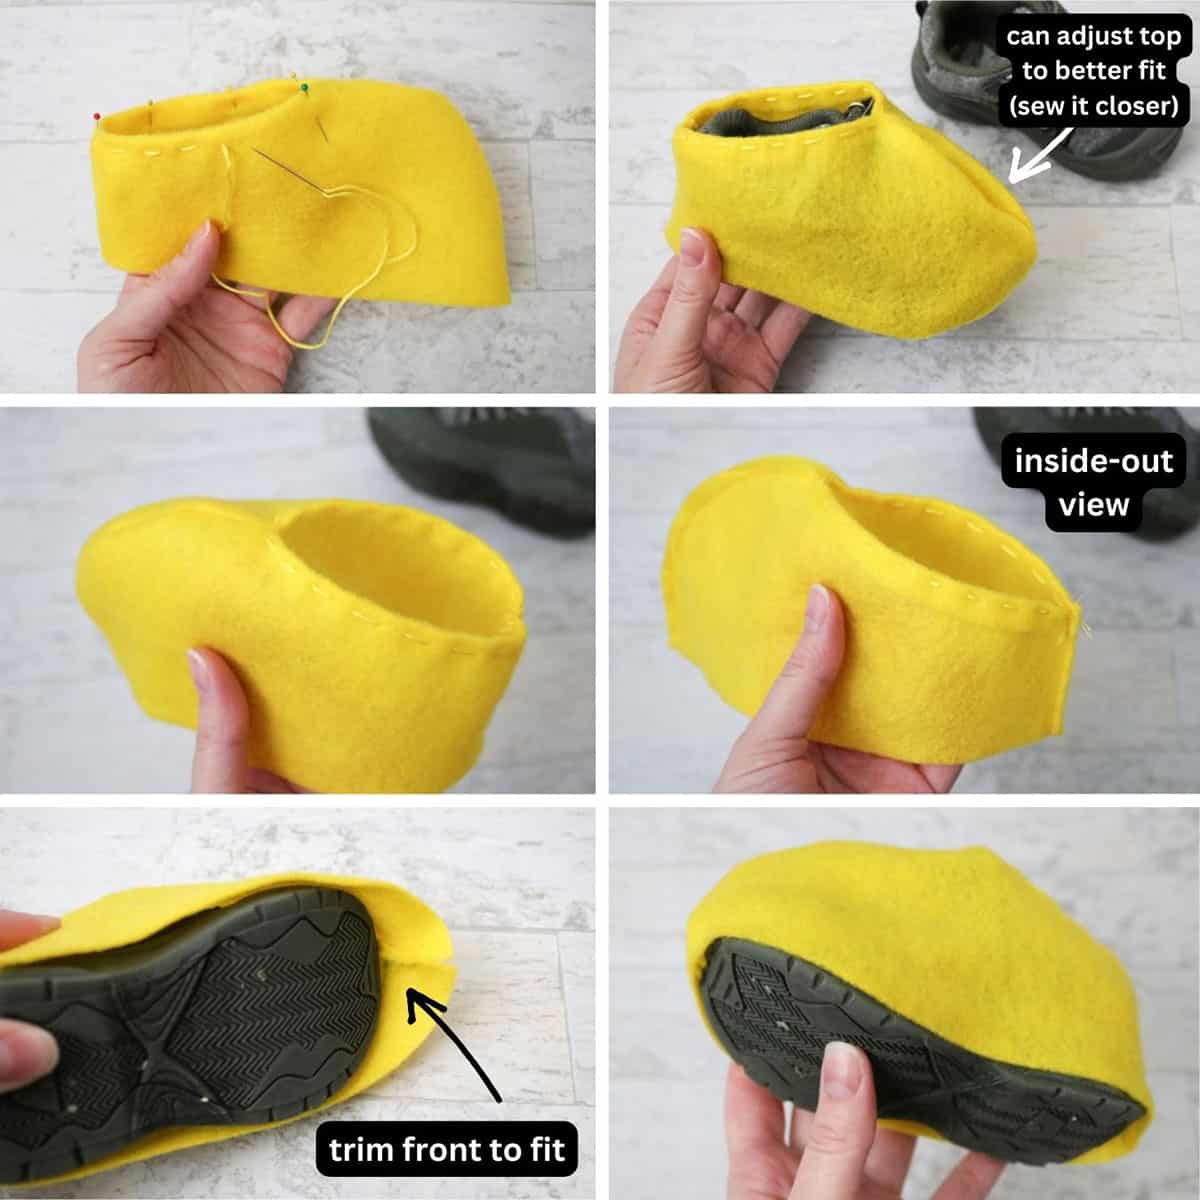
When you’re done sewing, you can trim around the front curve of the shoe and along the opening of the shoe (where the scissor icon is and where I’ve marked with my fabric pen—until you know exactly how this is going to fit your shoe, though, I recommend giving yourself a little extra felt on the opening of the shoe). Turn the felt shoe inside out and place around your actual shoe (see the last image above).
Now you can create a cuff around the opening of the shoe by folding the felt down and shaping it around the shoe opening. Pin the cuff, remove the shoe, and sew the cuff (you can machine or hand-sew, whatever you prefer).
Turn the felt shoe inside out again and trim the excess felt around the cuff (I cut mine quite close to the seam, but you could leave a little more if you want).
Put the felt shoe back on your actual shoe and trim the bottom to fit.
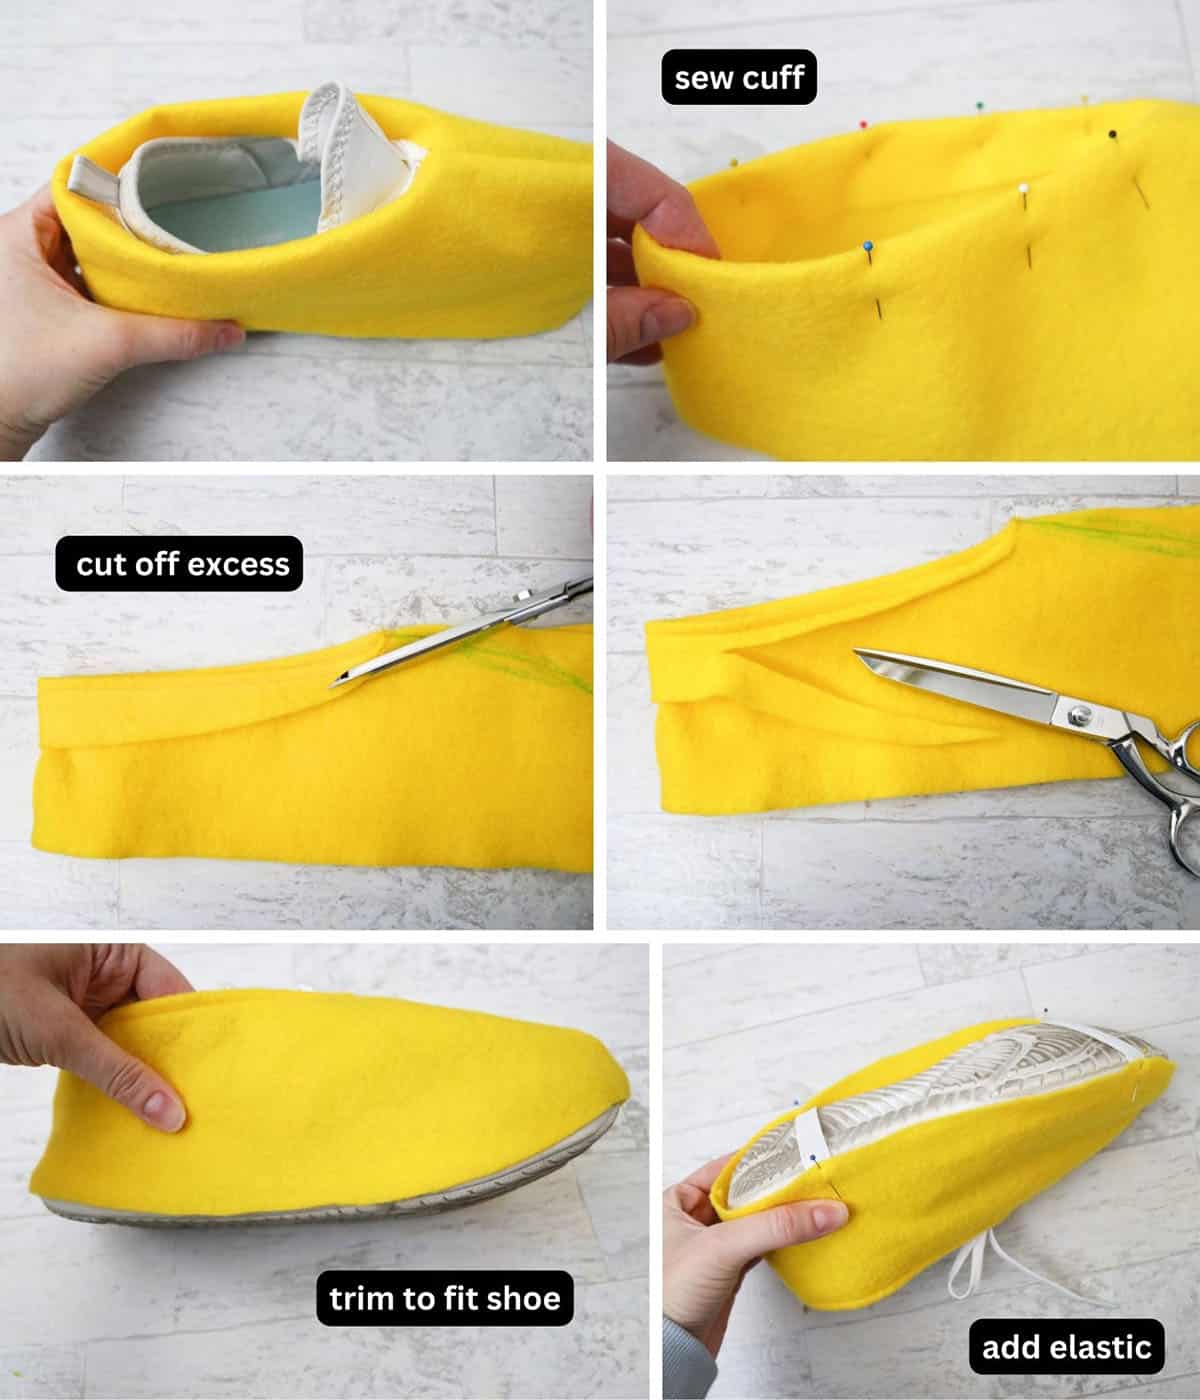
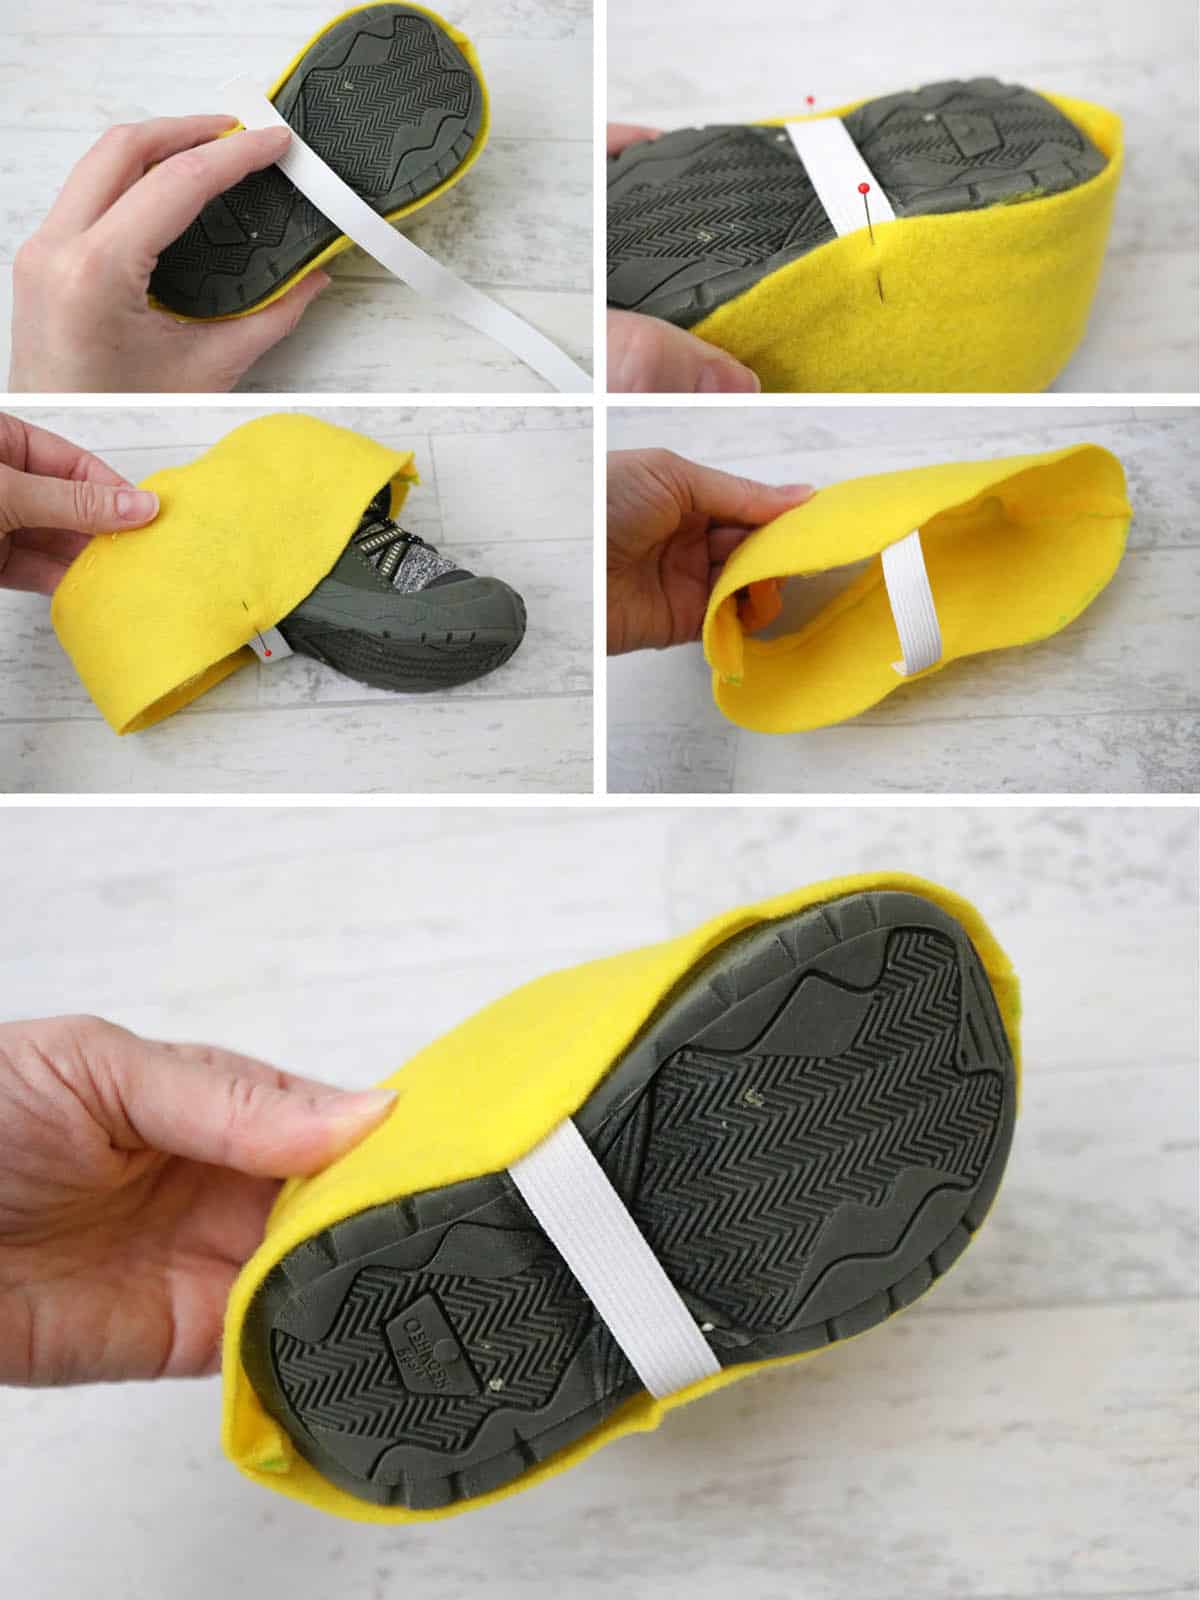
Next, you can add an elastic to the bottom of the shoe covers so they stay in place while walking. Measure across the bottom of the shoe where you want it to go and add an extra half inch or so to either side. Pin the elastic in place on the inside of the shoe cover. Carefully slip the shoe out and sew the elastic in place.
The process is the same for a child’s shoe, but here are some more visuals to help explain things further:
Once you’ve figured out the first shoe cover, you can use it as a pattern for the second. You can trace the outline onto felt with a fabric pen (but remember you need extra material for seam allowances at the shoe opening).
In this photo above, you can kind of see where I originally sewed the top of the shoe too big, so I adjusted the curve so it would fit closer to the shoe. Every shoe will be different so you just kind of figure it out as you go!
Next, add your elastic:
These shoe covers are very forgiving—they don’t need to look perfect! They’re all you need for a one-time costume and they held up great while we were trick-or-treating. (Maybe just do your best to keep them dry and out of mud. Dry leaves and debris will stick to the felt, too.)
Hopefully that all made sense! I was figuring it out as I went, so I apologize for the disjointed photos!
How to Make a Pluto Costume
For my husband’s Pluto costume, I went really easy and just made a hoodie for him. (If I could’ve found cheap sweatpants in the same color, I probably would’ve had him wear those but I think he was happy to just wear his jeans. This is the hoodie I bought.)
The sweatshirt has a Pluto collar made out of iron-on vinyl and ears made out of stiff felt.
DIY Pluto Iron-On Collar
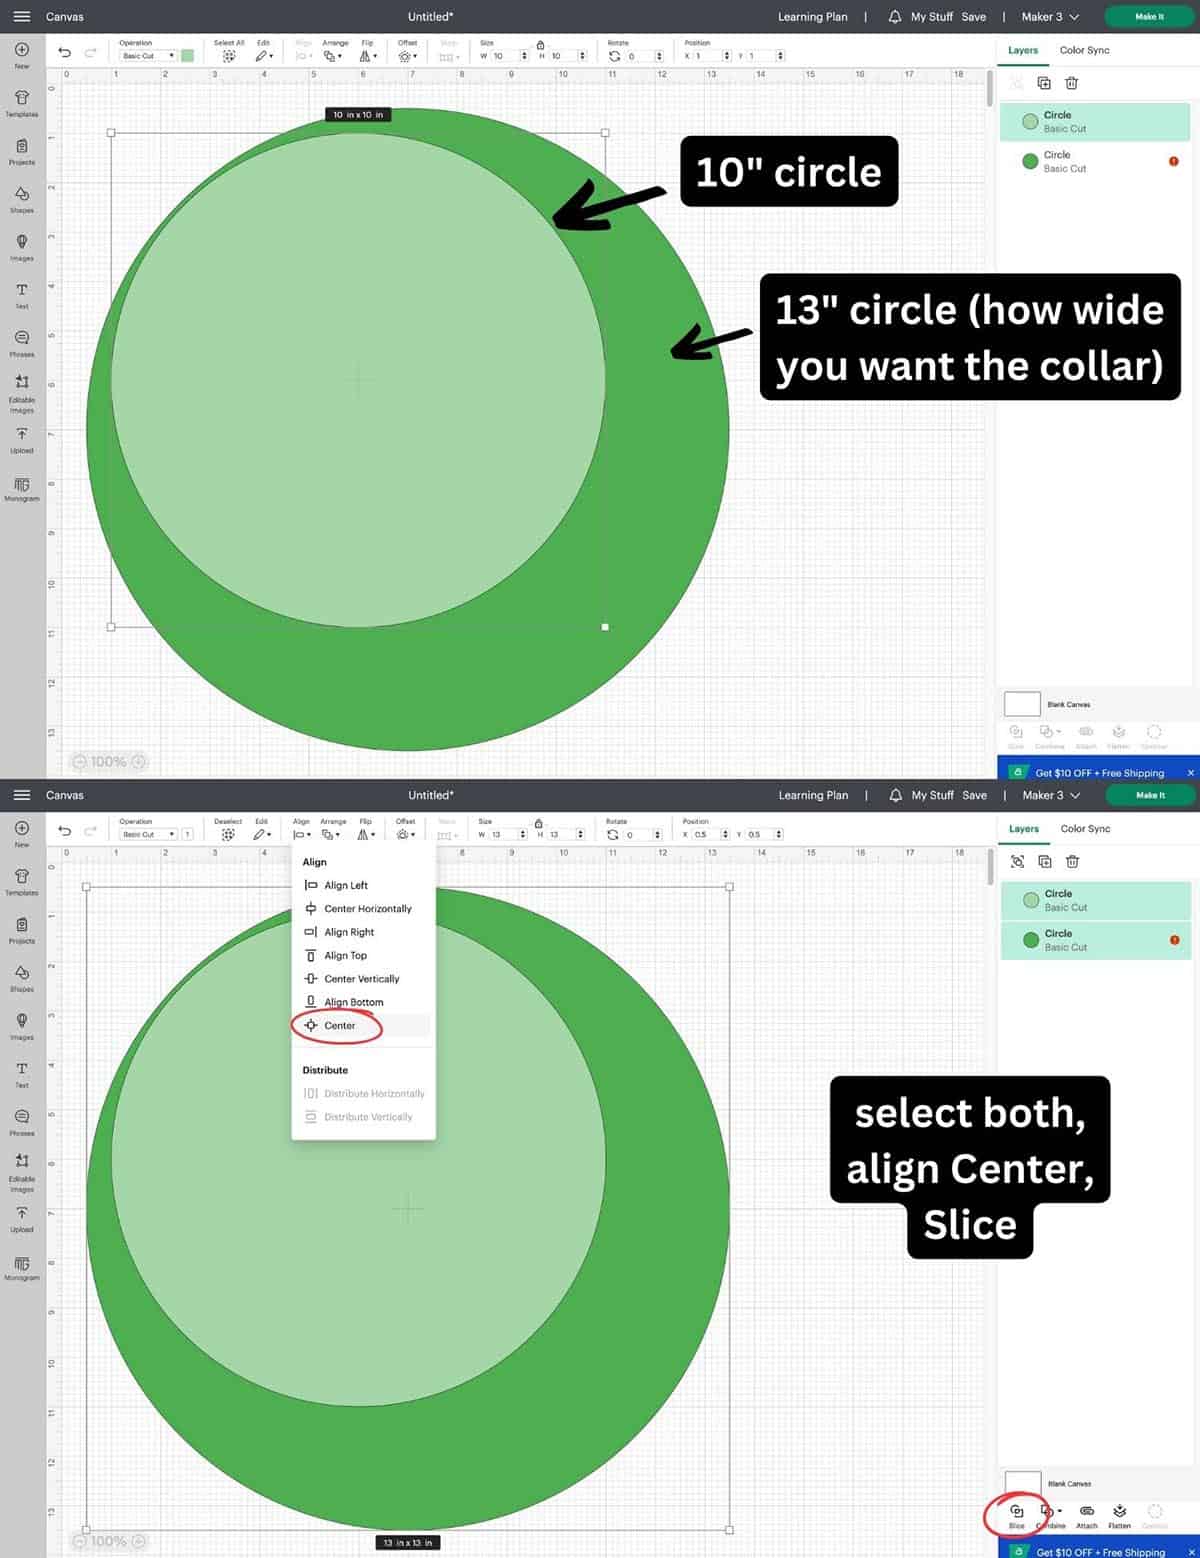
You can use my Design Space project here to duplicate the collar. If you need to make size adjustments, you can select everything and resize as a group. Or, if you need to create your own from scratch to fit your t-shirt or hoodie, this is how I figured out the measurements:
Measure the width of your neckline from left to right where you want the collar to be (so, on the hoodie I knew I wanted the collar to be 13″ from left to right). Make that size circle in Design Space (13″). I wanted my collar to be 1.5″ wide so I made a circle 3″ smaller than the first (you’re doubling the width of the collar since you’re accounting for left and right sides of the circle, this made my second circle 10″). Center the two circles on top of each other and slice. Delete all but one ring.
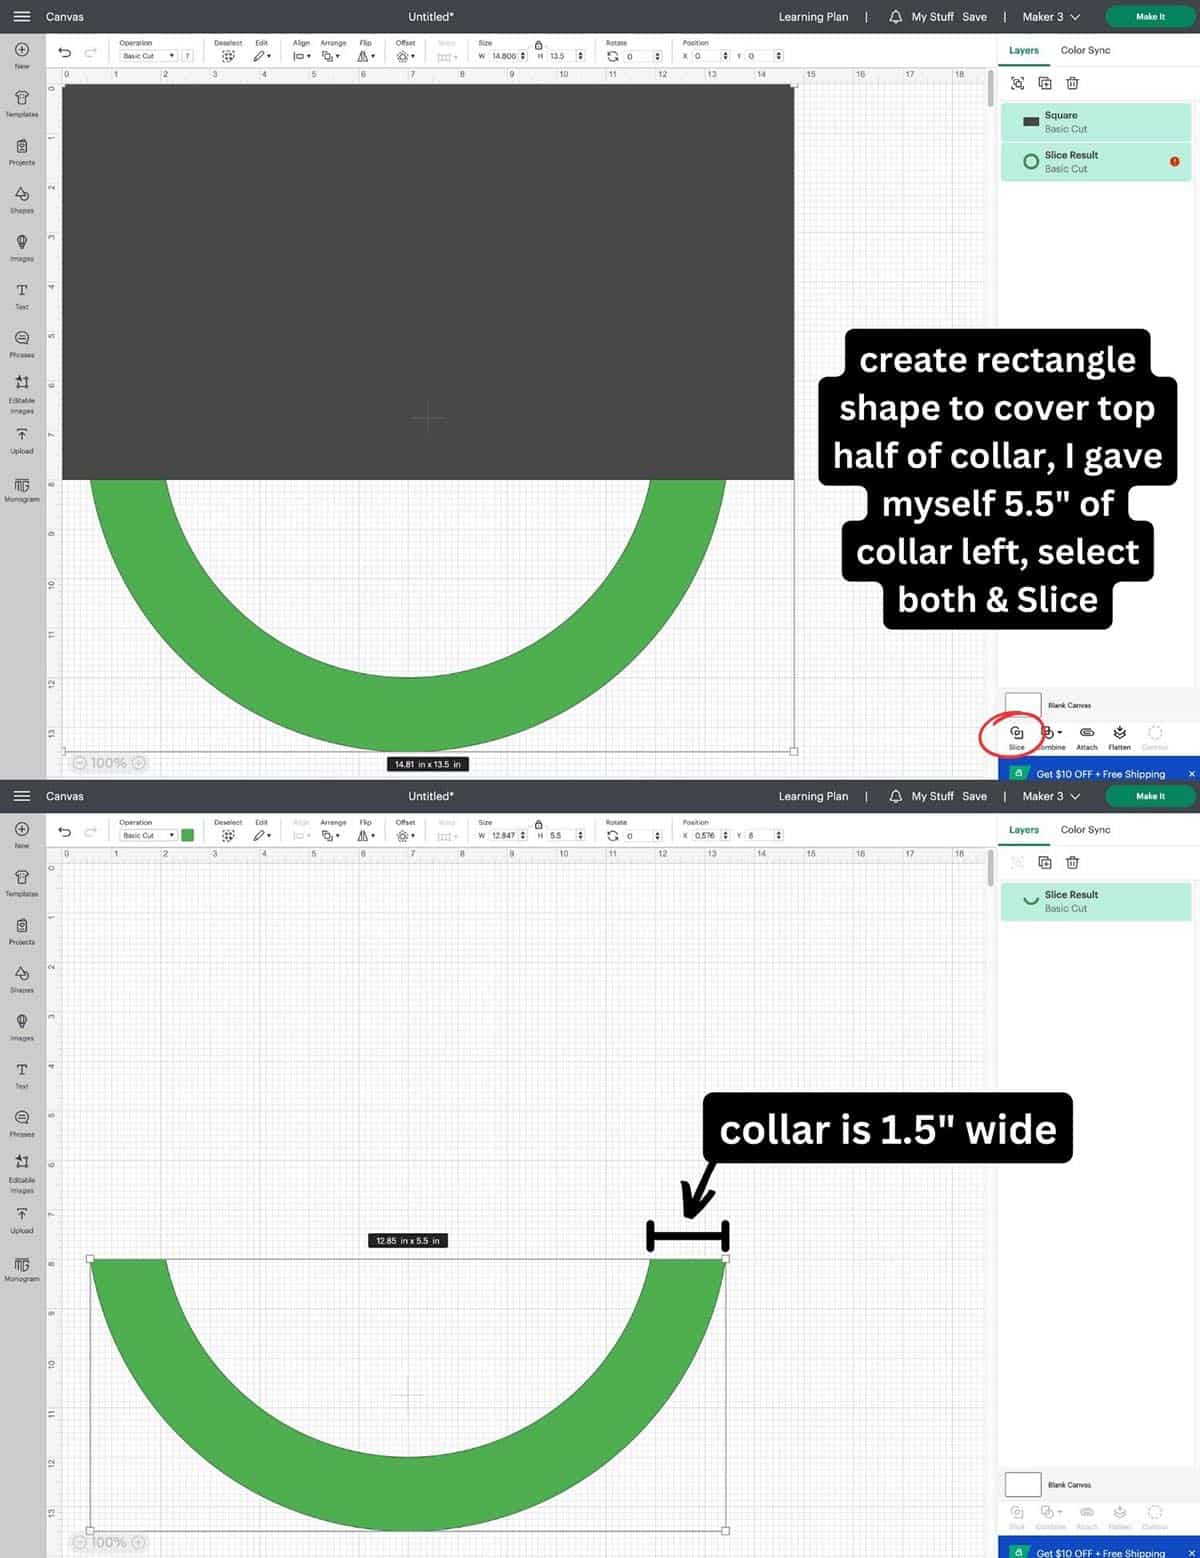
Now, you can create a rectangle shape to cover the top half of the collar, leaving just as much height as you need to fit your shirt/hoodie (I made my collar 5.5″ high). (I would measure from the top shoulder seam on your shirt/hoodie to the bottom of where you want the collar to be. If you want, you could add a little extra here so have some wiggle room and just manually cut it to size later before you press it on.) Select both the rectangle and the ring and slice. Delete all but the bottom collar.
I actually created my text in another program, but the Cricut font in the project is very similar (you’re welcome to change it, though, if you want).
Follow the Design Space prompts to cut all pieces from iron-on vinyl (don’t forget to mirror!). Weed the vinyl pieces when you’re done.
Before pressing, lay all the layers out on the sweatshirt so you know where to position them (they’re sliced, so they’ll fit like a puzzle). Press in this order: green collar first, gold tag, black ring, then black Pluto words.
Because you’re layering vinyl, it’s best that you use all the same brand of iron-on so the temperature and press times are the same. But because you are layering, you only want to press the first layers just long enough so they tack on (and you’re able to remove the carrier sheet) and then only press the full time on the last layer. Follow your brand of iron-on vinyl’s instructions for this.
DIY Felt Pluto Ears
I don’t have a pattern for the Pluto ears since I just eyed them. Just cut two long ovals from a sheet of stiff black felt (they can kind of be tear-drop-shaped–look up a picture of Pluto for reference). The length of the ears depends on whether you’re making this for an adult or child.
Once you’ve cut the ears, you can pin or sew them onto the hood. I recommend having your person try the hoodie on while you pin them so you know where to position them. Remove the hoodie and you can sew them into place with a line of tacking stitches at the top of the ear.
Save $10 on any Cricut machine or heat press with the coupon code AUBREE-10
How to Make Mickey Mouse, Minnie, and Pluto Family Halloween Costumes
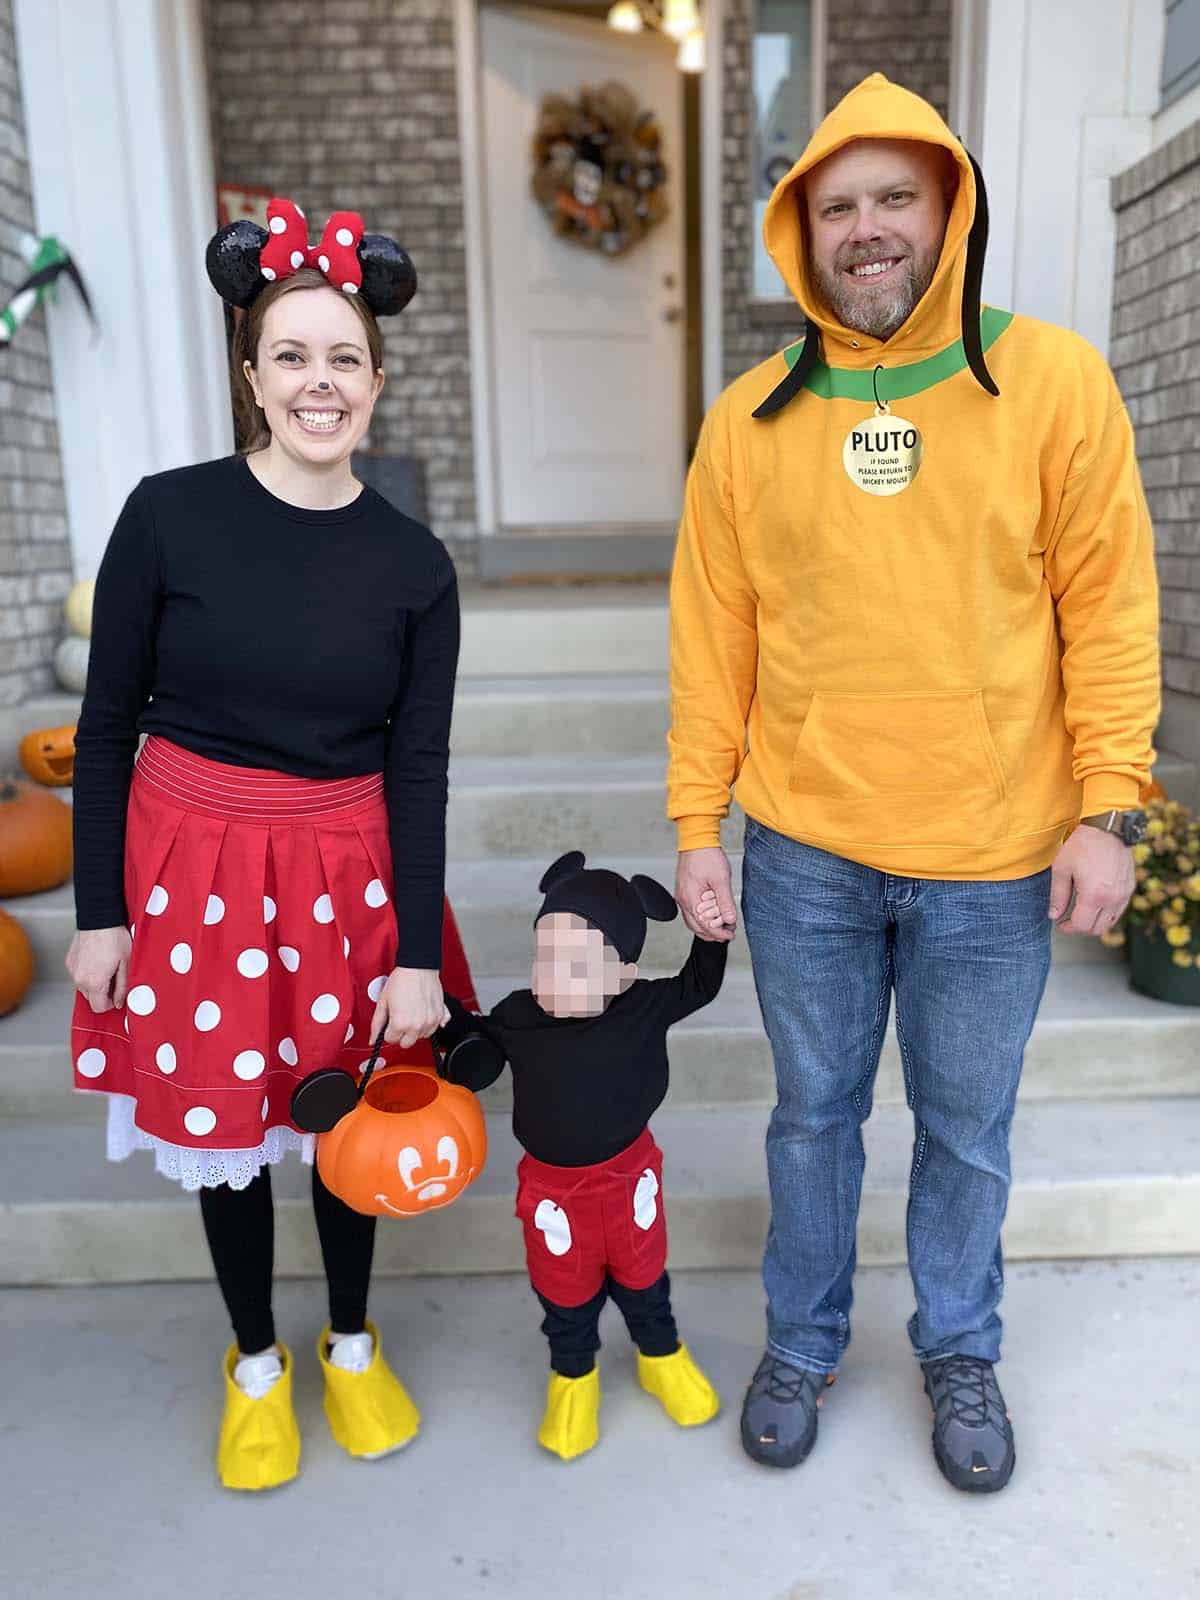
We had so much fun with these costumes! Mickey Mouse was totally adorable on our toddler and the matching Minnie Mouse and Pluto costumes were perfect for parents! If you have a larger family, you could definitely expand this to include Goofy, Donald Duck, and Daisy Duck.
Happy costume DIY-ing!

Don’t forget to pin and save for later!